
In this recipe, we will create a SOA Suite composite application, which has a BPEL service component with a synchronous Direct Binding service interface. The direct binding interface will be invoked from an OSB business service through the SOA-DIRECT transport:
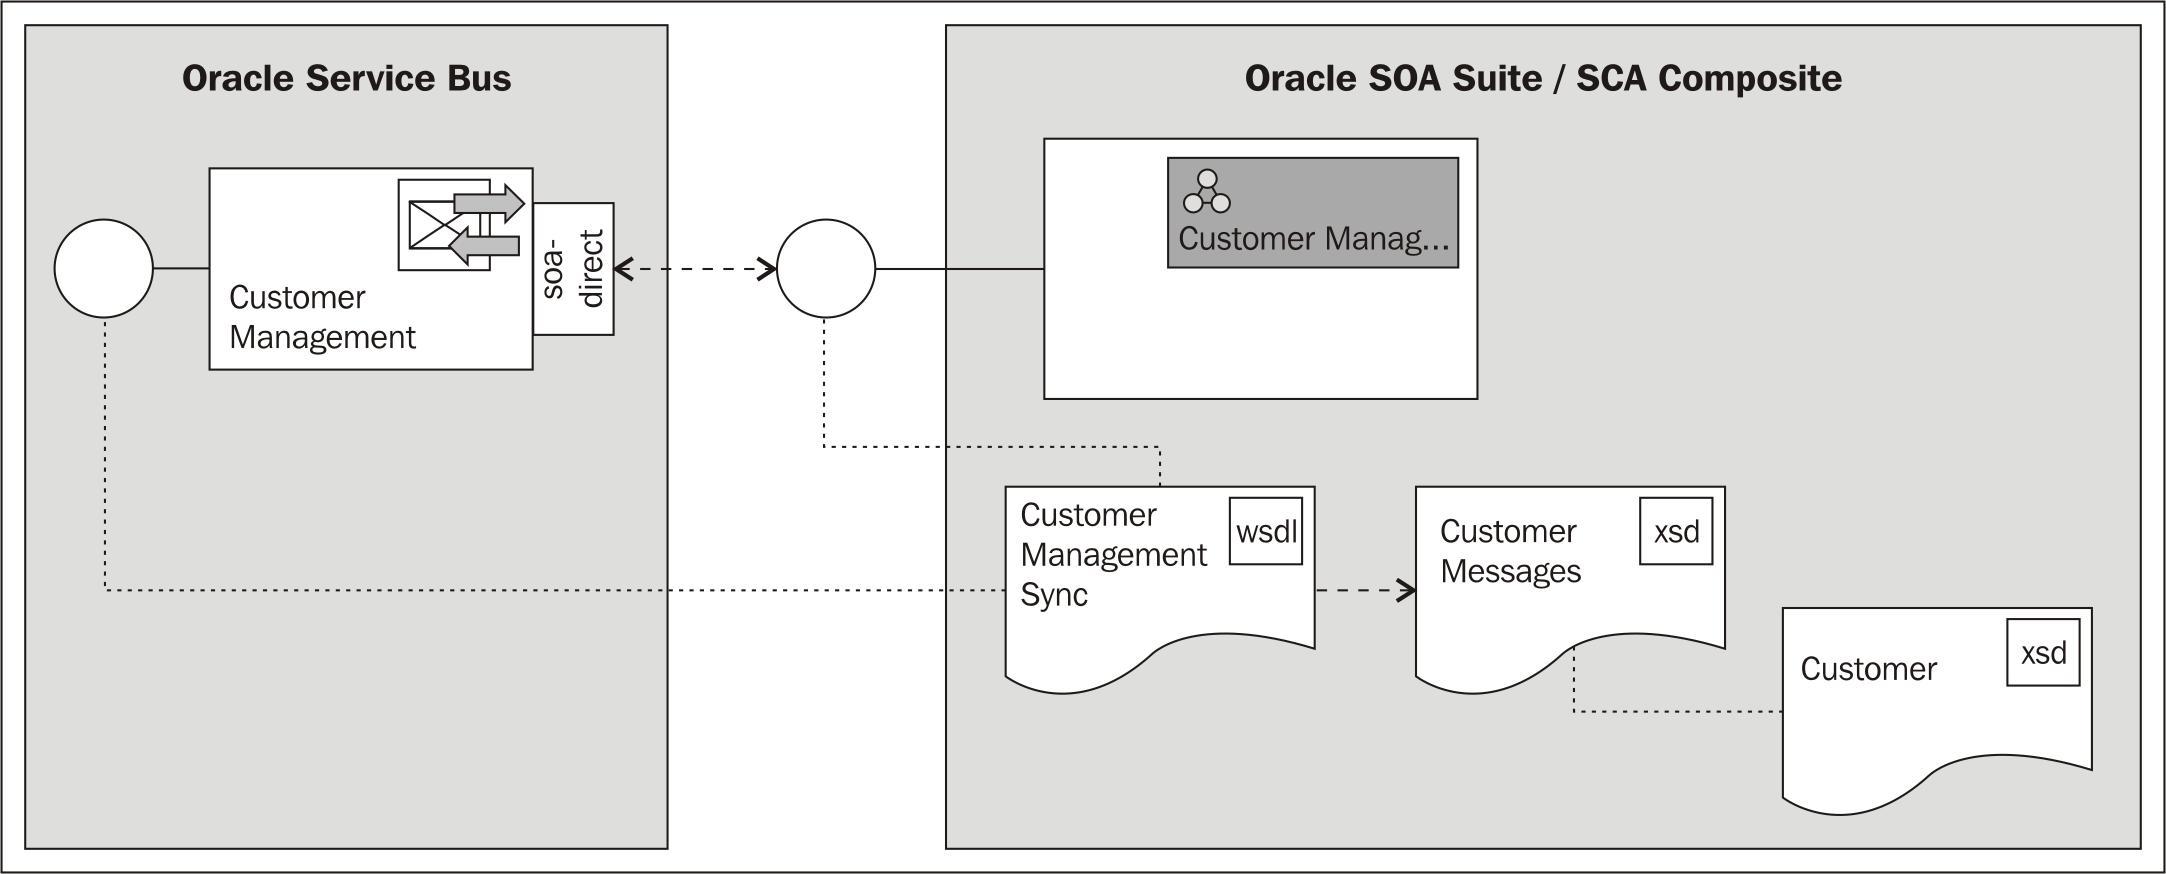
The SOA-DIRECT transport supports transactions and identity propagation across JVMs and uses the T3 RMI protocol to communicate with the SOA Suite server. It's important that the SOA Suite and the OSB server are on the same patch set level, otherwise we can get java class version errors.
Copy the soa-suite-invoking-soa-composite-sync holding the JDeveloper project from chapter-8getting-readyinvoking-soa-composite-sync into a local workspace folder.
Import the base OSB project containing the necessary schemas and the right folder structure into Eclipse from chapter-8getting-readyinvoking-soa-composite-sync.
First we need a SOA Suite composite which exposes a synchronous Direct Binding interface. In JDeveloper perform the following steps to create it:
- Open the SOA workspace in JDeveloper by selecting File | Open and navigating to the
invoking-soa-composite-sync.jwsfile. - Click on the composite.xml located in the CustomerManagement project to open up the SCA composite view.
- Drag a BPEL Process from the Service Components section of the Component Palette to the SCA composite and drop it on the Components area:

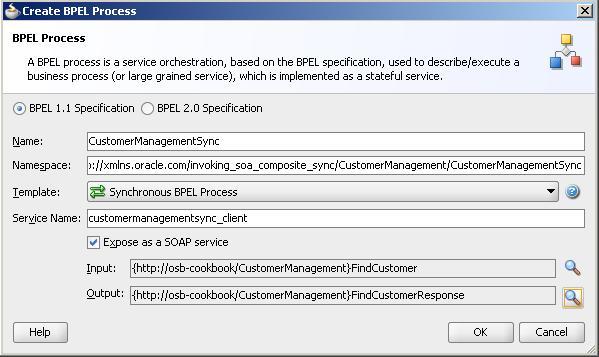
- In the Create BPEL Process window, enter
CustomerManagentSyncinto the Name field. - Choose Synchronous BPEL Process for the Template drop-down listbox.
- Click on the magnifying glass button right to the Input field.
- In the Type Chooser window expand the CustomerMessages.xsd inside the Project Schema Files folder:
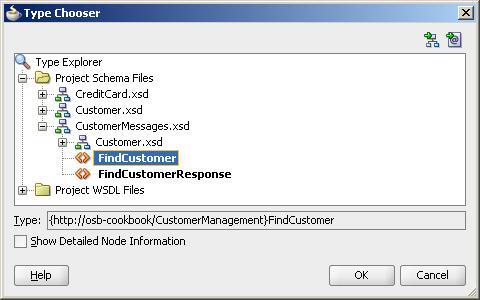
- Select the FindCustomer element and click on OK.
- Click on the magnifying glass button right to the Output field.
- In the Type Chooser window expand the CustomerMessages.xsd inside the Project Schema Files folder.
- Select the FindCustomerResponse element and click on OK:
- Click on OK.
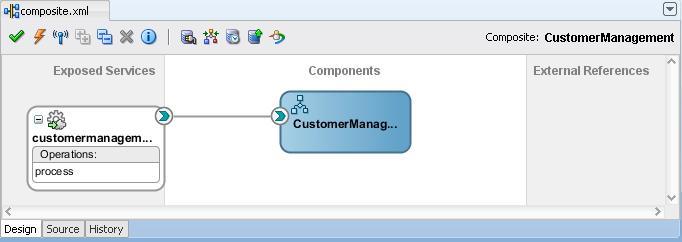
This will create a BPEL component with an exposed SOAP binding as shown in the following screenshot:
Now let's add a Direct Binding to the SCA composite. In JDeveloper perform the following steps:
- From the Component Palette drag the Direct Binding from the Service Adapter section and drop it on the Exposed Services section of the SCA composite.
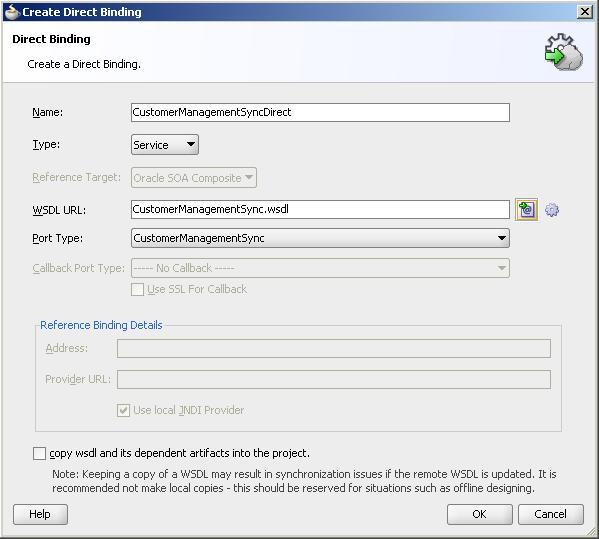
- Enter
CustomerManagementSyncDirectinto the Name field. - Make sure that Service is pre-selected for Type drop-down listbox, if you have not probably dropped the Direct Binding component on the wrong lane.
- Click on the icon with the green arrow next to the WSDL URL field to browse for the
WSDLfile created earlier. Select theCustomerManagementSync.wsdlfile and lick on OK. - Click on OK to finish the Create Direct Binding dialog:
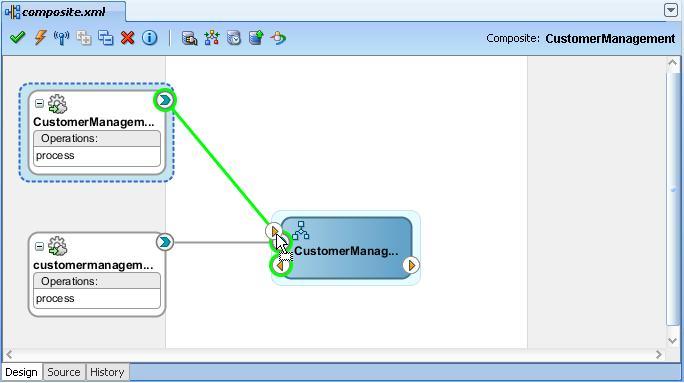
- Drag a wire from the CustomerManagementSyncDirect exposed service to the CustomerManagement BEL component:
Next, we will change the BPEL component so that it will return the customer test data:
- Double-click on the BPEL component symbol on the SCA composite.
- Drag an Assign activity from the Component Palette and drop it inbetween the receiveInput and replyOuput activity.
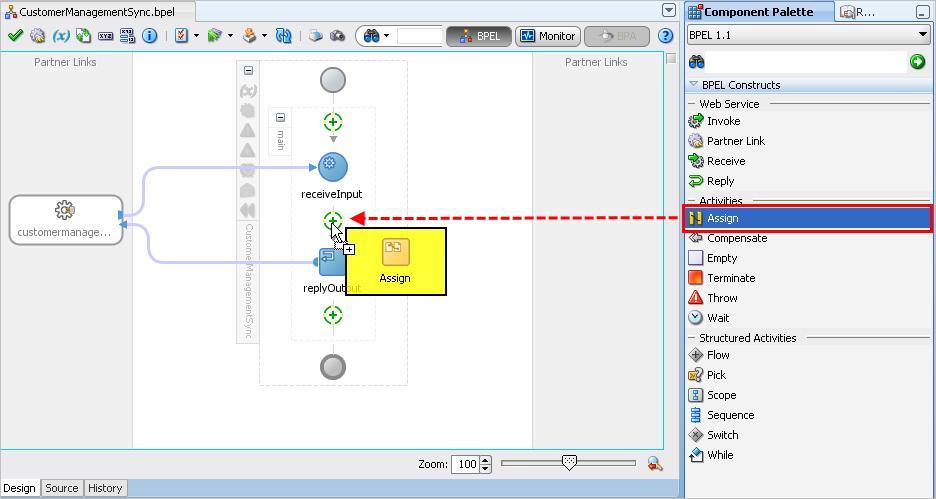
- Double-click on the Assign activity.
- Navigate to the General tab and overwrite the name field wih AssignOutput.
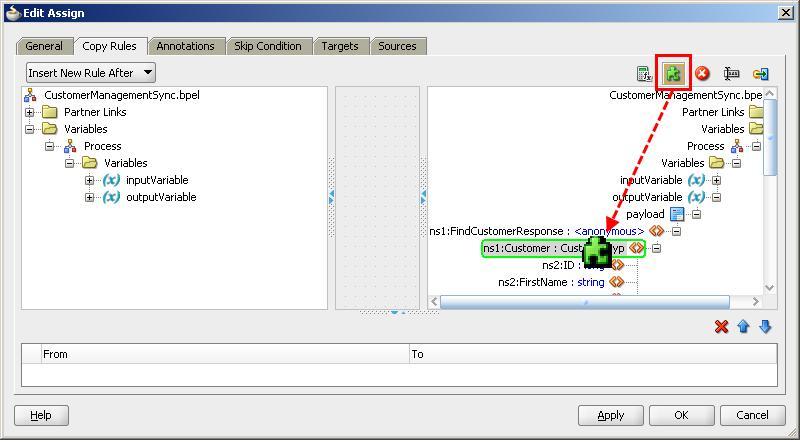
- Navigate to the Copy Rules tab.
- In the tree on the right (the target section) right-click on outputVariable and select Expand All Child Nodes.
- Drag XML fragment to the Customer : CustomerTyp element:
- Enter the following xml fragment into XML Fragment field of the pop-up window:
<Customer xmlns="http://osb-cookbook/CustomerManagement" xmlns:cus1="http://osb-cookbook/customer" xmlns:cred="http://osb-cookbook/creditcard"> <cus1:ID>100</cus1:ID> <cus1:FirstName>Larry</cus1:FirstName> <cus1:LastName>Ellison</cus1:LastName> <cus1:EmailAddress>[email protected]</cus1:EmailAddress> <cus1:Addresses/> <cus1:BirthDate>1967-08-13</cus1:BirthDate> <cus1:Rating>A</cus1:Rating> <cus1:Gender>Male</cus1:Gender> <cus1:CreditCard> <cred:CardIssuer>visa</cred:CardIssuer> <cred:CardNumber>123</cred:CardNumber> <cred:CardholderName>Larry</cred:CardholderName> <cred:ExpirationDate>2020-01-01</cred:ExpirationDate> <cred:CardValidationCode>1233</cred:CardValidationCode> </cus1:CreditCard> </Customer> - Click on OK to close the pop-up window.
- Click on OK to close the detail window of the Assign activity.
- Click on Save All and close the
CustomerMangementSync.bpelandcomposite.xml.Now we can deploy the SCA composite to the SOA Suite server. In JDeveloper perform he following steps:
- Right-click on the CustomerManagement project and select Deploy | CustomerManagement.
- Select Deploy to Application Server from the list of deployment actions and click on Next.
- Enable the Overwrite any existing composites with the same revision ID check box and click on Next.
- Select the ApplicationServerConnection from the list of application servers and click on Finish.
- Check the SOA-Log and Deployment status window for errors. The deployment is successful, if a deployment finished message is shown.
Next let's test CustomerManagement composite. In Enterprise Manager, perform the following steps:
- Expand the
SOAfolder in the tree on the left. - Expand
soa-infrafolder and click on the default node. - Click on CustomerManagement [1.0] in the list of composites and the details of the composite are displayed:
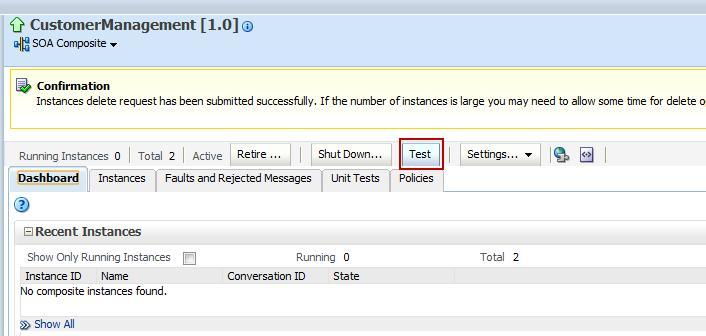
- Click on the Test tab.
- The Test Web Service screen is shown, which allows us to test the SOAP Binding of the composite.
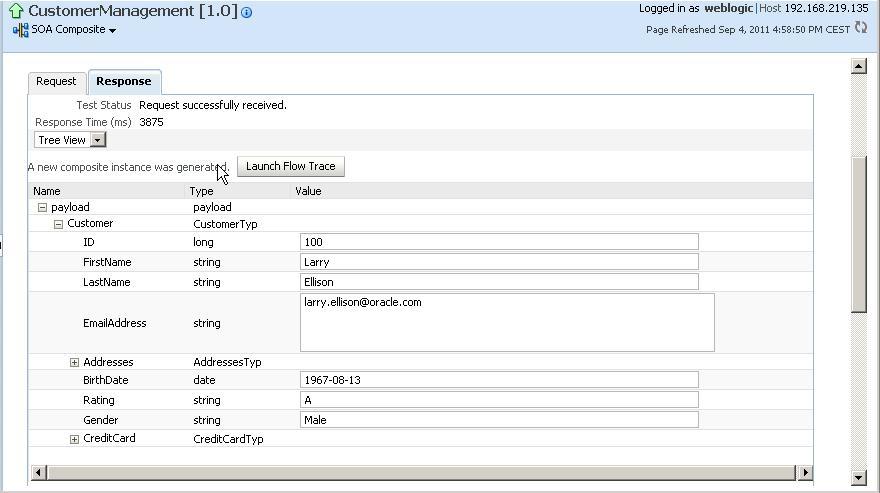
- On the Request tab, in the Input Arguments section enter
100into the ID field and click on Test Web Service in the top-right corner. - The result of the test is shown in the Response tab:
So far we have successfully created and tested the service provider side in SOA Suite. Now, let's implement the service consumer side on the OSB. First we need to get the WSDL of the SOA Direct Binding interface. We will retrieve the URL of the WSDL in JDeveloper and then use that URL to consume it in Eclipse OEPE.
In JDeveloper perform the following steps to retrieve the URL of the WSDL:
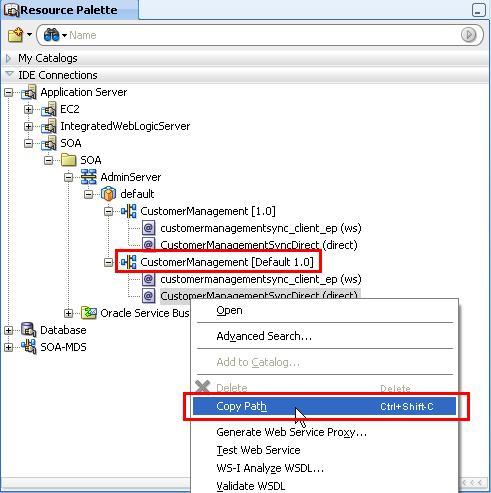
- Navigate to the Resource Palette tab on the right side of JDeveloper and expand the Application Server node.
- Expand the ApplicationServerConnection | SOA | [SOAManagedServerName] | default | CustomerManagement [Default 1.0], right-click on CustomerManagementSyncDirect (direc) and select Copy Path:
With the URL of the WSDL in the clipboard, let's create the business service by consuming the WSDL from the URL. In Eclipse OEPE, perform the following steps:
- In the
businessfolder, create a new business service and name itCustomerManagement. - On the General tab select WSDL Web Service.
- Click on Browse to define the WSDL.
- We want to consume the WSDL through the URL in the clipboard, so click on Consume.
- Select URI for the Service Resource, paste the URL into the URI field and click on OK.
- Select CustomerManagementSyncDirectDirectBindingPort2 (port) and click on OK.
- Confirm the Transport Configuration Change dialog with Yes.
- The WSDL is stored in the project folder itself. We can easily refactor by dragging it to the
wsdlfolder. The reference in the business service is automatically updated. - The necessary XML schemas are also consumed and stored in the project. However, they have generated names, so let's replace them by the ones we have used in the SOA Suite project. They are already available in the
xsdfolder of the OSB project. - Double-click on the CustomerMangementSyncDirect.wsdl and replace the value of schemaLocation for the import by
../xsd/CustomerMessages.xsd: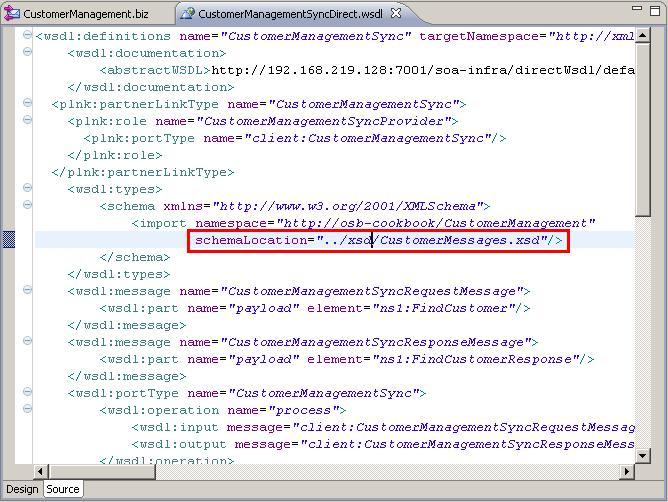
- Save and close the
wsdlfile. - Now delete the three generated XML schema files.
- Back on the
CustomerMangagement.bizbusiness service, naigate to the Transport tab. - Check the Endpoint URI.
- Navigate to the SOA-DIRECT Transport tab.
- Synchronous client should be selected for the Role radio-button.
- Save the project and deploy it to the OSB server.
Now let's test the service. In the Service Bus Console, perform the following steps:
- In the Project Explorer expand the invoking-soa-composite-sync node and click on the business node.
- Click on the Launch Test Console icon (icon with the bug) for the CustomerManagement business service.
- Change the ID to
100and click on Execute. - The response message from the BPEL component is shown inthe Response Document section:

A business service can call a SOA Suite Direct Binding service wired to a SCA component by using the SOA-DIRECT transport.
In this recipe, we have used a BPEL component, but it could have been any other SCA component, such as a Mediator or Rule component. OSB will use the T3 RMI protocol to communicate to the SOA Suite server but IIOP could be used as well. Because the WSDL of the SOA Direct Binding interface defines a synchronous request/response message exchange pattern, the business service will wait for the response.
If the OSB and the SOA Suite are not in the same WebLogic domain, a service account needs to be created. The business service will use the service account to authenticate against the SOA Suite server.
- Right-click on the security folder and select New | Service Account.
- Enter
ServiceAccountSOAinto the File name. - Click on Finish.
- Select Static at the Resource Type radio button.
- Enter
weblogicinto the User Name field. - Enter the password of the SOA Server into the Password and Confirm Password field.
- Save and close the service account.
- Go back to the
CustomerManagement.bizbusiness service and open the SOA-DIRECT Transport tab. - Expand Advanced Settings.
- Click on Browse on the Invocation Service Account field.
- In the pop-up window navigate to the
securityfolder in theinvoking-soa-composite-synchronouslyproject and selectServiceAccountSOA.sa. - Click on OK.
