In this chapter, we will cover:
- Using DB adapter to read from a database table
- Using DB adapter to execute a custom SQL statement against the database
- Using DB adapter to update a database table
- Using DB adapter to poll for changes on a database the table
- Using the AQ adapter to consume messages from database
- Using the AQ adapter to send messages to the database
In this chapter, we will show two different mechanisms to talk to the database:
- Using the DB adapter: It enables the OSB to communicate with database endpoints, such as Oracle database servers and any relational databases that provide JDBC drivers. Allows the execution of SQL statements, such as select, insert, updating, deleting as well as calling stored procedures or functions. Can also be used inbound, by polling for changes on a database table.
- Using the AQ adapter: It enables the OSB to talk to the Oracle Advanced Queuing (AQ) feature of an Oracle database. Oracle AQ offers queuing inside the database and is often used to implement asynchronous communication between applications in the database.
Both the DB adapter and the AQ adapter are JCA adapters and are well-known from the Oracle SOA Suite. As OSB 11g, they are also integrated with the OSB through the JCA transport.
The configuration of the JCA adapters is not available in Eclipse OEPE. For that, we have to use JDeveloper. The recipe, Setting, up, OSB, project, to, work, with, JCA, adapters, shows how to set up the project so that it's easy to share the different artifacts between JDeveloper and Eclipse OEPE.
Before we start with the recipes, we have to create the necessary connection factories on the DB and AQ adapter, which will be used by all the recipes.
To configure the DB adapter, perform the following steps in WebLogic Console:
- In the domain structure tree on the left, navigate to osb_cookbook_domain | Deployments.
- In the deployments list, locate the DbAdapter component and click on it.
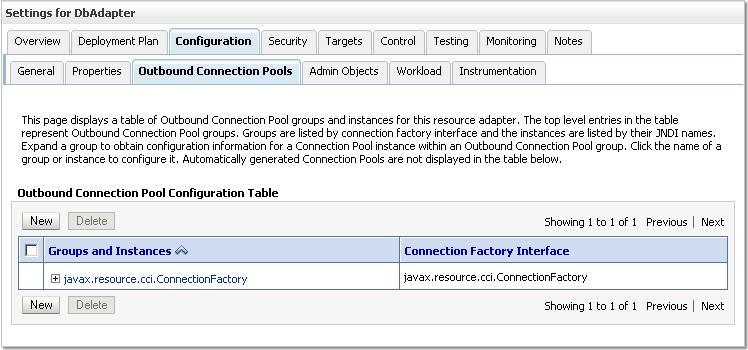
- Navigate to the Configuration tab, and select the Outbound Connection Pools tab.
- Click on New:

- Select the javax.resource.cci.ConnectionFactory radio button (which is the only option).
- Click on Next.
- Enter
eis/DB/OsbCookbookConnectioninto the JNDI Name field. - Click on Finish.
- On the Save Deployment Plan screen, click on OK.
Now, we have to configure the connection factory that we just created:
- Select the Configuration tab on the Settings for DbAdapter window.
- On the Outbound Connection Pools tab, expand the javax.resource.cci.ConnectionFactory node.
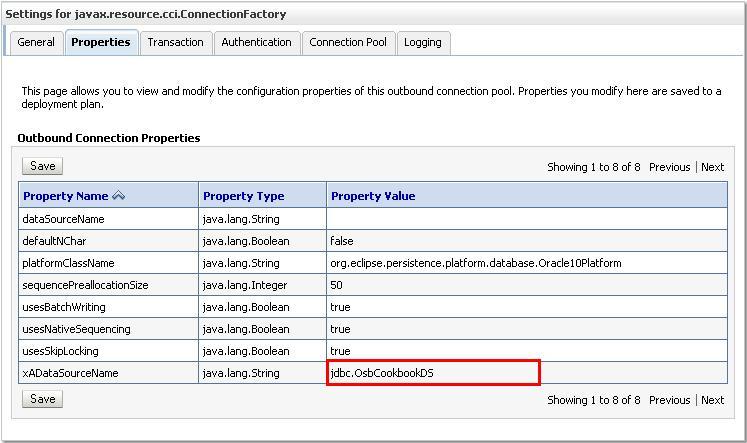
- Click on the eis/DB/OsbCookbookConnection link to open the connection properties.
- Click on the Property Value column in the row xADataSourceName. The field changes to editable.
- Enter
jdbc.OsbCookbookDSfor the JNDI Name field of the data source, which is part of the OSB Cookbook standard environment. Press Enter (this is important, otherwise the new value will not be saved). - Click on Save:

- We have successfully configured the new connection factory. In order to make it active, we have to reload the DB adapter. In WebLogic Console, perform the following steps:
- In the Domain Structure tree on the left, navigate again to osb_cookbook_domain | Deployments.
- In the deployments list, locate the DbAdapter and select the checkbox in front.
- Click on Update.
- Click on Finish. This finishes the work for the DB adapter.
Now let's configure the connection factory for the AQ adapter. In WebLogic Console perform the following steps:
- In the Domain Structure tree on the left, navigate to osb_cookbook_domain | Deployments.
- In the deployments list, locate the AqAdapter component and click on it.
- Navigate to the Configuration tab, and select the Outbound Connection Pools tab.
- Click on New.
- Select the javax.resource.cci.ConnectionFactory radio button (which is the only option).
- Click on Next.
- Enter
eis/aq/OsbCookbookConnectioninto the JNDI Name field. - Click on Finish.
Now let's configure the connection factory that we just created:
- Select the Configuration tab on the Settings for AqAdapter window.
- On the Outbound Connection Pools tab, expand the javax.resource.cci.ConnectionFactory node.
- Click on the eis/aq/OsbCookbookConnection link to open the connection properties.
- Click on the Property Value column in the row DataSourceName. The field changes to editable.
- Enter
jdbc.OsbCookbookDSfor JNDI Name field of the data source, which is part of the OSB Cookbook standard environment. Press Enter (this is important, otherwise the new value will not be saved). - Click on Save.
We have successfully configured the new connection factory. In order to make it active, we have to reload the Aq adapter. In WebLogic Console, perform the following steps:
- In the Domain Structure tree on the left, navigate again to osb_cookbook_domain | Deployments.
- In the deployments list, locate the AqAdapter and select the checkbox in front.
- Click on Update.
- Click on Finish.
The two adapters are now fully configured and we can use them.
