
This recipe will show how to copy artifacts from one OSB project into another OSB project. This is useful for duplicating artifacts in order to reuse them.
We will use the same project as in the previous recipe, with one proxy service calling another proxy service.
Import the base OSB project for this recipe from here: chapter-2getting-readycopying-artifacts-from-project-to-other.
Let's see how we can copy the proxy, wsdl and xsd artifacts into another OSB project. For that we first create a new OSB project in the same OSB configuration and then copy the artifacts. In Eclipse OEPE, perform the following steps:
- Create a new OSB project and name it copy-of-artifacts.
- Select the proxy, wsdl, and xsd folder with a multiselect in the copying-artifacts-from-project-to-other project, right-click and select Copy.
- Right-click on the copy-of-artifacts project and select Paste.
- The artifacts are copied into the new OSB project and the project gets flagged with the error marker.
- If we navigate into the proxy folder, which also has an error marker, we can see that the two proxy services are invalid.

- Open the CustomerManagement proxy service to see the reason for the error. The location of the CustomerManagement WSDL is still holding the name of the origin project.
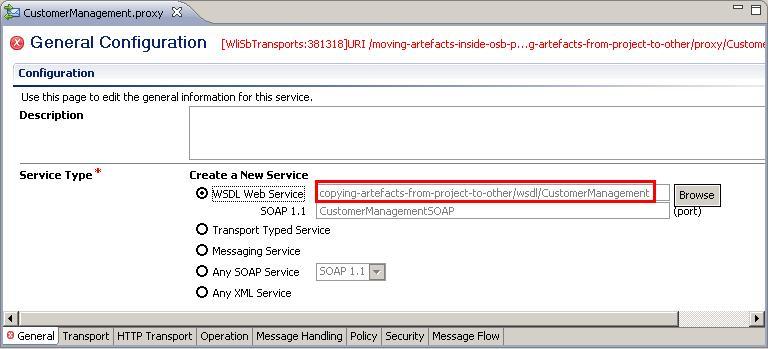
- Click Browse and navigate to the WSDL file local to the new copy-of-artifacts project.
- Select No on the Transport Configuration Change pop-up window, to confirm the overwriting of the transport configuration.
- Navigate to the Transport tab to manually change the value of Endpoint URI so that it no longer contains the name of the origin project.
- Repeat step 6 to 9 for the CustomerManagementLocal proxy service.
Save all the artifacts and the error marker should disappear. There is one last thing to adapt. The CustomerManagement proxy service is invoking the CustomerManagementLocal proxy service and the Routing action is also including the project name in the Service configuration. This has to be change too:
- Open the CustomerManagement proxy service.
- Navigate to the Message Flow tab.
- Select the Routing action inside the StoreCustomerRoute node.
- On the Properties of the Routing action, click Browse and select the correct proxy service to call. This overwrites the other settings of the Routing action.
- Change the value of the Invoking drop-down list box back to StoreCustomer.
This finishes the necessary refactorings for this simple case. Depending on the complexity of the artifacts and their interrelationships, many more actions might be necessary.
If we copy artifacts from one OSB project to another within Eclipse OEPE, then all the links referring to other artifacts are not changed as well. This may be correct, if the link is pointing to an artifact residing outside of the originating project. If the link is referring to a local artifact, then this is probably wrong and has to stay local, that is, it needs to be changed manually after copying the resources.
The same steps will be necessary if artifacts are copied from outside, that is, from a file explorer into Eclipse OEPE.
We have also seen that not all the wrong links will be marked as an error. A Routing action will still be fine as long as the artifact its invoking is still there, even if it's in another project.
Instead of changing the errors caused by the copy of the artifacts manually through the different Eclipse OEPE editors, it can also be done directly on the source (XML representation) of the proxy service.
To open the source representation of the CustomerManagement proxy service, perform the following steps in Eclipse OEPE:
- Close the CustomerManagement proxy service editor window if it's still open.
- Right-click on the CustomerManagement proxy service and select Open With | Text Editor.
- Change all occurrences of the origin project name copying-artifacts-from-project-to-other to the new name with a
find/replaceoperation, which can be found in the menu File | Find Replace.
Of course, we have to be very careful to not invalidate the structure of the XML when doing changes directly on the XML source code of the proxy service. Otherwise the editor view will no longer work.
If the same changes have to be applied on multiple file, then a global search and replace on the whole project can be done. A global search and replace is available through the Search menu:
- In the Project Explorer, select the project copy-of-artifacts.
- Click on the menu Search | Search.
- Enter the text to search copying-artifacts-from-project-to-other into the Containing text field.
- In the Scope section, select the Enclosing projects option and click on Replace.
- On the Replace Text Matches pop-up window, enter the replacement text copy-of-artifacts into the With field.
- Click Preview to review the changes that will be applied and then select OK.
Again be careful to really change the right occurrences only.
When directly manipulating the XML source code of the OSB artifacts, it's always a good idea to keep a copy of the previous version, that is, in a version control system such as Subversion or GIT.