
Using external content in SharePoint
Connecting SharePoint 2013 with external systems
TRADITIONALLY in Microsoft SharePoint, data are stored in lists and libraries; however, most organizations do not wish to move all their data into SharePoint—nor should they. Most organizations have spent time and money building or purchasing specialized customer relationship management (CRM) software systems such as Siebel and SAP to assist with key business processes. Those users who can access these external systems have to contend with multiple different UIs with an array of terminology. Typically, these users have undergone training in each UI and have developed their own cheat sheets to translate UI terms into their everyday business language. They now wish to integrate the data from those external systems into SharePoint sites and Microsoft Office applications, such as Microsoft Outlook 2013, Microsoft Access 2013, and Microsoft Visio 2013, with an easy-to-use interface and terminology that is familiar to SharePoint users.
Solutions that bring together data from a number of systems to assist in the automation of a business process are known in SharePoint as composites or mashups. Business Connectivity Services (BCS) is a key SharePoint component in building composites. The BCS stores the definition of the external content—its location, the type of data, and the behavior of the data when it is integrated into SharePoint and Office client applications—centrally, in the Business Data Connectivity (BDC) metadata store. The definition of the external content is known as the external content type (ECT). The definition of the location of the external system, together with the ECT, is known as the BDC model. Once an ECT is defined, you can use SharePoint Designer or a browser to manipulate the data from the external system using an external list.
This chapter details the different methods of accessing information external to SharePoint and then describes how to use BCS. You will look at the architecture of BCS, including the security options. You will also look at managing the data connections and how to expose the data from the external systems on webpages and in lists and libraries. Finally, you will learn how to use Microsoft Visual Studio 2012 with BCS.
Composite solutions can be divided into the following three types, as shown in Figure 22-1:
Simple. Built using the out-of-the-box capabilities within SharePoint. Many of these simple solutions require that the definition of how to connect to the external system is already in existence. The solution is built almost entirely using the ribbon in the browser or Office applications.
Intermediate. Built by power users, site owners, or business analysts. Such users, termed “citizen developers” by Gartner, Inc., and also known as consumer developers, operate outside the scope of IT, work in the business domain, and can use the What You See Is What You Get (WYSIWYG) tools to create new business applications for consumption by others.
Citizen developers use a combination of technologies, such as Access web apps, Microsoft InfoPath forms, business intelligence tools, Visio diagrams, webpages, workflows, and integration into Office applications, such as Outlook task panes or Microsoft Word documents. Citizen developers know what they want to achieve, they understand their business needs, and with a bit of SharePoint knowledge, they can wire together the business processes or sets of tasks.
Intermediate solutions are more complex than simple solutions, and they may involve the use of Office application macros or the manipulation of XSLT using the code view of Microsoft SharePoint Designer. Therefore, citizen developers may initially need some training or help from the organization’s central SharePoint team, particularly if they have never used SharePoint Designer, Access, or Visio before.
Note
Gartner, Inc., reports that citizen developers will build at least 25 percent of new business applications by 2014 (www.gartner.com/it/page.jsp?id=1744514) and warns that IT departments that fail to capitalize on the opportunities that citizen development presents will find themselves unable to respond to rapidly changing market forces and customer preferences.
Advanced. Built by the IT department and professional developers, involving the development of reusable components to augment simple and intermediate solutions or solutions that require a deep knowledge of architectural concerns and a formal code, test, deploy, and support management processes. Such reusable components could include SharePoint Apps, .NET assembly connectors to connect, aggregate, and transform data from external systems, custom web parts, custom workflow actions that can be used from within SharePoint Designer, and extensions to the browser UI. Many of these components will necessitate the use of Visual Studio.

IT departments will need to differentiate between the types of solutions that citizen developers can create and those that the IT department should develop. When this identification process is completed successfully, it should free up IT resources for more complex problems.
Although many business users will have developed complex solutions with such programs as Microsoft Excel that involve thousands of rows of data, the simple and intermediate types of BCS solutions will be based around forms or business processes. Many users in an organization may not have the specific data skills to build solutions in Excel or Access, but by taking advantage of their SharePoint skills, solutions involving data from multiple external systems will be more invasive and prolific in an organization.
The shift to citizen developers may be new to an organization and may instigate a user adoption strategy as well as an education program. This education program should be focused more on introducing and managing the changes in the way the business will work going forward rather than enhancing skill sets. Other organizations may assimilate the use of SharePoint and its tools into their formal/informal reengineering processes. The introduction of SharePoint and the use of BCS to hook external data with SharePoint and Office applications should not be seen by users as another task to complete in their already busy day; rather, users should be encouraged to view the use of these technologies as a new way of working so that they can accomplish more in the same amount of time.
Many of the most successful SharePoint solutions are built by the users who use them: the citizen developers. The solutions are successful because the citizen developers know what they want to achieve, they are using the solutions as they develop them, and they can resolve any problems—including issues that can be uncovered only by using the solution. Citizen developers find that there is no need to provide feedback to others or raise incidents with their organization’s help desk. These citizen developers are probably very passionate about their own SharePoint solutions. Therefore, when an organization encourages citizen developers to instigate the business reengineering process, it is more likely that other users in the organization will take to the solution, as one of their own developed it and that person knew the business requirements and experienced firsthand the issues of the solution.
Key to the success of this paradigm shift is that organizations need to take the citizen development strategy into consideration with any development process. That is, any SharePoint-related development project needs to add to the list of citizen developer tools, continuing the SharePoint philosophy of self-service for users, content owners, business owners, and site owners.
SharePoint 2013 provides the following methods of integrating with data that are not stored in SharePoint:
Access web apps. SharePoint 2013 provides two Access service applications: Access Services 2010, as provided in SharePoint 2010, and Access Services. To use either of these service applications, the Enterprise Client Access Licenses (CALs) are required. Access Services allows users to build quickly no-code, web-based form applications, known as web apps. These web apps are SharePoint Apps and can be deployed to SharePoint App stores. Data and Access objects for each Access web app is saved in its own Microsoft SQL Server 2012 database and not in SharePoint lists.
Note
For more information about Access web apps, see Chapter 21.
Access Services 2010. This service application enables you to publish an Access 2010 database, which creates a web database that is exposed as a SharePoint site where data held in Access tables is moved to SharePoint lists and forms and reports are created as webpages. You can then access the web database using the browser or the Access client application. Access web databases cannot be created using Access 2013. You can still view and edit a web database that was previously created by using Access 2010 and SharePoint Server 2010, and you can republish it to SharePoint Server 2013. You cannot convert a web database to an Access web app automatically; however, you can convert a web database to an Access web app manually by importing the data from the web database into a new Access web app and then re-create the user interface and business logic.
Note
More information on how to configure Access Services 2010 for web databases in SharePoint Server 2013 can be found at technet.microsoft.com/en-us/library/ee748653.aspx.
Excel Services. With this service application, you can publish Excel 2013 workbooks to SharePoint 2013, which allows users to view and interact with the workbooks in their browser.
Note
You can find more information about Excel Services in Chapter 14 and Chapter 15.
PerformancePoint Services. To use PerformancePoint Services, Enterprise CALs are required. PerformancePoint Services enable you to monitor and analyze business tools by providing tools to build dashboards, reports, scorecards, and key performance indicators (KPIs). All data used in PerformancePoint is classified as external data, including data stored in SharePoint lists or Excel files published to Excel Services. However, data stored within SharePoint can be used in PerformancePoint only in read-only mode. You can use PerformancePoint to connect to tabular data in SQL Server tables, Excel workbooks, and multidimensional (Analysis Services) data sources, and you can use a PowerPivot model built using the PowerPivot add-in for Excel as a data source.
Note
You can find more information about PerformancePoint Services in Chapter 14 and Chapter 16.
Visio Services. Visio Services enables you to share and view Visio 2013 files in the browser without the Visio client application or the Visio viewer installed on your local computer. To view your own Visio files using the Visio Service application, Enterprise CALs are required. The Visio drawing can contain visuals that are linked to data from an external data source. Visio Services can fetch the data from these linked data sources and update the visuals of a Visio drawing.
Note
You can find more information about using Visio Services in Chapter 17.
Microsoft InfoPath. With InfoPath, you can create both forms and browser-based forms. Users entering data into forms require Microsoft InfoPath Filler 2013. For browser-based forms, users need only a browser and InfoPath Form Services. Form templates for both types of forms can be created using Microsoft InfoPath Designer 2013. Forms created using InfoPath can connect to data sources such as SharePoint lists or web services. Forms or browser-based forms can be saved in a SharePoint Form library. The ASPX pages in external lists that allow you to create, read, update, and modify data from an external system can be replaced with InfoPath browser-based forms.
InfoPath Form Services (IFS). This service application enables InfoPath browser-based forms to be rendered in SharePoint 2013. To use this service, Enterprise CALs are required. However, if you only have Standard CALs, you can still see InfoPath association and initiation forms that have been created with SharePoint 2010 workflows. IFS is not a SharePoint 2013 service application; it is configured at the farm level using the Central Administration website.
Note
For more information about InfoPath, see Chapter 21.
SQL Server 2012 SP1 Reporting Services (SSRS). There are two components that integrate SSRS with SharePoint:
Reporting Services SharePoint mode. Also known as integrated mode, Reporting Services SharePoint mode is based on a completely new architecture, which is why you will see it in the SharePoint Central Administration website as a service application with a SharePoint Shared Service Application Pool. You configure it using the SharePoint Central Administration website or using Windows PowerShell commands. You no longer use the Reporting Services Configuration Manager, as you did in SharePoint 2010.
Reporting Services add-in. This add-in enables you to run SSRS Report Server within SharePoint 2013, where the SSRS reports, items, and properties are stored in SharePoint. Users can browse to SharePoint libraries to find the reports.
Note
You can find information on installing SSRS on SharePoint 2013 at blogs.msdn.com/b/biblog/archive/2012/12/04/installing-and-configuring-sql-reporting-services-on-sharepoint-2013.aspx.
Data Sources gallery using SharePoint Designer. Using Microsoft FrontPage 2003, and then later Microsoft SharePoint Designer 2007, you could connect, present, and modify data from several types of external data sources using the Data Source Library and Data Source Details task panes. This method is still available with SharePoint Designer 2013 by using the Data Sources gallery, which you can access through the Navigation pane. However, SharePoint Designer no longer has the Design or Split view; therefore, once you have added a Data Form Web Part (DFWP) using the ribbon, much of the subsequent customization needs to be completed using XSLT in Code view.
Note
More information on SharePoint 2013 composites can be found in the updated SharePoint Composites Handbook at msdn.microsoft.com/en-us/library/jj938032.aspx.
BCS is implemented as a service application, known as the Business Data Connectivity (BDC) service application, which is named for the fact that it is the component that connects to the external system and passes the data to the presentation layer. You create external system definitions once, and not only share those definitions to many sites within the same site collection or SharePoint web application, but also share those definitions with more than one web application.
In addition, a SharePoint farm—a SharePoint installation that is installed on one or more servers that share the same SharePoint configuration database—can host more than one BCS; each one can be configured independently by different sets of administrators. By storing external system definitions stored in a BCS on one SharePoint farm, which can be referenced from other SharePoint farms, you can manage all your external system definitions centrally. Once the external system definitions are retrieved, each SharePoint farm will connect directly to the external systems. A BCS can also be partitioned in a multitenancy configuration, which is the term commonly used to describe the isolation of websites in a hosting environment, such as SharePoint Online.
Although multiple BDC service applications can exist, the browser and SharePoint Designer can use only the BDC service application that is labeled as the default BDC service application. If you associate a web application with multiple BDC service applications, you can use the nondefault BDC service applications only with custom code.
BCS may be divided into four areas:
External system. This is where the external content resides. It may be maintained by one of your organization’s business critical applications, often known as line-of-business (LoB) applications. They may have a custom UI or a programmable interface, such as Open Data (OData), Microsoft Windows Communication Foundation (WCF) service, web 2.0 source, or as a database.
The OData data source type is newly supported for BCS in SharePoint 2013, and is used by many systems, including SharePoint, SSRS, Windows Azure Table Storage, Azure Data Marketplace, Facebook, Netflix, and others, such as those built using Open Government Data Initiative (OGDI), as well as the Microsoft .NET Framework. In fact, Windows Server 2012 includes a new feature that enables you to expose Windows PowerShell commands and scripts as OData Web service entities. Data is returned from the OData producers as JavaScript Object Notation (JSON), Atom, or plain XML data.
Before using BCS, you should explore the external system you wish to connect to (for example, evaluate the best method of connecting to the external system). Check with creators of the external system as to the methods available to access the content. If there is more than one method, ask which one is the best option to use.
Connectivity. Before SharePoint can access the content from an external system, the definition on how to connect to the system and the authentication method used must be created, which is the BDC model. The BDC model consists of declaration XML that describes the external system you want to access, as well as the operations you might like to use on this external content—for example, read a list of data, read one item (row) of data, or update one item (row) of data.
The BDC model can be created on a development or test SharePoint installation, from where it can be downloaded and imported into the SharePoint production farm, where it is stored in the BDC metadata store, or it can be used by Office applications.
The BDC model can be used in a SharePoint installation to create ECTs, which are also known as entities. However, in a SharePoint 2013 installation, before you can create or upload a BDC model, you must create the BDC service application. Office 2013 applications contain only the components that allow you to upload a BDC model; therefore, there is no management or configuration interface provided.
Presentation. This is the client-side consumer of the external content, such as an Office 2013 application, or if you are using SharePoint, it could be an external list created from the ECT. As with SharePoint 2010 and Office 2010, you can use external data with Office client applications such as Word, Access, InfoPath, Excel, and Outlook. New with Visio 2013, you can now link data from an external list to a diagram and its shapes. Word and Visio can use only data from external systems, whereas Access, InfoPath, Excel, and Outlook can create, read, update, and delete data in the external system if the ECT is configured to complete those operations and the user is allowed to complete those operations.
Tools. Microsoft provides two tools to create the BDC model to interact with the BCS program interfaces and manipulate the BDC objects. These are SharePoint Designer 2013 and Visual Studio 2012. There are other third-party tools that can help ECT designers, such as BCS Meta Man, which can be found at lightningtools.com. You could also use an XML editor, such as XML Notepad 2007 or Notepad, to create a BDC model.
Figure 22-2 shows the high-level interaction among these four areas. Notice the symmetry—the BCS architect is the same for Office 2013 applications as it is for a SharePoint installation. However, the Office 2013 applications do not have a BDC metadata store. In its place is a BDC client-side cache, so that when content in an external list is taken offline, the BDC model is taken from the BDC metadata store on the server and stored in the BDC client-side cache. The offline content from the external list is also stored in the client-side cache, which uses a SQL Compact Edition client database so that the offline external content and the BDC model are both persisted when the user’s computer is shut down.

Figure 22-2. BCS is divided into four areas: presentation, connectivity, external systems, and tools.
Also note in Figure 22-2 that the Office 2013 applications have their own connectors; therefore, when a user switches to online mode, the Office application connects directly to the external content without connecting through SharePoint. Other Office 2013 applications, such as Access 2013, can import a client-side version of the BDC model. Thus, in this scenario, Access 2013 does not need to connect to SharePoint at all; it connects directly to the external system. This could potentially create challenges for users when accessing data hosted in SharePoint Online, as well as accessing on-premise data.
To use the Office 2013 applications, a user must have the application installed on Windows 7 or later and have the following three software components:
SQL Server Compact 4.0
.NET Framework 4
WCF Data Services 5.0 for OData V3
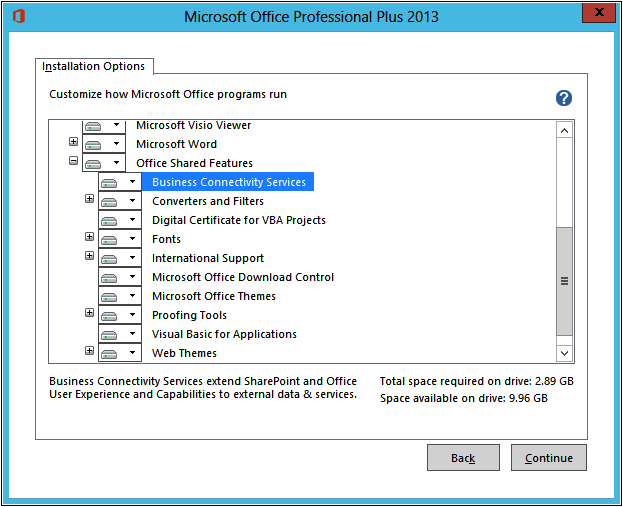
If these three components are not installed when the user tries to connect to data within an Office application via BCS, the user will be prompted to download and install them. In addition, the Office client applications must be installed with the Business Connectivity Services Office Shared Feature, as shown in Figure 22-3.
The advantage of using BCS over using the Data Source gallery in SharePoint Designer is that you need to define the external system and ECT only once; you can then use that ECT on many sites across all web applications that are associated with the BDC service application. One disadvantage. For example, is that ECT designers must be given edit permissions to the metadata store, which requires a high level of security, whereas with the Data Source gallery, you only need to be a site owner. In addition, other BCS security settings are needed to allow users to access the external content that can only be set using the SharePoint 2013 Central Administration website or Windows PowerShell. This results in a level of collaboration between the ECT designers and the SharePoint farm administrators, which in large organizations are usually two different people.
To connect and retrieve data from an external system, complete the following tasks:
Create a BDC service application and set permissions on the BDC metadata store to allow for the creation of the BDC model, external system definitions, and ECTs.
Define the external system connection.
Define the operations to Create, Read, Update, and Delete (CRUD) content stored in that external system as appropriate to your business requirements.
Create an ECT based on an external system definition.
Configure the permissions on the ECT so that users can see content from the external system.
Use the ECT to present the data from the external data source as external lists, an external data column, web parts, or from within an Office application.
Once an ECT is created, you can create solutions that use the external content. You can use the browser or SharePoint Designer to create these solutions. You can also create custom web parts or Windows form applications with Visual Studio that can access the data defined in the BDC metadata store.
External lists are the preferred method of displaying external content. These can be created using the browser, SharePoint Designer, or Windows PowerShell. Depending on the operations that you have defined on the ECT, you can create, read, update, and delete individual external content data, such as a specific customer, order, or employee from the external system. You can also add an XLV Web Part or a DFWP to a page that displays data from an external list.
Remember, the external content is not stored in SharePoint content databases; therefore, an external list cannot replicate all the same functionality as an internal SharePoint list. For example, you cannot use the Datasheet view, associate RSS feeds, or set item-level permissions; however, you can export the list data to Excel (a new feature with SharePoint 2013). In the Excel workbook, the data is linked to the external list, and therefore, when a user chooses to refresh the Excel workbook, the data is retrieved from the external system. As with internal SharePoint lists, this is a one-way synchronization process; that is, when a user modifies or deletes data in the Excel workbook, the data is not changed in the external system. And when a user synchronizes the workbook with the external system, all modifications in the Excel workbook are lost.
SharePoint does not have native control over the external content and does not know when data is in the external system; however, with the help of a developer, workflow can be triggered when data in the external system changes and alerts can be sent.
To create an external list using the browser, follow these steps:
Open the site where you want to create the external list. Click the Settings icon in the upper-right corner and then click Add An App.
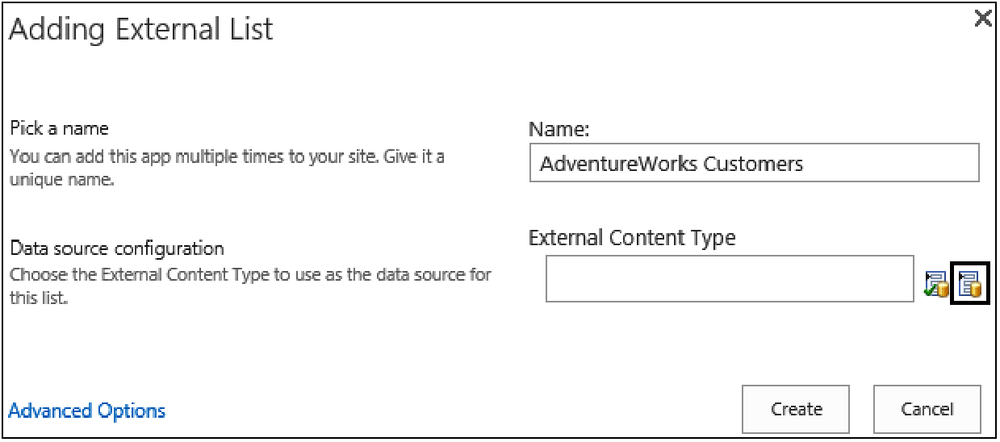
On the Your App page, click External List to display the Adding External List dialog box.
If you have a large number of list types, it is easier to find the External List option by typing external in the Find An App text box and pressing Enter.
On the Adding External List dialog box, enter the name and description for the external list.
You will need to click Advanced Options to display the New page to add a description.
To the right of the External Content Type text box, click the Select External Content Type icon, as shown here.
The External Content Type Picker dialog box appears, which displays the name of the external system and the display name of the ECT. It is important that your ECT designers have created a meaningful display name for the ECT so that your users can quickly identify the correct external content they wish to work with.
In the External Content Type Picker dialog box, select the ECT that defines the external content that you want to display in your external list, and then click OK.
The External Content Type Picker dialog box closes, and the ECT that you have chosen is specified in the External Content Type text box.
Note
If you choose the incorrect ECT, you cannot choose a different one once the external list is created. You will need to delete the list and re-create it, choosing the correct ECT. The external list acts as a virtual container displaying the contents from the external system; therefore, when you delete an external list or ECT, you are not deleting any content from the external system, just the virtual container and the definition of external content, as shown next.
In the Adding External List dialog box, or if you clicked Advanced Options earlier, then on the New page, click Create.
The Site Contents page is displayed where the list you just created appears. When the external list is displayed, the default Read List operation is used as the default view and the content from the external system is displayed.

External data columns enable you to add external content to a standard SharePoint list or library. You create an external data column as you would any other column; that is, on the List or Library tab, click the Create Column command and then, on the Create Column page, enter a column name and then select External Data as the column type. In the Additional Column Settings section, to the right of the External Content Type text box are two icons: the Check ECT icon, which you use when you type the name of the ECT in the check box, and the Select ECT icon, that, when clicked, opens the External Content Type Picker dialog box.
Once an ECT is selected, the Additional Column Settings section contains a list of properties associated with the ECT, as shown in Figure 22-4. In the Select The Field To Be Shown On This Column drop-down list, select the column that your users will usually associate with the external data. If the external system is a CRM system, then this may be the company name or contact name. You can then choose to add one or more fields from the external content to become columns in the list or library, such as the customer’s email address or phone number. You can then choose to add the fields to all content types, as well as adding it to the default view.

Figure 22-4. The Additional Column Settings section contains a list of properties associated with the ECT.
It is only when you add a new list item and click the Select External Item(s) icon that the BDC server run time will connect to the external system to retrieve data to populate the Choose dialog box, as shown in Figure 22-5. The dialog box will only show those fields which had the external item picker check box selected when you configured the ECT operations. When the external item picker check box is not selected for any field, all fields are displayed in the Choose dialog box.

When the new list item is saved, the external content is stored in the list in the SharePoint SQL content database, unlike the external list, which only contains a link to the ECT definition. To update the data in the list, you can click the Refresh icon to the right of the external data column name, as shown in Figure 22-6. A webpage is displayed that warns you that this operation could take a long time. You can choose to sync this folder only or this folder and all subfolders. If you click OK, the BDC server run time connects to the external system to return the necessary data. By copying the external content in the list, it has inherited all list type operations, such as views, filters, and the ability to be used to trigger list workflows.

To the right of the items in the external column is an icon and a down arrow; this is the External Data Action menu, as shown in Figure 22-7. The menu provides links to pages that display information relevant to the ECT item, such as displaying all the values for all the properties of the ECT item, known as the profile page, or by using the postal code property of the ECT item displaying a map of that location.

Creating external data actions External data actions can be created with the SharePoint Central Administration website by following these steps:
Navigate to the BDC Service where the ECT is defined, and then, on the Edit tab of the Service Application Information page, select External Content Types from the drop-down menu in the View group.
Click the ECT to display the External Content Type Information page, as shown next.
On the Edit tab, click Add in the Actions group.
On the Add Action page, type a name for the action, add the URL, specify whether to start the action in a new browser window or not (default), add parameters to the URL if required, and add the icon to display next to the action. You can choose from the Delete, Edit, or New icons, or you can choose your own image, as shown next.


Business data web parts SharePoint 2013 ships with seven generic external data web parts, six of which are functionally the same as they were for the business data web parts in SharePoint Server 2007: Business Data Actions, Business Data Connectivity Filter, Business Data Item, Business Data Item Builder, Business Data List, and Business Data Related List. The seventh is the Chart Web Part, which was introduced in SharePoint 2010.
These web parts can be used to display any data using any ECT without writing any code. After they are configured, they will automatically be named after the entity data they are displaying. The web parts that display data from the external systems query the metadata cached on each web front-end server, and then the instance data is retrieved from the data source. To use the business data web parts on a site, you must activate the SharePoint Server Enterprise Site Collection features at the site-collection level.
Surfacing external data in Word When an external data column is added to a library, the values in the external column can be made available in a .docx Word file by inserting a Quick Part onto a document, enabling you to embed BCS data. The first column to select would be the External Data column’s display name (for example, Customer), as shown in Figure 22-8. You can only choose fields from the ECT that you choose to display in the library.

The document properties are inserted onto the page as controls, as shown in Figure 22-9, with two icons that allow you to select data from the external system.

Before you can create an ECT, you need to create a BDC service application, which can be created by using the SharePoint configuration wizard, the SharePoint Central Administration website, or Windows PowerShell. Using the SharePoint Central Administration website or Windows PowerShell allows you to specify the SQL Server database name or use a preconfigured database name. Although you can use the configuration wizard, which creates an automatically generated BDC database name, it is not recommended to use the configuration wizard in production because of the lack of control you have over what it creates.
When using the SharePoint Central Administration website or Windows PowerShell, first check that at least one BDC machine service instance is started on one of the servers in your SharePoint farm. The machine service instance, also known as the SharePoint service, uses the service binaries to manage components, such as any related timer jobs, to make the service application function correctly. If you have more than one server in your SharePoint farm, the machine instance can be started on one or more of your servers. SharePoint then provides its own round-robin load-balancing mechanism to distribute user requests for data from the external systems evenly.
Once a machine service instance is started, you can create the BDC service application. This allows you to manage and create the definitions for the external systems. When the BDC service machine instance is started and its associated service application is created, then an Internet Information Services (IIS) Virtual Application is created that runs in the context of an IIS application pool within the SharePoint Web Services IIS website. It exposes a WCF web service, also known as the service application endpoint, as shown in Figure 22-10. This is used by SharePoint and can be used by developers in your organization to develop new solutions. Such an endpoint is created by SharePoint on each server where the machine service instance is started.
Once the BDC service application is started, you will see in the Central Administration website on the Service Applications page, below the BDC service application, a BDC service application proxy, also known as the service connection, as shown in Figure 22-11. This provides the connection between the components, such as webpages that wish to access the data from the external systems and the BDC service application. The service application proxy also understands the load-balancing mechanism that SharePoint uses, and if you publish a BDC service application for use on other farms, the service application proxy will be used for managing those connections as well.

Figure 22-10. The BDC service application endpoint is created within the SharePoint Web Services IIS website.

Figure 22-11. The BDC service application and the BDC service application proxy are shown on the Central Administration website.
Once you create the BDC service application, you will need to complete the following administrator tasks:
Create BDC service application administrators.
Import the BDC model that contains the metadata information.
Set BDC Metadata Store permissions.
If you are using SharePoint Server 2013 and have purchased Enterprise CALs, configure profile page creation (that is, the site where the profile pages are to be created). Ensure that the SharePoint Enterprise Site Collection features are activated on this site.
If you are using SharePoint Server 2013, configure Single Store Service if you plan to import any BDC models into the metadata store then you should plan to use this authentication mechanism.
Deploy any custom business data solutions, such as dashboards.
Table 22-1 lists the metadata store permissions that you can use and the allowed actions of the user, group, or claim.
Table 22-1. BDC metadata store permissions
Permission | Description |
|---|---|
Edit | Use to allow users to create and amend BDC models, external system definitions, and ECTs. Only allow highly trusted users to have this permission, especially in a production environment. Users with this permission can see external system definitions created by other users, and therefore this can be a security risk, where a malicious user can use the security information in the external system definition to access and corrupt external content, and adversely affect the running of the SharePoint installation. When you upload a BDC model from a development environment into a production environment with its security settings, remove the edit permissions from the BDC model for those users who created it in the development environment. If you do not have a development or prototype environment, you will need to give users who create external system definitions and ECTs using either SharePoint Designer or Visual Studio edit permission on the BDC model. |
Execute Selectable In Clients | There is no execute or selectable in Clients permission on the metadata store; however, you can choose to propagate these settings to child objects in the BDC model, external systems, ECTs, methods, and method instances, and their child objects. |
Set Permissions | Users with this permission can manage BCS permissions on the BDC metadata store, and by propagating a user’s settings, the user can set permission on any object in the metadata store. This permission is usually only given to BCS service application administrators. |
Follow these steps to set permissions on the BDC metadata store:
Open the SharePoint Central Administration website in the browser. Under Application Management, click Manage Service Applications.
On the Service Applications page, click the name of the BDC service for which you want to manage permissions.
Click Set Metadata Store Permissions on the Edit tab of the Ribbon.
On the Set Metadata Store Permissions page, enter the appropriate users or groups and select the appropriate permissions, as shown in the following graphic.
Click OK.

To create an external system definition, you need to know which protocol to use to connect to the external content, known as the data source type, and the authentication method to use, as well as the operations you want to use on the data. The following data source types can be used (these define the connector that the BDC server run time will use to connect to the external system):
Databases, including SQL Server and SQL Azure
Cloud-based services
Windows Communication Foundation (WCF) endpoints
Web services
.NET assembly that gathers data from multiple sources
All OData sources, including any SQL Server data source that is surfaced via OData
Custom external systems that have a nonstatic interfaces that change dynamically
The authentication methods that the BDC server run time uses to retrieve, modify, and delete, if appropriate, the data from the external systems are:
User’s identity (also known as PassThrough). When a user requests a SharePoint page that displays data from an external system, SharePoint sends the user’s credentials to the external system, which uses that identity to decide whether the user is allowed access or not. If you use Windows authentication and have a single server SharePoint farm and the external system is installed on that server, then using the user’s identity works well. However, to use Windows authentication in any other configuration, the user’s identity has to make one hop from the user’s computer to the SharePoint server and another hop from the SharePoint server to the external system. This double hop requires the configuration of Kerberos in your environment.
The other disadvantage of using the user’s identity is that if the external system is a SQL database, it causes a new SQL connection pool to be created for each user who is using the ECT to access the external content, which can cause performance issues. Connection pooling can be disabled, which can also affect performance.
Impersonate Windows identity. Specific Windows identities are used to authenticate with the external system. This Windows identity could be the same for all users or there could be some mapping mechanism, so the user requesting the content from SharePoint is matched to a different Windows identity that is passed on to the external system. To use this and the next authentication method, an application that does this mapping is required. If you are using SharePoint Server 2013, you could use the SSS application, or if you are using SharePoint Foundation, you will have to write your own equivalent system.
Note
For more information on SSS planning, see Chapter 14.
Impersonate custom identity. These could be credentials mapped in a database or could be claims-aware identities, which are sent to the external system.
BDC identity (also known as RevertToSelf). SharePoint reverts to the web application’s application pool identity to authenticate with the external system. This user name has a high level of privileges on a SharePoint installation. Any user who can create or edit a BDC Identity model can make themselves an administrator of SharePoint. Therefore, Microsoft does not recommend the use of this authentication mode and it is disabled by default. When a user tries to import or change the authentication mode to RevertToSelf, an error message displays. The error message that displays when using SharePoint Designer is shown in Figure 22-12.

The easiest way of defining an external system is to use SharePoint Designer 2013 or Visual Studio 2012. The tooling to create a BDC model for an OData source type has been included within Visual Studio 2012 and not SharePoint Designer. The BCS tooling within SharePoint Designer 2013 remains as it was in SharePoint Designer 2010; that is, you can define ECTs that use the following data source types: SQL Server, .NET, and WCF Service. By including the new tooling within Visual Studio 2012, the BDC model can either be included in a SharePoint or Office app or imported into a BDC metadata store using the SharePoint Central Administration website, Windows PowerShell, or in a tenant environment, such as Office 365, using the tenant admin site.
Follow these steps to create a BDC model for an SQL Server database:
Open SharePoint Designer 2013 and then open a SharePoint site.
You will not be storing anything in the site, so this can be any site in the web application that is associated with the BDC service application where you have edit permissions on the BDC metadata store.
In the Navigation pane, click External Content Types to open the External Content Types gallery that lists the ECTs to which you have permission.
The gallery may be empty if no ECTs are created or you do not have permission to see any, as shown next.
On the External Content Types tab, click External Content Type in the New group.
The summary view of the ECT is displayed with an asterisk on the workspace label, indicating that the ECT has not been saved to the metadata store on the SharePoint server. You cannot save an ECT until you have given it a name and defined Read Item and Read List operations on an external system.
In the External Content Type Information area, to the right of Name, click New External Content, type the name of the ECT and enter a display name, which is the name displayed in the ECT picker dialog box.
The ECT name is usually a short, terse, but meaningful name that preferably does not contain spaces. You cannot save an ECT until it has a name. Once you have saved the ECT, you cannot change the ECT name in SharePoint Designer; however, you can change the ECT display name. You could export the ECT as part of a BDC model, alter the XML in the file (say in Visual Studio), and then reimport the BDC model into the BDC metadata store. This will create a new ECT. You could then remove the misspelled ECT, however, this will affect any external lists you have created from the misspelled ECT, as ECTs are based on the name of the ECT and the namespace.
The namespace of a SharePoint Designer–created ECT is the URL of the web application. The namespace is used to group ECTs, so you should change the namespace to reflect the business purpose for a group of ECTs. In the following example, http://adventure-works-CRM relates all the customer relationship records for your organization.
To the right of External System, click Click Here To Discover External Data Sources and Define Operations to display the Operations Design view of the ECT.
You can toggle between the Summary view and the Operations Design view by using the two commands in the Views group on the External Content Types ribbon tab.
Click Add Connection.
In the External Data Source Type Selection dialog box, select the appropriate data source type, such as SQL Server, and then click OK to display the source type connection dialog box.
Enter the connection details. For example, for a SQL Server source type, enter the database server name, the database name, and the authentication type: User’s Identity, Impersonated Windows Identity, or Custom Identity.
For the two impersonated identities, you will need to use the SSS and provide the secure store application ID. The authentication details that you enter here will be used to authenticate with the external system as you use SharePoint Designer. You can specify different authentication methods for both SharePoint and Office applications that you wish to store in the BDC model, by clicking Edit Connection properties in the Connection Properties group.
Click OK.
The external system is registered in the BDC metadata store as an external system named SharePointDesigner-<external system name>-<userid>-<guid>, where <external system name> would be the name of the SQL database, <userid> is the user name of the person who created the external system definition, and <guid> is a generated number. One such example is SharePointDesigner-northwind-peter-581fd994-5891-49a5-8842-73b806483a04. These are placeholders to store the definitions you have created. It is not until you create an ECT for this external system that a valid external system definition is created that can be used by other ECT designers in other sites.


Once the external system definition is defined, you can now create an ECT and specify the CRUD operations that you wish to execute on that external system. Many organizations use ECTs rather than the Data Sources gallery for security and logistic reasons. The ECT can be defined once and stored centrally in the BDC metadata store, but used many times for all sites and site collections depending on the permission settings of the ECT. The schema and authentication methods need only be explained to a small number of ECT designers. This is as opposed to the Data Sources gallery, where the data source definition would have to be created for each site where you want to use the external content.
Follow these steps to create an ECT using SharePoint Designer:
In the ECT Summary view, ensure that the ECT has a name, and if the external content is to be displayed in Outlook 2013, configure the Office item type as Appointment, Contact, Task, or Post. Switch to the Operations view of the ECT.
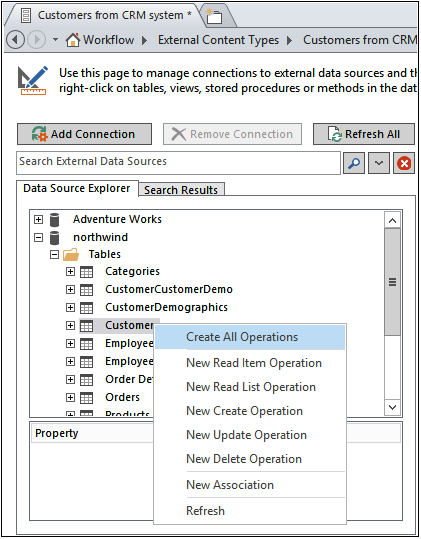
In the Data Source Explorer, expand the external system node by clicking the plus sign (+) to the right of the name.
If the data source is a database, expand Tables, Views, or Routines.
Right-click the table you want to create a BDC model for and then click the operations you want to create.
Depending on the operations exposed by the external system, you can add the operations create, read item, update, delete, and read list, as shown next.
A three-page operations wizard opens, where each page contains a section that displays issues, warnings, and errors as you configure the operations. The three pages are:
Operation properties. Use this page to set the operation name, operation display name, and operation type. For a database external system, you can create all operations. If you choose this option, then the operation properties are generated automatically and the operation names will be Create, Read Item, Update, Delete, and Read List.
When you create an External List from an ECT, then a view is created for each Read List operation. You may consider modifying the automatically generated names for the Read List operations so that they are meaningful to users of the external list.
Parameters. Use this page to select those fields, known as elements, you wish to use in your SharePoint solution. You can modify each data source element, including the identifier name, the field name, and the name of the field when it is displayed in the browser. By default, all fields will be shown in the external item picker when adding an external data column to a list or library. If the table, view, or routine returns a large number of fields, displaying them all in the external item picker may confuse users. Therefore, it is best to select a small set of elements that best describes an item.
If you selected an Office item type on the Summary View, you will use this page to map the external content data fields to Office properties. The Office mapping form is part of the Read Item operation, and therefore, if you wish to modify these settings once an ECT is created, modify the return parameter properties of the Read Item operation. You also change the Office item type on the Summary page once an ECT is created.
Filter parameters. Use this page to add your own throttling conditions to your solution; this will optimize the time taken to return the data from the external system. Remember, external content is not saved in the BCS database, but is retrieved by the BDC server run time when needed.
The filter types available are Comparison, Limit, Page Number, Timestamp, and Wildcard. For string data types, use the Wildcard filter type because this will internally translate to a like clause in queries to get the data.
BCS throttling is enabled by default to prevent Denial of Service (DoS) attacks. You are most likely to see the effect of this feature if no limit filter was created and when the BCS run time attempted to retrieve data from the external system it timed out due to the large amount of data it was trying to retrieve. For more information on BCS throttling, see the sidebar “Using external system throttling” later in this chapter.
This will create in the BDC metadata store an external system named <databasename> if this is the first ECT created for the external system, and an ECT with the name you typed in step 1.
The ECT is just one of the BDC metadata store objects for which you can set permissions, as described in Table 22-2. These permissions affect the interface between the SharePoint server and the presentation layer; that is, they do not define the authentication and security settings between the SharePoint server and the external system—those security settings are defined in the external system definition. The other objects present in the BDC metadata store that have their own access control list (ACL) are the BDC model and external system definitions. These permissions can be set by using the SharePoint Central Administration website or Windows PowerShell.
Table 22-2. BDC model object permission settings
Permission | Applies to | Description |
|---|---|---|
Edit | Access-controlled metadata objects | Users with this permission can perform the following actions: Update Delete Create a child object Add a property Remove a property Clear a property Add a localized display name Remove a localized display name Clear a localized display name Give edit rights to administrators and users who use SharePoint Designer. |
Execute | ECT, Method Instance | Users with this permission can execute operations via various run-time API calls; that is, they can view the data of an ECT returned from a finder method. In most scenarios, you would assign this right to all users who have access to SharePoint. |
Selectable In Clients | ECT | Users with this permission can use the external data picker to configure web parts and lists and create external lists. This permission should be available to administrators and users who design solutions using the browser or SharePoint Designer. |
Set Permissions | Individually securable metadata objects | Users with this permission can manage BCS permissions on the object. This permission is usually given only to BCS service application administrators. |
If you are fortunate to have a development environment, you may have created your external system definition and ECTs in that environment. If the testing was successful, you will now have to deploy these BDC definitions to the production farm by first exporting the appropriate BDC model from the BDC service application in the development environment and then importing the BDC model into the correct BDC service application in the production farm. You can use the SharePoint Central Administration website, a Windows PowerShell cmdlet, or SharePoint Designer to export the BDC model.
If you created the External System definition and ECT using SharePoint Designer then you should use that tool to export them. The BDC model, SharePointDesigner-<databasename>-<userid>-<guid>, created by SharePoint Designer, does not link to the ECTs that are created by SharePoint Designer. Therefore, you cannot use the SharePoint Central Administration website to export ECTs developed with SharePoint Designer.
If the BDC model is to be used by Office 2013 applications, then you can only export them in the correct format by using SharePoint Designer. The permissions you have configured on the BDC model, the external system, and ECT can also be included in the exported BDC model.
You can use the SharePoint Central Administration website or a Windows PowerShell cmdlet to import a BDC model. You cannot use SharePoint Designer to import BDC models.
When you export a BDC model, make changes and then import it into a BCS application; you should update the version number for the ECT. By default, the version number is set to 1.0.0.0. Changing the third or second number of the version number indicates a small change, such as adding a new method or changing connection information. Changing the first or second number of the version number signals a “breaking change” to BCS, such as adding a new field to the Read Item operation (Specific Finder method) or changing the identifier field. Breaking changes usually cause external lists that were defined using the previous version of the BDC model to fail. Therefore, before making an ECT widely available, ensure that your ECT meets all your business needs and is tested thoroughly.
Note
More information on migrating the BDC model and ECT from a development environment to testing environments and production environments can be found at msdn.microsoft.com/en-us/library/gg650431.aspx.
To export a BDC model using SharePoint Designer, follow these steps:
Open SharePoint Designer 2013 and then open a SharePoint site in the web application that is associated with the BDC service application where you have created the external system definition and ECT.
In the Navigation pane, click External Content Types to open the External Content Types gallery.
Click the icon to the left of the ECT you wish to export, and then, on the External Content Types tab, click Export BDC Model in the Manage group.
In the Export BDC Model dialog box, type the BDC model name, and in the Settings list, select Default (as shown here) if the BDC model is to be imported into another SharePoint farm, or select Client if you are going to use the BDC model with Office 2013 applications.
Click OK and save the BDC model as an XML file.
The file will have an extension of .bdcm. If you are importing the file into an Office 2013 application, change the extension to .xml.

To export a BDC model or the resource information in a separate file using the Central Administration website, follow these steps:
Under Application Management, click Manage Service Applications. On the Service Applications page, click the name of the BDC service application that contains the BDC model you wish to export.
In the View drop-down list, select BDC Models, if not already selected, and then, under Service Application Information, select the BDC model you wish to export.
On the Edit tab, click Export in the BDC Models group.
On the Export BDC Model page (shown here), select the Model or Resource file type option and the resource components you wish to export.
If you select the resource file type option, then a separate resource XML file will be created, which usually has an extension of .bdcr. When you export a BDC model in SharePoint Designer, you cannot export the resources separately, nor can you choose which resources you wish to export. With SharePoint Designer, all resource information is exported.
Click Export, and then save the file.

Note
Information on the BDC model and resource files can be found at msdn.microsoft.com/en-us/library/ee231601.aspx.
To import a BDC model using the Central Administration website, follow these steps:
Under Application Management, click Manage Service Applications. On the Service Applications page, click the name of the BDC service application that contains the BDC model you wish to export.
On the Edit tab, click Import in the BDC Models group.
On the Import BDC Model page, in the BDC Model section, either use the Browse button to navigate to the Model file or type the location of the Model file into the text box.
In the Advanced Settings section, select the Resource option if you are importing a file that contains only localized names, properties, or permissions.
Click Import to display the Importing webpage.
Note
When you choose to import permissions that are defined in your BDC model and an entry for an ECT already exists in the ACL, its value is overwritten with the permission information from the imported file.
Once the BDC model is imported, SharePoint 2013 separates the external system and the ECT information. You should review both these objects and set permissions according to your requirements. You should then check that an external list can be created from the ECT, and external content can be included in an external data column in a list or library.
You can also use the Delete command on the Edit tab to delete BCD models, external systems, or ECTs.
BCS is all about bringing data that lives outside SharePoint into SharePoint. The BCS provides connectivity to your external LOB systems by using connectors. Earlier in this chapter, SharePoint Designer was used as a no-code method to define the BDC model and use ECT as external lists and external data columns. This method has some limitations:
You can only create CRUD operations. BCS supports other operations that cannot be created using SharePoint Designer, such as the stream operation that allows you to access a file that is stored as a Binary Large Object (BLOB) in a SQL database.
The declarative XML created in the BDC model can be amended only if you export the BDC model and then open the file created by the export activity in SharePoint Designer. You would then need to know the BCS model schema to amend the XML. SharePoint Designer does not provide any no-code assistance in editing the BDC model XML file.
External lists cannot be used to represent any hierarchy or relationship between the content that is stored in the external systems. The data is presented as a flat, table-like structure; there is no inbuilt tree-like or folder structure that you can configure to match the relationship between the content.
SharePoint Designer only allows the use of SQL Server, .NET assembly, and WCF connectors.
SharePoint Designer does not allow you to create the VSTO add-ins that could provide extract functionality to work with the external content.
Visual Studio 2012 includes additional tooling for BCS—the SharePoint Customization Wizard—that was not included in Visual Studio 2010. You can use this wizard to create an OData BDC model and the BDC model operations that match the external system operations exposed via the OData endpoints. The Visual Studio wizard creates ECTs with fewer steps than it would take you to create ECTs in SharePoint Designer. Unfortunately, you cannot create or modify an OData ECT with SharePoint Designer.
To create a BDC model based on an OData producer using Visual Studio, complete the following steps:
In the Solution Explorer, right-click the project name, select Add, and then click Content Types for an External Data Source to display the SharePoint Customization Wizard page, as shown in the graphic on the following graphic.
On the Specify OData source page of the SharePoint Customization Wizard (shown here), type the OData Service URL and the Data Source Name.
Visual Studio connects to the $metadata endpoint and then displays the data entities available from the OData provider on the Select The Data Entities page. Use this page to select those entities to include in the BDC model and then click Finish, as shown next.


In the Solution Explorer, under External Content Types, you will see the data source that you entered on the Specify OData Source page. When the data source is expanded, as shown in Figure 22-13, there is an ECT for each data entity selected on the Select The Data Entities page.
Note
Visual Studio automatically generates the OData ECTs to use https, and therefore, the ECTs need to be amended if your OData provider endpoints use http.
When the Create List Instances For The Selected Data Entities check box is selected on the Select The Data Entities page, an External List definition (Elements.xml) is created and shown in the Solution Explorer.
The ECT files can be opened to display their contents as XML, or if you double-click an ECT file, it will open in Designer view, as shown in Figure 22-14. The Designer view allows you to easily configure the columns for the ECT and to add filters that you can use to limit the data that is returned from the data source. A filter named Limit is generated automatically with a default value of 100.

Note
The Microsoft Business Connectivity Services resource center can be found at technet.microsoft.com/en-us/sharepoint/ee518675.aspx.
This chapter detailed how to incorporate external content by basic SharePoint no-code solutions with SharePoint Designer using BCS components: ECTs, external lists, and external data columns. More advanced solutions can be built using Visual Studio 2012.
BCS provides a method of providing access to external content without having to redefine how to connect the external systems for each site that needs to use that external content. However, as an ECT designer, you do need high permissions and will need to collaborate closely with the SharePoint administrator to implement BCS solutions. Also, as changes to BCS solutions can affect many sites over many web applications, a release management process should be implemented.