
Performing community site management
Extending your community to the cloud with Yammer
MICROSOFT SharePoint has included features that are “social” in nature for quite a long time now. User profiles, My Sites, blogs, ratings, and so forth all helped SharePoint evolve beyond team collaboration into a social networking tool designed for the enterprise. It was not until the introduction of the Noteboard and other related features in SharePoint 2010 that customers truly began to consider SharePoint a viable enterprise social platform. However, SharePoint 2010 still had many shortcomings, perhaps the most significant of which was that it did not have a true microblog and the threaded discussions were no longer sufficient. Customers that wanted something like an “internal Twitter” were left wanting because of this gap.
Fortunately, the improvements in SharePoint 2013 for social networking are significant. Not only were the features from SharePoint 2010 improved, SharePoint 2013 has upped the game, thanks in part to the following new features:
Community sites
The community portal
Personal newsfeeds
Ability to follow people, content, sites
Ability to use @mentions, #tags, and “likes”
Reputation scores for people and content
There are dozens of interaction points for a user’s social experience in various parts of SharePoint 2013, but the center of gravity for the social experience centers around two primary places: the Newsfeed and community sites. Those two key areas of functionality and the details of their subcomponents are what this chapter will focus on.
When users sign into SharePoint, they get a Newsfeed link in the upper-right navigation pane that will take them to a personal view of their Newsfeed. Although the My Site infrastructure that was in prior versions of SharePoint still exists, the UI has been completely redesigned in SharePoint 2013 and is sometimes now referred to as a personal site. My Site functionality still exists, but the UI has been replaced with the Newsfeed and SkyDrive Pro.
The Newsfeed is robust and filled with socially driven information that is most relevant to the user. The Newsfeed truly becomes the Grand Central Station of the SharePoint 2013 social experience. It is a landing page that is personalized to each user with information that he or she cares about. The Newsfeed displays information from items that you follow, such as people, documents, sites, and tags. It shows several items in the feed, sorted in reverse chronological order. Each user will also see an Everyone feed that shows the last several posts or replies by all users, not limited to the people followed. As shown in Figure 6-1, the Activities feed shows all activity connected with a specific user. Other users can see your Activities feed while browsing your profile or About Me page.

In addition to notifications about content, the Newsfeed is a place where users can go to view a list of notifications for their social activities within SharePoint communities. The Newsfeed displays items that are specific and relevant to each user. The following is a partial list of community activities that are posted to the Newsfeed:
Public information from each user’s profile is displayed in the About Me page. It has a rich view of personal profile information regarding your interests and social connections. The About Me page also displays presence information for the user if he or she is logged onto Microsoft Lync. You can view a new People Card by pausing the mouse over someone’s network presence icon. The People Card includes standard contact details, but it now also has a user’s personal photo, status updates, activity feeds, and Facebook and LinkedIn account information. You can see an example of the About Me page in Figure 6-2.

The Community Site template is a new SharePoint 2013 site template designed for enterprise social networking. Fundamentally, community sites are a place where people can come to learn about specific topics and share information with a group of people with whom they have something in common. SharePoint communities are a place to ask and answer questions, share knowledge and interesting content, and engage with people who have similar interests.
The four major components of the new Community Sites feature built for SharePoint 2013 include:
The Community Site template
Reputation for people and content
A redesigned discussion experience
Membership, management, and moderation tools
Details about these four areas are provided throughout this chapter.
SharePoint 2013 includes a Community Portal Site template so that users can see an aggregated list of all community sites. As shown in Figure 6-3, the portal uses Search to access all the community sites, although you have the option to exclude certain communities if you choose. In addition, security trimming is still in effect, so users will see only portals where they have access. The community portal will also display open communities where users can request to join if they are interested in the topic.

Figure 6-3. Users can see an aggregated list of all community sites in the new Community Portal Site template.
The most popular community sites, as determined by the system, will receive prime time spots on the Community Portal page. Popularity of a community is determined by activity, membership, and other factors. When you create a community portal on your farm/tenant, the portal is added to the promoted sites page. Your users will benefit by being able to quickly discover and navigate to communities they might care about.
The Community Site template provides the UI that members interact with when working in a community. In some ways, it is not much different from a standard team site in that it has the ability to host most of the other common app web parts (such as tasks). However, the site template has four core pages that help set it apart from other SharePoint templates:
Home. This is the main landing page for community members.
Categories. This page provides the user with a graphical view of the different categories of conversations that are going on within the community. The icons representing each category are definable by the community owner using Community tools. Every discussion post must be put into a category.
Members. This is the list of all community members.
About. This includes information about the community, such as established date, community guidelines, and so forth.
The community sites also have a handful of web parts specifically built to help with community participation and management. The web parts included in community sites are:
Activity Dashboard. (“What’s Happening”) This web part provides a summary on the community home page of discussions, replies, and members.
Community Tools. This web part is a management tool for moderators and owners to perform various community tasks.
Top Contributors. This is a web part on the home page that displays some of the most prolific contributors.
Discussion List. This web part provides the UI that displays discussions and allows users to interact with the items.
An example of a community site created with the Community Site template is shown in Figure 6-4. On this community home page, you can see most of the items mentioned in the previous lists.
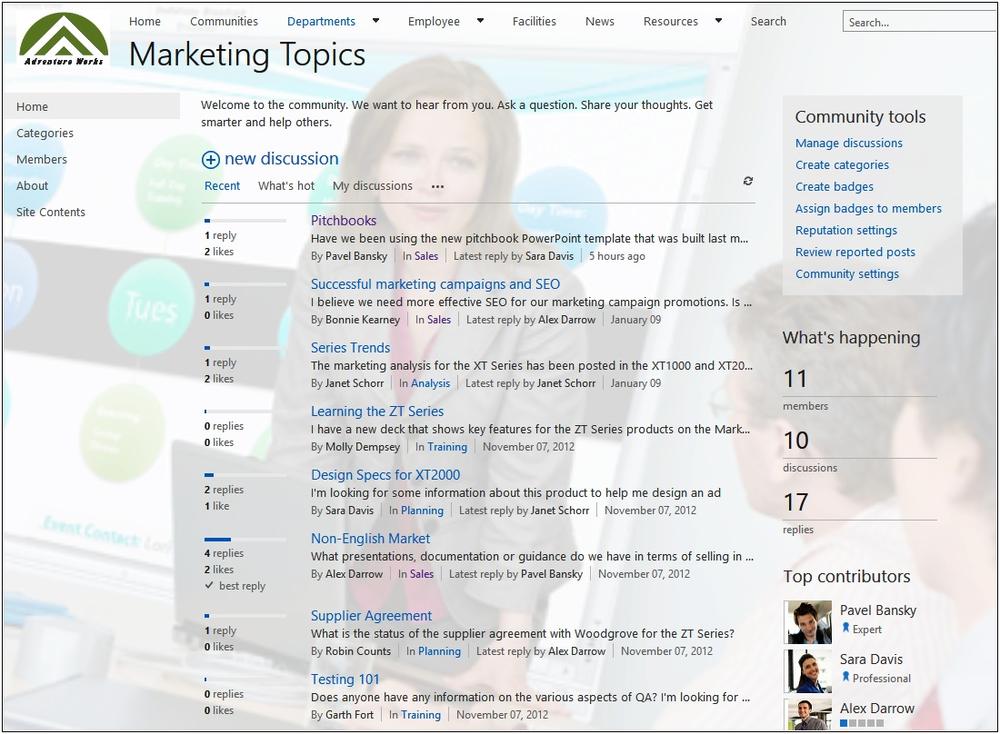
When you visit a community site that you are not a member of, you will notice a Join This Community button at the top of the page. If the community allows it, you can click this button to join. At that point, the site is also automatically added to your list of followed sites so that community activity will be pushed to your Newsfeed. Until you click Join, you are considered a visitor, which essentially means you can read content, but you cannot contribute anything.
When you join a community, you will be added to the Members list within that community site. Membership status is stored in a Members SharePoint list that exists in each community site; it is not in the site permissions.
Within SharePoint community sites, discussions provide the tools necessary for community members to create a vibrant, interactive social experience. Discussion capabilities have evolved dramatically in this version of SharePoint, adopting many popular features of consumer social networks (such as microblogging and hash tags).
Any member of a site can create a new discussion. When a new discussion is created, the user must select one of the predefined categories in which the post should be classified. Site owners and moderators define the categories for discussions (more on that later in the chapter).
When creating a new discussion, the member can choose to mark that thread as a question. This allows other community members an opportunity to answer the question, thus bolstering their reputation score in the community. Marking discussion posts as questions is also useful because other community members can filter on answered or unanswered questions, as shown in Figure 6-5.

Within the discussions, members have take several different actions. They can reply to a post, or to a reply. They can mark one response as the Best Reply for discussions that they created. Any member of the community can report an offensive or inappropriate post to the moderator.
Within a reply, members can use the @ sign to tag other users who will then be notified via email and on their Newsfeed. In addition, within a reply, they can use a hash tag (#) to add a tag. Users who are following that tag will receive a notification on their Newsfeed. Figure 6-6 illustrates an example of how to use @ and # in replies. Sara Davis is replying to Pavel; she has used the @ to include her colleague Alex, and she used the # to include a relevant tag.

Figure 6-7 shows the Newsfeed of a user who follows the tag that Sara used in her reply. Because he follows the #MarketingExcellenceAwards tag, anytime someone adds that tag to a community post, it will be displayed in his Newsfeed.

Community participation revolves largely around posting, replying, and “liking” discussions. These activities are the ones that determine a member’s reputation. SharePoint 2013 provides a visual indicator of a user’s reputation score within that community. Many types of SharePoint content can be part of a discussion (such as tasks and documents), but only interaction with the discussion is used to determine a reputation score. Community owners and moderators can determine the optimal point system for reputations—more on this later in the chapter.
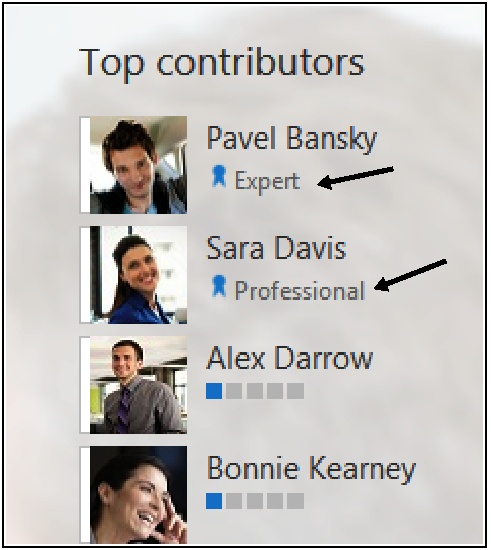
Related to reputations are Badges. Badges are a way for community moderators to provide special recognition to a member who has a particular impact on the community (such as an expert). Badges are not tied in to the reputation point system; they are assigned by a person. You can see an example of Badges in action in Figure 6-8.
Two primary roles perform community site management: owners and moderators. Site owners have administrative capabilities that allow them to perform many of the behind-the-scenes tasks required to establish and customize a community site. A partial list of these activities is as follows:
Community site creation
Modifying community settings, such as established date, reputation settings, and reporting
Customizing the community by editing the Home and About pages and the site theme
Creating categories for discussions
Adding apps to the site (such as calendars)
Defining permissions for the site and determining whether or not auto-approval will be enabled for people wishing to join the community
Thanks to the new Community Site template, it is relatively quick and easy to get a new community up and running. As shown in Figure 6-9, the Community Site template will be available when you create a new site or subsite.

Note
For larger communities, it is recommended that you create the community as the root site in a site collection. This provides a number of benefits, including the ability to move the entire site collection if necessary.
Community-site functionality can also be added to existing team sites if you activate the community features, as shown in Figure 6-10. Enabling this capability will add the standard community functionality, underlying lists, and features to an existing site.

During (or after) the creation of a community, you will decide what type of community you need (such as public or private). Permissions need to be assigned to the groups that will have access to the community. This will determine what type of capabilities people will have when they visit the community.
Permissions for a community site are defined as usual using SharePoint site permissions and groups in Site Settings. One thing to note is that if you want users who click Join Community to be automatically approved as members, you need to ensure that the Auto-Accept Requests option is turned on within Group Settings for the group in question. You can get to this by going to Site Settings | People And Groups | Settings | Group Settings. You can see the Auto-Accept Requests setting in Figure 6-11.

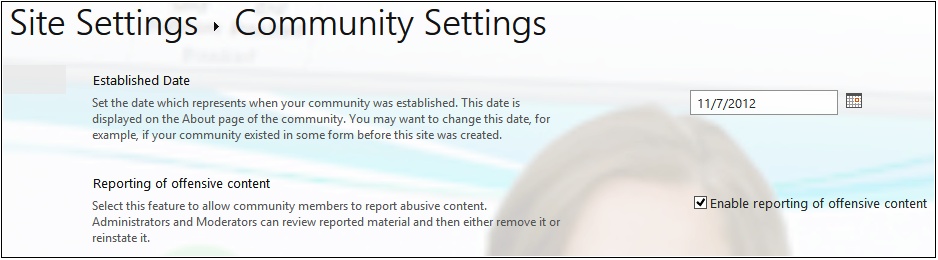
In Site Settings, each community has a Community Settings link that has some general settings for the community. The Established Date defaults to the date that the site was created, but the owner can change it if it is desired to convey the fact that the community has existed longer than the site itself. The Established Date is displayed on the community About page.
Also within Community Settings, you will find the option to enable Reporting Of Offensive Content. If you want community members to be able to report objectionable or offensive content to the moderator, enable this option.
All discussion posts in a community must be in a category. The moderators and owners of a community are the people who define the categories. The category settings can be found by using the Community Tools Web Part or by choosing Manage Categories under Site Settings.
Each category has four basic properties, as shown in Figure 6-12:

Category Name
Description
Category Picture
Picture Description
Because categories will be one of the primary methods that users have to navigate and filter discussions, it is important that you put thought and planning into what categories you create for a site. At the same time, it is important not to create an overabundance of categories or ones that overlap. If you make that mistake, your users will be confused on how to categorize new discussions.
“Likes” and ratings are optional; owners can enable or disable ratings by choosing Community Reputation Settings under Site Settings. Ratings can be either “likes” or stars. Also, on that same administration page, the owner can enable and configure a member achievement points system. This includes defining the value of specific types of activities; posting a new discussion might be worth more than replying to an existing discussion post, for example.
In addition to enabling and defining the point structure, the owner decides whether to display a member’s level in the community as a bar image or a text title. You can see this configuration option in Figure 6-13.

Communities introduce the requirement for moderation, which therefore introduces the need for a moderator. SharePoint 2013 sites with the Communities feature enabled add a new permissions level called Moderate. When a user is assigned the Moderate permission, she is allowed to perform various community stewardship tasks, such as recategorizing discussions and addressing content that has been reported.
The job of community moderation primarily consists of two major areas:
Managing and monitoring, which includes:
Promoting, which includes:
Assigning badges as appropriate
Marking replies as Best Reply
Designating important discussions as Featured
For a community to grow and thrive, moderation is often necessary, but unfortunately, this role is often overlooked. A best practice is to assign the Moderator role to someone who has a stake in the community’s mission, purpose, and success.
Moderators will have access to the main community settings and the lists in the background that provide functionality for the community (such as members). The moderators will see the community settings displayed in two places:
In the Community Tools Web Part, as shown in Figure 6-14
In the Community Site Settings

When someone is assigned the moderator role in a community, the Community Tools Web Part will be displayed on his or her page. Because the Community Tools Web Part is security trimmed, only owners and moderators have access to it.
If your community has enabled Reporting Of Offensive Content in the Community Settings page, as shown in Figure 6-15, moderators will also have access to the Reported Posts Moderation tool.
A moderator can navigate to reported posts easily by clicking Review Reported Posts on the Community Tools Web Part. This will take the moderator to a SharePoint list that stores reported post information. As shown in Figure 6-16, the moderator can edit or delete the post or dismiss the complaint.

Promoting people and content is an important part of a thriving online social community. SharePoint 2013 provides a number of tools and methods for moderators to assist in this process.
Moderators can mark content as Featured within a given category. In Figure 6-17, a moderator has marked the “Successful marketing campaigns and SEO” discussion as featured. There are a variety of reasons that a moderator might want to do this. For example, perhaps a question or recurring theme is being repeated in the community. By featuring the discussion, hopefully users will notice it before they post a redundant discussion.

Moderators can also mark a reply as a Best Reply. This helps a particular discussion stand out, and it boosts the reputation of the person who posted the reply. If the post is a question, selecting a Best Reply also marks the question as “answered.”
Moderators can assign badges to users who go above and beyond in their contributions to a community. The badge is simply a custom text title such as “expert”), but the impact is significant because it identifies the real champions of a community. This task is performed using the Community Tools Web Part. Once you have selected Assign Badges To Members, you can pick the user you want to give a badge, and then press the Give Badge button on the Moderation toolbar, as shown in Figure 6-18.

With the recent acquisition of Yammer by Microsoft, customers now have a significant new option to augment their SharePoint social experience. Yammer is a cloud-based social tool that has seen a huge popularity surge in recent years, with well over a million active users. For SharePoint customers, there are many potential scenarios where you might have a business need for both Yammer and SharePoint 2013 social capabilities. Fortunately, there is already a robust set of integration technologies between the products—and much more will be coming as Yammer becomes even more embedded into SharePoint.
Note
For more information on how Yammer and SharePoint integrate and complement one another, visit https://www.yammer.com/company/sharepoint.
A few possible reasons why you might want to consider adding Yammer to your social strategy include:
As a cloud service, Yammer is very easy to provision and implement; therefore, it can deliver value very quickly.
Yammer can integrate into an existing SharePoint 2007 or SharePoint 2010 implementation using tools such as the Yammer Web Part, Yammer federated search, profile sync, and more. Social discussions can take place in Yammer and integrate with your existing SharePoint implementation.
You can easily extend Yammer to people outside your organization to participate in your enterprise social network with minimal effort and without additional cost.
Yammer is highly scalable; your social network can include millions of users if necessary.
Yammer has robust and advanced support for nearly every type of mobile client device and operating system.
Social networking in business is quickly becoming a requirement for most organizations. SharePoint 2013 provides a solid, secure, and modern enterprise social experience for your users to collaborate and share. In this chapter, you learned about the principal social tools in SharePoint 2013, such as community sites and the Newsfeed. For certain scenarios, Yammer can augment the SharePoint social platform to bring even more power to your users, partners, and customers.