
Software requirements for business intelligence
Business intelligence in SharePoint Server 2013
Creating and configuring Excel Services service applications
Creating and configuring PPS service applications
Creating and configuring a Visio Graphics Service service application
Creating and configuring a Business Intelligence Center
MODERN business intelligence (BI) has come a long way from when it started as a back-office function; it is now utilized by both consumers and IT decision makers alike. BI refers to the systems and tools used by an organization to consolidate and maintain large amounts of information. Generally, these systems illustrate business intelligence in areas such as inventory, product profitability, market research, customer profiling, and customer support.
Two primary programs exist for BI: strategic planning and tactical implementations. Strategic planning encompasses the long-term vision of the enterprise and plays a key role in the processes of the corporation. Strategic plans set the boundaries for tactical implementations, as well as provide guidelines around how the business will be governed in the long term. Data warehouses become a single source of reliable data delivered through dashboards and portals, and business analysts are able to get deeper custom analysis through business intelligence analytical tools.
Traditionally, these tools were available only to people with years of experience in data warehousing and data mining, and they were used to access large amounts of unstructured data for the purpose of analysis. Many companies collect the large amount of data from their business operations and then keep track of the information through a wide range of tools used throughout the organization. Using multiple software programs can make it difficult to retrieve the information in a timely manner and perform the analysis of the data. Because this process is more manual, it can lead to errors, making the data untrustworthy. This is no longer the case today. BI applications and tools in Microsoft SharePoint 2013 enable organizations to capture and present data in an organized and meaningful way to help promote the organization’s goals, processes, and performance measures. This chapter looks at the improvements in the BI capabilities in SharePoint 2013, along with the software requirements for implementation.
Planning for business intelligence in SharePoint 2013 requires specific installations and settings for SharePoint and Microsoft SQL Server to be implemented first. The next part of this chapter focuses on the software requirements for implementation.
Analysis Services, Integration Services, Reporting Services, PowerPivot, Master Data Services, and several client applications are part of the Microsoft BI platform as features in SQL Server 2012. This section focuses on the requirements for these features.
Reporting Services and Analysis Services can be set up on stand-alone servers, in scale-out configurations, or as shared service applications within a SharePoint farm. Installing these services enables PowerPivot and Power View for SharePoint and the new Reporting Services ad hoc interactive report designer, which runs on PowerPivot or Analysis Services tabular model databases.
The following requirements are necessary to run PowerPivot for SharePoint 2013:
SQL Server 2012 SP1 CTP3. To use the new Microsoft Excel Services advanced data models feature, an instance of SQL Server 2012 SP1 CTP3 Analysis Services must be installed in SharePoint Deployment mode.
Excel Services and SQL Server Analysis Services (SSAS) server. Excel Services must be configured on a farm that has at least one SSAS server in SharePoint mode and must be registered in the Excel Services configuration. If using multiple SSAS servers, all SSAS servers must be running SQL Server 2012 SP1 CTP3.
Secure Store. Must be configured on the farm in order to configure scheduled data refreshes of PowerPivot workbooks.
Note
PowerPivot for SharePoint 2013 must be installed from either SQL Server SP1 CTP3 setup or from the SQL Server 2012 SP1 Feature Pack (http://www.microsoft.com/en-us/download/details.aspx?id=35580). If your organization is not planning to immediately use PowerPivot for SharePoint, it is still recommended to set up the servers for PowerPivot if the organization would like to use PowerPivot in the future. This will eliminate difficulties with post-implementation. The primary MSDN documentation for installing and configuring PowerPivot for SharePoint 2013 may be found at http://msdn.microsoft.com/en-us/library/jj218792.aspx.
The following requirements are necessary to run Power View, start Report Builder from SharePoint, and view SQL Reporting Services reports on SharePoint 2013:
SQL Server 2012 SP1 CTP3. An instance of SQL Server 2012 SP1 CTP3 is required in order to start Report Builder from SharePoint and for viewing Reporting Services reports from SharePoint Server 2013.
SSAS server. To view Power View from Microsoft Excel worksheets in SharePoint, Excel Services must be configured and at least one SSAS server in SharePoint mode must be registered in Excel Services.
The requirements are as follows for Excel Services in advanced scenarios:
SSAS server. At least one SSAS server must be registered in Excel Services in order to use Excel Services with advanced data models.
Secure Store Service. Must be configured in the farm in order to store encrypted credentials for data refresh scenarios or if you want to use the Excel Services unattended service account.
The requirements are as follows for PPS:
ADOMD.NET V10. The Microsoft ADOMD.NET client library must be installed so PerformancePoint can connect to any SSAS data source.
Secure Store Service. Must be configured in the farm in order to store encrypted credentials for data refresh scenarios or if you want to use the PPS unattended service account.
Kerberos. If you want to delegate user credentials to an external data source for data refresh scenarios, the Kerberos constrained delegation must be configured.
The requirements are as follows for Visio Services:
Secure Store Service. Must be configured in the farm in order to store encrypted credentials for data refresh scenarios or if you want to use the Visio Services unattended service account.
Kerberos. If you want to delegate user credentials to an external data source for data refresh scenarios the Kerberos constrained delegation must be configured.
SharePoint 2013 business intelligence applications provide the ability to create powerful data mashups, data models, ad-hoc reporting, and sophisticated dashboards capable of integrating reports and metrics from multiple data sources that can be customized for difference audiences. The BI tools available in SharePoint Server 2013 include Excel Services, PPS, and Visio Services.
Excel business intelligence provides the capability to explore and analyze data of any size and integrate and show interactive solutions of the data. In SharePoint 2013, Excel Services BI offers the following new features:
Power View (“Crescent”) add-in for Excel. Powered by the BI Semantic Model and IMBI, Power View enables users to visualize and interact with modeled data by using interactive visualizations, animations, and smart querying. Rich storyboard presentation capabilities provide the user the ability to present and share insights with others.
Decoupled PivotChart and PivotTable reports. Enables users to create PivotChart reports without the need to include a PivotTable report on the same page.
In-Memory BI Engine (IMBI). Also known as Vertipaq Engine, IMBI is a fully integrated feature in Excel that allows almost instant analysis of millions of rows of data.
Excel Services, introduced in Microsoft Office SharePoint Server (MOSS) 2007, is a business intelligence tool that allows the sharing of data-connected workbooks and is used primarily for business intelligence scenarios. In SharePoint 2013, Excel Services is a shared service and is only available in the Enterprise edition of SharePoint. Excel 2013 workbooks can be connected to external data sources and then published to a SharePoint library so the workbooks can be rendered through the browser. The workbook is rendered through the browser via Excel Services and the external data connection is maintained and the data is refreshed when necessary. The published workbooks allow broad sharing of reports through the organization and can be managed and secured according to the organizational needs.
Excel Services consists of the following:
Excel Calculation Services. Used to load, calculate, and call custom code (user-defined), and refreshes the data.
Excel Web Access Web Part. Web part used to display Excel workbooks through the browser.
Excel Web Services. Used for programmatic access.
Excel Services has come a long way from when it started. The improvements in SharePoint 2010 included better handling of unsupported features. Some of the unsupported features include Microsoft Visual Basic for Applications (VBA) macros and form controls will not load in Excel Services. In MOSS 2007, Excel Services would not open a file that contained an unsupported feature. This improved with the updates to Excel Services in SharePoint 2010 and with each release, the functionality gap between Excel and Excel Services becomes narrower and the number of unsupported features gets reduced.
The new features in Excel Services for business intelligence include the following:
Business Intelligence Center update. Improvements to the Business Intelligence Center Site template include a new look and easier use.
Improved data exploration. Using SSAS data and PowerPivot data makes it easier for data exploration and data analysis.
Field list/field well support. Enables the ability to change easily which items are displayed in rows, columns, values, and filters in PivotChart and PivotTable reports that have been published to Excel Services.
Calculated measures and members. Support for calculated measures and calculated members created in Excel.
Enhanced timeline controls. Support for timeline controls that render and behave the same as in the Excel client.
Application business intelligence servers. Allows the support of more advanced analytic capabilities in Excel Services by allowing administrators to specify SSAS servers.
PPS is a service application in SharePoint 2013 that enables users to create rich interactive, context-driven business intelligence dashboards that aggregate data and content. These dashboards can display key performance indicators (KPIs) and data visualizations in the form of scorecards, reports, and filters. PPS allows for robust security to the user and can integrate with multidimensional data sources.
PPS in SharePoint 2013 has the following new features and improvements:
Business Intelligence Center update. Cleaner and easier to use, with folders and libraries configured for each use.
Dashboard migration. Enables the ability to copy complete dashboards and dependencies to other site collections, users, or servers. Single items can be migrated to other environments and content can be migrated with Windows PowerShell.
Filter enhancements and filter search. Improved UI allows users to view and manage filters easily. Items can be searched within filters without navigating through the tree.
Support for Analysis Services effective user. Eliminates the need for Kerberos delegation when per-user authentication is used for Analysis Services data sources.
iPad support. PerformancePoint dashboards can now be viewed and interacted with on iPads through the Safari browser.
Visio Services enables users to share and view Visio diagrams through a web browser and mobile devices without the need for Visio or Visio Viewer. The Visio-rendered diagrams are rendered within a Visio Web Access Web Part. Visio Services enables published diagrams to refresh connections to various data sources and update the visuals of the Visio diagram.
The improvements to Visio Services in SharePoint 2013 include the following:
New file format. Visio 2013 introduces a new file format (.vsdx) that replaces the Visio binary (.vsd) and Visio XML Drawing (.vdx) file format. This new file format is supported in Visio Services and eliminates the need to convert the file before publishing to a SharePoint site.
Comments on diagrams. Comments can be added to diagrams and associated with specific shapes to a diagram when in Full-Screen mode. Where are the comments stored? The comments on the diagrams are not attached to the metadata as most would expect—they are actually embedded in the document.
Business Connectivity Services (BCS) support. Visio shapes can now be connected to data contained in external lists.
Maximum cache size parameter. Central Administration now contains a new service parameter for the maximum cache size located in the Visio Graphics Service Application Global Settings. The value can be set between 100 MB and up to 1,024,000 MB, and the default value set is 5,120 MB.
Updated Windows PowerShell Set-SPVisioPerformance cmdlet. This cmdlet has been updated to include the new maximum cache size parameter.
New Health Analyzer rules. New Health Analyzer rules have been added to reflect the new maximum cache size parameter.
Before Excel Services can be used on your SharePoint farm, Excel Services must be enabled by creating an Excel Services service application from Central Administration. This section walks through the steps to set up and deploy Excel Services for your SharePoint farm.
Before configuring Excel Services, the following prerequisites are required:
SharePoint 2013 Enterprise edition. Required to run Excel Services.
Domain account. Required to run the Excel Services application pool. It is recommended that you use a separate domain account when running the Excel Services application pool. This account does not require any specific domain privileges.
Farm Administrators group permissions. You must be a member of the Farm Administrators group to perform the configuration and setup of Excel Services.
Excel Services uses an application pool account to run Excel Services. Once a domain account is created, before it can be used as an account to run an application pool, it must first be registered as a managed account in SharePoint.
Note
Using a separate domain account for the Excel Services application pool is recommended for better security. Have your domain administrator create a domain account for Excel Services. As mentioned earlier, this account does not require any specific domain privileges.
Registering the managed account To register the managed account in SharePoint Server, follow these steps:
From Central Administration, click Security, located in the left navigation.
Under General Settings, click Configure Managed Accounts | Register Managed Account.
Type the user name and password of the preferred domain account, and then click OK.
Note
Optionally, you can select Enable Automatic Password Change if you want SharePoint Server to manage password changes for the domain account that is being registered.
Granting the managed account access to the content database The managed account used to run the Excel Services application pool must also be granted access to the SharePoint content database. Use the following Windows PowerShell steps to grant access to the managed account:
On the Application Server, click Start | All Programs | Microsoft SharePoint 2013 Products.
Right-click SharePoint 2013 Management Shell, and then click Run As Administrator.
Type the following in to the Windows PowerShell command prompt:
$webApp = Get-SPWebApplication –Identity http://<WebApplicationURL>
$webApp.GrantAccessToProcessIdentity("<Domain><Username>")
The Excel Calculation Services service must be started on at least one application server in the farm in order to use Excel Services.
To start an Excel Calculation Services service, follow these steps:
From Central Administration, click Manage Services on a server located in the System Settings group.
Select the desired server you want to start the service on by selecting Change Server from the Server drop-down list.
Click Start next to Excel Calculation Services.
Once the application pool account has been granted access to the content database, follow these steps to create an Excel Services service application:
Navigate back to the Manage Services application in Central Administration.
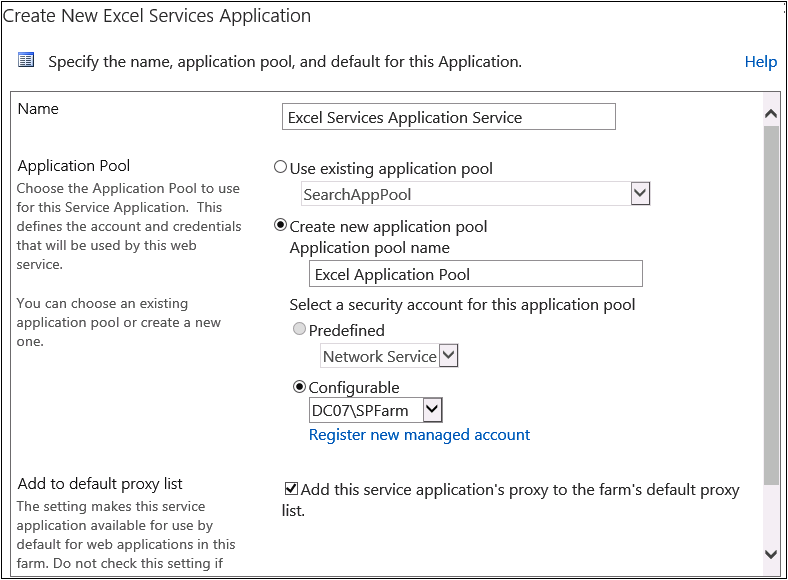
Click New, and then Excel Services Application. The Create New Excel Services Application window appears, as shown here.
Select an existing application pool or create a new one.
To create a new one, select the Create New Application Pool option and type in the Application pool name. Select the Configurable option, and select the account to be used to run the application service. It is recommended to create a new application pool for the Excel Services Application.
Click OK.
Retrieving data from a data source requires a user to be authenticated by the data source before the user is provided authorized access to the data. In the case of a workbook, Excel Services authenticates to the data source connected to the workbook on behalf of the user viewing the file. Excel Services supports connections with SQL Server databases, SSAS, and custom Object Linking and Embedding Database (OLE DB) or Open Database Connectivity (ODBC) providers.
The authentication method used with Excel Services to retrieve data depends on the type of the underlying data source. Table 14-1 lists the Excel Services data source options and their associated authentication methods.
Table 14-1. Excel Services data source options and supported authentication methods
Data source | Authentication method |
SQL Server databases | Windows authentication (integrated security) using:
|
SSAS | Windows authentication (integrated security) using:
|
Custom OLE DB or ODBC data providers | Varies based on the data source, but typically uses a connection string that stores the user name and password. |
Excel Services does not support connecting to the following data sources:
Access databases
Text files
Web content
Windows Azure
XML data
Excel Services can connect to various data sources by using a specific data provider for each data source. As a security measure, before using the data providers, Excel Services must explicitly trust data providers. Trusted data providers can be configured for Excel Services, which is covered later in this chapter in the section, “Managing Excel Services.”
Excel workbooks allow the following two kinds of connections:
Embedded connections
Stored as part of the Excel Services workbook.
Used in scenarios when you need a data connection that will not be widely used.
Linked connections
Stored externally to a workbook in Office Data Connection (ODC) files. A workbook must reference an .odc file stored in the same farm as the workbook in a trusted data connection library. Trusted data connection libraries are covered later in this chapter in the section, “Managing Excel Services.”
Most useful in scenarios when the connections will be shared across many users and when control by an administrator for the connection is important. Use in scenarios when you must have a data connection to an enterprise-scale data source.
The two data connection options are compared in Table 14-2.
Table 14-2. Excel Services data connection comparison
Connection type | Advantages | Disadvantages |
Embedded connections | Connection information is stored in the workbook. Little administration required. Easy to create. | If data connection details change for the data source, all workbooks with embedded connections must be updated and republished. More difficult for administrators to audit. |
Linked connections (ODC files) | Connections can be centrally stored, managed, audited, shared, and accessed using a data connection library. Workbook authors can use existing connections. If the data connection details change, the administrator needs to update the connection only in the one ODC file. All workbooks will use the updated connection information when refresh occurs. | May require help from a SharePoint administrator to share, manage, and secure the linked connection. Linked connections are stored in clear text, so extra care must be taken to help secure these files because they may include database passwords. |
The options for managing the Excel Services Application Service settings are shown in Figure 14-1 and include the following:

Figure 14-1. The service settings for the Excel Services Application are changed in Central Administration.
Global Settings. Defines the load balancing, memory, and throttling thresholds. Also includes the option for setting the unattended service account and data connection timeouts.
Trusted File Locations. Defines where the spreadsheets can be loaded from in SharePoint.
Trusted Data Providers. Adds or removes data providers that can be used when data connections are refreshed.
Trusted Data Connection Libraries. Defines the SharePoint document library where data connections will be stored and loaded from.
User-Defined Function Assemblies. Settings for registering managed code assemblies that can be used by Excel spreadsheets.
Data Model Settings. Registers SSAS servers that Excel Services can use for advanced data analysis functionality.
The global settings for managing workbooks includes settings for external data connections, load balancing, session management, memory utilization, workbook caches, and security.
Follow these steps to edit the Excel Services global settings:
From Central Administration, click Manage Service Applications in the Application Management group, and then click the Excel Services service application that you want to configure.
From the Manage Excel Services page, click the Global Settings link.
Update the desired settings and then click OK.
A trusted file location is a SharePoint server location, a network file share (UNC path), or a web folder address that enables workbooks to be loaded from it and is required because Excel Services loads workbooks only from trusted file locations. By default, Excel Services automatically creates a trusted file location (http://) that trusts the entire SharePoint farm and enables any file to be loaded from the SharePoint farm. Administrators can define new trusted file locations as needed to tighten security and expand workbook capabilities.
Adding trusted file locations Follow these steps to add a trusted file location in Excel Services. To perform these steps, you must be a member of the Farm Administrators group or an administrator of the Excel Services service application that you are configuring.
From Central Administration, click Manage Service Applications in the Application Management group, and then click the Excel Services service application that you want to configure.
Click the Trusted File Locations link and then Add Trusted File Location.
Continue to Configure A Trusted File Location to configure the settings.
Configuring trusted file locations Follow these steps to configure the trusted file locations. (If you are already in the trusted file location that you want to edit, continue to step 3.)
From Central Administration, click Manage Service Applications in the Application Management group, and then click the Excel Services service application that you want to configure.
Click the Trusted File Locations link, and then, in the Address column, click the file location that you want to configure.
Configure the settings as described in Table 14-3 and then click OK when finished.
Table 14-3. Trusted file location setting options
Option | Description |
Address | Location of the Excel documents that you want Excel Services to trust. |
Location Type | Select Microsoft SharePoint Foundation if the document library is stored in the SharePoint 2013 content database. Select UNC if the document library is stored in a network file share. Select HTTP if the document library is stored in a web folder address. |
Trust Children | Select Children Trusted if you want to trust all child libraries or directories. |
Description | Text description of the file location that you specified. |
Session Timeout | Value in seconds that an Excel Calculation Services session can stay open and inactive before it is shut down, as measured from the end of each open request. The default is 450 seconds. |
Short Session Timeout | Value in seconds that an Excel Services session stays open and inactive, before any user interaction, before it is shut down. This is measured from the end of the original open request. The default is 450 seconds. |
New Workbook Session Timeout | Value in seconds that an Excel Calculation Services session for a new workbook stays open and inactive before it is shut down, as measured from the end of each request. The default value is 1,800 seconds (30 minutes). |
Maximum Request Duration | Value in seconds for the maximum duration of a single request in a session. The default is 300 seconds. |
Maximum Chart Render Duration | Value in seconds for the maximum time that is spent rendering any single chart. The default is 3 seconds. |
Maximum Workbook Size | Value in megabytes for the maximum size of workbooks that Excel Calculation Services can open. The default size is 10 MB. |
Maximum Chart Or Image Size | Value in megabytes for the maximum size of charts or images that Excel Calculation Services can open. The default size is 1 MB. |
Volatile Function Cache Lifetime | Value in seconds that a computed value for a volatile function is cached for automatic recalculations. The default is 300 seconds. |
Select File to perform calculations as specified in the file. Select Manual if you want recalculation to occur only when a Calculate request is received. Select Automatic if you want any change to a value to cause the recalculation of all other values that depend on that value. Also, volatile functions are called if their time-out has expired. Select Automatic Except Data Tables if you want any change to a value to cause the recalculations of all other values dependent on that value (the values cannot be in a data table). Also, volatile functions are called if their time-out has expired. | |
Allow External Data | Select None to disable all external data connections for the trusted file location. Select Trusted Data Connection Libraries only to enable using connections to data sources that are stored in a trusted data connection library. The server will ignore settings embedded in the worksheet. Select Trusted Data Connection Libraries and embedded to enable connections that are embedded in the workbook file or connections that are stored in a trusted data connection library. If you do not have to have tight control or restrictions on the data connections that are used by workbooks on the server, consider selecting this option. |
Warn On Refresh | Select the Refresh Warning Enabled check box to display a warning before refreshing external data for files in this location. This option will make sure that external data is not automatically refreshed without user interaction. |
Display Granular External Data Errors | Select the Granular External Data Errors check box to display specific error messages when external data failures occur for files in this location. Displaying specific error messages can help troubleshoot data connectivity issues if they occur. |
Stop When Refresh On Open Fails | Select the Stopping Open Enabled check box to prevent users from viewing files that are configured to refresh on open, if the refresh fails. This prevents users from seeing cached information in the workbook. This option is effective only if the user does not have Open Item permissions on the workbook. (A user with Open Item permissions on the workbook can open the workbook in Excel and thus has access to any cached information.) |
External Cache Lifetime (Automatic Refresh) | In the Automatic Refresh (periodic/on-open) box, type a value in seconds for the maximum time that the system can use external data query results for automatically refreshed external query results. The default is 300 seconds. |
External Cache Lifetime (Manual Refresh) | In the Manual Refresh box, type a value in seconds for the maximum time that the system can use external data query results for automatically refreshed external query results. To prevent data refresh after the first query, type -1. The default is 300 seconds. |
Type a value for the maximum number of queries that can run at the same time during a single session. The default is 5 queries. | |
Allow External Data Using REST | Select the Data Refresh From REST Enabled check box to use all requests from the REST application programming interface (API) to refresh external data connections. Note this setting has no effect if Allow External Data is set to None. Also, this setting has no effect if Warn On Refresh is enabled. |
Allow User-Defined Functions | Select User-defined Functions Allowed to allow user-defined functions in Excel Calculation Services for workbooks from this location. See the “User-defined function assemblies” section, later in this chapter, for more details on user-defined functions. |
Deleting trusted file locations Follow these steps to delete a trusted file location in Excel Services:
From Central Administration, click Manage Service Applications in the Application Management group, and then click the Excel Services service application that you want to configure.
Click the Trusted File Locations link.
Point to the trusted file location you want to delete, click the arrow that appears, and then click Delete.
Click OK in the Delete Confirmation message box.
As mentioned earlier in this chapter, trusted data providers are part of a security measure because Excel Services must explicitly trust data providers before they can be used. Trusted data providers can be configured for Excel Services through Central Administration.
Adding a trusted data provider Follow these steps to add a trusted data provider in Excel Services:
From Central Administration, click Manage Service Applications in the Application Management group, and then click the Excel Services service application that you want to configure.
Click the Trusted Data Providers link and then click Add Trusted Data Provider.
The Excel Services Application Add Trusted Data Provider window opens, as shown here.
Type the Provider ID in the Provider section (for example, SQL Server).
Select the Provider Type to be one of the following:
OLE DB. Object Linking and Embedding (OLE) provider type
ODBC. Open Access Connectivity
ODBC DSN. Open Database Connectivity (ODBC) with Data Source Name
Type in Description (optional), and then click OK.

Configuring a trusted data provider Use the following steps to configure an existing trusted data provider in Excel Services:
From Central Administration, click Manage Service Applications in the Application Management group, and then click the Excel Services service application that you want to configure.
Click the Trusted Data Providers link, and then click Edit on the menu of the data provider that you want to configure.
Deleting a trusted data provider Use the following steps to delete an existing trusted data provider in Excel Services:
From Central Administration, click Manage Service Applications in the Application Management group, and then click the Excel Services service application that you want to configure.
Click the Trusted Data Providers link, and then click Delete on the menu of the data provider that you want to delete.
Click OK in the Delete Confirmation message box.
Excel Services provides the ability to connect to external data sources and uses data connection files that are stored in a trusted data connection library. Follow the steps in this section to add and configure a trusted data connection library.
Adding a trusted data connection library Follow these steps to add a trusted data connection library in Excel Services:
From Central Administration, click Manage Service Applications in the Application Management group, and then click the Excel Services service application that you want to configure.
Click the Trusted Data Connection Libraries link, and then click Add Trusted Data Connection Library.
Type in the address of the trusted data connection library in the Location section and input a Description (optional), as shown here.
Click OK.

Configuring a trusted data connection library Follow these steps to update the configuration of an existing trusted data connection library in Excel Services:
From Central Administration, click Manage Service Applications in the Application Management group, and then click the Excel Services service application that you want to configure.
Click the Trusted Data Connection Libraries link.
Click the data connection library that you want to configure or point to the name and click the arrow that appears, and then click Edit.
Modify the settings and then click OK.
Deleting a trusted data connection library Follow these steps to delete an existing trusted data connection library in Excel Services:
From Central Administration, click Manage Service Applications in the Application Management group, and then click the Excel Services service application that you want to configure.
Click the Trusted Data Connection Libraries link. Point to the data connection library that you want to delete, click the arrow that appears, and then click Delete.
Click OK in the Delete Confirmation message box.
User-defined functions in Excel Services is supported if your deployment scenarios include workbooks that contain user-defined functions to extend the capabilities of Excel Calculation Services. In order to use user-defined functions, you must register the user-defined function assemblies on the Excel Services user-defined function assemblies list. This section provides the steps to register your user-defined function assemblies.
Note
Before registering, user-defined function assemblies must be enabled on trusted file locations that contain workbooks that require access to user-defined functions. This setting is set in the global settings, which is discussed in the section, “Trusted file locations,” earlier in this chapter.
Adding a user-defined function assembly Follow these steps to add a user-defined function assembly in Excel Services:
From Central Administration, click Manage Service Applications in the Application Management group, and then click the Excel Services service application that you want to configure.
Click the User-Defined Function Assemblies link, and then click Add User-Defined Function Assembly.
In the Assembly section, shown here, type in the Assembly box the assembly name or full path of an assembly that contains the user-defined functions.
For Assembly Location, select one of the following options:
Global Assembly Cache. The global assembly cache (GAC) is the global place where signed assemblies can be deployed and run with full trust by default.
File Path. A local or network file location.
In the Enable Assembly section, select the Assembly Enabled check box to enable Excel Services to call the assembly. You can also clear this check box to disable the assembly without removing the function from the list.
Click OK.

Editing a user-defined function assembly Follow these steps to edit an existing user-defined function assembly in Excel Services:
From Central Administration, click Manage Service Applications in the Application Management group, and then click the Excel Services service application that you want to configure.
Click the User-Defined Function Assemblies link, point to the user-defined function assembly that you want to edit, click the arrow that appears, and then click Edit.
Update the assembly details, and then click OK.
Deleting a user-defined function assembly Follow these steps to unregister (delete) a user-defined function assembly in Excel Services:
From Central Administration, click Manage Service Applications in the Application Management group, and then click the Excel Services service application that you want to configure.
Click the User-Defined Function Assemblies link, point to the user-defined function assembly that you want to delete, click the arrow that appears, and then click Delete.
Click OK in the Delete Confirmation message box.
The data model settings in Excel Services are used to register one or more instances of SSAS. It can be used in Excel Services for processing data models created in Excel 2013 to perform advanced data analysis calculations. SSAS provides the back-end service for Excel Services to load, query, and refresh the data models so that users can interact with the workbook through SharePoint.
When multiple tables in the same import operation in Excel are selected, Excel Services will automatically create the data models. SSAS is required if you want to build workbooks that store imported data in multiple tables and interact with this data through SharePoint.
In order to use SSAS with SharePoint, SSAS must be on the same network and domain as the SharePoint farm, and SSAS must be installed and managed using the SQL Server installation and media tools. After SSAS is installed, the only additional configuration required is to configure Excel Services to point to the SSAS server instance.
Multiple instances of SSAS can be specified in Excel Services, which then makes the data models stream to the instances in a round-robin fashion for load balancing. Additional SSAS servers are used for greater capacity when the resource usage is excessive on the SSAS server or SharePoint becomes slow in the browser when working with the data models.
Registering SSAS with Excel Services To register an SSAS server to Excel Services, follow these steps:
From Central Administration, click Manage Service Applications in the Application Management group, and then click the Excel Services service application that you want to configure.
Click the Data Model Settings link.
Click Add Server, and then type in the instance of the SSAS server in the Server Name and the Description (optional), as shown here.
Click OK.

Editing SSAS details Follow these steps to edit the details of registered SSAS servers in Excel Services:
From Central Administration, click Manage Service Applications in the Application Management group, and then click the Excel Services service application that you want to configure.
Click the Data Model Settings link.
Pause the mouse over the server that you want to edit, click the arrow that appears, and then click Edit.
Update the Server Name and Description as needed, then click OK.
Deleting SSAS in Excel Services Follow these steps to remove an instance of SSAS servers from Excel Services:
From Central Administration, click Manage Service Applications in the Application Management group, and then click the Excel Services service application that you want to configure.
Click the Data Model Settings link.
Pause the mouse over the server that you want to unregister, click the arrow that appears, and then click Delete.
Click OK in the Delete Confirmation message box.
This section describes the steps to create and configure a PPS service application. The steps are listed in order to configure PPS properly for SharePoint.
For PPS to work properly, it is important to configure it following all required installs and configuration settings.
ADOMD.NET is a Microsoft .NET Framework object model used to enable client-side applications to access data stored in SSAS. The PerformancePoint Dashboard Designer uses ADOMD.NET to browse and query data in SSAS, so ADOMD.NET must be installed. The stand-alone package installation instructions are available for download from the Microsoft website located at http://www.microsoft.com/en-us/download/details.aspx?id=16978. Download and follow the instructions provided to install ADOMD.NET to your environment before moving on to the next steps.
To run the PerformancePoint Services service application, the application pool account requires a managed account, which is typically an Active Directory account. This account must have access to the PerformancePoint data content databases.
Registering the managed account To register the managed account in SharePoint Server, follow these steps, which are the same as the steps you followed for Excel Services:
From Central Administration, click Security, located in the left navigation.
Under General Settings, click Configure Managed Accounts, and then click Register Managed Account.
Type the user name and password of the preferred domain account and then click OK.
Note
Optionally, you can select Enable Automatic Password Change if you want SharePoint Server to manage password changes for the domain account that is being registered.
Granting the managed account access to the content database The managed account used to run the PPS application pool must also be granted access to the content databases where the PerformancePoint data will be stored. Use the following Windows PowerShell steps to grant access to the managed account for each web application that contains a content database where PerformancePoint Services data will reside:
On the Application Server, click Start | All Programs | Microsoft SharePoint 2013 Products, right-click SharePoint 2013 Management Shell, and then click Run As Administrator.
Type the following into the Windows PowerShell command prompt:
$webApp = Get-SPWebApplication –Identity http://<WebApplicationURL>
$webApp.GrantAccessToProcessIdentity("<Domain><Username>")
Once the application pool account has been granted access to the content database, you can proceed to start PPS on the application server where you want PPS to run. For better performance, you can start the service on multiple application servers. It is not required to start the PPS service on all application servers; however, it is required to be started on at least one application server.
Follow these steps to start PPS:
From Central Administration, click Manage Services on a server located in the System Settings group.
Select the desired server that you want to start the service on by clicking the Server drop-down list and then click Change Server.
Click Start next to PerformancePoint Services.
Follow these steps to create a PPS service application:
Navigate back to the Manage Service Applications in Central Administration.
Click New, then PerformancePoint Services Application.
Type in the Name and select the box for Add This Service Application’s Proxy To The Farm’s Default Proxy List.
Update the Database Name (optional).
Select an existing application pool or create a new one.
To create a new one, select the Create New Application Pool option and type in the Application Pool name. Select the Configurable option and select the account to be used to run the application service.
Click Create.
Once the PPS application is created, a module window will pop up with the information regarding the service application. If you have not installed PowerPivot, you will receive the message shown in Figure 14-2.

Figure 14-2. A New PerformancePoint Service Application summary appears once the PPS application is created.
The PPS service application proxy must be associated with the default web application in order for PPS to function. If you did not select the Add This Service Application’s Proxy To The Farm’s Default Proxy List option in the previous steps, then you can confirm that the association is configured between the web application and the PPS application proxy by following these steps:
From Central Administration, click Application Management.
Click Configure Service Applications Associations, located in the Service Applications section.
Under the Application Proxy Group column, click Default and ensure that the PerformancePoint Services box is selected. Click the box if it is not selected, then click OK.
PPS objects are made available for others to use on any site within the site collection after the feature is enabled on a site collection. Administrators can limit the PPS features that use trusted locations by allowing one or more sites, document libraries, or lists rather than allowing the entire site collection.
Specified locations can be set where dashboard content and data sources are secured for PPS. The default is to trust all locations; however, the following other trusted locations can be specified by the administrator:
PerformancePoint content list. Stores the elements used to construct a PerformancePoint dashboard.
PerformancePoint data source library. Contains data-source definitions that identify a source of business data. May include cubes or perspectives based on online analytical processing (OLAP) cubes, relational databases, Excel Services worksheets, or Comma-separated values (CSV) files.
Trusted data sources and trusted content locations. Both have two options, which are All SharePoint Locations or Only Specific Locations. When Only Specific Locations is selected, the list of trusted locations is enabled.
Follow these steps to add a trusted data source location:
From Central Administration, click Manage Service Applications in the Application Management group, and then click the PerformancePoint Services service application that you want to configure.
Click Trusted Data Source Locations, then select either All SharePoint Locations or Only Specific Locations (Current Setting), as shown here.
If Only Specific Locations (Current Setting) was selected, the Add Trusted Data Source Location window appears.
Click Add Trusted Data Source Location and specify the URL and Location, as shown here.
Enter the full web address (site collection, site, or document library).
Select Location Type, type a Description (optional), and then click OK.


Follow these steps to add a trusted content location:
From Central Administration, click Manage Service Applications in the Application Management group, and then click the PerformancePoint Services service application that you want to configure.
Click Trusted Content Locations, then select All SharePoint Locations or Only Specific Locations.
If Only Specific Locations was selected, the Add Trusted Data Source Location window appears.
Click Add Trusted Data Source Location and specify the URL and Location.
Enter the full web address (site collection, site, list address).
Select Location Type, type a Description (optional), and click OK.
This section provides the steps to create and configure Visio Graphics Service service applications for SharePoint Server 2013 through Central Administration.
Follow these steps to create a Visio Graphics Service service application:
From Central Administration, click Managed Services on a server located in the System Settings group.
On the ribbon, click New, then click Visio Graphics Service.
Input the name for the new Visio Graphics Service service application.
Choose an existing application pool or create a new one.
To create a new one, select the Create New Application Pool option and type in the Application Pool name. Select the Configurable option and select the account to be used to run the application service.
Leave the Create A Visio Graphics Service Application Proxy and add it to the default proxy group box checked.
Click OK.
The global settings for a Visio Graphics Service include managing settings for performance, security, and refreshing data connections.
Follow these steps to configure the Visio Graphics Service global settings:
From Central Administration, click Manage Service Applications in the Application Management group, and then click the Visio Graphics Service service application that you want to configure.
From the Manage Visio Services page, click the Global Settings link.
Configure the settings as described in Table 14-4 and click OK when finished.
Table 14-4. Visio Graphics global settings
Description
Maximum Diagram Size
Maximum size in megabytes of a diagram that can be rendered. If the server is under heavy load, a larger size limit may lead to slower performance and a smaller limit may prevent more complex diagrams from being rendered.
Valid values range from 1 to 50; default value is 25 MB.
Minimum Cache Age
Minimum number of minutes that a diagram is cached in memory. Smaller values increase CPU and memory usage on the server but allow more frequent data refresh operations for users.
Value is per user per diagram. Interval begins when a user views a diagram and the user cannot refresh the diagram until the interval expires. Interval begins for other users when they first view the diagram.
Applies to diagrams with data connections and diagrams with recalculations based on shape sheet functions. For Visio Web Parts, the automatic refresh setting is also constrained by this setting.
Valid values range from 0 to 34,560 minutes; default value is 5 minutes.
Number of minutes that pass before cached diagrams are purged. Larger values increase memory usage on the server but decrease file I/O and CPU load.
Valid values range from 0 to 34,560 minutes; default value is 60 minutes.
Maximum Recalc Duration
Number of seconds before data refresh operations time out. Longer timeouts will use more processing power but will allow for more complex data connected diagrams to be recalculated. This setting applies only to data connected diagrams.
Applies to diagrams with data connections and diagrams with recalculations based on shape sheet functions.
Valid values range from 10 to 120; default value is 60 seconds.
Maximum Cache Size
Maximum cache size in megabytes (between 100 and 1,024,000) that can be used. A larger size limit may lead to more disk resource usage by the service and a smaller limit may affect performance.
Valid values range from 100 to 1,024,000; default value is 5,120 MB.
External Data
The Target application ID in the registered Secure Store Service used to reference Unattended Service Account credentials. The Unattended Service Account is a single account that all documents can use to refresh data. Required when you connect to external data sources outside of SharePoint.
Settings to add or remove data providers can be used when refreshing data connections through a Visio Graphics Service. Follow these steps to create a trusted data provider for a Visio Graphics Service:
From Central Administration, click Manage Service Applications in the Application Management group, and then click the Visio Graphics Service service application that you want to configure.
From the Manage Visio Services page, click the Trusted Data Providers link.
Click Add A New Trusted Data Provider. The Add Trusted Data Provider window opens, as shown here.
Enter the values for the parameters as described in Table 14-5 and click OK.
Table 14-5. Trusted data provider parameters
Description
Trusted Data Provider ID
The data provider ID is the name of the driver that acts as the data provider. This ID must be the same ID used to reference the data provider in the connection string. The driver for the data provider must be installed on all application servers running the Visio Graphics Service.
Trusted Data Provider Type
The data provider type must be one of the following values:
1 - OLEDB
2 - SQL
3 - ODBC
4 - ODBC with DSN
5 - SharePoint Lists
6 - Custom Data Provider
Trusted Data Provider Description
Friendly name that appears in the Trusted Data Providers section.

The Business Intelligence Center provides a central location to store reports and dashboards. When Excel Services and PPS are enabled, a location to store reports and dashboard content will already exist.
Note
Before you can create and configure a Business Intelligence Center, a Secure Store Service must be configured first. Please see the article “Configure the Secure Store Service in SharePoint 2013,” located at http://technet.microsoft.com/en-us/library/ee806866.aspx.
A Business Intelligence Center is created by using the Business Intelligence Center enterprise template and creating a new site collection. To create a Business Intelligence Center, follow these steps:
From Central Administration, click the Application Management group, and then click Create Site Collections.
Input the Title, Description, and set the Web Site Address for the site collection.
Click the Enterprise tab located in the Template Selection section, and then click Business Intelligence Center.
Set the Primary Site Collection Administrator, and then click OK.
When the top-level site is successfully created, click OK.
Set the user permissions for the new site collection.
To set permissions for a Business Intelligence Center, follow these steps:
From the browser, open the newly created Business Intelligence site collection.
In the upper-right corner, click Settings | Site Settings, and then click Site Permissions.
On the ribbon, click Grant Permissions.
In the Share Central Administration Invite People To box, type the name of the account to which you want to assign permissions, and then click Show Options and select a group or permission level.
Click Share.
In this chapter, you learned what improvements were made to the business intelligence features in SharePoint Server 2013, along with the requirements for implementing BI for SharePoint Server 2013. Excel Services new features include the Power View, IMBI and decoupled PivotChart and PivotTable reports. Some of the new and improved features of PPS include dashboard migration, support for SSAS Effective User, and iPad support. You learned that Visio Services has a new file format, the ability to comment on diagrams, and also added BCS support for external lists. The Business Intelligence Center has also been updated in this release.
This next chapter will continue with a deeper dive into Excel Services and the ways to work with Excel Services and SQL Server 2012. Chapter 16 focuses on PPS, and in Chapter 17 you will take a more detailed look at Visio Services.