
MICROSOFT SharePoint has a long history of being a capable platform for hosting and managing business forms of all types. In the past, these forms fell largely into two categories: declarative (no code) and custom code. Depending on the specific requirements (or skills of the forms designer), SharePoint forms were generally created with Microsoft InfoPath, Microsoft SharePoint Designer, or Microsoft Visual Studio.
These options all still exist in SharePoint 2013, although SharePoint Designer is being deemphasized as a forms tool. InfoPath XML-based forms and Visual Studio 2012 custom forms are still fully supported as form design tools, and the integration they have had with SharePoint in the past is still available. For code-based solutions, your new form projects can piggyback on the support of HTML5 and .NET offered by SharePoint. Visual Studio 2012 is still the flagship tool for creating custom code forms, although with support for HTML5 and JavaScript, several new possibilities exist for responsive design, including TypeScript, jQuery libraries, and so on.
In addition to the aforementioned tools, SharePoint 2013 introduces one compelling, new option for no-code forms: Microsoft Access 2013 form apps. (We’ll discuss this more later in this chapter.)
Many factors go into the decision of which tool is best to create your forms with. Some of the factors are technical, some are business-oriented, and some are just pragmatic decisions based on what is possible.
Some of the strengths of InfoPath 2013 forms are:
Support for offline form-filling scenarios, where users are disconnected from the network
Deep integration with SharePoint libraries
Ability to customize SharePoint list forms
Options for rich-client or browser-based forms
Support for code-behind solutions using Visual Studio 2012
Some of the strengths of Access 2013 forms are:
Full support of the new app model
Integrated with the SharePoint app catalog
Form data is stored in Microsoft SQL Server
Inherits SharePoint site permissions and branding
Cross-browser and mobile support
Some of the advantages of custom code forms are:
Total control over the UI elements
Full support of the SharePoint app model
Ability to connect the form to all the various SharePoint application programming interfaces (APIs) and Web Services
Allows developers to publish their form to the public SharePoint store for customers to purchase it
Option to use a variety of industry-standard web-development tools
This chapter primarily focuses on the no-code solutions: InfoPath 2013 and Access 2013. A downloadable custom code example of the sample form written using HTML5 and JavaScript is available for download at www. .
Note
For more information on building custom code solutions, see Chapter 23.
InfoPath 2013 is a forms-creation and data-gathering tool that can help you streamline your business processes. It is a flexible, powerful, easy-to-use XML forms editor that’s part of the Microsoft Office Professional suite. InfoPath 2013 is well suited for almost anyone that needs to design and deploy form solutions—including information workers, IT pros, and developers. You can use InfoPath 2013 to design sophisticated forms that can quickly and accurately gather information that meet your organizational needs. Moreover, its deep integration with the SharePoint platform opens up a new world of possibilities for your electronic form requirements.
InfoPath empowers you to design and fill out electronic forms that are hosted on SharePoint, such as expense reports, event registrations, and other common business forms. When entering data in an InfoPath 2013 form, users are presented with familiar, document-like features. For example, they can change fonts, check spelling, or insert images into certain fields.
If you create your forms as browser-enabled form templates, users who do not have InfoPath installed on their computers can still work with the form in a browser. This lets you share business forms with a variety of users, including employees, customers, and vendors.
The forms that you design can range from simple forms for collecting data from a small group to complex forms that are integral components of a much larger business process. If you use SharePoint Server 2013 and SharePoint Designer, InfoPath 2013 forms can be used as part of a fully automated business process. This can include workflows, such as routing and notification based on information within the form. In addition, the data that users enter in your InfoPath forms does not have to remain sealed inside that form forever; it can be reused in a variety of ways within SharePoint.
InfoPath provides forms design capabilities that include sophisticated logic rules, conditional formatting, and data validation to information workers who may not be programmers. To benefit from these capabilities previously would have required a great deal of technical expertise. A large factor in the power of InfoPath is that the file format of the forms is XML, which provides many inherent benefits in terms of flexibility, power, and standardization. Fortunately, InfoPath forms designers are not required to know much about XML, XML schema definition (XSD) extensible stylesheet language transformations (XSLT), XSLT, and all the other technical details behind the scenes. The UI of InfoPath is essentially the same as the other Office 2013 products. If you are familiar with Microsoft Word, Microsoft Excel, or Access, you probably will feel right at home in InfoPath 2013.
Most InfoPath forms that you create will have several basic design concepts in common. The form design process typically begins with the following two tasks:
Building the visual aspects of the form by using tables, themes, and page designs
Adding the necessary controls to provide the functionality and data fields that your form requires
Depending on the complexity of the form, you might need to do much more than this, but typically, the creation of most InfoPath forms starts with layout and controls.
As previously mentioned, InfoPath uses XML for storing data and managing the schema of the form for you. Most of the tools that you will use to build the form have a direct correlation to the underlying XML. However, InfoPath removes the need for you to interact with all of the XML “plumbing” behind the scenes. For example, when you add a simple text control, InfoPath automatically generates an XML leaf node (the XML equivalent of an InfoPath field) in the underlying XML schema.
When you open InfoPath on your desktop, the design time visual layout tools that you will use most often can be found on the ribbon, as shown in Figure 21-1.

The following tabs on the ribbon are relevant to form layout:
Home. This is where you can find the basic text editing tools that you would find in a word processor. The functionality available on the Home tab is for controlling fonts—size, color, and so forth. These tools are fairly standard and work just as in the other Office products.
Insert. This is where you can find the prebuilt table styles. These tables can give your forms a consistent and professional layout.
Page Design. This is where you can find InfoPath’s predefined page layouts and color themes to quickly give your form a professional look and feel. The color themes are the same ones that are in SharePoint, so it’s easy to make your forms blend in nicely on a SharePoint site. Also, on the Page Design tab, you can work with Views and add headers/footers if necessary.
Layout. The tools on this tab (also known as the Table Tools tab) are used for modifying properties of the tables in your forms. Tables are the primary structural tool for organizing controls, labels, and images in your forms. This is also the location where you can use the Table Drawing tool if you don’t want to use any of the provided table styles.
There are multiple approaches to building InfoPath forms. The one that is most common is to simply begin with one of the built-in page layouts on the Page Design tab of the ribbon, add some tables and a color theme, and then begin adding data controls in order to complete the form’s functional requirements.
Along the way of the InfoPath form design process, there are many best practices. A few of the key ones will be highlighted in the next section as we dissect a completed form. If you require a comprehensive tutorial on InfoPath design, Microsoft Press and other publishers have entire books dedicated solely to InfoPath.
To illustrate the process of designing an InfoPath form, we will walk through the steps to create a sample Records Management Site Request form. This form uses several common InfoPath capabilities that are used when designing enterprise forms that are hosted on SharePoint. The purpose of this form is for employees of the Blue Yonder Airlines company to be able to submit a form to request that a SharePoint Records Management site be provisioned for them.
Note
The completed Records Management SharePoint Site Request form sample is available for download at: http://aka.ms/SP2013InsideOut/files.
The form itself is not complex; it really is just gathering some basic information via a series of questions. However, the way in which the form is designed takes advantage of InfoPath’s ability to provide business logic, rules, and conditional formatting—all without writing any code. The form is built in a wizard-like approach that walks the user through a series of screens. The functionality in InfoPath that allows this to happen is provided by views. After gathering the information from the user, the final screen of the form gives the user a summary of his or her answers.
When you download the Site Request form, you’ll notice that the file extension is .xsn. This indicates that the file is an InfoPath template. When you have the form downloaded to your system, you will need to find the file in Windows Explorer, then right-click the file and choose Design, as shown in Figure 21-2. This will open the form in InfoPath 2013 in Design mode. If you were to just double-click the file, the file would open in InfoPath in Filler mode, as if you wanted to submit a new form. However, our goal for now is to take a high-level look at how the form is put together.

In this section, you will learn about the design techniques used to build the Site Request form. The approach we will use is to look at the form’s views one at a time and point out the most important design considerations within each view.
When you open the form in Design mode, you should be taken to the first view of the form. To confirm this, you can select the Page Design tab on the ribbon. Once there, you will see a drop-down menu, as shown in Figure 21-3, that lets you navigate quickly between views while in Design mode.

Figure 21-3. The View drop-down menu on the Page Design tab lets you navigate quickly between views in Design mode.
Once you have confirmed that you are seeing the Home view, notice that this initial page of the form is actually quite simple. We are simply asking users to select what type of records they expect to keep in the new site they are requesting. If you look at the properties for the drop-down menu, as shown in Figure 21-4, you will see that they have six options to choose from.
In addition to a drop-down menu for the record type, the consumer of the form is given a text box in which they can type in some comments about the specifics of their request. After the user has performed these two tasks on the form, the only other item that’s of interest is the arrow graphic on the lower-right part of the Home view. This arrow is provided as a way to allow the user to navigate easily to the next screen (view) of the form. This is the first example in the form of using Rules to provide functionality in the form.

Note
The arrow graphic is a special type of control in InfoPath called a Picture button. Picture buttons allow the designer to associate logic and formatting rules with graphics and icons.
Click the arrow graphic so that it is the active selection on the design surface. Once you have done that, ensure that you choose the Home tab of the ribbon and select the Manage Rules button. As shown in Figure 21-5, this will open the Rules pane on the right side of the InfoPath Designer.
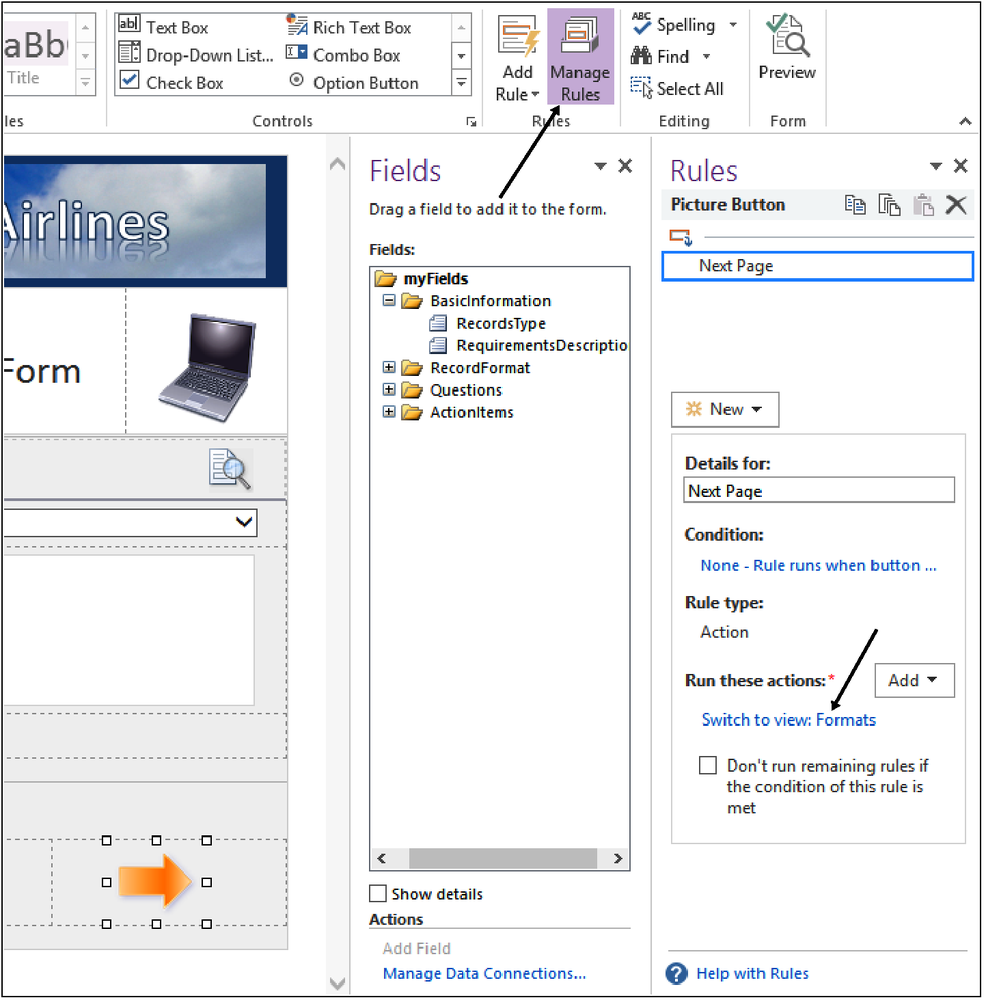
Figure 21-5. Select the Manage Rules button from the Home tab to open the Rules pane on the right side of the InfoPath Designer.
This particular rule is an Action rule —simple, but useful. The rule simply dictates that when the form user clicks the arrow, InfoPath should take the action of moving them to the next view they will be working with. In this case, clicking the arrow will take the form user to the Formats view.
To see this in action, press the F5 key while inside InfoPath Designer. This will put the form into Preview mode so that you can easily see what the user experience will be at run time. When you have the form opened in Preview mode, click the arrow and notice that you are taken forward to the next view in the form.
If you are not already back in the Designer, close out of Preview mode and, using the Page Design tab on the ribbon, navigate to the Formats view. One of the first things you’ll notice on the Formats view is that we now have two arrow graphics on the form. Each of these Picture buttons has an Action rule associated with it that allows the user to navigate to either the previous view or the next one.
The primary purpose of the Formats view is to have the user choose whether their records are digital, physical, or both. Each of the icons in the middle of the view is associated (via a rule) with a record format. As with the arrow graphic, if you make one of the graphics the active selection in the Designer and then look at the Rules pane, you will see the details of the rule.
As shown in Figure 21-6, you will be able to see the logic assigned to any particular picture button. Notice that the rule sets both the value of the respective format field and the value of the DisplayLabel field at the same time.

Use the F5 shortcut to enter Preview mode while in Formats view. This will allow you to see what this view would do for the form user in Run-time mode.
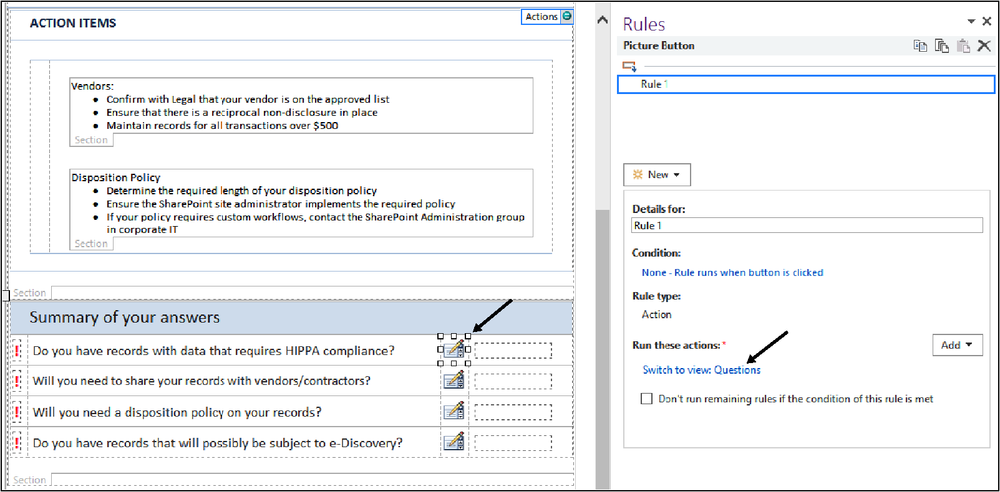
If you are not already back in the Designer, close out of Preview mode and, using the Page Design tab on the ribbon, navigate to the Questions view. This view asks the user some questions about the nature of their requirements and then displays appropriate information. The method that the form uses to do this is Formatting Rules. The formatting rules in this view are primarily to show or hide information depending on the user’s answers. As with the previous two views, the Questions view also makes use of picture buttons tied to Action rules, but in a slightly different and creative manner.
Use F5 to enter Preview mode so that you can understand what this view performs when a user is in Run-time mode. After you have familiarized yourself with the functionality of the Questions view, return to InfoPath Designer.
With the Questions view open in InfoPath Designer, click the Question Mark picture button, as shown in Figure 21-7.

Figure 21-7. When selected, the Question Mark picture button enables further explanatory text to be displayed.
Notice that once you select the Question Mark picture button, you will have a couple of items displayed in the Rules pane. There are two possible rules instantiated when the user clicks the button: a Show rule and a Hide rule. The purpose of the rules are to either show or hide the Help sections for each question. The Help section contains the actual help text. When the user clicks the question mark, the Show rule sets a Boolean field’s value to True. When they click it again, it sets the field’s value to False, as shown in Figure 21-8.

As you can see in Figure 21-9, each section also has a formatting rule that simply references its respective Boolean field to determine whether it should display the help text on the form.

To summarize, when clicked, the Question Mark picture button runs an Action rule that sets a Boolean field to True or False. The section containing the actual help text then references the hidden field via a conditional formatting rule to determine whether to show itself or not.
In addition to the Help sections, notice at the bottom of the form that additional Action Items informational sections will be displayed to the user depending upon his or her answers. In Figure 21-10, you can see that these Action Item sections will be shown or hidden using the same type of rules and logic as the above Help sections. Notice that the logic here tells the section that if the hidden Boolean field is not equal to True, hide the section.

If you are not already back in the Designer, close out of Preview mode and, using the Page Design tab on the ribbon, navigate to the Summary view. This view aggregates and displays information that has already been collected in previous views, as shown in Figure 21-11. It uses the same type of logic as the previous view did to determine whether to display any of the Action Items.

In Figure 21-12, you will see that the most interesting use of rules on this view is once again using a picture button with a Switch View Action rule in order to allow users to return to a previous view to edit their answers.
One major component is missing in the Site Request form that you will need to add to a form like this in the real world—a Submit button. If you want to have your users easily submit (save) the form to a SharePoint form library once they are done filling it out, the best practice would be to add a nice large SUBMIT THIS FORM button somewhere on the last view. In order to do this, you or your SharePoint administrator will need to create a SharePoint form library for your forms to be published to. And then you will need to add a button to your form that uses an InfoPath rule to submit to a data connection. In our case, the data connection would be a SharePoint library.
Note
If creating a SharePoint form library is unfamiliar to you, there is plenty of information online regarding SharePoint form libraries. Also, an entire chapter in Using InfoPath 2010 with SharePoint 2010 Step by Step (Microsoft Press; 2011) focuses on publishing and submitting InfoPath forms. The content is still relevant for the 2013 version of InfoPath, which has not changed much since the prior version.
In this section, you will learn about creating SharePoint forms by using Access 2013. You will be given a walkthrough of a Site Request form similar to the previous section, but this time built in Access and using the new SharePoint app model.
Access 2013 features a new application model that enables power users and developers alike to quickly create web-based form applications. Most Access databases need a good form in front of them, and fortunately Access 2013 includes a set of templates that you can use to jump-start creating your application. Taking a look at some of the example templates included with Access is a great way to understand how to build your own form app.
Note
To use Access 2013 forms, you must have Access Services enabled on your SharePoint farm. Access Services are part of SharePoint’s Enterprise features.
As mentioned in Chapter 5 when SharePoint 2013 hosts an Access app, SQL Server 2012 is used as its data storage technology. Therefore, Access 2013 significantly improves the manageability and scalability of Access form applications. Availability of Access Services with Office 365 and SQL Azure can significantly increase the reach of your Access forms.
Building an Access form like the InfoPath example shown in the previous section is similar in terms of effort. Replicating the basic functionality of the Site Request form can be accomplished without any code; however, from a design standpoint, Access 2013 is a different tool than InfoPath. Using some basic design tactics in the Access Designer, we can essentially replicate the form, but now you can also gain all the inherent advantages of a forms tool that conforms with the new app model.
Before we deconstruct the Site Request form built in Access, let’s cover a few basic Access forms design concepts.
Access forms also have the concept of views, much as InfoPath does.
Note
For more information, see the MSDN article “What’s New for Access 2013 developers,” at http://msdn.microsoft.com/en-us/library/office/jj250134.aspx#ac15_WhatsNew_Views.
Access automatically generates two views—List and Datasheet—for each table in your form. You can also create blank views if you prefer to start from scratch with your form views. Each view in an Access form automatically gets some useful built-in UI elements, such as the Action Bar, which that is common in each view and shown in Figure 21-13. The buttons, from left to right, perform the following actions:
Add a new record/form
Delete the current form
Edit the current form
Save your changes
Cancel your changes
If required for your form, you can add buttons that perform custom actions. You can also delete the default buttons, or hide the Action Bar altogether. In many cases, the default buttons provide the basic editing capabilities that Access form apps need.
There are two types of macros in Access forms: UI macros and Data macros. UI macros will be used extensively in most Access forms because they provide the intuitive navigation guidance of a well-designed form. UI macros perform actions such as navigating to another view or using logic to show or hide various controls. UI macros can be attached directly to objects, such as command buttons or combo boxes.
When you connect a UI macro to an object in the form, the macro is typically triggered by an event. The types of events supported by UI macros include:
On Click. Occurs when a control is selected via a mouse click.
On Load. When a view is first opened, On Load macros are instantiated.
On Current. When the user moves to a different record in a form view.
After Update. After you type data into a control or choose data from a control, this type of macro is triggered.
While UI macros focus on the elements that the form user interacts with, data macros provide the capability for implementing business rules at the data layer. Therefore, data macros can create, edit, and delete records.
In this section, we will explain the Access version of the Site Request form on a view-by-view basis. This will allow you to fully grasp the design principles at work within each page of the form.
Note
The completed sample form for the following walkthrough is available for download as an .app package at: www. . Before you can use the app, you (or your administrator) will need to add the .app package to your app catalog. Instructions to do that are at http://technet.microsoft.com/en-us/library/fp161234.aspx#AddApps. Once the app has been added to your app catalog, you need to then add the Records Management Request app to your site. Instructions on how to add an app to your site are located at http://technet.microsoft.com/en-us/library/fp161231.aspx.
After you have added the Site Request app to a site in which you are an owner, go ahead and use the Add button on the Action Bar of the form to add a few new records. While navigating through the form and its various views, you should begin to get an understanding of the user experience differences between an Access-based form and InfoPath. When you have created and saved a few new records, then use the Settings icon and choose Customize In Access, as shown in Figure 21-14. This will open Access 2013 and put you in Edit mode, which is similar to Design mode in InfoPath.

Once Access opens the form, ensure that you are in the Home view, as shown in Figure 21-15, and then click the Edit icon.

Now that you have entered Edit mode, we’ll take a look at a few of the highlights of this view so that you can understand how to design an elegant, easy-to-use form app using Access 2013.
When you previewed the form in your browser, you may have noticed that the Request Name field contained some text to help the form user. This is called an input hint. A best practice is not to use input hints on every field in your form, or else the user will learn to ignore them. But in a required field, such as Request Name, it makes sense to alert users to the fact that they must enter a value. As shown in Figure 21-16, you can see that there is a toolbar with three options on many of the controls in Access forms: Data, Formatting, and Actions. These will help you provide the functionality that each of the fields in your form may need. In the case of the Request Name field, we use the input hint under Formatting to provide the hint.

As users proceed in the Home view of the Site Request form, they are given a drop-down combo box from which to select the desired type of record. The items in the drop-down box can come from either a table in your Access database, or they can be entered manually into the table properties, as shown in Figure 21-17. To access the list of values for a combo box, select the Modify Lookups button on the ribbon.

Figure 21-17. The items in the drop-down field can come from a table in your Access database or they can be entered manually into the table properties.
Also on the Home view, there is an arrow graphic similar to the picture button on the InfoPath version of the form. This helps the user easily navigate through the various views of the form in a wizard-like manner, thus eliminating any potential confusion. If you select the Actions property of the arrow graphic, you will notice in Figure 21-18 that the On Click Macro button is green, indicating to the form designer that a macro has been assigned to this particular action.

When you select the On Click button, you will be taken into the Macro Designer in Access. As you can see in Figure 21-19, the action macro in this case performs two quite simple tasks. First, it saves the record when the user selects the arrow. This eliminates the need for the form to ask the user to save the changes before moving to the next view. The macro will perform the Save function immediately on behalf of the user when the user clicks the arrow. Second, the macro performs a ChangeView action to take the user to the Formats view when the arrow is clicked.

As the user progresses to the second view of the form (Formats), the form design approach selected on this view was to simply present the user a series of check box controls to select one or more record formats that will be stored in their SharePoint site. Each of the check boxes will store a Yes or No value as the user fills out this view. You can see in Figure 21-20 that the check boxes are connected to their respective fields in the database schema via the Data properties for each control.

Figure 21-20. The check boxes are connected to their respective fields in the database schema via the Data properties for each control.
One other design tactic worth noting on this view is that the entire view itself has a macro that is instantiated immediately when the view is opened by the form user. The purpose of this On Load macro is to ensure that the form is in Edit mode when the user is moved into the view. If we did not add this macro, the user would have to click the Edit button from the Action Bar—an unnecessary step.
In order to see a macro on a view when in Design mode, you need to click anywhere with some empty space (not on a control) in the view. As shown in Figure 21-21, this will enable the properties for the view. The macros again are under the Actions properties.

The Questions view, shown in Figure 21-22, is the third view that the user encounters when filling out our simple Site Request form. The purpose of this view is simply to ask the user four questions about the nature of their records content and display extra information about each selection the user makes.

Similar to the Formats view, the Question view of the form has a macro that runs when the form initially loads. The purpose of this macro, as shown in Figure 21-23, is to ensure that the extra information for each question is set to be hidden. So if the respective item’s selection is not equal to 1 (true), then hide the detailed information. This helps reduce clutter when the view is initially displayed to the user.

Figure 21-23. The Form Load macro for the Questions view ensures that the extra information for each question is set to be hidden.
As you just saw, when the Questions view initially loads on a new record, the extra information about each question is hidden until they select it. Once selected, however, then another set of macros (which are tied to each check box’s After Update property) take over. The purpose of these macros (see Figure 21-24) is to toggle the extra detailed information on or off, depending on whether the form user has selected that particular item.
The result is that users get a very clean form that only displays extra detail about each question if they need it. If after reading the details they decide they don’t need that item checked, they can simply clear it, and the details disappear because the macro returns the Visible value to False.

The final view of the form is simply an Access List view that has had the data fields rearranged on it slightly to make it more usable and aesthetically pleasing (see Figure 21-25). From here, the user can easily navigate or search for any of the forms, and then, using the Action Bar, modify the form if necessary. In many form scenarios, this wouldn’t be the approach you’d take on the final view, but this is a nice example of using the built-in Access List view to give users a convenient landing spot once they’ve added a new record.
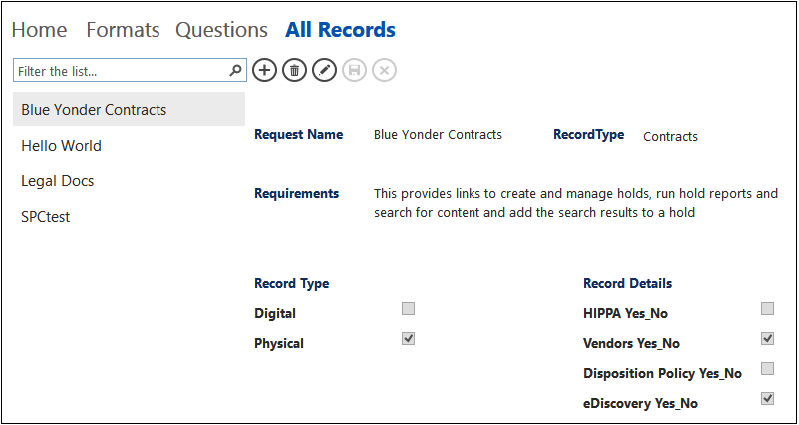
Figure 21-25. The All Records view of the form allows the user to select different records and see the details of a particular site request easily.
INSIDE OUT: Analyzing the Access and InfoPath forms: Behind the scenes
In some instances, you may desire to gain a deeper understanding of what is happening in the background when a browser interacts with your SharePoint farm during the use of a form. InfoPath browser-based forms and Access 2013 form apps can be monitored, dissected, and understood much more deeply if you use the free tool called Fiddler (www.fiddler2.com) to analyze your form. When you have Fiddler installed on your desktop, you can use it to peer inside all communication between the client browser and SharePoint, thus allowing you to find performance issues and other potential issues in your form design. Fiddler captures everything, including the JavaScript, form data, images, and all other types of data that flow between the browser and SharePoint when a form is opened and used. Even the JavaScript for the Access macros can be viewed in raw form, as shown here. The authors have found Fiddler to be an invaluable tool when testing, designing, and troubleshooting enterprise forms; we recommend that you take Fiddler along on your next forms design journey.

If neither InfoPath nor Access 2013 is sufficient to meet the needs of your form, custom development is always an option as well. In Chapter 23, you will learn about SharePoint apps, which are essentially modern web applications. If you know how to build a web application, then you can easily use those skills to build a Form app for SharePoint. And you can use many web-friendly languages such as HTML5, JavaScript, or .NET.
If you are interested in building SharePoint form apps with HTML5 and JavaScript, there are some new options and tools to be aware of, such as Microsoft LightSwitch and TypeScript. For readers of this book, we have provided a sample custom version of the Site Request form that was developed using LightSwitch and JavaScript. It is distributed as an .app package, and you can download the form (including the source code) at http://aka.ms/SP2013InsideOut/files.
Every business and government entity needs forms that enable its users to input and share information. SharePoint 2013 presents a platform that allows for these forms to be hosted and integrated with many other useful technologies, such as workflows and search.
InfoPath and Access 2013 are the two primary tools for creating SharePoint-based electronic forms of all types, without needing to use code. The types of forms that you can create with these two powerful tools are limited only by your imagination. InfoPath has been a popular forms tool for many years and has excellent integration into SharePoint lists. Access 2013 represents the new era of SharePoint digital forms that are adopting the new SharePoint cloud app model. And custom solution developers have never had so many interesting options for building code-based SharePoint forms—HTML5, Visual Studio 2012, TypeScript, JavaScript, PHP, and so on.