
Gathering requirements using Visio diagrams
Creating, editing, and managing custom workflows with SharePoint Designer
MICROSOFT SharePoint 2010 introduced a considerable array of new functionality concerning the creation, maintainability, reusability, and deployment of workflows. However, this new functionality often was difficult to scale in organizations that made heavy use of workflows, especially if their SharePoint farms were not properly architected, and the added workflow functionality often had a negative effect on the ability of the SharePoint servers to respond to users’ requests for SharePoint webpages. Fortunately, SharePoint 2013 introduces new capabilities to help solve these challenges.
In Microsoft SharePoint Server 2013, you have the option of no longer running a workflow within a SharePoint process. SharePoint Server 2013 introduces a new, highly scalable workflow framework that is implemented by using the Workflow Manager, originally known as Windows Azure Workflow (WAW). Workflow Manager is not installed automatically; therefore, a default installation of SharePoint Server 2013 can only use the same workflows that can be used in SharePoint 2010. The new workflow framework is not designed to work with Microsoft SharePoint Foundation 2013, and therefore, with SharePoint Foundation, you can use and create only SharePoint 2010 workflows.
Once you install Workflow Manager, your SharePoint server administrator needs to register the Workflow Manager with the SharePoint Server 2013 installation. SharePoint Server does not contain any SharePoint 2013 workflow templates, only SharePoint 2010 workflow templates; therefore, even though Workflow Manager is installed, users will still only be able to use SharePoint 2010 workflows. SharePoint 2013 workflows and SharePoint 2013 workflow templates need to be created before you can take advantage of the Workflow Manager.
Note
You can create SharePoint 2013 workflows or SharePoint 2010 workflows by using Microsoft SharePoint Designer 2013 or by using Microsoft Visual Studio 2012. SharePoint 2013 also contains new Windows PowerShell cmdlets that allow you to manage workflows.
There are no enhancements to SharePoint 2010 workflows in SharePoint 2013. You have the same actions and conditions as in SharePoint 2010, and they are built on Microsoft .NET Framework 3.5. If you are upgrading from SharePoint 2010 to SharePoint 2013, all of your workflows that were built in SharePoint 2010 will continue to work in SharePoint 2013. You can modify SharePoint 2010 workflows in SharePoint 2013 using either SharePoint Designer 2010 or SharePoint Designer 2013.
The basic usage and manageability of workflows has not changed, whether they are SharePoint 2010 or SharePoint 2013 workflows. Users interact with workflows using the browser or Microsoft Office applications. You use the browser to add workflow templates to lists, libraries, content types, and sites.
You can use SharePoint Designer to create reusable workflows that can be associated with multiple lists or libraries, and you can then save the reusable workflow as a workflow template in the form of a Windows SharePoint solution file (.wsp). This workflow template can then be imported to another site to be used to create the same workflow on the new site or imported into Visual Studio 2012, where it can be further enhanced.
This chapter details how to use the out-of-the-box SharePoint 2010 workflows in the browser. It then looks at creating and extending SharePoint 2010 and SharePoint 2013 workflows using SharePoint Designer. Also in this chapter, you will use a holiday request business process to explore the use of the out-of-the-box workflows, Microsoft Visio 2013 Premium, and SharePoint Designer.
For the past several years, there has been a push across both government and commercial sectors to do more work in less time, to minimize the number of files attached to email, and to reduce the amount of information that needs to be printed. Many large organizations, especially in the civilian government, finance, and healthcare industries, have been clogging their email systems with duplicate data and choking on paperwork and processes. Of course, forms and processes are required, and SharePoint can address many of these issues by using the WF components to provide user-driven process automation. WF offers all the functionality required for building enterprise-level workflows, such as built-in support for transactions, tracking, and notifications. WF does not act as a stand-alone application but always works with an application, which in this instance is either SharePoint for WF 3.5 or Workflow Manager for WF 4.0. And because SharePoint Server 2013 is built on top of WF 3.5 and can communicate with Workflow Manager, once installed, it too has workflow capabilities.
SharePoint can help automate business processes by using one of the following methods:
Really Simple Syndication (RSS) feeds. Use RSS feeds for finding information from a variety of sources on an ad-hoc basis. Use this method when the information is not needed on a day-to-day basis. RSS feeds use a pull mechanism to find information; that is, you only find information exposed by RSS feeds when you open an RSS reader, such as Windows Internet Explorer or Microsoft Outlook.
Alerts. Use alerts for regular notifications of new, modified, or deleted content. Alerts can be configured to send email immediately when SharePoint finds information in which you have registered an interest, or a daily or weekly digest of that information.
Content approval. Along with versioning, you can use content approval to manage content and control who can see content that is classified as draft. When you enable content approval on a list or library, a column named Approved Status is added to the library, together with a number of views. In addition, enabling content approval activates the Approval/Reject command on the list item menu and on the ribbon. The Approval Status column can contain the choices Approved, Rejected, or Pending. Users who are assigned the Manage Lists permission can approve or reject items. No email is sent to users with the Manage List permission. They would need to visit the list to see if any items are in a pending state.
However, with none of these three methods can you automate business processes beyond a one-step method. You can combine these methods with other SharePoint functionality, such as using content approval with alerts to provide a lightweight workflow that sends you email when your team members publish documents as a major version so that you can approve documents according to a specific timescale. However, such a solution can help solve only a small number of your business processes. You might want to route a document or a webpage to a number of people before publishing it.
Note
The Microsoft TechNet website contains an article on versioning, content approval, and check-out planning. You can view this article at technet.microsoft.com/en-us/library/ff607917.aspx.
SharePoint provides two other methods to help automate processes:
Workflows. Workflows are used to automate and track processes that require human intervention, such as notifying users when their action is required to move the process forward. Such processes can take days, weeks, or months to complete and might need to wait for an event or another process to complete. Workflows can be created by using the browser, SharePoint Designer, and Visual Studio.
Event receivers. Event receivers are used to automate processes that require no human intervention, such as moving job applications from one document library to a series of other document libraries for some purpose. Event receivers can only be created by using Visual Studio.
Workflows and event receivers cannot automate a task unless time is taken to understand it at a very detailed level. A workflow cannot track the status of information stored on paper documents, nor can you force users to perform a particular task by using the workflow you created. You must have a clear understanding of how the business process operates. If you do not understand how to complete a business process manually, you will not be able to describe the business process in sufficient detail to automate it. You also need the reassurance of the business process owners that upon the introduction of this workflow, it will be used by the process users. Using workflows to automate parts of a business process really means that you are involved in business process re-engineering. Managing the change of the new process and understanding the people, their fears, and their worries are the most important parts of automating process into the business workspace.
Therefore, there is more to creating a successful workflow than using the browser or SharePoint Designer to configure one. You need to plan how you intend to automate a process, taking into account people, processes, and technology. You need to choose the process that you are going to automate carefully—do not attempt to automate every process in your organization. Look for processes that are predictable and for which the startup cost of creating a workflow and ensuring that your team is happy with the new process will be offset by the productivity improvement that the automated process will provide. Understand the technologies you are going to use to automate the processes, which in this case are SharePoint and WF.
Note
The TechNet website contains a SharePoint 2013 Workflow Resource Center at technet.microsoft.com/en-us/sharepoint/jj556245.
In the same way that you base a new site, list, or library on a template, you base a new workflow process on a workflow template. These templates are implemented as features that can be activated or deactivated at the site or site-collection level by using the browser or by using a custom program or Windows PowerShell. A workflow template is available only when a workflow feature is activated.
SharePoint Foundation ships with only one SharePoint 2010 workflow template—the Three-State workflow—whereas SharePoint Server contains a number of document-centric SharePoint 2010 workflow templates:
Approval–SharePoint 2010. Provides an approval mechanism for documents.
Collect Feedback–SharePoint 2010. Provides a feedback mechanism for documents. The feedback is not stored within the document but in a list. Most users prefer to use the built-in review functionality of Microsoft Word to collect feedback, as such comments are stored within the document.
Collect Signatures–SharePoint 2010. Provides a mechanism for collecting digital signatures for completing a document. This workflow can be used only in conjunction with Office documents that contain one or more of the Office signature line controls.
Disposition Approval. Provides an expiration and retention mechanism that allows you to decide whether to retain or delete expired documents. This workflow can be started only by using the browser.
Publishing Approval. Similar to the approval workflow. Used on sites with the publishing feature, where you would associate it with the Pages library and allow publishing pages, also known as web content management (WCM) pages, to go through an approval process.
No version of SharePoint 2013 contains site workflow templates. SharePoint Server 2010 contained two site workflow templates that were associated with Web Analytics. In SharePoint 2013, Web Analytics is no longer a separate service application; it is now part of SharePoint’s search engine. Search is a lot smarter in SharePoint 2013 and can be used to analyze individual actions by the user as well as click through rates of sessions. This information can then be used to provide relevance and suggestion information for users. You can find the analytic information for a site in a Microsoft Excel file named Usage.xlsx. To access this file, on the Site Settings page, under Site Administration, click Popularity Trends.
Note
More information on search and usage analytics can be found in Chapter 19.
Workflows are a series of tasks that produce an outcome. To create a workflow, you configure and add (also known as associating) the workflow template to a list, library, or site. An instance of the workflow can then be initiated by using the configured workflow template, which defines the conditions that should be tested to decide what tasks to complete to produce the outcome. You can also associate a workflow template with a content type, and then associate the content type with a list or library to define a workflow.
The workflow always has a start and an end. An instance of the workflow is created when a workflow event is triggered for a specific list item or file. The workflow instance then enters the workflow at its start point and progresses through the workflow process as defined by the configured workflow template until it reaches the end point, at which time the workflow instance is set to Completed, as shown in Figure 7-1. The workflow then does no other work until a new workflow instance is created. A workflow can contain one or more workflow instances. A list item or file can be related to more than one workflow instance, so long as each workflow instance is related to different workflows.

To create a workflow, you must provide a workflow name, choose how you want workflow instances to start, and complete an association form to provide values that are needed by the workflow, especially if the workflow is configured to start automatically. When a workflow allows workflow instances to be started manually, then users may be provided with an initiation form that allows them to define values that the workflow requires. These might be similar to the values provided on the association form. When a workflow instance is automatically started, the initiation form is not displayed and the default values or the values provided on the association form are used. Once a workflow is created, users with modify permissions can start workflow instances within that workflow.
Using the browser, you can create a workflow by using a workflow template with lists, libraries, content types, and sites. Workflows are commonly created on lists and libraries. Users interact with workflow instances either via email or through task items in a task list.
Note
In SharePoint 2010, at the top-level site of a site collection, you can use the Workflows page to see which workflow templates are available and active, the number of SharePoint objects (such as lists, libraries, content types, and sites) with which the workflow template is associated, and the number of workflow instances that are running in those workflows. This page is not available in SharePoint 2013.
Although it is not strictly required, most workflows use the following two lists:
Workflow tasks list. Use this list to create task items to remind users of the work that needs to be completed or to collect information for the next step of the workflow. Workflows can also send email to users with a link to the task items that are assigned to them.
Workflow history list. This list keeps track of the workflow instances that are running or have been completed for a given list item or document. The workflow writes key information to this list, such as the date, status, participant, and description. The default workflow history list is a hidden library and is not shown on the Site Content webpage. The default workflow inherits permissions from the site; therefore, any user who is mapped to the contribute permission level can update items in this list. You can display this list in the browser by appending /lists/workflow%20history/ to your site’s URL (such as http://hr.adventure-works.com/lists/workflow%20history/). By default, workflows cannot write to the description field of a workflow history item that is larger than 255 characters.
Note
SharePoint Server 2010 provides Activity Duration and Cancellation and Error reports that use the workflow history list to analyze the workflow instances and the activities within the workflow process. These are not available in SharePoint 2013.
If you use the same workflow tasks list and workflow history list for all workflows in a site, then these two lists can become large. This was more of a problem in SharePoint 2010, when it could cause performance problems. As a result, SharePoint 2013 includes a daily timer job to remove all history and task items that exist 60 days after the related workflow instance completes. Because of the default security settings on these lists and the 60-day purge of list items, you should not use these lists as an audit of what the workflow is doing.
You can use an existing task and workflow history list when you first create a workflow. If you believe that you will have many workflow instances, create a task and workflow history list for your specific workflow. There is a daily Workflow Auto Cleanup timer job for each web application that purges items in the task and workflow history list for workflow instances that have been marked complete or cancelled and removes the links to those workflow instances on the workflow status pages.
The person who has Manage List permissions on a list or library can use the Workflow Settings page to associate a workflow template with that list or library, and thereby create a workflow for that list or library. List and library workflow templates can be specific to one content type, or they can be used for any content type. From the Workflow Settings page, you pick where the workflow tasks and history information are stored and set the conditions that trigger a workflow instance for a list item or file. You can also modify and remove an existing workflow process on this page.
Note
To use the Three-State workflow template, you need a choice column on the list or library with which you are associating it. The choice column is used to store the three statuses of the workflow (such as Holiday Request Submitted, Holiday Request Approved, and Holiday Taken). The default value for the column should be set as the first status in the workflow (in this case, Holiday Request Submitted).
Perform the following steps to add a workflow template to a list or library:
Use the Quick Launch or Site Contents page to navigate to the document library or list with which you want to associate a workflow template.
On the ribbon, click the List or Library tab. (This tab could also be named Calendar if the list was created from a calendar list template.)
In the Settings group, click the arrow to the right of Workflow Settings and then click Add A Workflow, as shown next.
On the Add A Workflow page, in the Workflow section, select a workflow template.
In the Name section, type a new name for this workflow, such as Holiday Request Approval.
This name will be used to create a column in the list or library, and therefore, it must be unique in the list or library. You must not use the name of an existing column or any of the reserved column names, such as Title, Created By, Modified By, Checked Out To, or Approval Status.
In the Task List section, select an existing tasks list or Task (new).
If you select Task (new), the name of the new task list will take the format of <workflow name> Tasks, such as Holiday Request Approval Tasks.
In the History List section, select an existing workflow history list or Workflow History (new).
The name of a new workflow history list will take the format of <workflow name> History. You can see these steps in the following screenshot.
In the Start Options section, select one of the options that will initiate a workflow instance, as shown next.
Depending on the workflow template and its configuration, the start of a workflow instance can be triggered using one of the following options:
Manually, when you want to test a newly added workflow or when the list or library to which you have added a workflow has a list item or document that needs to progress through the workflow. This option can be limited so that only users who have the Manage List permission can start a workflow instance manually.
Automatically, when minor and major versioning is enabled and you want to approve publishing a draft version (minor version) of a list item or document to a major version.
Automatically, when you create a list item or document.
Automatically, when you change a list item or document.
When you first create a workflow to test the workflow quickly, select the Allow This Workflow To Be Manually Started By An Authenticated User With Edit Item Permissions option.
Click Next to go to the association page named Change A Workflow Holiday Request Approval.
The association page for the Approval–SharePoint 2010 workflow template is a Microsoft InfoPath form that is rendered in a webpage in the browser by InfoPath Form Services (IFS). If you create InfoPath forms and you want them to render in the browser, then you need the Enterprise edition of SharePoint Server; however, if the form is used as a workflow association form, then only the Standard edition of SharePoint Server is needed.
In the Approvers section, type the name of one or more users that you want to approve the document, as shown next.
Make any other changes as needed and then click Save to be returned to the Workflow Settings page.
This page displays all workflows that were added to the list or library, together with the number of workflow instances that are progressing through each workflow, as the following graphic shows.


Once a workflow template is added to a list or library, you might need to make changes to its configuration. To modify a workflow, follow these steps:
Navigate to the library or list to which you added the workflow template and then on the ribbon, click the List or Library tab, on the ribbon. In the Settings group, click the Workflow Settings command to display the Workflow Settings page.
Under Workflow Name, click the workflow that you want to modify (such as Holiday Request Approval) to display the Change A Workflow page. If you cannot see the workflow that you want to monitor, under Workflows, click Show All Workflows.
Note
The Change A Workflow page may not always be displayed. If the workflow template was developed by using Visual Studio, you might be able to change association parameters by clicking the workflow name. If the site workflow was created by using SharePoint Designer, you can change the site workflow only via SharePoint Designer, and therefore, clicking the workflow name displays a message box, stating that you need to use a SharePoint-compatible workflow editing tool, as shown next:
Use the Change A Workflow page to change the task list, the workflow history list with which this workflow is associated, the name of the workflow, and the start options.
Click Next to open the association page and modify what you want to happen when a workflow instance is initiated.
Click Save to confirm your changes.

When a workflow is no longer needed, you should remove it from the list or library to prevent confusing users who use that list or library. To remove a workflow from a list or library, follow these steps:
Navigate to the Workflow Settings page for the library or list to which you added the workflow template.
Click Remove, Block, Or Restore A Workflow to display the Remove Workflows page.
This page displays each workflow that was added to this list or library, together with the number of workflow instances that are currently progressing through the workflow. The three options allow workflow instances to start in the workflow, prevent any workflow instances from starting, or remove the workflow from the list or library. If you feel that you might need the workflow in the future, select the No New Instances option, as seen in the following graphic.
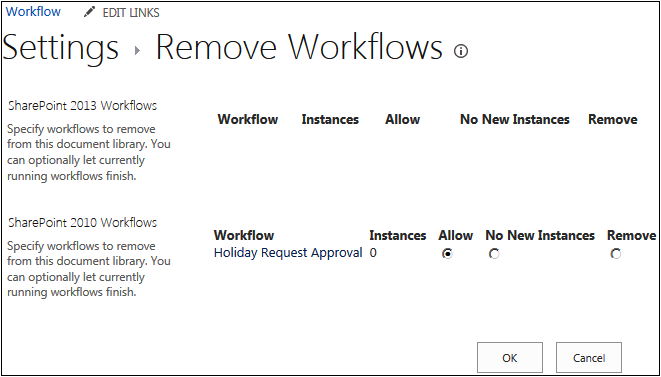
When you remove a workflow from a list, it removes the column that the workflow uses to indicate the status of a workflow instance in the workflow process. This column was created when a workflow template is associated with a list or library and contains such values as In Progress, Cancelled, and Completed. Removing columns on lists and libraries causes a database operation proportional to the number of items or files in the list or library. When the list or library contains more than a million items, do not remove the workflow from the list or library; instead, set the workflow to No New Instances.
Once a workflow is added to a list or library, a list item or file can progress through that workflow. The trigger that SharePoint uses to initiate a workflow instance for a list item or file is dependent on the following:
The Content type with which the workflow is linked and whether the list item or file is of the same type.
The Start options that you configured on the association forms. You can start a workflow instance by manually starting the workflow, uploading or creating a new file, or modifying an existing list item or file.
To start a workflow instance for a list item of a file manually, perform the following procedure:
Pause your mouse over the list item or file for which you want to start a workflow, and then select the check that appears to the left of the list item or file.
On the Items tab (if this is a list) or the Files tab (if this is a library), click Workflows in the Workflows group.
The <list or library name>: Workflows: <file or item name> page is displayed, as shown next.
Under Start A New Workflow, click the name of the workflow that you want to start, such as, Holiday Request Approval, as displayed next.
If the workflow has an initiation form, it is displayed. Click Start. The Working On It message appears, stating, “Please wait while your workflow is started.” Once SharePoint has started your workflow instance, you are returned to the default view of the list and library, where a new column might appear. This new column is named with the workflow name, with a status of In Progress. This new column is not added to the default view when the default view is a calendar view.


To review the workflow progress of the list item or file, follow these steps:
Browse to the list or library where the item or file is stored.
In the workflow column, click In Progress. If the workflow column is not shown, select the check to the left of the item, and then on the Items tab, click Workflows. Under Running Workflows, click In Progress for the workflow that you want to review. The Workflow Status page displays, as shown next.

The Workflow Status page summarizes workflow instance information in three sections:
Workflow information. This section details workflow instance information, such as who initiated the workflow instance, the start time, the name of the item that the workflow instance is linked to, and the status. You can also use the line at the bottom of this section to terminate the workflow for the list item or file. When you terminate a workflow instance, the status of the workflow changes from In Progress to Cancelled, and any task items created by the workflow are deleted.
Tasks. This section displays task items that are associated with this workflow instance. It provides a link to the list item or file and a link to the task list associated with the workflow. When you click the title of a task item, if you have Microsoft Silverlight installed, a modal dialog box opens and displays the details of the task item.
Workflow history. This section details messages that the workflow instance wrote to the workflow history list.
To complete tasks assigned to you as a list item or file progresses through a workflow, complete the following procedure:
Browse to the Workflow Status page, as described in the previous procedure, or alternatively, display the workflow task list by using the Site Contents page if a link to the workflow task list is not displayed on the Quick Launch toolbar.
Click the title of the task item assigned to you to display the task input form.
The layout of the task input form is dependent on the workflow template used to create the workflow. For the Approval–SharePoint 2010 workflow template, the task input form is an InfoPath form.
Select Approve, Reject, Cancel, Request Change, or Reassign Task.
If the workflow instance has completed all tasks, then the status of the workflow will change from In Progress to Completed.
Site workflows are not associated with a list or library. However, site workflows can work with any SharePoint object within the site. By default, SharePoint 2013 does not provide any site templates to use with any sites; therefore, you would need to develop a site workflow template by using Visual Studio, or you can publish a workflow to a site by using SharePoint Designer.
To manually start a site workflow instance or to monitor a site workflow by using the browser, follow these steps:
On the Quick Launch toolbar, click Site Contents, or on the Settings menu, click View Site Contents to display the Site Contents page, and then, on the right, click Site Workflows.
Under Start a New Workflow, click the site workflow that you want to start, or under My Running Workflows or under My Completed Workflows, click the workflow that you want to monitor.
To manage the site workflows associated with a site, follow these steps:
Browse to the Site Settings page and then, under Site Administration, click Workflow Settings.
Click Remove A Workflow to display the Remove Workflow page.
This page displays each workflow that was added to the site, together with the number of workflow instances that are currently progressing through the workflow. You can use this page to prevent the start of any new workflow instances or to remove site workflows.
To create a site workflow by using SharePoint Designer, follow these steps:

You can then create an initiation form, use actions and conditions, and publish the workflow, as described later in this chapter.
The ability of a business analyst to communicate effectively with developers is greatly improved by using Visio process diagrams. This capability was first introduced in SharePoint 2010, and you can use this same method in SharePoint 2013. You can create your SharePoint process diagram in Visio 2013 using either the SharePoint 2013 Workflow template or the SharePoint 2010 Workflow template. You no longer need the Premium edition of Visio to create a SharePoint Visio Workflow diagram.
However, SharePoint Designer does provide a new way of creating Visio diagrams. When you have Workflow Manager installed and you want to create a SharePoint 2013 workflow, you can create Visio diagrams using the built-in Visual Designer offered by SharePoint Designer, a Visio ActiveX control.
You can design your workflow diagram just like you can with any other Visio diagram by using the drag-and-drop functionality to create a nice layout. Once the diagram is complete, the user can run the validation provided by Visio to ensure that no branches or paths have been missed. Next, you create the Visio diagram file, which can be imported into SharePoint Designer. If you create a Visio workflow diagram, then you cannot configure the conditions and actions within Visio, you need to complete the configuration of the SharePoint 2010 workflow within SharePoint Designer.
You cannot import the .vwi file into Visual Studio; however, once you configure the workflow in SharePoint Designer, you can then save the workflow as a workflow template solutions file (.wsp), which can then be imported into Visual Studio.
To create a SharePoint workflow using Visio 2013, perform the following steps:
Open Visio 2013 to display the Backstage view. On the New tab, click Categories and then click Flowchart.
Click either Microsoft SharePoint 2013 Workflow or Microsoft SharePoint 2010 Workflow, as shown next.
In the Microsoft SharePoint 2013 Workflow dialog box, click Create, as shown next.
A Visio drawing opens that contains one stage, a start shape (blue cycle with white arrow), a stage enter shape (green-filled arrow), and an exit shape (red-filled square) with the shapes connected by a blue line. In the left Shapes pane, three stencils are displayed, such as SharePoint 2013 Workflow, Conditions–SharePoint 2013 Workflow, and Components–SharePoint 2013 Workflow, as shown next.


You can now add conditions and actions that represent the tasks of your business process that you wish to automate. For example, you can add a condition that checks whether a calendar item is set to a category of holiday and then creates a task item for the team leader.
To add a condition or action to a Visio diagram, follow these steps:
In the Shapes pane, under Conditions–SharePoint 2013 Workflow, click If Any Value Equals Value, drag it to the drawing area to the right of the Enter shape and place it on the line connecting the Enter shape to the Exit shape.
In the Shapes pane, under Actions–SharePoint 2013 Workflow, click Start a Task Process. Drag it to the drawing area to the right of the If Any Value Equals Value and place it on the line connecting the If Any Value Equals Value shape to the Exit shape.
Right-click the line connecting the If Any Value Equals Value shape and the Start A Task Process shape, and then click Yes.
On the Home tab, in the Tools group, click Connector, click the bottom corner of the If Any Value Equals Value shape, and then drag a line to the Exit shape so that a red square appears on the leftmost edge of the Exit shape. Right-click the connecting line, and then click No.
On the Home tab, in the Tools group, click the Pointer tool. Double-click If Any Value Equals Value, and then type Is Calendar Category = Holiday? Double-click Start A Task Process, and then type Send email to employee’s Team Leader to approve holiday. This step is illustrated next.

Once you have created a diagram of your workflow and modified the text for each shape to document the details of the process, you need to validate the drawing before you can export the diagram and give it to the person who will create the workflow as either a SharePoint Designer or Visual Studio workflow.
To validate and export a Visio SharePoint workflow, complete the following procedure:
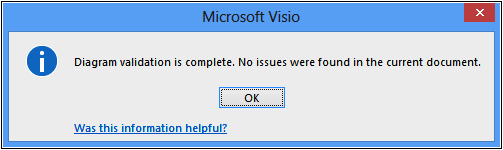
On the Process tab, in the Diagram Validation group, click Check Diagram, as shown next.
A Microsoft Visio dialog box opens (as shown next), stating “No issues were found in the current document.” If your workflow has issues, an Issues task pane opens at the bottom of the Visio window. The erroneous component is highlighted. The Issues pane can be opened or closed by using the Issues Window check box in the Diagram Validation group on the Process tab.
To create a Visio file that can be used with SharePoint Designer, complete one of the following tasks:
If you are creating a SharePoint 2013 workflow, select the File tab, and then, on the backstage, click Save As. Under Computer, click Browse to open the Save As dialog box. Navigate to where you want to save the .vsdx file.
If you are creating a SharePoint 2010 workflow, then on the Process tab, in the SharePoint Workflow group, click Export. The Export Workflow dialog box opens so that you can navigate to where you want to save the .vwi file.
In the File Name text box, type the name of the file, and then click Save to save the file and close the dialog box. Close Visio.

To import a .vwi or a .vsdx file into SharePoint Designer, follow these steps:
Using SharePoint Designer, open a SharePoint site for which you want to develop a SharePoint Designer workflow.
If you want to create a globally reusable workflow from the file, the site must be a top-level site of a site collection.
In the Navigation pane, click Workflows. On the Workflows tab, in the Manage group, click the Import From Visio split button and select either Import Visio 2010 Diagram for a .vwi file or Import Visio 2013 Diagram for a .vsdx file, as shown next.
In the Import Workflow From Visio Drawing dialog box, click Browse, navigate to the location where you stored the .vsdx or .vwi file, click Open to display the Create Workflow dialog box.
In the Workflow Name text box, type the name of the workflow as it will be seen by users on a SharePoint site, and then select List Workflow, Site Workflow, or Reusable Workflow, as shown next.
If you select List Workflow, you need to select a list with which to associate the workflow defined in the file. If you select Reusable Workflow, then you will be creating a workflow template that you can associate with any content type.
If this is the first time you’ve created a workflow, a dialog box opens asking you to wait while SharePoint Designer downloads the necessary information from the SharePoint site you have open, concerning the SharePoint Designer workflow conditions and actions that are installed, as shown next.
If you import a Visio 2013 diagram, then the workflow opens in the SharePoint Designer Visual Designer; otherwise, the diagram opens in the Text-Based Designer, also known as the Declarative Designer.


Note
You can find more information about SharePoint Designer in the next section and in Chapter 20.
The workflow templates provided with SharePoint 2013 may not be sufficient for many of the tasks related to business processes that you want to automate. This is when you will use SharePoint Designer to create workflows. SharePoint Designer provides a Workflow Editor that allows you to create no-code, rules-based declarative workflows. SharePoint Designer 2013 provides the following new features:
A Visual Designer that uses a Visio 2013 ActiveX control
New actions, such as the Call HTTP Web Service action, which enables no-code web service calls from within a workflow, and the new coordination actions, which let you start a workflow built on the SharePoint 2010 Workflow platform from a workflow built on the SharePoint 2013 Workflow platform
New workflow building blocks such as Stage, Loop, and App Step
There are three types of workflows that you can create with SharePoint Designer:
List workflows. Also known as content workflows, these workflows are created to automate tasks associated with content stored in lists and libraries.
Site workflows. These workflows are not associated with specific SharePoint objects and are started manually at the site level.
Reusable workflows. These are workflow templates that can subsequently be added to (associated with) a list or library on the site for which the reusable workflow is created. You create reusable workflows by binding them with content types. Reusable workflows can be published to the global workflows catalog, which makes it reusable on every site in the site collection, and visible to all users. Only reusable workflows at the top-level site of a site collection can be published as globally reusable workflows.
When you create a workflow with SharePoint Designer, you can modify the workflow using two pages:
Workflow Settings
Workflow Editor
Perform the following steps to create a list workflow for a list or library:
Using the Navigation pane in SharePoint Designer, click Workflows.
On the Workflows tab, in the New group, click List Workflow, and then click the name of the list or library (such as Holiday Request) to display the Create List Workflow dialog box, as the following graphic shows.
You can also display the Create List Workflow dialog box by using the List Workflow command in the New group on the Site tab and the List Settings tab.
In the Name text box, type Holiday Request Approval, and then click OK, as shown next.
If the Downloading Data dialog box opens, wait for it to close.
A new tab named Holiday Request Approval opens with an asterisk, indicating that the workflow is not saved. The Text-Based Designer contains one stage, Stage 1, and a flashing orange horizontal line where the first condition or action can be inserted, as shown next.
On the workspace breadcrumb, click Holiday Request Approval to navigate to the Workflow Settings page.
On the Workflow Settings tab, click Save.
The Microsoft SharePoint Designer dialog box temporarily opens as the workflow is saved back to the SQL content database.


Once you have created or modified a workflow, you should use the commands in the Save group on the Workflow tab to check for errors, save, and then publish the workflow. The Publish command also checks for errors and saves the workflow. Use the following steps to publish your workflow:
If you are on the Workflow Settings page, then on the Workflow Settings tab, click Edit Workflow in the Edit group. On the Workflow tab, click Check For Errors in the Save group.
A Microsoft SharePoint Designer dialog box opens, stating that the workflow contains no errors. Click OK. If errors are reported, then this is usually because you have failed to complete link values in conditions or actions or with a SharePoint 2013 workflow that the Transition section is empty. Review and correct any errors, and then recheck your workflow.
On the Workflow tab, click Publish in the Save group.
A Microsoft SharePoint Designer dialog box displays as the workflow files are saved to the server. You can publish a workflow that contains errors; however, the errors may prevent it from functioning correctly, and therefore it will be saved in a draft state.
You can now test your solution by creating a holiday request in the Holiday Schedule list. You might need to initiate a workflow instance manually on your list item, depending on the workflow start options that you set on the Workflow Settings page.
Reusable workflows are workflow templates that can be modified in SharePoint Designer. In SharePoint 2010, these were the only no-code workflows created or modified by SharePoint Designer that you could develop in non-production environments and then move to a live environment. Now, in SharePoint 2013, you can develop list, site, and reusable no-code SharePoint 2013 workflows that can be moved between environments. No-code workflows developed in the live environment can be used on other lists and libraries, within the same site, within all sites in a site collection, or on sites within other site collections.
When you create a SharePoint 2010 reusable workflow, you must associate it with a content type—either a specific content type, such as Event, or with all content types. Windows 2013 reusable workflows are not associated with a content type.
With SharePoint 2010 workflows, the advantage of associating a reusable workflow with a specific content type, if you choose your content type carefully, is that the site columns you need to retrieve values for the current item will be present. The disadvantage is that you will be able to use that reusable workflow only with lists or libraries where that specific content type is added.
When you create a SharePoint 2010 reusable workflow associated with all content types, you need to create site columns and use the Association Column command to make columns that you want to work with available to your workflow. This entails more planning and forethought when you create your workflows.
In SharePoint 2010, you could only package and deploy reusable workflows. Now, in SharePoint 2013, you can deploy list, site, and reusable SharePoint 2013 workflows.
Exporting workflows Before you can export a workflow, first save or publish the workflow, and then save the workflow as a .wsp file, also known as a template, by performing the following steps:
Open a site that contains the workflow that you have created in SharePoint Designer and then, in the Navigation pane, click Workflows.
Click the appropriate workflow to display the Workflow Settings page.
On the Workflow Settings tab, in the Manage group, click Save As Template.
A dialog box appears, stating that the template has been saved to the Site Assets library. The workflow template is saved with a file name that is the same as the name of the workflow.
In the Navigation pane, click Site Assets to display the gallery page that displays all the files stored in the Site Assets library. If you do not see the workflow, click the refresh icon or press F5.
Click the icon to the left of the appropriate .wsp file, and then, on the Assets tab, in the Manage group, click Export File to display the Export Selected As dialog box.
Choose a directory in which to save the file, and then click Save. A Microsoft SharePoint Designer dialog box opens, as shown here, stating that the .wsp has been successfully exported:

Importing a reusable workflow To use a reusable workflow in a site where it was not created, execute the steps that follow. You can also use these steps if you create a reusable workflow in a subsite of a site collection; therefore, you cannot publish it as a globally reusable workflow.
Using the browser, navigate to the top-level site of the site collection where you want to make the reusable workflow available.
Click Site Actions, and then click Site Settings.
Under Galleries, click Solutions.
On the Solutions tab, in the New group, click Upload Solution.
Click Browse to open the Choose File To Upload dialog box, navigate to where you saved the .wsp workflow template file, click Open, and then click OK.
The Solution Gallery–Activate Solution dialog box opens.
On the View tab, click Activate.
Browse to the site where you want to use the workflow, click Site Actions, and then click Site Settings.
Under Site Actions, click Manage Site Features.
Click the Activate button to the right of the workflow template.
The SharePoint 2013 Workflow template that is included in Visio 2013 also uses conditions, actions, steps, stages, and loops as logical building blocks to create workflows. SharePoint 2010 workflows use steps, conditions, and actions.
You can group together actions and conditions, including if-then-else branching, into stages or steps. However, there can be only one path into a stage (and a step) and one path out. Steps represent a grouped series of sequential actions and must be contained in a SharePoint 2013 workflow by a stage.
Conditions are used to create rules that portray the logic of the workflow. Actions are the basic unit of work performed by the workflow. When a condition is true, then all the actions associated with that condition are performed. A condition and its else-if branch conditions must be completed in a single step; that is, they cannot extend from one step to another.
Using a combination of conditions and actions, you can define which actions should be performed under which conditions. A workflow does not need to contain any conditions, but should contain at least one action, such as writing to the history log or sending the creator of a list item an email. If a workflow does not contain any conditions, then all the actions defined in the workflow will be performed.
Loops are a series of connected actions and conditions that will execute as a loop.
Note
When the set of built-in conditions and actions does not meet your business needs, a developer can create new conditions or actions, which are known as custom activities, using Visual Studio 2012 or a third-party tool. You can find information on how to create a custom activity by using Visual Studio at msdn.microsoft.com/en-us/library/jj163911(v=office.15).aspx.
SharePoint Designer divides the built-in conditions into two categories: Common Conditions and Other Conditions, which are listed in Table 7-1.
Table 7-1. Workflow conditions
Condition category | Conditions that can be used in both SharePoint 2013 and SharePoint 2010 workflows | SharePoint 2010–only conditions |
Common | If Any Value Equals Value | If Current Item Field Equals Value |
Other | Created By A Specific Person Created In A Specific Date Span Modified By A Specific Person Modified in A Specific Date Span Person Is A Valid SharePoint User Title Field Contains Keywords | Check List Item Permission Levels (only available within an Impersonation Step) Check List Item Permissions (only available within an Impersonation Step) The File Size In A Specific Range Kilobytes The File Is A Specific Type |
The most used condition in a SharePoint Designer workflow is If Any Value Equals Value, which is a generic condition that you can use to compare two values, where a value can be:
A metadata value from the list item or file on which the workflow instance was initiated, known as the current item
A metadata value for a list item or file in list or library, where the workflow instance was not initiated
Workflow variables or parameters, such as initiation form parameters and local variables
Workflow context, such as the name of the workflow template, the current site URL, or the current user
A value from items stored in the workflow’s associated tasks or history list
When the value that you want to compare is not in the current item, you need to provide logic to specify from which item the workflow can obtain the value.
A SharePoint 2010 workflow action is a task that needs to be completed. You can choose to run actions serially; that is, an action starts only if the preceding one is complete. Alternatively, you can choose to run actions in parallel, known as a parallel block, where all actions start at the same time. SharePoint Designer divides built-in actions into categories, as shown in Table 7-2.
SharePoint Designer does not provide any diagnostic or debug facilities. When your workflow fails to run to completion, the only way to track which branch of a condition or which actions completed successfully is to write many items to the history list.
Table 7-2. Workflow actions
Action category | Used in both SharePoint 2013 and SharePoint 2010 Workflows | SharePoint 2013 workflows only | SharePoint 2010 workflows only |
Coordination Actions | Start a List Workflow Start a Site Workflow | ||
Core Actions | Add a Comment Add Time to Date Do Calculation Log to History List Pause For Duration Pause Until Date Send an Email Set Time Portion of Date/Time Field Set Workflow Status Set Workflow Variable | Build Dictionary Call HTTP Web Service Count Items from a Dictionary Get Item from a Dictionary | Send Document to Repository Stop Workflow |
Document Set Actions | Capture a version of the Document Set Send Document Set to Repository Set Content Approval Status for the Document Set Start Document Set Approval Process | ||
List Actions | Check In Item Check Out Item Copy List Item Create List Item Delete Item Discard Check Out Item Set Field In Current Item Update List Item Wait For Event In List Item | Translate Document | Declare record Delete Drafts Delete Previous Versions Set Content Approval Status Undeclared Record Wait for Change in Document Check-Out Status Wait for Field Change in Current Item |
Relational Actions | Lookup Manager of a User | ||
Task Action | Assign a Task Start a Task Process | Assign a Form to a Group Assign a To-do Item Collect Data from a User Start Approval Process Start Custom Task Process Start Feedback Process | |
Utility Actions | Extract Substring from End of String Extract Substring from Index of String Extract Substring from Start of String Extract Substring from Index with Length Find Interval Between Dates | Find Substring in String Replace Substring in String Trim String |
Note
SharePoint Foundation does not support document sets or importing user information from Active Directory; this is why you will not see those categories when you work with workflows in SharePoint Designer on a SharePoint Foundation site.
Note
For additional information, read the reference guide to workflow actions in SharePoint Designer 2013, which is available at msdn.microsoft.com/en-us/library/jj164026(v=office.15).aspx. Information on the Visio 2013 shapes that refer to SharePoint Designer workflow actions and conditions can be found at technet.microsoft.com/en-us/library/jj164055(v=office.15).aspx.
Use steps to document the major set of activities that need to be completed as part of your workflow. SharePoint Designer workflows can become large; and by grouping conditions and actions into steps, your workflow becomes more readable, which is important if a colleague is asked to maintain a workflow that you have created, or if it has been some time since you last looked at the workflow.
All actions in a SharePoint 2013 workflow must be placed in a stage, which is a container stage in Visio 2013 and the Visual Designer in SharePoint Designer 2013. Each stage must have a unique name and should be used to document the purpose of the stage.
In the Visual Designer view or in Visio, a Stage shape requires that an Enter and an Exit shape be added to the edges of the container to define the paths in to and out of the stage. The Enter and Exit shapes are added for you when you first drop a stage onto the drawing area of a Visio SharePoint 2013 workflow diagram.
Unlike steps, where the flow of the workflow is sequential from one step to the next, in stages, the follow of the workflow stops at the end of the stage. Therefore, at the end of each stage, there is a Transition To Stage area, as shown in Figure 7-2, where you can configure the workflow to end the workflow or to go to another stage to execute the conditions and actions within that stage. Only conditions can be added to a Transition To Stage area.

A stage must adhere to the following rules:
All SharePoint 2013 workflows must have at least one stage.
Stage containers cannot be nested. If you want to nest another subprocess within a stage, use a step.
Stages in a Visio diagram must conform to the following:
They cannot have any connectors coming in or going out other than through the Enter and Exit shapes. Stop Workflow shapes may exist within a stage.
They must have an explicit Start shape outside the stage for the entire diagram. An explicit Terminate shape outside the stage is not required.
At the top level, a SharePoint 2013 workflow can contain only stages, conditional shapes, and Start and Terminate terminators. All other shapes must be contained within a stage.
Loops are a series of connected shapes that will execute as a loop, returning from the last shape in the series to the first, until a condition is satisfied.
Like stages, loops in Visio are represented by a container shape that includes an Enter and Exit shape (added when the shape is dropped on the drawing canvas). A Loop shape also requires that an Enter and Exit shape be added to the edges of the container to define the paths in to and out of the loop.
Visio 2013 and SharePoint Designer 2013 support two types of loops: loop n times and loop until value1 equals value2.
Loops must also conform to the following rules:
Loops must be within a stage, and stages cannot be within a loop.
Steps may be within a loop.
Loops may have only one entry and one exit point.
Use the Workflow Settings page to view and manage settings for the workflow. It consists of a contextual ribbon tab, as shown in Figure 7-3, and five areas, as shown in Figure 7-4.

Figure 7-3. On the Workflow Settings tab, you can save, edit, manage workflows, and create and manage variables.

The five areas on the Workflow Settings page can be used as follows:
Workflow information. This area displays basic workflow information, such as the workflow name, description, type (list, site, or reusable) and Platform type (SharePoint 2010 Workflow or SharePoint 2013 Workflow). When the type of workflow is a list workflow, then this area displays the name of the list or library with which the workflow is associated. When the workflow type is reusable, this area displays the name of the content type with which it is associated.
Customization. The links provided in this area will differ depending on the type of workflow. For example, for a list workflow, this area contains links to the Workflow Editor page and links to open the associated list, task list, and workflow history list.
Settings. Use this area to select the task and workflow history list that the workflow is to use. For list and site workflows when you create a SharePoint 2010 workflow, this area contains a check box that is associated with workflow visualization within the browser. This option is only applicable when you have SharePoint Server 2010 Enterprise edition installed.
Start options. Use this area to select the start options for the workflow.
Forms. This area displays the pages that SharePoint Designer automatically creates during the publishing process. Depending on the type of workflow and the start option selected, a number of pages will be created. Whenever a workflow can be started manually, an initiation page is created. When you use the task action to collect data from a user, then task pages are created. If you create a SharePoint 2010 workflow in a SharePoint Server 2013 installation, the forms will be created as InfoPath forms; otherwise, the forms will be .aspx files.
Use the Workflow tab to create and change the workflow. If you are creating a SharePoint 2013 workflow, use the Workflow tab to switch between three editing views of the workflow: Text-Based Designer, Visual Designer, or Stage View. When you create a SharePoint 2010 workflow, you can only use the Text-Based Designer view.
The Workflow tab can consist of up to five tab groups, depending on the view you are using. The Workflow tab when you are using the Text-Based Designer is shown in Figure 7-5. The Clipboard, Modify, and Insert groups are specific to the Text-Based Designer.

Use the Save group to check your workflow for errors, save your workflow, and publish your workflow. The Save and Publish commands are the same commands you find in the Save group on the Workflow Settings tab. Use the Save command when you wish to save your amendments but have not completed the workflow, and therefore you do not wish other users on the site to use the workflow. When you click the Publish command, it also saves the workflow.
New to SharePoint Designer 2013, you now have the ability to copy and paste within the Text-Based Designer. You can use the command in the Clipboard group on the ribbon, as well as using keyboard combinations such as CTRL+C to copy, CTRL+V to paste, or CTRL+X to cut. There is no undo or redo capabilities. You can also use the context menu of any selected item, as shown in Figure 7-6.

You can copy Stages, Steps, or individual actions or condition blocks, as well as selecting multiple lines of actions, steps, condition blocks, or stages. Selected items will be highlighted in a sky-blue color.
Use the commands in the Modify group to move and delete conditions, actions, and steps, as well as to modify the advanced properties of conditions and actions. Actions can be moved between steps and within steps, whereas conditions can only be moved up or down within their condition block. A condition block starts with an If statement, and subsequent conditions within that condition block start with an and or an or.
Use the commands in the Insert group to insert conditions, actions, steps, and, if it is a SharePoint 2013 workflow, stages. Use the else-if branch commands to add another condition block so that you can define actions to be performed, if the conditions of the first condition block are not true.
Use the Parallel Block command when you want a set of actions to execute at the same time and not in sequence. Parallel actions may not be performed absolutely simultaneously. The exact order cannot be specified and can vary each time a workflow instance runs. Use steps to document the major set of activities that need to be completed as part of your workflow.
If you are using a SharePoint 2013 workflow, the Insert group will contain the Impersonate Step command, which you can use to add a special step to your workflow that allows the conditions and actions within that step to execute using the security credentials of the workflow author.
The Manage group contains three commands that are the same as those in the Manage group on the Workflow Settings tab. The commands available on the Workflow tab allow you to publish a reusable workflow as a globally reusable workflow, export the workflow as a Visio file, and to switch to the Workflow Settings page. You can also switch to the Workflow Settings page by using the workspace breadcrumb and clicking the name of the workflow, which appears in the workspace breadcrumb to the right of Workflows.
Variables provide temporary storage that persists for the lifetime of the workflow. This tab group contains two or three commands, depending on whether you are working with a SharePoint 2013 or SharePoint 2010 workflow. These commands are the same as those in the Variables group on the Workflow Settings tab. The three commands are:
Initiation form parameters. Use when a workflow instance is to be manually started; thus, the initiator of the workflow can provide values stored in initiation variables, which can then be used in the workflow. The values entered by the workflow initiator are only available for the lifetime of the workflow instance.
Local variables. Use to pass values from one condition or action to another condition or action (for example, to save the Task ID created from the Collect Data From A User action so that a subsequent action can use the values that a person entered into the task).
Association columns. This command is available only with SharePoint 2010 workflows and is used with reusable workflows to add site columns to the list or library when the workflow is associated with that list or library. You should review existing site columns before you create new site columns within the Association Columns dialog box. With a SharePoint 2013 workflow, if you need to use workflows on other sites, then you should create a list or library workflow where the list or library contains the columns needed by your workflow. You can then save those workflows as workflow templates.
With SharePoint 2013 workflows, you can create a new type of variable that can hold an array of values, known as a dictionary. These are created using the Build Dictionary action and are used in conjunction with the loop actions.
Note
More information on dictionary actions in SharePoint Designer 2013 can be found at msdn.microsoft.com/en-us/library/jj554504(v=office.15).aspx.
You can use the Visual Designer within SharePoint Designer only when you are creating a SharePoint 2013 workflow. You can use the Visual Designer once you create a workflow from a Visio diagram, as described in the previous section, or you can create a SharePoint 2013 workflow within SharePoint Designer and then switch to use the Visual Designer by using the Views split button in the Manage group on the Workflow tab, as shown in Figure 7-7. The Visio diagram displayed is also known as the Workflow Outline.
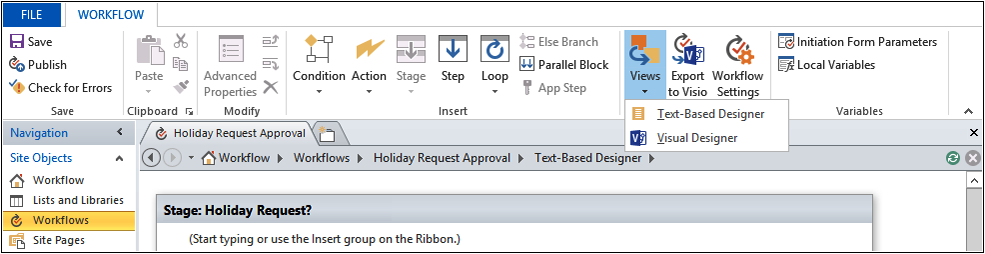
Figure 7-7. Use the Views split button to switch among the three views for a SharePoint 2013 workflow.
You can use the content area of the workspace and Workflow tab as you would within Visio. In the content area, you have a Shapes pane and a drawing area. When using the Visual Designer, the Workflow tab is displayed and consists of four groups:
Save
Modify
Manage
Variables
The Modify group is specific to the Visual Designer and contains commands similar to those that you would see in Visio: Pointer tool, Connector tool, and Text. The other ribbon groups are the same as you would see when using the Text-Based Designer and are described later in this chapter.
In the Modify ribbon group, you have the Advanced Properties command, which provides a way of displaying the Properties dialog box. You also can display this box by using the Action Tags menu, shown as a workflow settings type icon that appears on the lower-left side of the shape when you pause over or select the action, as shown in Figure 7-8.

The Action Tag, a drop-down menu, displays the attributes for that action or condition in the workflow and as a link—Properties—that opens a dialog box allowing you to modify parameter values to be used for that action.
In many cases, the attribute links on the Action Tag drop-down menu are also provided in the Properties dialog box; however, the Action Tag attributes provide a friendlier input mechanism than the Properties dialog box. The Action Tags attribute dialog boxes are the same as the dialog boxes that you would see if you used the Text-Based Designer. For example, the Start A Task Process shape has two attributes, Process Settings and Process Outcome, which you can use to configure the Start A Task Process action, as in the following procedure:
From the Action Tag menu, select Process Settings to display the Select Task Process Participants dialog box.
Configure the recipient or recipients of the task item by clicking the ellipsis icon to the right of the Participants text box to open the Select Users dialog box. Under Or Select From Existing Users And Groups, select User Who Created Current Item, click Add, and then click OK. The following graphic shows an example.
Enter a task title line for the task item.
You can include dynamic data within your workflow. For example, if you have associated your workflow with a calendar list, you can get the workflow to dynamically obtain the start date that a user has entered when he or she created the calendar item. To the right of the Task Title text box, there is an ellipsis button (also known as the Display Builder button), and the Define Workflow Lookup button, as shown next.
Click the ellipsis button to open the String Builder dialog box and then, in the Name text box, type Holiday request. At the lower left side of the String Builder text box, click Add Or Change Lookup to open the Lookup For String dialog box.
As shown in the following graphic, leave the Data Source as Current Item to tell the workflow to use the list item which was used to start the workflow instance, and then, from the Field From Source list, select Start Time.
In the Return Field As list, you can choose how you want the date/time field to be displayed. Select Long Date and then click OK twice to close the Lookup For String dialog box and the String Builder dialog box.
Use the Description text box of the Select Task Process Participants dialog box, to type the main message of the task item, as shown next. You can also use the Open Editor For Body button to open a String Builder dialog box, which allows you to include dynamic text. For example, type Team member, and then click Add Or Change Lookup to open the Lookup For String dialog box. In the Field From Source list, select Created By, and in the Return Field As List, click Display Name. Click OK to close the Lookup For String dialog box.
In the String Builder dialog box, on a new line, under Team, type has submitted a holiday request to, and then click Add Or Change Lookup to open the Lookup For String dialog box. In the Field From Source list, select Location. Click OK to close the Lookup For String dialog box.
Workflows developed by using SharePoint Designer are human centric, and therefore, as the workflow progresses, you will need to communicate with users of the site, either to complete a task or to obtain additional information. SharePoint 2010 workflows provided a number of task actions, the Start A Task Process action is similar to the Start Approval Process action that you may have used in SharePoint 2010 workflows. The sections Assignee Options, Email Options, and Outcome Options allow you to further configure this action, as shown next.
If you choose to send an email to the participants in the approval process, you can use the Open Editor button to open the Define Email Message dialog box, where you can enter the subject and the body of the email. The dialog box provides buttons that allow you to format the body of the email message.
Click OK to close the Define Email Message dialog box.


You could use the Properties dialog box to configure the action. When you choose Action Tag, Properties, a Start A Task Process Properties dialog box appears that displays all of the parameters for the action, as shown in Figure 7-9.

In the Define Email Message dialog box, you are limited to how to format the text by the button shown above the Body text box. Notice that the Properties dialog box exposes the body of any email properties as HTML tags. For example, by clicking AssignmentEmailBody and then clicking the ellipsis button that appears, the String Builder dialog box opens, where you can modify the HTML source code, as shown in Figure 7-10. Unfortunately, there is no IntelliSense provided, and you cannot copy and paste HTML text from your favorite HTML editor because you would lose any lookup values that you may have included in the message.

The Text-Based Designer, similar to the Visual Designer, allows you to see how stages, steps, actions, and conditions are associated with each other. The Workflow Editor surrounds conditions and their associated actions with a gray rectangle. Action and condition attributes are displayed as underlined text, which you use to configure them. Any dialog boxes that are displayed are the same dialog boxes that you see when you configure the actions and conditions using the Visual Designer.
Stage outline provides a high-level view of your SharePoint 2013 workflow, as shown in Figure 7-11. It shows the stages within your workflow, not the individual conditions and actions.

To use the Stage View within SharePoint Designer, Visio needs to be installed as well, and you have to display the workflow using the Visual Designer, before you can select the Generate Stage Outline from the Manage group on the Workflow ribbon tab. To switch to the Workflow Outline (that is, the first diagram displayed when you click Visual Designer), click Generate Workflow Outline in the Manage group on the Workflow ribbon tab.
There will be circumstances in which you find yourself in need of information, but it is not saved in the list where the workflow is associated nor in other lists or libraries in your site. However, the information can be calculated from the information in your site. SharePoint also allows you to specify a condition, so you are able to match retrieved data from a list item within another list or library; however, it will return only the first item that matches your condition.
The best way to understand these workflow calculations and obtaining data from another list is to use a specific scenario. In the following example, a holiday request scenario uses two related lists, as shown in Figure 7-12.

Holiday Request. This list is based on a Calendar list template with content approval enabled and one additional column:
Days Absent. This column is a number column with a default value of 1 and a minimum value of 1.
Holiday Allowance. A list created from the Custom list template, which has a list item for each employee in a team and consists of four columns. Because you will not be using the Title column, this field should be set as Not Required. All other columns should be configured as Required. The four columns are:
Team Member. A People Or Group field.
Allowance. A number field with a default value of 20, a minimum value of 0, and a maximum value of 50.
Holiday Taken. A number field with a default value of 0, a minimum value of 0, and a maximum value of 50.
Holiday Remaining. A calculated column with a formula,
[Allowance]–[Holiday Taken].
In the following steps, you will find the list item in the Holiday Allowance list that matches the team member who created the holiday request. You will then calculate the number of days a team member plans to take when adding the new holiday request to the number of days the team member has taken as holidays previous to this request.
In the Text-Based Designer, click where you would like the calculation action to appear. On the Workflow tab, in the Insert group, click Actions, and then, under Core Actions, click Do Calculation.
The words “Then Calculate Value Plus Value (Output To Variable: Calc)” appear.
Click Variable: Calc, and then click Create A New Variable to open the Edit Variable dialog box.
You can also create new variables by using the Local Variables command on the Workflow tab in the Variables group. It is good practice to not use the variables that SharePoint Designer creates because they might not be of the correct data type for your calculation, and the name will not indicate the information stored in the variable. You should use the variable name as a mechanism to document your workflow, and in large workflows where there are many variables using an appropriate name, this can save you time when you need to change your workflows. When you create a new workflow variable, create it before completing any links within an action or condition. When you create a variable after completing the links, then the links will clear and you will need to complete them again.
In the Name text box, type a_HolidayTaken, and then, in the Type list, select Number, as shown here. Click OK to close the Edit Variable dialog box.
Some actions, such as the SharePoint 2010 workflow actions, Start Approval Process, or the Start Feedback Process available in SharePoint Server 2013, will create their own variables when incorporated into your workflow; therefore, when you create a variable, it is advisable to devise a naming standard so that you can quickly identify the variables that you generated.
Click the first occurrence of Value, and then click Define Workflow Lookup to open the Lookup For Number dialog box.
Leave Current Item as the selected item in the Data Source list, and then, in the Field From Source list, select Days Absent. Click OK to close the Lookup For Number dialog box.
Click the remaining Value link, and then click Define Workflow Lookup again to open the Lookup For Number dialog box.
In the Data Source list, scroll down and click Holiday Allowance.
The Lookup For Number dialog box expands to include a second section, Find The List Item.
In the Field Data To Retrieve section, click Field From Source, and then select Holiday Remaining.
In the Find The List Item section, click the down arrow to the right of Field, select Team Member, and then in the Value, click the ellipsis button to open the Select User dialog box, as shown in the following graphice.
Under Or Select From Existing Users and Groups, select User Who Created Current Item, and then click Add. Click OK to close the Select Users dialog box.
Click OK to close the Lookup For Number dialog box.
A Microsoft SharePoint Designer dialog box opens, stating that the lookup you defined does not guarantee to return a single value, and that if more than one value is returned, only the first value will be used. Therefore, when you use SharePoint Designer to join two lists or libraries, you should verify that your workflow design ensures that only one value is returned. In this scenario, there should only be one list item in the Holiday Allowance list for each team member. Unfortunately, you cannot use the Enforce Unique Value option when you create a column of type People or Group.
Click Yes to close the Microsoft SharePoint Designer dialog box.


SharePoint 2013 provides two workflow platforms: the SharePoint 2010 workflow platform and the SharePoint 2013 workflow platform. The SharePoint 2010 workflow engine is installed automatically with SharePoint 2013. SharePoint 2013 workflows become available only when you install and configure the Workflow Manager. The Workflow Manager can be used only with editions of SharePoint Server 2013 and is not available with SharePoint Foundation 2013. All of your workflows that were built using SharePoint 2010 will continue to work in SharePoint 2013; however, SharePoint 2010 workflows do not use the Workflow Manager and are hosted within SharePoint.
The SharePoint 2010 workflow templates provided out of the box with SharePoint 2013 can be used to meet many customer requirements with no further effort. If they don’t meet your specific requirements, you can design your own workflows by using Visio 2013, which can then be imported into SharePoint Designer 2013, where the configuration of the workflows can be completed.
SharePoint Designer 2013 includes new functionality designed specifically for the Workflow Manager, which includes a visual workflow development environment that uses a Visio 2013 add-in. Workflow Manager is built on .NET Framework 4.5 and provides additional workflow actions and conditions and includes the notions of stages and loops, as well as steps.
SharePoint Designer also gives you an expanded capability to design workflows and reusable workflows within a site and to promote those workflows to globally reusable workflows so that they can be used by any site in a site collection. You can also save list and site workflows as templates and use them on other sites. In addition, you have the ultimate flexibility to design your own workflow components and SharePoint Designer activities within WF by using Visual Studio 2012.