
Using the Keyword Query Language (KQL)
Creating a customized search experience
MICROSOFT SharePoint 2013 provides more opportunity than ever before for building custom search experiences that deliver the right information to your search users. Search in SharePoint 2013 graduates to more than just lists of results; Search becomes a practical and powerful data access layer. With several new methods of using Search to access and aggregate information, the search experiences that you can provide your users are undeniably compelling when done properly. Many of the techniques require no code, and in many cases, it is not terribly difficult even when code is required.
In the previous chapter, we introduced some search concepts at a high level. In this chapter, we focus on the most important topics you will need to create your own unique search-based solutions. In the first part of the chapter, we take a deeper look at the primary Search UI building block technologies in SharePoint 2013:
Keyword Query Language (KQL)
Search web parts
Result sources
Query rules
Result types
Display templates
After a deeper look at each of these components, we will walk through a simple search customization that uses each of the items we discussed. After working through this chapter, you should have all the basic knowledge necessary to begin building your own SharePoint 2013 Search solutions.
INSIDE OUT: Testing your search customizations
In scenarios where you need to test your search customization in a question-and-answer or development environment prior to production, you can now use the new Configuration Import and Export feature in SharePoint 2013 Site Settings (in the Search section). The export option sends query rules, result sources, managed properties, and other information to a file named SearchConfiguration.xml. Thus, you are able to get all your settings just the way you want them in a development environment and export them. Then you can use the Import option into a site or site collection in your production environment. In addition, if you are building a search-based app, you can use your export package as part of the app package so that when it is installed in another environment, all the configuration information is installed with the app.

Sometimes the best way to provide a “custom” search to users is to arm them with extra knowledge on how they can optimize their search queries. Perhaps the best route for user education is providing them some basic instruction on how to use KQL. When users type a query into a SharePoint Search Box Web Part page, whether they realize it or not, they are taking advantage of KQL.
The following list includes some examples of how you might use KQL to perform better searches.
Note
A full KQL reference is available at http://msdn.microsoft.com/en-us/library/ee558911.aspx.
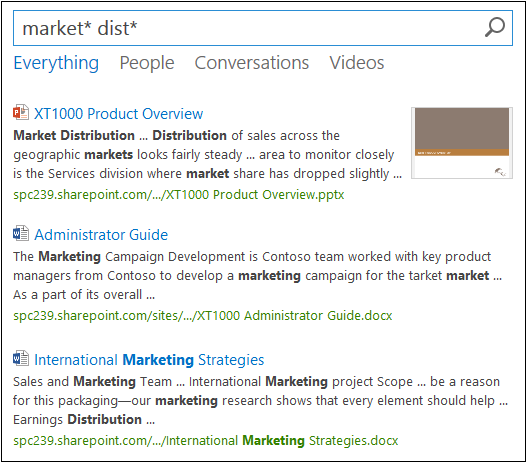
You want to find all documents that have terms such as “market,” “marketing,” “markets,” and/or the words “distribution,” “distributor,” and so on. You can use wildcard search to assist in this type of search rather than having to specify an exact match for each of the possible variations of the word. You would enter the following search syntax into the Search Box: market* dist*, as shown next.
You want to find only items that match the phrase, “market distribution.” To eliminate all other potential matches, enclose the search terms in parentheses. The only results that will be returned are those that have the exact words (in order) in the phrase.
You want to limit the previous search to now include only items that are authored by Sara Davis. To do this, you can use a property restriction. So, the search syntax you put in the Search box is “market distribution” author:“Sara Davis.” Notice that there can be no white space between the property name (author), the property operator (:), and the property value (Sara Davis).
Another example of a property restriction would be to limit your search by the title of the item. You only want to return items that have the exact words marketing campaign in the title. Therefore, your search syntax would be title:“marketing campaign,” as shown next.


There are many useful properties you can use in your KQL; these are merely a few simple examples. See the link mentioned earlier for even more examples of how to use KQL in your search queries.
INSIDE OUT: Using KQL for search applications
While KQL is simple and accessible for users, it is also an extremely powerful tool for creating custom search applications without code. With some creative use of KQL, you can provide links on team sites that are search URLs with a KQL parameter. For example, the following URL embedded in a link, as shown here, would return all calendar events: https://adventureworks.sharepoint.com/search/Pages/results.aspx?k=ContentClass%3DSTS_ListItem_Events.

The search results page in SharePoint is comprised of four primary web parts:
Refinement
Search Box
Search Navigation
Search Results
Most of these web parts have properties that can be used to customize the search experience in the browser easily. We will take advantage of the configurable properties of the Search web parts in the walkthrough later in this chapter.
Note
This chapter focuses primarily on the web parts in the search results pages typically found on a SharePoint Search Center. The Content Search Web Part is used most often in publishing scenarios; therefore, it is discussed in Chapter 12.
As mentioned in the previous chapter, SharePoint 2013 search results pages implement the concept of verticals as part of the search navigation. Verticals allow users to target their searches at content, people, videos, and so forth. The Refinement Web Part appears on all the out-of-the-box search vertical pages (such as Results.aspx, Peopleresults.aspx, Conversationresults.aspx, and Videoresults.aspx). The Refinement Web Part helps users narrow search results to a more precise set of content by selecting categories they care about.
Each of the search verticals has its own unique refinement properties that make sense for that context (such as author refiner for documents and expertise refiner for people). When you customize a search results page, you can change properties in the Refinement Web Part and configure the following items:
Identify a different Search Results web part from which to filter search results.
Select all the refiners to show in the web part.
Specify the display template that is applied to the web part if you want to change the way refiners look or how they are ordered.
INSIDE OUT: Managed properties and the Refinement Web Part
The SharePoint 2013 Search schema contains attributes of managed properties and a mapping between crawled properties and managed properties. A crawled property is content and metadata that is extracted from an item (such as a spreadsheet) during an incremental or full crawl. To include the content and metadata of crawled properties in the search index, you simply map crawled properties to managed properties. The managed properties can have many different types of attributes. And it is these attributes that determine how your content is will be shown in search results.
If the managed property you want to add as a refiner is not available in your list of refiners, you first need to ensure that they are configured as a Refined property. This is performed in the Managed Properties area of Search Settings for your site collection, as shown here. (For a complete list of out-of-the-box managed properties, see http://technet.microsoft.com/en-us/library/jj219630(v=office.15).)

The Search Box Web Part is obviously important, considering that it is the initial point of interaction a user has when typing in a query on a search page. Configuration options for the Search Box Web Part are relatively straightforward. As shown in Figure 19-1, the primary configuration change you might make in the Search Box Web Part settings is to alter the destination of where search results are sent. You have the option to send them to a web part on the same page or to another search results page in cases where you are providing customized search experiences. The Search Box properties also allow you to control whether Query Suggestions are enabled. They are turned on by default.

The Search Navigation Web Part presents the user with the various search verticals configured for the site. Out of the box, the verticals you will see are Everything, People, Conversations, and Videos. The primary purpose of this web part is to provide the user interface for search verticals, but the Search Navigation Web Part itself does not have many configurable properties; rather, it directs you to configure the navigation links on the Search Settings page of your site.
As shown in Figure 19-2, on the Search Settings page, you have the option to add your own navigation URLs, which will then appear on the Search Navigation Web Part. Each of the navigation links references a search results page that can be configured with web parts and properties that deliver an experience that is most appropriate for the type of content being searched for. For example, if you added an Images search vertical, your navigation link could direct the user to a search results page that has refiners and display templates that make the most sense for picture search results.

At its most basic level, the Search Results Web Part provides the UI for displaying results to a user. However, the Search Results Web Part has some important configurable properties that can help provide a very rich and targeted set of results to a person performing a search. As shown in Figure 19-3, the most significant properties on the Search Results Web Part are the Change Query option under Search Criteria and the ability to change the Display Templates used for search results in the Display Templates section. These Search Results Web Part properties allow you to control both the target content sources to which queries are directed and the manner in which the results are displayed.

As discussed in the previous chapter, result sources are the searchable content repositories available in SharePoint 2013. You can see in Figure 19-4 that SharePoint 2013 has 16 result sources out of the box. The default is set as Local SharePoint Results. You can change the default result source for your search pages if you want. If you need to add a custom result source, you may do so at the farm, site-collection, or site level, depending upon how broadly you plan to use the custom result source.

In the previous chapter, you were introduced to the basic capabilities of query rules, and you saw an example of a simple one in action. To reiterate, query rules enable a site or site-collection owner to add conditions, whereby search results are dynamically reformulated in order to more closely match the intent of the search user and then provide an appropriate action. For example, if a user performs a search on a keyword phrase such as “marketing videos,” you might give them a promoted result block with items that come from a video repository (result source). In addition, you could then present related actions that the user can perform on the videos.
Another way to think about it is that query rules enable you to “conditionally control” the search experience that a user will have in any given search vertical. Used correctly, query rules substantially increase the likelihood of providing a user with the most relevant information possible.
When you create a new query rule, the action that you configure will create a promoted result, alter the ranked results, or both. Promoted results put specific result items that you have selected at the top of the results list in a banner. These were formerly known as “Best Bets” in SharePoint 2010. You can add as many promoted results as you need for any given query rule.
Similar to a promoted result is a result block. A result block is essentially the same as a promoted result, but rather than just one promoted item, it is a group of results that match your conditions (such as all items that are on sale today). As with a promoted result, items matching the result block can be configured to return results to the user at the top of the search results page.
Query rules also have the power to dynamically alter the ranked results themselves. Without a query rule in place, the search engine ranking methods of SharePoint will determine what items are most relevant to return to a user’s query. But if you have scenarios where you would like to alter the ranked results, you can do that with a query transform inside your query rule. An example might be if users search for marketing decks, you might know that they are looking for Microsoft PowerPoint files. So your query rule can have an action that specifies a user who searches for that particular term will get .pptx file type results returned before any other matches. The ability to adjust how ranked results will be returned to the user is a nice step forward in no-code search-relevance tuning in 2013.
Occasionally, you will want to change a user’s query in order to provide the most relevant results. For example, suppose that you create a custom search vertical for HR forms. When someone types a query in the HR forms vertical search page, you can change the query so that it returns only results that are HR forms. In order to give the user’s query this sort of nudge in the proper direction, you use the Query Builder to configure a query transform.
A query transform can be used to replace properties of a query, such as the result source, or the order that items will be displayed in search results. A query transform replaces the text of the query by using a query template that you can configure. The query template has the text that will replace the user’s query, and the template can contain query variables to make it even more flexible. Figure 19-5 shows a simple example of using Query Builder within a result source. The purpose of this transform is simply to take the user’s search terms and narrow the results to only items where that user is the author.

Query transforms can be created in three primary locations:
In the result source that the query uses to get its results. Of all the places that you can use query transforms, results sources are the one you should choose if you want to be sure that it takes precedence over any other possible transforms on the content. When you configure a transform in a result source, the transform changes will not be overridden because the result source performs the last transform on the query.
The Search Results Web Part. You would typically configure a transform in a web part only when you do not need to make the same changes to queries running beyond the scope of the web part on that page.
In a query rule. Here, you can specify that certain actions will be performed only if certain conditions are fulfilled. Two of the query rule actions use a transform to dynamically change the query:
Add A Result Block on the search results page.
Change The Ranked Results. This action modifies the query that the user typed, thereby reranking the results at the time the search is performed.
Recall from the previous chapter that result types define rules for the way a particular type of content will be displayed in your site’s search results page. For example, when you perform a search, the way a Microsoft Excel result type is displayed is different than a Microsoft OneNote result.
Each of the result types are bound to a result source and then configured to match certain types of content with that source. A set of common SharePoint result types are available when you install SharePoint. You can see the list of the out-of-the-box result types in your Search Site settings. Once again, each result type is connected to its own display template. This allows each result type to have a unique appearance and surface properties that are most relevant to a specific kind of document.
In addition to the default result types, you can define custom result types that are relevant to your business. A result type can then be associated with a custom display template, enabling you to surface specific kinds of results that are significant for users. An example might be that when your users search for HR forms, you would like the search results to display some extra fields of metadata information from your forms, such as the human resources contact assigned to the employee performing the search. To accomplish this, you can create a custom result type for human resource result items, as illustrated in Figure 19-6.

As a real-world example, let us pretend that in your business, HR forms are Microsoft Word documents with a custom property, IsHRform, along with additional metadata: HRContact, EmployeeHireDate, and EmployeeNumber. To create a human resources result type, you would first copy the standard Word result type and add a condition whereby results that match should have the custom property IsHRform equal to True.
Next, you need to build a custom display template for HR forms that surfaces the managed property HRContact and any of the other pieces of metadata you want in your template. The process of customizing display templates is not difficult. The work that you will perform is done in HTML and JavaScript. By far, the best way to do this is to create a new template by copying an existing template. Then add your additional managed properties to the template that is relevant for the respective result type.
Once you complete the result type and template, when a user performs a search, each result is evaluated against the rule for HR results. If the query matches, results are displayed using the HR display template that you created. If the query does not match, it is simply matched to one of the out-of-the-box result types and corresponding template. In the walkthrough later in this chapter, you will have a chance to see some of this in action.
In previous versions of SharePoint, the primary method of customizing search results pages was by adding XSLT to the Search Results Web Part. As mentioned in the previous chapter, the technology for controlling the rendering and presentation of a search result item in SharePoint 2013 is with the HTML5-based Display Template functionality. Display templates provide a much more elegant approach to delivering a customized search result UI.
As you can see in Figure 19-7, one place to view your display templates is in the Design Manager of your Search site.

Note
For full coverage of Design Manager, see Chapter 12.
Display templates provide many useful and flexible options that you can adjust in the HTML and JavaScript code. One of the easiest and most advantageous options is the ability to retrieve managed properties that you have identified in your HTML code and then display them in a search results item. Your users will find great value in having extra bits of highly relevant information displayed along with their search results.
In this section, we will now put all the components we have discussed thus far together to create a simple, customized search solution. There are limitless examples of when you might want to create a custom search solution. For this exercise, we’ll pick a relatively common scenario: users are looking for information contained in product Portable Document Format (PDF) files that are in a corporate repository. Our goal is to make it even easier for them to find the right content.
You might be asking yourself, “That seems like something you could just use standard out-of-the-box SharePoint Search for, right?” Well, yes, that is true, but what we want to illustrate in this section is how to create an enhanced search experience that goes beyond the out-of-the-box interface. Even more important, we want to understand how to customize a search environment so that the probability of users finding the right content on the first search attempt is increased.
The process we use to accomplish our goal consists of six primary steps, each of which requires a number of tasks. In the following pages, we illustrate the steps to take so that you can replicate a similar solution in your environment. The six primary steps are:
Create a result source that points at the library holding our PDF files.
Generate a search page for the new Product PDF vertical.
Edit the Search Results Web Part on the new page to point at the PDF result source.
Add search navigation so that the new vertical appears on the Search Center.
Add a query rule that creates a promoted result anytime someone types “SharePoint,” “Business,” “Productivity,” or “ECM.”
Create a custom result type and display template that enables a hover panel preview for the PDFs.
Our first task is to create a result source. The link to create a new result source is in the Site Settings of the Search Center. Create a new result source with the name Technical PDFs, and leave all other settings at their default except for the query transform. This is where we tell the result source what its “scope” will be by using search syntax to restrict results to only the library with our technical PDFs in it.
After clicking Launch Query Builder, enter some simple KQL syntax, as shown in Figure 19-8. We use the site property with a prefix match on the library that stores our technical PDFs.

Once the KQL is verified using the Test Query button, simply save the result source and exit. The first step is complete.
The next step is to add a search page that is configured for the new result source. In order to do this, simply go to the Settings menu in your Search Center site and select Add A Page, as shown in Figure 19-9.

After you do this, notice the new page has all the search web parts preconfigured on it. This is because you created the page from within your Search Center. Now that we have a new page, we are ready to configure the Search Results Web Part.
Now you need to configure the Search Results Web Part. With the Search Results Web Part in Edit mode, click Change Query and point the result source at the custom Technical PDF source that we added in the previous step. This is shown in Figure 19-10. Providing this configuration will tell the Search Results Web Part for the new Search page to restrict results to only the Technical PDF result source.

At this point, click Apply in the web part settings window. Next, click Save and stop editing your new page. Once you have saved the new page, check it in and publish it to the site. It is time to add a Navigation link for our new PDF vertical.
Enter Site Settings in your Search Center and click the Search Settings link under the Search Category. Once we are in Search Settings, click Add Link in the Configure Search Navigation section. Give the new link a name, and then browse to the new PDF search page that we added in the previous step (see Figure 19-11).

Click OK to save the link, and then click OK again to leave the Search Settings page. Now when we perform a search, the new search vertical appears on our results page, and by selecting it, we can restrict results to just technical PDFs, as shown in Figure 19-12.

There are many potential uses for query rules. In our example, we built a search page and added a link to it in the Search Results navigation. But what if the user performing the search is not aware of the Technical PDF Library? Perhaps the user will never use the link that we have provided in the interface. She might never click anything other than the default “Everything” search vertical. Our solution to this is to build a simple query rule that adds a promoted result to the search results page even if the user is performing a search from the Everything vertical. The promoted result that we added is triggered any time the user searches for “SharePoint,” “Business,” “Productivity,” and so on. This ensures that if users type specific search terms indicating that they are likely looking for content that we know is in the Technical PDF Library, they will always get that result at the top of their search results.
In Site Settings, go into Edit Query Rule and create a new query rule for the result source Local SharePoint Results. This will tell the query rule to run any time the user is doing a search for content stored in the “local” SharePoint farm. In the Query Rule Condition, provide all the potential keywords that will trigger your rule, as shown in Figure 19-13. Finally, add a promoted result that simply points to the URL of the Technical PDF Library.

Now when we run a search from the Everything vertical that has one of the keywords defined in our query rule, we will see a promoted result, as shown in Figure 19-14.

Figure 19-14. The Technical PDF Library has been promoted to the top of the results page based on a keyword the user had in his search query.
At this point, we have a search experience that provides our users much better guidance on finding relevant content in the Technical PDF Library—either by using the new vertical that we created or by using some help from the query rule. In order to do that, we took advantage of result sources, search result pages, Search Results Web Part, search navigation, and a simple query rule. Next, we will show you how to use result types and display templates to improve the look of search results that come from the Technical PDF Library.
By default, SharePoint 2013 does not provide a robust display panel for PDF search results because there is no thumbnail preview. The out-of-the-box display panel for PDFs is shown in Figure 19-15. Therefore, to finalize our Technical PDF Library search customization, we chose to use result types and display templates to provide an improved Search interface for results from our library.

When we are done with our modifications, results from our PDF Technical Library will look like Figure 19-16. Notice the big, beautiful hover panel preview of a PDF search result.

To create our improved Display Panel template, go into Master Pages And Page Layouts in the Site Settings of the Search Center. Click Display Templates and then Search. When creating a custom Display Panel template, it is best to start with a copy of an existing one, so download a copy of Item_Default.html (this is the Display Panel template for many generic items).
Open the file with your favorite HTML editor. (Notepad will do just fine.) Inside the HTML code, change the title to something like “YourName_PDF.” Then change the hoverUrl variable in the body to “~sitecollection/_catalogs/masterpage/Display Templates/Search/Item_Site_HoverPanel.js.
<body>
<div id="Item_Default">
<!--#_
if(!$isNull(ctx.CurrentItem) && !$isNull(ctx.ClientControl)){
var id = ctx.ClientControl.get_nextUniqueId();
var itemId = id + Srch.U.Ids.item;
                   var hoverId = id + Srch.U.Ids.hover;
                   var hoverUrl = "~sitecollection/_catalogs/masterpage/Display
                                        Templates/Search/Item_Site_HoverPanel.js";
That change tells our custom Display Panel template to use the SharePoint Site Hover Panel, which is actually quite handy and adept at viewing PDFs. Save your new Display Panel template file as “PDF_Default.html” or something similar, as shown in Figure 19-17. Now upload the new HTML template to the same place we made the copy from (Site Settings|Master Pages|Display Templates|Search).

Last, but not least, we provided a custom result type so that when a user searches for a PDF, search results will know to use your custom Display Panel template for PDF result types. To do this, go into Site Settings and create a new result type. Name it My PDF Viewer, set it to match PDF content, and then configure it to match results that look like whatever you named your custom Display Panel template, as shown in Figure 19-18.

After saving the new PDF Viewer result type, we went back and edited our Technical PDF Library search page so that the Search Results Web Part specifically uses the new Display Panel template we created. That will force any searches done on the Technical PDF vertical to return results using the correct Display Panel template. Publish your changes and voilà! You not only have made it easier for users to find relevant PDFs, but also you have modified an out-of-the-box Display Panel template to give them a thumbnail preview in the hover panel.
SharePoint 2013 Search is powerful and effective, even if you choose to use only the default settings. As you have seen in this chapter, the opportunity exists to make the search experience for your organization even better by utilizing a few simple tools, such as result sources, query rules, display templates, and so on. In this chapter, you learned about the basic components that are available to create a customized search experience. With some creative application of these tools, the potential exists to build some truly great and productive search experiences—without very much heavy lifting.