
What’s new in SharePoint 2013 Search
Exploring the new search user interface
Discovering social and people information
Search architecture and site administration
Adding a result source, query rule, and result type to your site
WITH the power of the new Microsoft SharePoint 2013 Search, you can search and discover information you need at precisely the time you need it from nearly any modern computing device. In SharePoint 2013, you have a similar level of power and flexibility for finding information that Internet-based search engines deliver—and beyond! The search architecture of SharePoint 2013 now allows you to connect to the data sources you require and present the information you need in a rich, interactive user interface unlike anything SharePoint possessed previously. Moreover, search in SharePoint 2013 is not merely about getting a list of results; now search actually powers many of the core user experiences, such as social, videos, web content management, navigation, and more. In many cases, users are presented with actionable items when they perform searches, enabling them to perform pertinent, useful actions to obtain the information they need.
In the first half of this chapter, you will learn the basics of how to find information using the new SharePoint 2013 Search interface. Then, you will receive a high-level overview of the new search architecture in SharePoint. To wrap things up, you will come to understand some of the configuration and customization power that is now available to site owners.
The short answer to the question “What’s new?” is, a lot! There are massive improvements to the entire search engine—all the way from the UI to the relevancy ranking and tuning model to the physical and logical SharePoint farm architecture. One of the most significant changes is that SharePoint 2013 now has a unified search architecture. In SharePoint 2013, the search architecture is updated and includes components that were previously available only when you installed FAST Search Server 2010 in addition to SharePoint 2010. There is no longer a need to do a separate installation of FAST Search Server for a SharePoint farm, as was the case in SharePoint 2010. Now, when you install SharePoint 2013, you get 100 percent of the search features “in the box.”
Some of the new capabilities of SharePoint 2013 Search include the following:
User experience. A new HTML5-based search results framework that includes enhanced results pages, hover panels, richer previews, and result counts.
Search administration. Enhanced search management, including a number of new Windows PowerShell commands.
Developer capabilities. New developer capabilities, including REST web service support, a new client-side object model for returning search results to mobile and other client applications, and a new search results framework allowing customization of the UI with HTML, JavaScript, and CSS.
eDiscovery. Closer integration with Microsoft Exchange, allowing eDiscovery of email data.
Continuous crawling. SharePoint administrators can now enable continuous crawling for content. What this means for users is that new content will be added to the search index and thus show up in search results very quickly.
Cloud readiness. SharePoint 2013 search was designed with the cloud in mind for those customers who prefer to outsource the hosting of their SharePoint environments.
Search refinements. Site owners can define search refiners that are specific to the needs of their site, thus allowing users to refine search results by using tags and metadata terms that are relevant to their business.
Result sources. Site administrators now have the ability to manage result (content) sources for their sites.
Query rules. Site owners can add query rules to help guide users to the best results by dynamically reformulating the user’s search queries and then promoting the most relevant results on the search page by using promoted results (formerly known as best bets).
SharePoint 2013 has a sleek and modern search interface that represents a significant step forward in ease of discovering and acting upon all types of information. Usability of the search results page and related components was one of the primary investment areas during product development. Some of the most prevalent changes include the following:
An HTML5- and JavaScript-based interface
In-document library search
Rich preview panes and interactive hover panels
Deep refinement of results
Visual refinements with counts
A Results tab for videos and reports
Language selection
Note
For this next section, it is assumed that you have a SharePoint 2013 environment in place with some documents that have been crawled and added to the search index.
Now we will explore each of these new interface aspects in more depth, starting with the out-of-the-box search experience. When you enter a search site, as shown in the example in Figure 18-1, you will notice that the interface is clean and simple.

When you enter a term in the Search box and execute it, you are directed to a search results page. This is where you will begin to get a full appreciation for the major usability enhancements in the new interface. The page that you see should look similar to Figure 18-2. You should immediately notice some changes in the refinement options in the left navigation pane. You will see that you can refine your content in a variety of ways, including file type and author.

Figure 18-2. The new search results page in SharePoint 2013 includes refiners and rich document previews.
Notice the rich thumbnail previews of the Microsoft PowerPoint files. If you pause over one of the search results, a hover panel appears that shows the file in the Office Web Apps. Depending on the type of file, several options are available for interacting with the document. In Microsoft Word documents, you can scroll or click headings. In PowerPoint, you can toggle between the slides.
Note
Much of the richness of the new SharePoint 2013 search results page is due to the new display template technology, which is discussed in more detail in Chapter 19.
From the hover panel, you can easily interact with a search result. You can follow, edit, or view the library in which the file resides. The hover panel also gives you the option to send the file via email to a colleague. If you click one of the links under “Take A Look Inside,” you are redirected to a new browser tab in which SharePoint presents that particular location in the document. This requires that Office Web Apps is installed in your environment.
Note
As mentioned in Chapter 6 Office Web Apps Server is a new server product that delivers browser-based versions of Word, PowerPoint, Microsoft Excel, and Microsoft OneNote. To provide document previews in the hover panel of SharePoint 2013 search results pages, Office Web Apps must be configured and installed correctly in your environment. For details on installing and configuring Office Web Apps, refer to the following Microsoft TechNet article: technet.microsoft.com/en-us/library/jj219455(v=office.15).aspx.
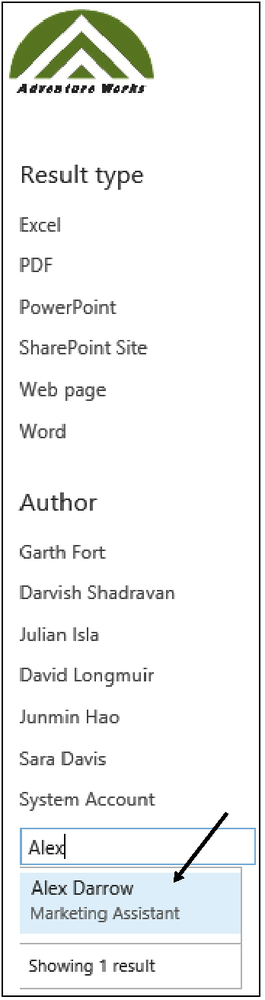
The refiners on the left navigation pane give you the ability to limit your results to only the types of results you want. There are many refiners available out of the box, and the good news is that you can now easily select and add refiners to your site under the Schema section of Search Within Site Settings. You will notice each of the refiners has a Show More option under it if there are more options available. The Author refiner, shown in Figure 18-3, has a useful feature in that when you click the Show More option, you are able to type in a user name, and you can refine down to only documents by that person.
Another useful feature of using the refinement panel is that you are presented with counts at the bottom of the search results list. In Figure 18-4, the user refined the search results down to include only those with extensions that match “PDF.” The set of results went from hundreds down to three with one click.

When performing a document search, you probably also noticed near the bottom of the refinement panel the interesting new interactive Created refiner, as shown in Figure 18-5. This interactive histogram control allows you to refine your results by either clicking one of the bars on the chart or using the slider to select the date range you are interested in.

Figure 18-5. The Created refiner allows you to refine search results further by moving a slider bar.
If you enter page edit mode on the search results page and then edit the Refinement Web Part, the Choose Refiners button appears in the properties for the Search Refinement Web Part. Once you select this, a window appears that allows you to add, modify, or remove refiners, as shown in Figure 18-6.

Note
For a deeper look at adding your own custom refiners, see Chapter 19.
Searching from an Enterprise Search Center is useful when you want your search to span a large set of enterprise content. However, there are times when you simply need to find a specific item within a document library rather than searching the entire index. SharePoint 2013 has made that task possible by placing a search box inside each library. This capability is called In Line Search. In Line Search is scoped to only the items within that particular library.
Figure 18-7 shows a document library with several documents in it, before any search is performed. Figure 18-8 shows the same document library immediately after the user typed “Q3.”


As you have seen, in SharePoint 2013, document search is greatly improved. Along with that improvement comes a new concept known as search verticals. Search verticals were known as search scopes in SharePoint 2010. Search verticals are categories of information types that your users may want to search on, such as people, videos, and conversations. Social information, such as discussions in community sites, is now easily searchable, thanks in part to search verticals.
In SharePoint 2010, the option existed to do people searches for those times when you were looking for information related to a person rather than a document (such as skills, projects, location, etc.). That capability still exists in 2013—and is greatly enhanced. To test this yourself, simply do a search for a generic term in your environment (such as marketing, project, etc.). Make sure you select the People tab on the search results page. If you pause over a person’s name in the results list, you are presented with a rich set of information in a hover panel, similar to the way you are presented a hover panel for document results.
Similar to SharePoint 2010, the information about a person in a people search result comes from the SharePoint user profile. In SharePoint 2013, one significant improvement is that the people search checks to see which documents a user has authored when determining relevancy. This is important because it is often the case that the user’s profile may not be updated regularly, but that person may still be actively working on new content. Therefore, SharePoint surfaces documents in the hover panel that make the person relevant to a particular search query. For example, as shown in Figure 18-9, we searched for “marketing and packaging.” Notice that Dorena has items with the term “packaging,” and the search engine has therefore determined that she is a relevant result for the query. This is a powerful way to find the right person and the right document at the same time!

Along with people search, SharePoint 2013 now has two additional search verticals: conversations and videos. Each of these verticals allows users to target their search to a category of information. For example, if you know that what you are searching for is related to a conversation on a community site microblog, you can target your search by choosing conversations as the scope, as shown in Figure 18-10.

Figure 18-10. On the conversation search results page, I can target my search by choosing conversations as my scope.
The video search works much the same way. The video search is a good example of a search-based application. It combines many of the SharePoint Search customization capabilities to deliver a rich video experience. If you have videos in your SharePoint to search, you can select the videos search vertical, as shown in Figure 18-11. Not only will you get video results, but also you can get a hover panel that actually plays the video for you without having to leave the search results page.

If you want to add your own search vertical with custom data, you can accomplish this with the Site Search Settings page.
Note
See Chapter 19 for more information about how to add your own search vertical.
As a site or site-collection owner in SharePoint, you most likely do not need to be concerned with the SharePoint farm administration aspects of search. However, there are now several important and powerful aspects of search administration that can be delegated to site-collection administrators and site owners. This next section will help you become familiar with the new SharePoint 2013 search architecture at a high level. Then you will learn about some of the specific site owner administrative tasks that you can perform to ensure a fruitful search experience for the users of your site.
While this book does not cover the farm-level administration of search, it is still important to understand the primary components of a search topology so that when you are discovering information in SharePoint or configuring a site’s search settings, you will have a full appreciation and understanding for what is happening behind the scenes.
As was mentioned earlier in this chapter, SharePoint 2013 Search is now consolidated into a single architecture. This is useful from a business standpoint because your organization no longer needs to make the decision of whether to acquire the extra FAST Search option that existed in 2010. All the functionality for Enterprise Search exists in the Standard version of SharePoint 2013.
From a technical point of view, this is also advantageous because now SharePoint administrators no longer need to install a separate farm to support the additional capabilities that a FAST server brought to the table. All of the tools to build, develop, manage, and deliver a rich and modern search experience are available in the Standard edition of SharePoint Server 2013.
As shown in Figure 18-12, SharePoint Search consists of six primary components:

Crawl
Content Processing
Analytics Processing
Index
Query Processing
Search Administration
Each of these components has a valuable role to play in ensuring that SharePoint Search is able to deliver the information you request rapidly when you perform a search query. When SharePoint administrators configure the SharePoint farm, one of the administrative tasks they undertake is to define result (content) sources. Result sources generally include content that resides in SharePoint, but often include many other sources as well, such as email, databases, business applications, and other websites. After the content sources are defined in SharePoint Central Administration, the SharePoint Search Admin component guides crawling of the content on whatever schedule the administrators have defined.
The Search component responsible for crawling is simply referred to as the crawl component. The crawl component does not actually parse through the content; rather, the crawl component hands off the content to the content processing component.
The content processing component actually processes the crawled items and their associated metadata. Format handlers within the content processing system actually sift through items such as documents and PDF files to extract the text and other important properties, such as language detection and metadata. Content processing is at the core of the search indexing system in SharePoint. It is the part of the search system where artifacts are actually extracted and prepared for consumption into the search index.
Once the content processing function is complete, the analytics processing component can begin its work. This includes analyzing the crawled results and making determinations about how the users interact with the content and analyzing usage statistics, such as page views and recommendations. The analytics information is available for reporting in a SharePoint database named Analytics Reporting.
The next major component in the search architecture is the index. This is a unique part of the SharePoint search architecture in that the index both “eats” and “feeds.” The index ingests information provided to it from the previously discussed content processing component and writes that information to the physical index files. The index also provides responses to incoming queries coming from the query processing component, which is discussed next.
Note
If you want to understand all the details of the SPEnterpriseSearchIndexComponent Windows PowerShell command, there is an article on TechNet located at technet.microsoft.com/en-us/library/jj219721(office.15).aspx.
The last major component involved in the handling of user search queries is the query processing component. This extremely important last step of the search process is responsible for taking the data from the user’s search input, handing it off to the search index, and then returning the results to the user once the query is processed. The query process is much more than merely returning a set of matching results. At the time a query is submitted, the query processing component analyzes the input for linguistics information, checks the input against the thesaurus, spell-checks the input, and performs several other important functions. As part of the query analysis, this component also checks to see if there are any query rules that are applicable to the search.
The administrative component of SharePoint search focuses primarily on system management of the search components and processes. The administrative component has multiple duties, including:
Managing search topology on the SharePoint farm
Coordinating all of the previously mentioned search components
Running system processes related to search, such as Noderunner.exe and Mssearch.exe
Reading and writing configuration information to the Search Admin SQL database
The first task in providing a rich search experience to users in SharePoint 2013 is to create a special site-collection type called a SharePoint Enterprise Search Center. If you do not already have one created on your SharePoint farm, you will need to create one or work with your SharePoint administrator to put a search site in place. It is a simple process to add a search center; when you create the site collection, simply choose the Enterprise Search Center template, as shown in Figure 18-13.

Once you have created a search center, you can configure your site collections to use this search center as the users’ “fallback” location to search from if they do not find the results they need. If they do not find what they were looking for in your site, they will be prompted to try their search again from that Search Center. This setting is under the Search portion of Site Collection settings, as shown in Figure 18-14. Therefore, by ensuring a properly configured environment, your users will be more likely to find the content they need.

If you are a SharePoint 2013 site or site-collection owner, you now have a significant amount of power and control over the search settings for your site(s). In this version of SharePoint, the search architecture is designed in such a way that much of the search experience is available to be customized at the site level. A site owner has the following search-specific settings available in the Site Settings for a site:
Result sources. This is the list of content repositories a site uses to provide search results when a search query is performed. By default, it will use the same set of content sources as are defined in the Site Collection settings. However, you can add your own result source, as you will see in the upcoming section, “Adding a result source, query rule, and result type to your site.”
Result types. While result sources define what content repositories are available to be queried, the result types setting defines the rules for the way a particular type of content will be displayed on your site’s search results page. Result types are the way in which you invoke display templates that are based on a set of rules. The rules can contain common operators that test against managed properties. For example, you could have a result type that only activates if the JobTitle managed property field contains “Executive,” thus providing a different experience for the users that have that term in their title. Several common result type definitions are provided with SharePoint, such as PowerPoint, email, PDFs, and so on. You can add custom result types to meet your specific business and technical requirements. Each result type is an aggregation of the following components:
Conditions. Result type conditions define what content sources and specific types of content comprise that result type.
Properties. Properties is an optional part of a result type condition that allows you to restrict the search results to content that has been flagged with the managed property you specified.
Display templates. Display templates are how you define a specific visual layout of each result type. Display templates use HTML, JavaScript, and CSS to define the visual layout and behavior of a result.
Query rules. The query rules setting allows you to improve the relevance of certain types of user queries on your site proactively by dynamically reformulating their search at query time. The query rule consists of conditions and actions. Conditions define when the query rule takes effect, such as when a specific keyword is detected). Conditions also define what content sources the query rule is relevant to when it runs. Actions are what the query rule does with the results. An example would be when someone inputs a query that contains the keywords “customer report,” you might return a set of promoted results from a SQL Server Reporting Services content source. We will take a closer look at the details of a query rule in the “Adding a result source, query rule, and result type to your site” section, later in this chapter.
Schema. Managed properties (metadata) and crawled properties for the content in your site are configured on the schema page. If you add a custom content type that has some number of data fields (columns), you can work with those columns under the Schema settings. The managed properties will be useful when configuring query rules and custom display templates.
Search settings. Configure high-level behavior of your site’s search settings here. There is an option that allows you to re-direct searches on your site to an appropriate Enterprise Search Center. You also create custom search navigation links for your site on the Search Settings page.
Searchable columns. Here, you have the option to choose any columns of data on your site that you want excluded from the search index.
Search and offline availability. If you want your entire site to be excluded from SharePoint search, this is where you make that choice. By default, sites are enabled for display in search results. A similar configuration option exists on this page for allowing users to take files and content from your site offline with them. If you know that you want to disable offline use for everything in your site, you have the option of disabling it on this page.
Configuration import and export. If you want to import a search configuration and all its settings from another site where the work has already been done, use the Import option. Likewise, if you need to transport your site’s search settings to another site, choose Export.
To help pull together some of the concepts that were discussed in the previous section, we will do a brief walk-through of a real-world use case. In this scenario, our marketing department has requested that whenever someone does a search query for terms such as “marketing news” or “marketing PR,” the search results page somehow ensures that documents that are tagged as press releases will be shown as promoted results.
The solution consists of four primary components:
A press release SharePoint content type.
A press release result source that narrows the scope of content down to items that match up with the press release content type.
A press release query rule that will fire whenever a user searches for one of the keywords the marketing team has identified (PR, news, etc.). This query rule helps identify relevant content and promote it to the top of the search results page as a promoted result.
A press release result type that matches up results from the Press Results content source with a custom display panel that displays extra metadata tags for this specific type of content.
Together, those four items give us the necessary components to achieve the business goal the marketing department defined for us.
The first piece we needed to have in place is a standard SharePoint content type that the marketing team uses when creating press releases. You can see our simple content type in Figure 18-15. It provides all the benefits of SharePoint content types as discussed earlier in the book.

Once you have the content type in place, you will need to create a result source in your Site Settings. As shown in Figure 18-16, this will help SharePoint identify content that matches our press release content type. The query transformation we use for this content source is simple: {searchTerms} ContentType:Press Release will return results that match the appropriate content type.

The third component is the query rule. The query rule’s primary task is to identify queries that include our keywords and then take appropriate actions. In cases where queries match the query rules, our query rule’s main mission is to promote press release results on our search results page. On the query rules page in Site Settings, we added a query rule, as shown in Figure 18-17. In this figure, we are looking at the top portion of the Edit Query Rule page, where the query conditions are identified. In this case, we are looking for text matches of specific terms (such as “PR,” “news,” “press,” and “release”).

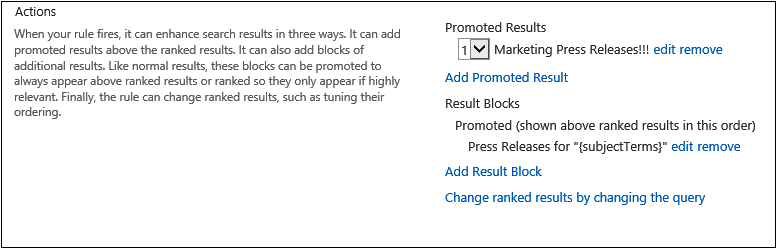
The other part of the query rule that we are concerned with is setting an action. In our example, the actions we provide are:
Adding a title to the top of the search results page that says “Marketing Press Releases!!!”. This is added to the results page only when the query rule is actually triggered by a user query.
Adding a result block to the search results page. This provides a visual indicator to the user that the results contained in the block are probably the most relevant results.
Figure 18-18 shows the action portion of the query rule. Note the edit link on the result block. That is where you must go to configure the details of the result block.
The last major piece of the puzzle is the result type. The primary goal of our result type is to ensure that when search results of a press release result type are put on a search results page, they have a unique display panel that we created just for press releases. As you can see in Figure 18-19, items of press release result type will use a special display template named Word Item - Custom_PR.

Figure 18-19. When you edit a query rule, you can change the display template under the Actions area.
Note
For more information about custom display templates, see Chapter 19.
With all of these configuration changes in place, we can now go to your search box and type in a query that we know will instantiate our query rule. In Figure 18-20, we entered the search query “marketing news,” which therefore triggers our query rule. Notice how our promoted results show up in a result block at the top of the page. We have tuned the relevancy of our search engine using nothing more than a few easily configurable site settings!

Figure 18-20. When you add a query rule result block, the search results page provides intelligent recommendations to the search user.
When a user pauses over one of the promoted results, the hover panel will use the custom display template that we defined in the result type. Notice that, in Figure 18-21, the hover panel looks similar to the normal document panel except that we have added some extra content such as the Document ID, total views, and so on.

Note
We cover creating custom display panels in depth in Chapter 19.
As the über-logical Mr. Spock once said, “Insufficient facts always invite danger.” Fortunately, you have seen in this chapter that SharePoint 2013 Search is a powerful way to discover information—and to ensure that you have sufficient facts to achieve your tasks! Mr. Spock would be so proud.
Through a new relevancy engine, the search system in SharePoint 2013 understands what data a user needs more clearly than ever before. The search engine learns over time with usage and customizes results to a person’s unique needs. SharePoint 2013 search has a significantly updated UI, a new unified server architecture, and deep integration with many aspects of SharePoint, including social, reports, people, videos, and so on.
Site owners in SharePoint 2013 have more power than ever before to create a powerful search experience using tools such as query rules, display templates, and result types. Developers can build search-driven applications using powerful new options, such as REST web services. And most important, business users can easily discover and organize essential information, refine the results, and then take appropriate actions.