Excel has always enabled you to manage lists of data effectively, enabling you to sort your worksheet data based on the values in one or more columns, limit the data displayed by using criteria (for example, show only those routes with fewer than 100 stops), and create formulas that summarize the values in visible (that is, unfiltered) cells. Customer feedback indicated that many Excel 2007 users wanted a more robust structure within Excel 2007 that enabled users to perform those operations and more. Excel 2003 included a structure called a data list that has evolved into the table in Excel 2007.
To create a data table, type a series of column headers in adjacent cells and then type a row of data below the headers. Select the headers and data; on the Home tab, in the Styles group, click Format as Table; and then, from the gallery that appears, click the style you to apply to the table. When the Format as Table dialog box opens, verify that the cells in the Where is the data for your table? field reflect your current selection and that the My table has headers check box is selected, and then click OK.
Excel 2007 can also create a table from an existing data list as long as your data has a differently formatted header row, the list has no blank rows or columns within the data, and there is no extraneous data in cells immediately below or next to the list.
When you want to add data to a table, select a cell in the row immediately below the last row in the table or a cell in the column immediately to the right of the table; then type a value into the cell. After you enter the value and move out of the cell, the AutoCorrect Options smart tag appears. If you didn't mean to include the data in the table, you can click Undo Table AutoExpansion to exclude the cells from the table. If you never want Excel 2007 to include adjacent data in a table, click Stop Automatically Expanding Tables.
Tip
To stop Table AutoExpansion before it starts, click the Microsoft Office Button, and then click Excel Options. In the Excel Options dialog box, click Proofing, and then click the AutoCorrect Options button to display the AutoCorrect dialog box. Click the AutoFormat As You Type tab, clear the Include new rows and columns in table check box, and then click OK twice.
You can add rows and columns to a table, or remove them from a table, by dragging the resize handle at the table's lower-right corner. If your table's headers contain a recognizable series of values (such as Region1, Region2, and Region3), and you drag the resize handle to create a fourth column, Excel 2007 creates the column with the label Region4—the next value in the series.
Tables often contain data you can summarize by calculating a sum or average, or by finding the maximum or minimum value in a column. To summarize one or more columns of data, you can add a Total row to your table.

When you add the Total row, Excel 2007 creates a formula that calculates the sum of the values in the rightmost table column. To change that summary operation or to add a summary operation to any other cell in the Total row, click the cell, click the arrow that appears, and then click the summary operation you want to apply. Clicking the More Functions item displays the Insert Function dialog box, from which you can select any of the functions in Excel 2007.
Much as it does when you create a new worksheet, Excel 2007 gives your tables generic names such as Table1 and Table2. You can change a table name to something easier to recognize by clicking any cell in the table, clicking the Design contextual tab, and then, in the Properties group, editing the value in the Table Name field. Changing a table name might not seem important, but it helps make formulas that summarize table data much easier to understand. You should make a habit of renaming your tables so you can recognize the data they contain.
Note
See Also For more information about using the Insert Function dialog box and about referring to tables in formulas, see Creating Formulas to Calculate Values in Chapter 7, Chapter 7.
If for any reason you want to convert your table back to a normal range of cells, click any cell in the table and then, on the Table Tools contextual tab, in the Tools group, click Convert to Range. When Excel 2007 displays a message box asking if you're sure you want to convert the table to a range, click OK.
In this exercise, you will create a data table from existing data, add data to a table, add a Total row, change the Total row's summary operation, and rename the table.
Note
USE the Driver Sort Times workbook. This practice file is located in the DocumentsMicrosoft Press2007OfficeSBS_HomeStudentExcelData folder.
OPEN the Driver Sort Times workbook.
Select cell B2.
 On the Home tab, in the Styles group, click Format as Table, and then select a table style.
Verify that the range =$B$2:$C$17 appears in the Where is the data for your table? field and that the My table has headers check box is selected, and then click OK.
Excel 2007 creates a table from your data and displays the Design contextual tab.
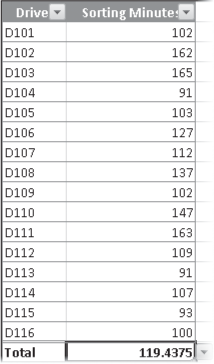
In cell B18, type D116, press
 , type 100 in cell C18, and then press
  .
.Excel 2007 includes the data in your table.
Select a cell in the table and on the Design contextual tab, in the Table Style Options group, select the Total Row check box.
A Total row appears in your table.
Select cell C19, click the arrow that appears at the right edge of the cell, and then click Average.
Excel 2007 changes the summary operation to Average.
On the Design contextual tab, in the Properties group, type the value SortingSample01 in the Table Name field, and press
.Excel 2007 renames your table.
 On the Quick Access Toolbar, click the Save button to save your work.