
Chapter 6. Working with existing PDFs
- Importing pages from existing PDF documents
- Adding content to existing PDF documents and filling forms
- Copying pages from existing PDF documents
When I wrote the first book about iText, the publisher didn’t like the subtitle “Creating and Manipulating PDF.” He didn’t like the word manipulating because of some of its pejorative meanings. If you consult the dictionary on Yahoo! education, you’ll find the following definitions:
- To influence or manage shrewdly or deviously
- To tamper with or falsify for personal gain
Obviously, that’s not what the book is about. The publisher suggested “Creating and Editing PDF” as a better subtitle. I explained that PDF isn’t a document format well suited for editing. PDF is an end product. It’s a display format. It’s not a word processing format.
In a word processing format, the content is distributed over different pages when you open the document in an application, not earlier. This has some disadvantages: if you open the same document in different applications, you can end up with a different page count. The same text snippet can be on page X when looked at in Microsoft Word, and on page Y when viewed in Open Office. That’s exactly the kind of problem you want to avoid by choosing PDF.
In a PDF document, every character or glyph on a PDF page has its fixed position, regardless of the application that’s used to view the document. This is an advantage, but it also comes with a disadvantage. Suppose you want to replace the word “edit” with the word “manipulate” in a sentence, you’d have to reflow the text. You’d have to reposition all the characters that follow that word. Maybe you’d even have to move a portion of the text to the next page. That’s not trivial, if not impossible.
If you want to “edit” a PDF, it’s advised that you change the original source of the document and remake the PDF. If the original document was written using Microsoft Word, change the Word document, and make the PDF from the new version of the Word document. Don’t expect any tool to be able to edit a PDF file the same way you’d edit a Word document.
This being said, the verb “to manipulate” also means
- To move, arrange, operate, or control by the hands or by mechanical means, especially in a skillful manner
That’s exactly what you’re going to do in this chapter. Using iText, you’re going to manipulate the pages of a PDF file in a skillful manner. You’re going to treat a PDF document as if it were made of digital paper.
But before you can take copies of pages or add new content, you’ll need an object that can “read” an existing PDF document.
6.1. Accessing an existing PDF with PdfReader
First, we’ll look at how you can retrieve information about the document you’re going to manipulate. For instance, how many pages does the original document have? Which page size is used? All of this is done with a PdfReader object.
6.1.1. Retrieving information about the document and its pages
In this first example, we’ll inspect some of the PDF documents you created in part 1. You can query a PdfReader instance to get the number of pages in the document, the rectangle defining the media box, the rotation of the page, and so on.
Listing 6.1. PageInformation.java
public static void inspect(PrintWriter writer, String filename)
  throws IOException {
  PdfReader reader = new PdfReader(filename);
  writer.println(filename);
  writer.print("Number of pages: ");
  writer.println(reader.getNumberOfPages());
  Rectangle mediabox = reader.getPageSize(1);
  writer.print("Size of page 1: [");
  writer.print(mediabox.getLeft());
  writer.print(','),
  writer.print(mediabox.getBottom());
  writer.print(','),
  writer.print(mediabox.getRight());
  writer.print(','),
  writer.print(mediabox.getTop());
  writer.println("]");
  writer.print("Rotation of page 1: ");
  writer.println(reader.getPageRotation(1));
  writer.print("Page size with rotation of page 1: ");
  writer.println(reader.getPageSizeWithRotation(1));
  writer.print("File length: ");
  writer.println(reader.getFileLength());
  writer.print("Is rebuilt? ");
  writer.println(reader.isRebuilt());
  writer.print("Is encrypted? ");
  writer.println(reader.isEncrypted());
  writer.println();
  writer.flush();
}
The following output was obtained while inspecting some of the PDFs from chapters 1 ![]() and
and ![]() , 3
, 3 ![]() , and 5
, and 5 ![]() .
.
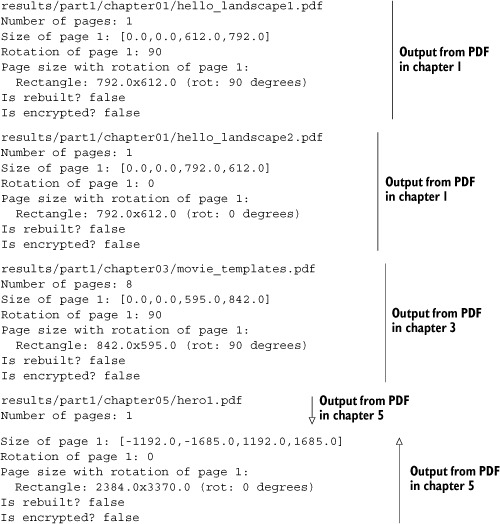
The most important PdfReader methods you’ll use in this chapter are getNumberOfPages() and getPageSizeWithRotation(). The former method will be used to loop over all the pages of the existing document; the latter is a combination of the methods getPageSize() and getPageRotation().
Page Size
The first two examples show the difference between creating a document with landscape orientation using
Document document = new Document(PageSize.LETTER.rotate());
and a document created using
Document document = new Document(new Rectangle(792, 612));
This difference will matter when you import a page or when you stamp extra content on the page. Observe that in example ![]() of the earlier output, the coordinates of the lower-left corner are different from (0,0) because that’s how I defined the
media box in section 5.3.1.
of the earlier output, the coordinates of the lower-left corner are different from (0,0) because that’s how I defined the
media box in section 5.3.1.
Broken PDFs
When you open a corrupt PDF file in Adobe Reader, you can expect the message, “There was an error opening this document. The file is damaged and could not be repaired.” PdfReader will also throw an exception when you try to read such a file. You can get an InvalidPdfException with the following message: “Rebuild failed: trailer not found; original message: PDF startxref not found.” If that happens, iText can’t do anything about it: the file is damaged, and it can’t be repaired. You’ll have to contact the person who created the document, and ask him or her to create a version of the document that’s a valid PDF file.
In other cases, for example if a rogue application added unwanted carriage return characters, Adobe Reader will open the document and either ignore the fact that the PDF isn’t syntactically correct, or will show the warning “The file is damaged but is being repaired” very briefly. PdfReader can also overcome small damages like this. No alert box is shown, because iText isn’t necessarily used in an environment with a GUI. You can use the method isRebuilt() to check whether or not a PDF needed repairing.
You may also have difficulties trying to read encrypted PDF files.
Encrypted PDFs
PDF files can be protected by two passwords: a user password and an owner password. If a PDF is protected with a user password, you’ll have to enter this password before you can open the document in Adobe Reader. If a document has an owner password, you must provide the password along with the constructor when creating a PdfReader instance, or a BadPasswordException will be thrown. More details about the different ways you can encrypt a PDF document, and about the different permissions you can set, will follow in chapter 12.
6.1.2. Reducing the memory use of PdfReader
In most of this book’s examples, you’ll create an instance of PdfReader using a String representing the path to the existing PDF file. Using this constructor will cause PdfReader to load plenty of PDF objects (from the file) into Java objects (in memory). This can be overkill for large documents, especially if you’re only interested in part of the document. If that’s the case, you can choose to read the PDF only partially.
Partial Reads
Suppose you have a document with 1000 pages. PdfReader will do a full read of these pages, even if you’re only interested in page 1. You can avoid this by using another constructor. You can compare the memory used by different PdfReader instances created to read the timetable PDF from chapter 3:
Listing 6.2. MemoryInfo.java
public static void main(String[] args) throws IOException {
  MovieTemplates.main(args);
  PrintWriter writer = new PrintWriter(new FileOutputStream(RESULT));
  fullRead(writer, MovieTemplates.RESULT);
  partialRead(writer, MovieTemplates.RESULT);
  writer.close();
}
public static void fullRead(PrintWriter writer, String filename)
  throws IOException {
  long before = getMemoryUse();
  PdfReader reader = new PdfReader(filename);
  reader.getNumberOfPages();
  writer.println(String.format("Memory used by full read: %d",
    getMemoryUse() - before));
  writer.flush();
}
public static void partialRead(PrintWriter writer, String filename)
  throws IOException {
  long before = getMemoryUse();
  PdfReader reader = new PdfReader(
    new RandomAccessFileOrArray(filename), null);
  reader.getNumberOfPages();
  writer.println(String.format("Memory used by partial read: %d",
    getMemoryUse() - before));
  writer.flush();
}
The file size of the timetable document from chapter 3 is 15 KB. The memory used by a full read is about 35 KB, but a partial read needs only 4 KB. This is a significant difference. When reading a file partially, more memory will be used as soon as you start working with the reader object, but PdfReader won’t cache unnecessary objects. That also makes a huge difference, so if you’re dealing with large documents, consider using PdfReader with a RandomAccessFileOrArray parameter constructed with a path to a file.
Note
In part 4, you’ll see how to manipulate a PDF at the lowest level. You’ll change PDF objects in PdfReader and then save the altered PDF. For this to work, the modified objects need to be cached. Depending on the changes you want to apply, using a PdfReader instance created with a RandomAccessFileOrArray may not be an option.
Another way to reduce the memory usage of PdfReader up front is to reduce the number of pages before you start working with it.
Selecting Pages
Next, you’ll read the timetable from example 3 once again, but you’ll immediately tell PdfReader that you’re only interested in pages 4 to 8.
Listing 6.3. SelectPages.java
PdfReader reader = new PdfReader(MovieTemplates.RESULT);
reader.selectPages("4-8");
The general syntax for the range that’s used in the selectPages() method looks like this:
[!][o][odd][e][even]start[-end]
You can have multiple ranges separated by commas, and the ! modifier removes pages from what is already selected. The range changes are incremental; numbers are added or deleted as the range appears. The start or the end can be omitted; if you omit both, you need at least o (odd; selects all odd pages) or e (even; selects all even pages).
If you ask the reader object for the number of pages before selectPages() in listing 6.3, it will tell you that the document has 8 pages. If you do the same after making the page selection, it will tell you that there are only 5 pages: pages 4, 5, 6, 7, and 8. The old page 4 will be the new page 1. Be careful not to try getting information about pages that are outside the new range. Don’t add the following line to listing 6.3:
reader.getPageSize(6);
This line will throw a NullPointerException because there are no longer 6 pages in the reader object.
Now that you’ve had a short introduction to PdfReader, you’re ready to start manipulating existing PDF documents.
6.2. Copying pages from existing PDF documents
You probably remember the Superman PDF from chapter 5. The Hero example imported a plain text file containing PDF syntax into the direct content. I explained that this wasn’t standard practice. If you want to reuse existing content, it’s dangerous to copy and paste PDF syntax like I did in listing 5.14. There are safer ways to import existing content, as you’ll find out in the next example.
In this section, you’ll use an object named PdfImportedPage to copy the content from an existing PDF opened with PdfReader into a new Document written by PdfWriter.
6.2.1. Importing pages
Let’s continue working with the timetable from chapter 3. Suppose you want to reuse the pages of this document and treat them as if every page were an image. Figure 6.1 shows how you could organize these imported pages into a PdfPTable. The document in the front of figure 6.1 is created with the code in listing 6.4.
Listing 6.4. ImportingPages1.java

Figure 6.1. Importing pages from an existing PDF document

You’ll recognize the five steps in the PDF creation process discussed in part 1. Now you’re also creating a PdfReader object and looping over all the pages, getting PdfImportedPage instances with the getImportedPage() method (as highlighted in bold). What does this method do?
Page Content and Resources
If you browse the API of the PdfReader class, you’ll discover the getPageContent() method, which returns the content stream of a page. This content stream is very similar to what’s inside the hero.txt file. In general, such a content stream contains references to external objects, images, and fonts.
In section 3.4.1, for instance, we examined the PDF syntax needed to draw a raster image:
q 232 0 0 362 25.5 27 cm /img0 Do Q
In this snippet, /img0 referred to a key in the /Resources dictionary of the page. The corresponding value was a reference to a stream object containing the bits and bytes of the image. Without the bits and bytes of the image, the PDF syntax referring to /img0 is meaningless.
Warning
It doesn’t make sense to get the content stream of a page from one PDF document, and copy that stream into another PDF without copying all the resources that are needed.
The Hero example was an exception: the syntax to draw the vector image of Superman was self-contained, and this is very unusual. As soon as there’s text involved, you’ll have at least a reference to a font. If you don’t copy that font, you’ll get warnings or errors, such as “Could not find a font in the Resources dictionary.” That’s why it’s never advisable to extract a page from PdfReader directly. Instead, you should pass the reader object to the writer class, and ask the writer (not the reader!) to import a page. A PdfImportedPage object is returned. Behind the scenes, all the necessary resources (such as images and fonts) are retrieved and copied to the writer.
FAQ
Why are all my links lost when I copy a page with PdfImportedPage? It’s important to understand the difference between resources needed to render the content of a page and the interactive features of a page. In general, these features are called annotations. They include links, text annotations, and form fields. Annotations aren’t part of the content stream. They aren’t listed in the resources dictionary of the page, but in the annotation dictionary. These interactive features aren’t copied when using PdfImportedPage, which means that all interactivity is lost when copying a page with the getImportedPage() method of the PdfWriter class.
The PdfImportedPage class extends PdfTemplate, but you can’t add any new content to it. It’s a read-only XObject you can reuse in a document with the method addTemplate(); or you can wrap it inside an Image. You’ve already used these techniques in section 3.4. The original dimensions of each imported page are the same as the original media box, but in this example, the PdfImportedPages are scaled to fit inside a table. Note that the rotation of the original page isn’t taken into account. If that’s a problem, you’ll have to apply the rotation.
Listing 6.5. ImportingPages2.java
PdfPTable table = new PdfPTable(2);
for (int i = 1; i <= n; i++) {
  page = writer.getImportedPage(reader, i);
  table.getDefaultCell().setRotation(-reader.getPageRotation(i));
  table.addCell(Image.getInstance(page));
}
You can see the result in figure 6.1 (the figure in the back). Observe that cell and image rotations go counterclockwise. In the next example, we’ll look at how to apply more transformations.
6.2.2. Scaling and superimposing pages
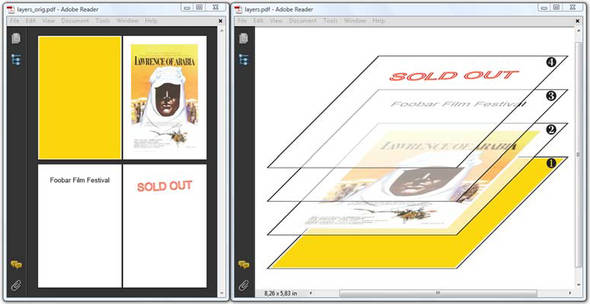
You can transform pages in iText, just like you can transform images. Do you remember figure 3.2? That was the image I used to explain the different content layers used by iText. I created this image by generating a document with four pages, and then importing those pages into a new one; see figure 6.2.
The imported pages are added to the new PDF document using addTemplate(). The parameters are calculated so that each page is scaled and skewed.
Figure 6.2. Scaling and skewing pages from an existing PDF
Listing 6.6. Layers.java
PdfContentByte canvas = writer.getDirectContent();
PdfImportedPage page;
BaseFont bf = BaseFont.createFont(BaseFont.ZAPFDINGBATS, "",
     BaseFont.EMBEDDED);
for (int i = 0; i < reader.getNumberOfPages(); ) {
  page = writer.getImportedPage(reader, ++i);
  canvas.addTemplate(page, 1f, 0, 0.4f, 0.4f, 72, 50 * i);
  canvas.beginText();
  canvas.setFontAndSize(bf, 20);
  canvas.showTextAligned(Element.ALIGN_CENTER,
    String.valueOf((char)(181 + i)), 496, 150 + 50 * i, 0);
  canvas.endText();
}
A common technique used with PDF files is called superimposing.
Superimposing PDF Pages
Superimposing means that you add different PDF pages on top of each other on the same page. You could do this with the four pages shown to the left in figure 6.2 to obtain the PDF shown in figure 6.3.
Figure 6.3. PDF created by superimposing four different pages

Listing 6.7. Superimposing.java
PdfReader reader = new PdfReader(SOURCE);
Document document = new Document(PageSize.POSTCARD);
PdfWriter writer = PdfWriter.getInstance(document,
     new FileOutputStream(RESULT));
document.open();
PdfContentByte canvas = writer.getDirectContent();
PdfImportedPage page;
for (int i = 1; i <= reader.getNumberOfPages(); i++) {
  page = writer.getImportedPage(reader, i);
  canvas.addTemplate(page, 1f, 0, 0, 1, 0, 0);
}
document.close();
Superimposing is often used to create documents with a standard header and footer.
Importing Company Stationery
Suppose your company has preprinted paper containing the company name and logo in the letterhead, and maybe also a watermark. All letters are printed on this company stationery. You can achieve something similar with PDF, as shown in figure 6.4.
Figure 6.4. Using an existing PDF as background image for new PDFs
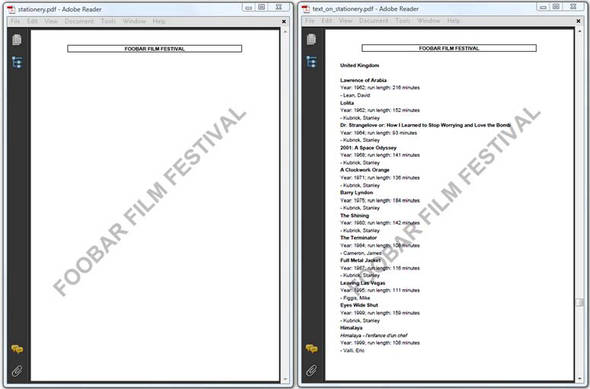
In figure 6.4, the PDF to the left is the equivalent of the preprinted paper. When creating a new document, as shown to the right, the template page is imported and added to the background of each new page using a page event.
Listing 6.8. Stationery.java
public class Stationery extends PdfPageEventHelper {
  protected PdfImportedPage page;

  public void useStationary(PdfWriter writer) throws IOException {
    writer.setPageEvent(this);
    PdfReader reader = new PdfReader(STATIONERY);
    page = writer.getImportedPage(reader, 1);
  }
  public void onEndPage(PdfWriter writer, Document document) {
    writer.getDirectContentUnder().addTemplate(page, 0, 0);
  }
}
We’ll conclude the series of PdfImportedPage examples by introducing two more concepts.
6.2.3. N-up copying and tiling PDF documents
When searching for PDF tools on the internet, you’ll find numerous small tools that are designed to meet specific requirements, such as one that creates an N-up layout in a PDF file.
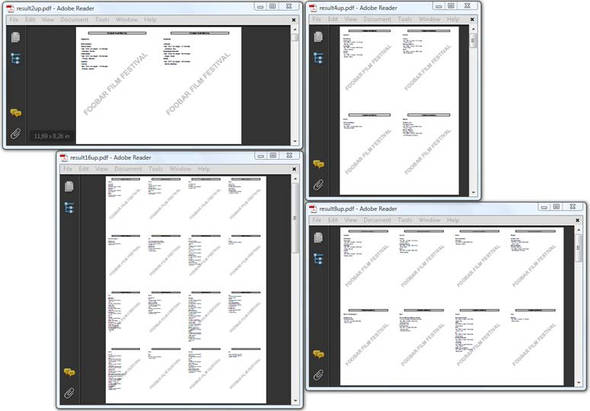
To cut paper costs by 50 percent when printing a PDF document, you can copy an existing PDF into a new one that has half the number of pages. All you have to do is put two pages next to each other on one page. This is called 2-up copying. Figure 6.5 shows the document you created in the previous example in its 2-up, 4-up, 8-up, and 16-up forms.
Most of the tools you can find online have iText on the inside.
Figure 6.5. N-up copying combines multiple pages onto one page
Listing 6.9. NUp.java
The opposite of N-up copying a PDF file is when you have one page, and you want to print it on different pages; see figure 6.6. We already looked at this in chapter 5, but now you’ll do the exercise again using PdfImportedPage.
Figure 6.6. Scaling and tiling a PDF file

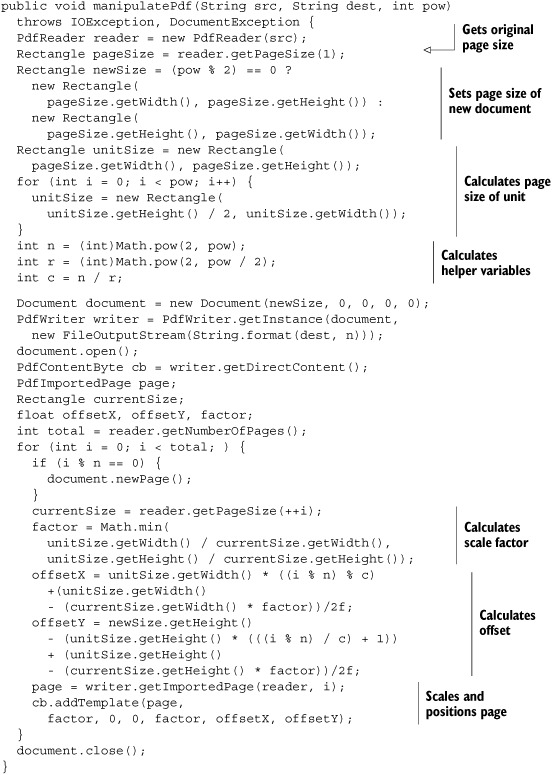
The next bit of code takes one page from a PDF document and scales it so that the one page is “tiled” over 16 pages.
Listing 6.10. TilingHero.java
public void manipulatePdf(String src, String dest)
  throws IOException, DocumentException {
  PdfReader reader = new PdfReader(src);
  Rectangle pagesize = reader.getPageSizeWithRotation(1);
  Document document = new Document(pagesize);
  PdfWriter writer =
    PdfWriter.getInstance(document, new FileOutputStream(dest));
  document.open();
  PdfContentByte content = writer.getDirectContent();
  PdfImportedPage page = writer.getImportedPage(reader, 1);
  float x, y;
  for (int i = 0; i < 16; i++) {
    x = -pagesize.getWidth() * (i % 4);
    y = pagesize.getHeight() * (i / 4 - 3);
    content.addTemplate(page, 4, 0, 0, 4, x, y);
    document.newPage();
  }
  document.close();
}
In this section, we’ve been reusing content from existing PDF documents in a new document. You can take digital photocopies of existing pages, scale them up or down, and use them as if they were an image or an XObject.
In the next section, we’re going to take an existing PDF and add extra content.
6.3. Adding content with PdfStamper
Up until now, we’ve created new documents using the five steps in the iText document-creation process. In this chapter we’ll add content to an existing document using PdfStamper.
PdfStamper uses a different mechanism, as demonstrated in the manipulateWithStamper() method.
Listing 6.11. SelectPages.java

You’ve already seen part of this example in listing 6.3. It’s an example that creates a new PDF document containing only a selection of pages from the original document. In ![]() , you create a PdfReader that will read the 8 pages of the timetable PDF, but you immediately tell the reader that you’re only interested in pages
4 to 8. In
, you create a PdfReader that will read the 8 pages of the timetable PDF, but you immediately tell the reader that you’re only interested in pages
4 to 8. In ![]() , you create a PdfStamper object. As soon as you close the stamper, a new document will be created. It will contain only 5 pages. You can add content
between the constructor and the close() method.
, you create a PdfStamper object. As soon as you close the stamper, a new document will be created. It will contain only 5 pages. You can add content
between the constructor and the close() method.
6.3.1. Adding content at absolute positions
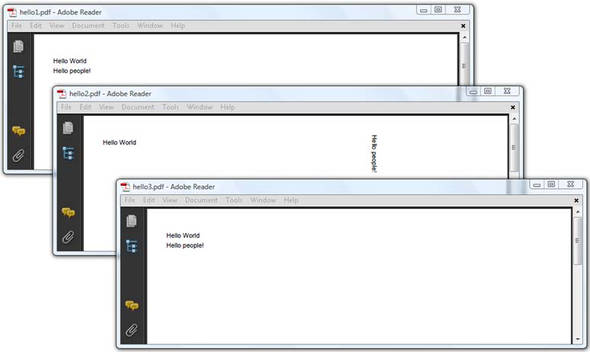
Let’s start with the “Hello World” examples with paper size Letter in landscape format from chapter 1. There were two versions of this example. Let’s add the words “Hello people!”
Listing 6.12. StampText.java
PdfReader reader = new PdfReader(src);
PdfStamper stamper = new PdfStamper(reader, new FileOutputStream(dest));
PdfContentByte canvas = stamper.getOverContent(1);
ColumnText.showTextAligned(canvas,
  Element.ALIGN_LEFT, new Phrase("Hello people!"), 36, 540, 0);
stamper.close();
The getOverContent() method is similar to the getDirectContent() method discussed in chapter 3. It returns a PdfContentByte object that allows you to write to a new layer that goes on top of the existing content of the page you choose. There’s also a getUnderContent() method, which is the equivalent of getDirectContentUnder().
Note
The methods getOverContent() and getUnderContent() give you the option to write to the direct content on a layer that goes on top of or below the existing content. They don’t give you access to the layer with the existing content. You can’t use these methods to replace existing content, nor to complete it. It’s not possible to say: “I want to add the words ‘Hello people!’ after the words ‘Hello World’.” You can only add those words to the layer above or below the existing content at an absolute position whose coordinates you know.
The media box of the file that was used as the basis for hello3.pdf was 792 pt x 612 pt. I’ve added the extra text at the coordinates (36, 540). That’s near the top-left corner. The file used as the basis for hello1.pdf had a media box measuring 612 pt x 792 pt, but the page had a rotation of 90 degrees. The difference between these two ways of creating a page in landscape is made transparent: iText took the rotation into account and rotated the coordinate system. If you don’t want this, you can tell iText to ignore the fact that the page is rotated. That’s what happened with hello2.pdf in figure 6.7.
Figure 6.7. Adding text to an existing document
In the next code snippet, the extra text was added at the same coordinates as in listing 6.12, but the rotation of the page isn’t taken into account. This is prevented with the setRotateContents() method.
Listing 6.13. StampText.java (continued)
PdfReader reader = new PdfReader(src);
PdfStamper stamper = new PdfStamper(reader, new FileOutputStream(dest));
stamper.setRotateContents(false);
PdfContentByte canvas = stamper.getOverContent(1);
ColumnText.showTextAligned(canvas,
  Element.ALIGN_LEFT, new Phrase("Hello people!"), 36, 540, 0);
stamper.close();
We could now repeat everything that we covered in chapter 3, and explain how to draw lines, shapes, and text to the PdfContentByte layers obtained with getOverContent() and getUnderContent(), but it’s a better idea to look at practical examples.
6.3.2. Creating a PDF in multiple passes
In section 5.4.2, we solved the “page X of Y” problem by using page events and a PdfTemplate object. One of the problems inherent to this solution is that you don’t know the number of pages when you create and position the placeholder. You create a small canvas up front, but you can only add the page number once the document is completely finished. You don’t know in advance how much space will be needed to draw this number. Will the document eventually have 9 pages or 9999? You could guess the number of digits beforehand and reserve enough space for them accordingly, but you won’t always be able to make the right guess.
That’s why you might consider an alternative way to add page numbers. The document shown in figure 6.8 is made in two passes.
Figure 6.8. Adding a page X of Y header to an existing document
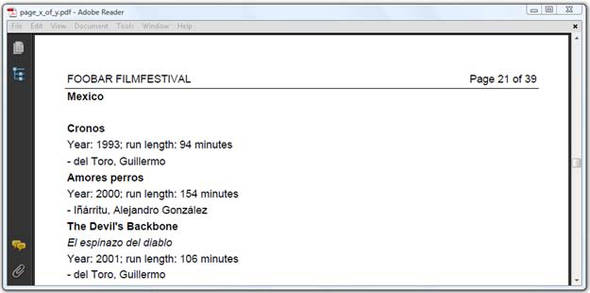
In the first pass, the document is created without a header. The header, and—if necessary—a footer and a watermark, can be added in a second pass. Note that it isn’t necessary to create two files on disk. If the file size isn’t huge, and the memory available in your JVM allows it, you can easily keep the file created during the first pass in memory.
Listing 6.14. TwoPasses.java
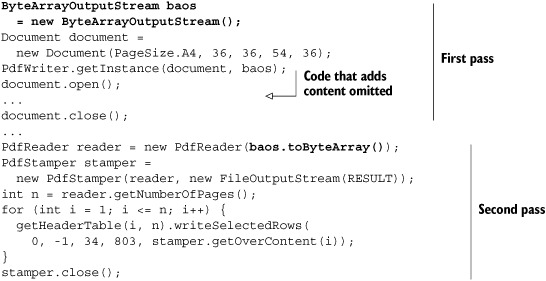
Instead of writing the document to a FileOutputStream in the first pass, you keep the file in memory using a ByteArrayOutputStream (see section 1.3.2). In the second pass, you use the bytes from this OutputStream to create a PdfReader instance.
FAQ
PdfStamper always creates a new PDF file, but how can I manipulate the existing file? You can’t use the same physical file used by PdfReader to create a FileOutputStream for PdfStamper. Common sense tells us that changing a file while you’re still reading it risks corrupting the file. There are different ways to work around this. Some applications read a file into memory before changing it; you could read the original file into a byte array and create a PdfReader object as demonstrated in listing 6.13. Other applications work with temporary files; once you’ve finished “stamping,” you could replace the original file with the new one. Finally, you could also create the new file in memory using a ByteArrayOutputStream, and then overwrite the original file using these bytes. The “best choice” depends on the context. As a rule of thumb, I prefer temporary files for applications that run on the desktop; in a web environment, I create all files in memory.
In section 6.2, you added an existing PDF as the background of a newly created PDF using page events. But suppose you’re given an existing PDF, and you need to add company stationery after the fact. That’s what the next example is about.
6.3.3. Adding company stationery to an existing document
Figure 6.9 looks very similar to figure 6.4, but now you have an existing file, original.pdf, to which you want to add the file stationary.pdf, with the file stamped_stationery.pdf being the result.
Figure 6.9. Adding stationery to an existing document

To achieve this, you need to import a page from one PDF and add it as the background to another PDF.
Listing 6.15. StampStationery.java
PdfReader reader = new PdfReader(src);
PdfReader s_reader = new PdfReader(stationery);
PdfStamper stamper =
  new PdfStamper(reader, new FileOutputStream(dest));
PdfImportedPage page = stamper.getImportedPage(s_reader, 1);
int n = reader.getNumberOfPages();
PdfContentByte background;
for (int i = 1; i <= n; i++) {
  background = stamper.getUnderContent(i);
  background.addTemplate(page, 0, 0);
}
stamper.close();
Here you obtain a PdfImportedPage object from PdfStamper with the getImportedPage() method. This method writes the resources necessary to render the imported page to the writer associated with the stamper.
This technique is often used to add watermarks to existing document. You can easily adapt the example to add an Image with the addImage() method instead of an imported page. All the methods from chapter 3 are at your disposal.
Note
This example combines PdfStamper with PdfImportedPage. All the interactive features present in the document that’s being manipulated with PdfStamper are preserved, but the interactive features that were present on the page that’s being imported are lost.
As discussed in the introduction of this chapter, PDF isn’t a format that can be used for word processing. You can’t insert a couple of lines between two existing paragraphs on a page. You can only insert complete pages. That’s what you’re going to do in the next example.
6.3.4. Inserting pages into an existing document
In section 5.2.4, you were faced with a problem concerning the TOC of a document. You were only able to create the table of contents (TOC) once the document was finished. But you wanted to display the TOC before the rest of the content, not after. In listing 5.12, you reordered the pages.
Listing 6.16 offers an alternative solution: you could create the PDF in two passes and add the TOC in the second pass by inserting extra pages. You could, for instance, create a ColumnText object containing a series of Paragraphs, then you add these Paragraphs to a number of pages that are inserted into the existing document.
Listing 6.16. InsertPages.java

There’s a significant difference between what you did in chapter 3 and how you create the ColumnText object here in ![]() . Normally, you have to pass a PdfContentByte object with the constructor. In this case, you don’t have a reference to the direct content yet: you use null as the parameter. You wait to set the canvas until
. Normally, you have to pass a PdfContentByte object with the constructor. In this case, you don’t have a reference to the direct content yet: you use null as the parameter. You wait to set the canvas until ![]() . In
. In ![]() you try to fit the content inside a rectangle. If the content doesn’t fit on page one, you insert a second page, and so on.
you try to fit the content inside a rectangle. If the content doesn’t fit on page one, you insert a second page, and so on.
In the previous example, the TOC consists of only two pages; the actual content consists of 39 pages. What if you want to reorder the pages?
Listing 6.17. InsertPages.java (continued)
PdfReader reader = new PdfReader(RESULT1);
reader.selectPages("3-41,1-2");
PdfStamper stamper =
  new PdfStamper(reader, new FileOutputStream(RESULT2));
stamper.close();
There’s nothing new in the listing. It’s almost identical to what you did in listing 6.11, but now you’re using selectPages() to reorder the pages. The document created by PdfStamper will start on page 3 of the original document, go on until page 41, and then add pages 1 and 2 at the end of the document.
These are practical examples that can be used to solve common problems with the help of PdfStamper, and using the concept of writing to the direct content as discussed in chapter 3. In the next section, we’ll look at a totally different concept. We’ll talk about interactive forms.
6.3.5. Filling out a PDF form
There are different flavors of forms in PDF. We’ll discuss the details in chapter 8, where we’ll create forms using iText. For now, we’re going to use another tool to create an interactive PDF form.
Creating a Form with Open Office
Figure 6.10 shows how you can use Open Office to create an XML form document. Using the Form Controls toolbar, you can add different kinds of form fields. Figure 6.11 shows a Film Data Sheet. It has text fields for the title, director, year, and duration. It has check boxes for the locations, because one movie can be screened in different movie theaters during the film festival. Finally, it has radio buttons for the category, because each film in the selection belongs to only one category. The properties for each of these fields—name, possible values, and so on—are set in a separate Properties dialog box.
Figure 6.10. Creating an XML form document with Open Office Writer

Figure 6.11. Creating fields in an Open Office document

When you create such a document, you may want to save it as an ODT file first. This will allow you to edit the document afterwards, in case something has to be changed. Then choose File > Export as PDF to open the PDF Options dialog box shown in figure 6.12.
Figure 6.12. Exporting an Open Office document as a PDF form

Make sure that the check box next to Create PDF Form is checked. The resulting PDF document will be a form, as shown in figure 6.13.
Figure 6.13. A form created with Open Office Writer

This is an interactive form. You can start entering data manually into the fields you defined. However, when using Adobe Reader, you’ll get a message saying, “You cannot save data typed into this form.” In section 9.2, you’ll see how data entered in a form that has a Submit button can be posted to a server, but the film data sheet you’re using in this chapter was created for a different purpose: you’re going to fill it out programmatically, using iText and PdfStamper. That is, after you’ve learned how to inspect the form.
Inspecting the Form and its Fields
If you want to fill out the form using iText, you need to know the name of each field you want to fill out. In the case of check boxes and radio buttons, you also need to know the different values that can be chosen. You know these names and values if you’ve created the form yourself, but in most cases the form will be created by a graphical designer. As a developer, you’ll have to inspect the form to find out which names were used.
Listing 6.18 shows the different types of fields you can encounter. These types will be discussed in detail in chapter 8, except for signature fields, which will be discussed in chapter 12.
Listing 6.18. FormInformation.java

The result when executing this code for the form shown in figure 6.13 looks like this:
MA_2: Checkbox
GP_8: Checkbox
GP_7: Checkbox
director: Text
CP_1: Checkbox
MA_3: Checkbox
CP_2: Checkbox
CP_3: Checkbox
title: Text
duration: Text
category: Radiobutton
GP_3: Checkbox
GP_4: Checkbox
year: Text
Possible values for CP_1:
 - Off
 - Yes
Possible values for category:
spec, toro, anim, comp, hero, Off, worl, rive, teen, kim,
kauf, zha, fest, s-am, fdir, lee, kubr, kuro, fran, scan
Note that the movie theaters are stored in the database like this: CP.1, GP.3, MA.3, ... But when you define the check boxes using Open Office (as in figure 6.11), you replace the dot with an underscore character because the dot character is forbidden in field names.
A check box has two possible values that correspond with an appearance state. In the case of the locations, the value can be Off—the check box isn’t checked—or Yes—the check box is checked. These values can vary from PDF to PDF, so it’s important to check the possible states before you start filling out the form. The possible values for the group of radio buttons is either Off—no radio button is selected—or a code that corresponds with the keyword field in the festival_category table (see figure 3.4).
Now that you’ve inspected the form, you have enough information to fill it out using iText.
Filling out the Form
Filling out forms programmatically is usually done for two reasons: prefilling data in an editable form, and presenting information in a standard layout.
Imagine an online insurance company. When a customer wants to report an incident, they can log in, and choose among a number of PDF forms. These forms contain a number of standard fields with content that’s already present in the company’s database: name, address, and so on. When the customer logs in, the application could have access to this information, so why require the customer to enter all this information manually? Wouldn’t it be better to take the blank form and prefill part of the information to save time for the customer?
That’s what’s done in figure 6.14. The film data sheet is filled with data from the database, but the data is still editable. In the context of an insurance company, the customer’s phone number could be filled in, but the customer could still change it in case his number has changed.
Figure 6.14. A form filled out using iText

Another typical use of PDF forms is when you want to use the form as a standard template. You don’t really need a form to communicate with an end user. You just want to create documents that share the same structure, but with differing content.
The PDF shown in figure 6.15 was made using the Film Data Sheet form, but it’s no longer interactive. The form has disappeared. The fields were only used as placeholders for the film title, director, and so on.
Figure 6.15. A form filled out and flattened using iText

The process of keeping the data but removing the form is called flattening, and there are different possibilities in-between. You can choose to flatten only specific fields, or you can change the status of specific fields to read-only. For instance, a customer of an insurance company is allowed to change their telephone number on the prefilled form, but not their name. Flattening will be discussed in chapter 8; in this chapter, you’ll only use the basic mechanism of form filling.
Listing 6.19. FillDataSheet.java

In this listing, you’re creating a separate document for every movie in the database that was made after 2006. The new reader instance is created inside the loop.
FAQ
Why do I get a DocumentException saying “The original document was reused. Read it again from file.”? Every PdfReader object can be used for one and only one PdfStamper object. Looking at the example in listing 6.19, you might argue that new PdfReader(DATASHEET) could be moved outside the loop, because it’s the same for all the PdfStamper objects, but that won’t work. As soon as you use a PdfReader object to create a PdfStamper, the reader object is tampered. You can check this by adding the line reader.isTampered();. If this method returns true, you can’t use the reader to create a new stamper object. You have to create a new instance—which is exactly what the error message tells you.
If you want to fill out a form, you need to have an AcroFields object. You can get an instance of this object using the method getAcroFields().
FAQ
Why do I get a DocumentException saying “This AcroFields instance is read-only?” If you look closely at listings 6.18 and 6.19, you’ll see that the getAcroFields() method exists in the PdfReader class as well as in the PdfStamper class. The AcroFields retrieved in listing 6.18 is read-only, and it will throw a DocumentException as soon as you try to fill out a field. You need to use the method with PdfStamper if you want to update the form.
Filling out the form is easy. If you know the field name, such as “title”, you can set its value using only one line:
form.setField("title", movie.getMovieTitle());
As you can see in listing 6.19 ![]() , the filled-out data sheets of movies dating from 2007 are flattened. Figure 6.15 shows such a data sheet. It looks like an ordinary PDF file. The content is stamped on the document; it’s no longer an editable
form. In figure 6.14, you see a data sheet for a movie made in 2008. It’s still a form; you can change the title manually.
, the filled-out data sheets of movies dating from 2007 are flattened. Figure 6.15 shows such a data sheet. It looks like an ordinary PDF file. The content is stamped on the document; it’s no longer an editable
form. In figure 6.14, you see a data sheet for a movie made in 2008. It’s still a form; you can change the title manually.
There’s much more to say about forms, but we can’t go into further detail until we’ve talked about annotations. Also, I haven’t said anything about the different types of PDF forms yet: there are forms based on AcroForm technology (like the form you created using Open Office), and there are XFA forms (created with Adobe Designer). This will have to wait until chapter 8, because we have one more group of PDF manipulation classes left to cover.
6.4. Copying pages with PdfCopy
In the previous section, each PdfStamper object was associated with one and only one PdfReader object. As soon as you want to assemble pages from more than one document, you should use another PDF manipulation class: PdfCopy.
PdfCopy extends PdfWriter, and you’ll immediately recognize the five steps in the PDF creation process:
Listing 6.20. SelectPages.java

The main difference between these five steps and the ones from chapter 1 is that you’re now using PdfCopy instead of PdfWriter in step 2. You can only add content using addPage(). Listing 6.20 is a variation on listing 6.11, with only one document being involved in this example. Let’s extend the example and concatenate two PDFs.
6.4.1. Concatenating and splitting PDF documents
In chapter 2, we created a list with movies containing links to the Internet Movie Database (IMDB). We also created a historical overview of these movies with bookmarks that were generated automatically. Now let’s combine those two PDFs into one new document.
Listing 6.21. Concatenate.java
String[] files = { MovieLinks1.RESULT, MovieHistory.RESULT };
Document document = new Document();
PdfCopy copy = new PdfCopy(document, new FileOutputStream(RESULT));
document.open();
PdfReader reader;
int n;
for (int i = 0; i < files.length; i++) {
  reader = new PdfReader(files[i]);
  n = reader.getNumberOfPages();
  for (int page = 0; page < n; ) {
    copy.addPage(copy.getImportedPage(reader, ++page));
  }
}
document.close();
MovieLinks1.RESULT is a document with 34 pages. MovieHistory.RESULT has 26 pages. The page count of the concatenated file is 60.
FAQ
After merging two PDFs, I’m seeing unnecessary white space. Why are there so many blank areas? Sometimes people expect that a document with one page concatenated with another document counting one page will result in a document with only one page. They expect that, when the pages of the original document are only half full, the new document will put both halves on one page. That’s not how PDF works! In PDF, you work with complete pages; it’s not possible to reflow the content on those pages.
There are two different versions of the addPage() method. You can add blank pages if you use a Rectangle and a rotation value as parameters, or you can add a PdfImportedPage obtained from the same PdfCopy instance using getImportedPage().
Preservation of Interactive Features
You’ve used imported pages with PdfWriter in section 6.2 and with PdfStamper in section 6.3. You’ve scaled these imported pages, rotated them, and so on. All of this isn’t possible with the PdfImportedPage objects obtained from PdfCopy. You can only add them to a new document in their original form and size.
This limitation comes with a major advantage: most of the interactive features of the page are preserved. The links that are present in MovieLinks1.RESULT are lost if you import a page using PdfWriter or PdfStamper, but they still work if you import the same page with PdfCopy. Links are a special type of annotation, and we’ll discuss the different types of annotations in chapter 7. For now, it’s sufficient to know that all annotations are kept with PdfCopy. The bookmarks of MovieHistory.RESULT, on the other hand, are lost.
We’ll find a way to work around this in the next chapter.
Adding Content with Pdfcopy
In previous sections, I explained that PdfImportedPage is a read-only subclass of PdfTemplate. You can’t add any content to an imported page. This wasn’t a big deal when using imported pages with PdfWriter and PdfStamper because we could easily add content over or under the imported page. When using PdfCopy, it would be interesting if we could somehow add extra content too.
It would be interesting if we could add a “page X of Y” footer that reflects the new page numbers.
Listing 6.22. ConcatenateStamp.java
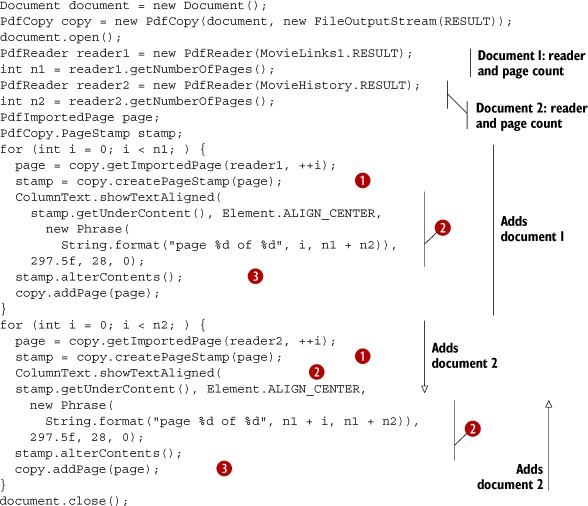
With PdfCopy, we can add content to a PdfImportedPage using a PdfCopy.PageStamp object. Such an object can be obtained with the createPageStamp() method ![]() . This object has two methods for getting a direct content layer: getUnderContent() and getOverContent(). These methods return a PdfCopy.StampContent object. PdfCopy. StampContent extends PdfContentByte, and you can use it just as you’d use any other PdfContentByte object. In listing 6.22, you use it to add text at an absolute position
. This object has two methods for getting a direct content layer: getUnderContent() and getOverContent(). These methods return a PdfCopy.StampContent object. PdfCopy. StampContent extends PdfContentByte, and you can use it just as you’d use any other PdfContentByte object. In listing 6.22, you use it to add text at an absolute position ![]() . There’s one caveat: you mustn’t forget to invoke the alterContents() method
. There’s one caveat: you mustn’t forget to invoke the alterContents() method ![]() .
.
Splitting a PDF
Using a PdfReader instance with PdfCopy doesn’t tamper the reader the way PdfStamper does. You can reuse the same reader object for different PdfCopy objects. You can, for instance, construct one reader instance that reads the timetable PDF from chapter 3, and create a new PdfCopy instance for every page to split the document into individual pages. In PDF terminology, this process is often called PDF bursting.
Listing 6.23. Burst.java
PdfReader reader = new PdfReader(MovieTemplates.RESULT);
Document document;
PdfCopy copy;
int n = reader.getNumberOfPages();
for (int i = 0; i < n; ) {
  document = new Document();
  copy = new PdfCopy(document,
    new FileOutputStream(String.format(RESULT, ++i)));
  document.open();
  copy.addPage(copy.getImportedPage(reader, i));
  document.close();
}
The original file representing the timetable contained 8 pages, and its size was about 15 KB. Bursting this file results in 8 different single-page documents, each with a file size of about 4 KB. 8 times 4 KB is 32 KB, which is more than the original 15 KB, because resources that were shared among pages in the original document are now copied into each separate document. So you might wonder what would happen if you concatenated PDF documents containing duplicate content.
6.4.2. PdfCopy versus PdfSmartCopy
In section 6.3.5, you filled out and flattened the film data sheet form to create a separate file for movies made in the year 2007. Wouldn’t it be nice to create one single document that contains the data sheets for all the movies in the database?
Here you’ll fill the data sheet using PdfStamper. The resulting PDF files will be kept in memory just long enough to copy the page into a new document with PdfCopy.
Listing 6.24. DataSheets1.java
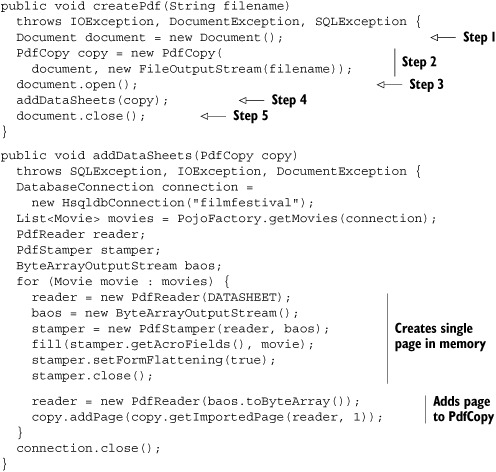
This example works perfectly, and at first sight you won’t find anything wrong with the resulting PDF when you open it in Adobe Reader. Only when you look at the file size will you have doubts. The original datasheet.pdf was less than 60 KB, but the resulting PDF is almost 5 MB.
This document has 120 pages that are almost identical. Only the specific movie information differs from page to page; the form template is repeated over and over again. But PdfCopy isn’t aware of that: it takes every page you add, including its resources, and copies everything to the writer. The code in listing 6.24 adds the same bits and bytes representing the original form to the same document 120 times. The resulting PDF is full of redundant information.
This can be avoided by using PdfSmartCopy instead of PdfCopy in step 2.
Listing 6.25. DataSheets2.java
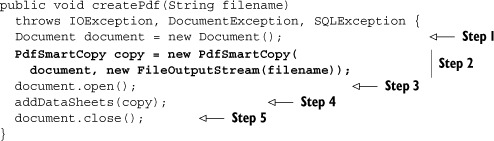
Now the size of the resulting PDF file is only about 300 KB; that’s a much better result.
PdfSmartCopy extends PdfCopy. It inherits the same functionality, but it checks every page that’s added for redundant objects, so it can save plenty of disk space or bandwidth. There’s a price to pay for this extra “intelligence.” PdfSmartCopy needs more memory and more time to concatenate files than PdfCopy. It will be up to you to decide what’s more important: file size and bandwidth, or memory and time. It will also depend on the nature of the documents you want to concatenate. If there is little resemblance between the pages, you might as well use PdfCopy. If different documents all have the same company logo on every page, you might want to consider using PdfSmartCopy to detect that logo.
In this example, you’ve concatenated flattened forms. But what happens if you concatenate the original forms? You don’t have to try this: it won’t work. Although PdfCopy (and PdfSmartCopy) preserve the annotations used to visualize a form, the form functionality will be broken if you try to concatenate two or more documents containing forms using PdfCopy. Your best chance to achieve this is to use PdfCopyFields.
6.4.3. Concatenating forms
Suppose you want to create a film data sheet form with two or more pages. This can easily be done with only four lines of code.
Note
These examples will only work if your forms are created using AcroForm technology. It’s not possible to concatenate XFA forms using iText.
Listing 6.26. ConcatenateForms1.java
PdfCopyFields copy = new PdfCopyFields(new FileOutputStream(RESULT));
copy.addDocument(new PdfReader(DATASHEET));
copy.addDocument(new PdfReader(DATASHEET));
copy.close();
DATASHEET refers to the file datasheet.pdf. RESULT refers to a new form with two identical pages. This form probably won’t work the way you expect it to. You probably want to be able to enter the information about one movie on the first page, and about another movie on the second page. That’s impossible with this form. Although the field “title” is physically present in two different locations in the same document, there’s only one logical field with the name “title” in the form. This single field can only have one value. If you enter a title on page one, you’ll see the same title appear on page two. That may not be your intention; you probably want to create a form with two pages that can be used to enter information about two different movies.
That’s only possible if you use forms with different field names, or if you rename the fields.
Listing 6.27. ConcatenateForms2.java

This code snippet renames fields such as “title” into “title_1” (on page 1) and “title_2” (on page 2). Now there’s no longer a conflict between the field names on the different pages.
Note
Don’t use PdfCopyFields to concatenate PDF documents without form fields. As opposed to concatenating documents using PdfCopy, PdfCopyFields needs to keep all the documents in memory to update the combined form. This can become problematic if you’re trying to concatenate large documents.
The PdfCopyFields example completes this chapter on the different PDF manipulation classes. It’s high time for a summary with an overview that will help you pick the right class for the job.
6.5. Summary
In this chapter, you’ve been introduced to the different PDF manipulation classes available in iText. You’ve used these classes to solve a series of common problems: N-up copying and tiling PDF documents, using a PDF as company stationery, adding headers, footers, watermarks, and “page X of Y” to existing documents, concatenating and splitting PDFs, and so on.
Every class had its specific specialties and limitations. Table 6.1 gives an overview of the classes that were discussed in this chapter.
Table 6.1. An overview of the PDF manipulation classes
|
Usage |
|
|---|---|
| PdfReader | Reads PDF files. You pass an instance of this class to one of the other PDF manipulation classes. |
| PdfImportedPage | A read-only subclass of PdfTemplate. Can be obtained from a PDF manipulation class using the method getImportedPage(). |
| PdfWriter | Generates PDF documents from scratch. Can import pages from other PDF documents. The major downside is that all interactive features of the imported page (annotations, bookmarks, fields, and so forth) are lost in the process. |
| PdfStamper | Manipulates one (and only one) PDF document. Can be used to add content at absolute positions, to add extra pages, or to fill out fields. All interactive features are preserved, except when you explicitly remove them (for instance, by flattening a form). |
| PdfCopy | Copies pages from one or more existing PDF documents. Major downsides: PdfCopy doesn’t detect redundant content, and it fails when concatenating forms. |
| PdfSmartCopy | Copies pages from one or more existing PDF documents. PdfSmartCopy is able to detect redundant content, but it needs more memory and CPU than PdfCopy. |
| PdfCopyFields | Puts the fields of the different forms into one form. Can be used to avoid the problems encountered with form fields when concatenating forms using PdfCopy. Memory use can be an issue. |
In the next chapter, we’ll focus mainly on PdfStamper. I’ll introduce the concept of annotations, and you’ll learn that form fields are a special type of annotation. You’ll create a form from scratch using iText, and we’ll discuss the different types of interactive forms in PDF.