
Chapter 8. Filling out interactive forms
- Creating AcroForms using iText
- Manipulating AcroForm fields
- Manipulating XFA forms
- Filling out Reader-enabled forms
Adobe products support two ways to create, view, and fill out interactive PDF forms. One is based on AcroForm technology. These forms are defined using PDF objects that correspond to subclasses of the PdfObject object in iText: PdfDictionary, PdfArray, and so on. We’ve already created a form like this with Open Office in chapter 6.
The other type of form uses the XML Forms Architecture (XFA). These are created with the Designer tool that ships with Acrobat. You’ll learn how to fill out an XFA form in the second part of this chapter. First, we’ll have a closer look at AcroForms.
8.1. Introducing AcroForms
You created form fields in the previous chapter. As you saw, you had to use the getAnnot() method in JavaScript to get an annotation object from a specific page. But you used getField() (without specifying a page) when the annotation corresponded to a form field. The best way to explain the relationship between a widget annotation and a form field is to quote the definition of a form field in ISO-32000-1:
Each field in a document’s interactive form shall be defined by a field dictionary. For purposes of definition and naming, the fields can be organized hierarchically and can inherit attributes from their ancestors in the field hierarchy. A field’s children in the hierarchy may also include widget annotations that define its appearance on the page.
ISO-32000-1, section 12.7.1
This definition tells us that fields and widget annotations are two different types of objects. A field is an entry in a form; a widget annotation is its visual representation. However,
As a convenience, when a field has only a single associated widget annotation, the contents of the field dictionary and the annotation dictionary may be merged into a single dictionary containing entries that pertain to both a field and an annotation.
ISO-32000-1 section 12.5.6.19
That’s why the iText PdfFormField class extends PdfAnnotation, which is in turn a subclass of PdfDictionary. We keep the field and widget information in one dictionary. As soon as you add a field dictionary to a PDF, iText creates a form:
An interactive form is a collection of fields for gathering information interactively from the user. A PDF document may contain any number of fields appearing on any combination of pages, all of which make up a single, global interactive form spanning the entire document.
ISO-32000-1 section 12.7.1
Each PDF document can contain one form, consisting of different types of fields. The type of a field is defined by the /FT value in the field dictionary.
AcroForms support four types of fields:
- /Btn— Button fields
- /Tx— Text fields
- /Ch— Choice fields
- /Sig— Signature fields
We’ll discuss button, text, and choice fields in the next three sections. We’ll deal with signature fields in chapter 12.
8.2. Selecting states or trigger actions with button fields
You created buttons in the previous chapter: buttons with and without icons, buttons with and without actions. Now we’re going to look at the different types of buttons that are available:
- Radio button fields— These contain a set of related buttons that can each be on or off. Typically, at most one radio button in a set may be on at any given time, and selecting any one of the buttons automatically deselects all the others.
- Check boxes— These can toggle between two states, on and off.
- Pushbuttons— These are purely interactive controls that respond immediately to user input without retaining a permanent value.
Figure 8.1 shows examples of each type of button field.
Figure 8.1. A PDF file with different button fields

In listing 7.29, you created a pushbutton field using the createPushButton() method. There are more static methods for creating different form fields in the PdfFormField class, but they’re mainly there for internal use by iText.
In listings 7.26, 7.27, and 7.28, you used the convenience class PushbuttonField to create pushbutton fields. You obtained an instance of the PdfFormField class using getField(). The PushbuttonField class extends BaseField, and it has two siblings: RadioCheckField and TextField. These classes help us shape the widget annotations for the field in a programmer-friendly way. In the upcoming examples, you’ll learn how to use the appropriate convenience class whenever possible. Creating widget annotations for a radio field, for instance, is best done with the RadioCheckField class.
8.2.1. Radio fields and radio buttons
A radio button field is represented by a set of related buttons.
Listing 8.1. Buttons.java

Radio buttons are an exception to the “use a convenience class” rule: the parent field is created using the static method
createRadioButton() ![]() . You then use the RadioCheckField class to shape the widgets
. You then use the RadioCheckField class to shape the widgets ![]() .
.
Types of Radio and Check Box Widget Annotations
You can choose one of the types listed in table 8.1 as a parameter for setCheckType() to let iText create appearances for the on and off states of the button. The second column in the table contains the character code for the ZapfDingbats character that’s used to check the radio or check box widget (ZapfDingbats is one of the standard type 1 fonts available in every PDF viewer).
Table 8.1. Different RadioCheckField types
|
Code |
char |
Description |
|---|---|---|
| TYPE_CHECK | 4 | A square with a check mark (when selected); the default for check boxes. |
| TYPE_CIRCLE | 1 | A circle with a bullet (when selected); the default for radio fields. |
| TYPE_CROSS | 8 | A square with an X (when selected). |
| TYPE_DIAMOND | u | A square with a diamond (when selected). |
| TYPE_SQUARE | n | A square with a filled square (when selected). |
| TYPE_STAR | H | A square with a five-pointed star (when selected). |
The default for radio field widgets is TYPE_CIRCLE, so the line setting the type in listing 8.1 was redundant. These types also apply to check boxes; the default for check boxes is TYPE_CHECK.
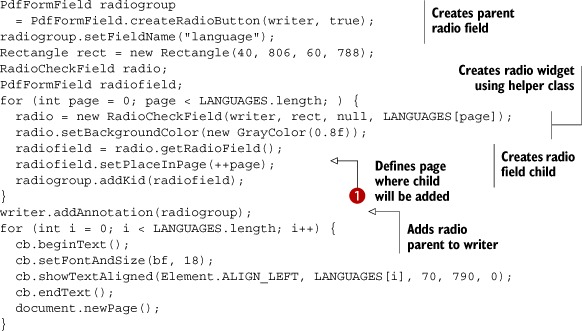
In listing 8.1, we used the LANGUAGES array containing five Strings to add five radio fields on the same page. Adding radio buttons to different pages is more complex.
Fields Spanning Different Pages
To create all the children of the radio field in advance, define the page number where they’ll appear ![]() even before the page is created.
even before the page is created.
Listing 8.2. RadioButtons.java
Adding check boxes is much easier, because each check box can only have two values: it’s selected or not. There’s no need to differentiate between the field and its widgets.
8.2.2. Check boxes
In the previous examples, iText has created the appearance of the radio buttons based on one of the types defined in table 8.1. This mechanism also works for check boxes. If you don’t like the predefined appearances, you can also create custom appearances. In listing 7.29, you created different PdfAppearance objects for a pushbutton. This is how you create normal appearances for the On and Off states of a check box.
Listing 8.3. Buttons.java

Note that "On" and "Off" are also the values that can be used to set the field when you manipulate the form. If you don’t know which values are available because you didn’t create the fields yourself, you need the getAppearanceStates() method.
Listing 8.4. Buttons.java
PdfReader reader = new PdfReader(src);
PdfStamper stamper = new PdfStamper(reader, new FileOutputStream(dest));
AcroFields form = stamper.getAcroFields();
String[] radiostates = form.getAppearanceStates("language");
form.setField("language", radiostates[4]);
for (int i = 0; i > LANGUAGES.length; i++) {
  String[] checkboxstates = form.getAppearanceStates("English");
  form.setField(LANGUAGES[i], checkboxstates[i % 2 == 0 ? 1 : 0]);
}
stamper.close();
One of the problems of having plenty of iText examples available online is that many developers copy and paste code snippets without really knowing what they’re doing. For instance, they copy this:
form.setField("checkbox", "On");
This line works for this example, but only because On is the name of one of the possible states of the check box we want to check. Other check boxes could have other values, such as Yes, or true, or whatever was defined for the checked state of the field.
Let’s finish our overview of button fields with some more information about pushbuttons.
8.2.3. Pushbuttons
First you need to create a pushbutton.
Listing 8.5. Buttons.java

Clicking the pushbutton shown in figure 8.1 will trigger the showButtonState() method. This method (which you should add as document-level JavaScript) opens an alert box showing the state of the radio field and the check boxes.
Border Styles
You’ve already defined colors with the methods setBackgroundColor() and setBorderColor() in listing 8.2. Now you can use setBorderWidth() and setBorderStyle() to define the width and style of the border of a widget annotation. Possible values for the style are:
- STYLE_SOLID— A solid rectangle surrounding the annotation.
- STYLE_DASHED— A dashed rectangle surrounding the annotation.
- STYLE_BEVELED— A simulated embossed rectangle that appears to be raised above the surface of the page.
- STYLE_INSET— A simulated engraved rectangle that appears to be recessed below the surface of the page.
- STYLE_UNDERLINE— A single line along the bottom of the annotation rectangle.
You’ve already used methods with the same name in the previous chapter, when you created annotations.
Pushbutton Labels and Icons
The content of the pushbutton consists of an icon and some text, because you changed the layout using the setLayout() method in listing 8.5. Possible values for specifying the layout are:
- LAYOUT_LABEL_ONLY— No icon; caption only (the default).
- LAYOUT_ICON_ONLY— No caption; icon only.
- LAYOUT_ICON_TOP_LABEL_BOTTOM— Caption below the icon.
- LAYOUT_LABEL_TOP_ICON_BOTTOM— Caption above the icon.
- LAYOUT_ICON_LEFT_LABEL_RIGHT— Caption to the right of the icon.
- LAYOUT_LABEL_LEFT_ICON_RIGHT— Caption to the left of the icon.
- LAYOUT_LABEL_OVER_ICON— Caption overlaid directly on the icon.
Note that iText can change this parameter internally. If the icon doesn’t fit the button rectangle, iText can decide to switch to LAYOUT_LABEL_ONLY.
You can change the scaling behavior of the icon with setScaleIcon() and one of the following values:
- SCALE_ICON_ALWAYS— Always scale (the default).
- SCALE_ICON_NEVER— Never scale.
- SCALE_ICON_IS_TOO_BIG— Scale only when the icon is bigger than the annotation.
- SCALE_ICON_IS_TOO_SMALL— Scale only when the icon is smaller than the annotation.
The aspect ratio of the icon can be preserved or unlocked when scaling by using the setProportionalIcon() method.
There are also two methods to adjust the position of the icon: setIconHorizontalAdjustment() and setIconVerticalAdjustment(). The parameter is a float value between 0 and 1 indicating the fraction of leftover space to allocate at the left (horizontal adjustment) or at the bottom (vertical adjustment) of the icon. A value of 0 positions the icon at the left or bottom of the annotation rectangle. The default is 0.5, which centers the icon.
The PDF reference told you that pushbuttons don’t retain any permanent value. That’s true, but you can also use buttons as placeholders for images. In listing 7.27, you used a button to add an advertisement promoting this book to an existing PDF document. But wouldn’t people prefer to see the nice woman on the cover instead of me as Superman?
Manipulating a Pushbutton
The AcroFields class you use to fill out fields also has a getNewPushbuttonFrom-Field() method. With this method, you can obtain a new PushbuttonField object with the same properties as an existing button in the form. After changing the properties of this object, you can replace the existing button with the new, altered one using replacePushbuttonField().
Listing 8.6. ReplaceIcon.java

You’ll create more buttons in chapter 9, where you’ll learn how to submit the content of a form to a server. For now, let’s continue our overview of the different types of fields.
8.3. Filling in data with text fields
A text field is “a box or space for text fill-in data typically entered from a keyboard. The text may be restricted to a single line or may be permitted to span multiple lines” (ISO-32000-1 12.7.4.3). Figure 8.2 shows examples of such text boxes.
Figure 8.2. A PDF file with different text fields

We’ll look at how to use the TextField class and the getTextField() method to obtain a PdfFormField instance.
8.3.1. Creating text fields
The text fields in figure 8.2 were created using this code.
Listing 8.7. TextFields.java

In this listing, you’ll recognize several features you used earlier when defining buttons, but it also introduces some new methods.
Text Properties
Previously you used setTextColor(), setFontSize(), and setText() to define captions for pushbuttons. When the text didn’t fit a button, it was truncated. The behavior is different for text fields. Three things can happen when an end user enters text that doesn’t fit the text field rectangle:
- The full text is present in the field, but it’s clipped by the annotation rectangle. The end user has to scroll back and forth to see what has been entered.
- The full text is shown, but the more characters that are added, the smaller the font size gets. This is what happens if you set the font size to 0.
- The end user can’t add more than the number of characters that was defined with the setMaxCharacterLength() method.
The alignment of the text is set with the setAlignment() method. You use the same parameters as you’ve used to define the alignment of paragraphs.
FAQ
Why can’t I set the alignment to ALIGN_JUSTIFIED? If you check the PDF reference, you’ll discover that justified text isn’t supported in AcroForm text fields. It’s impossible to justify the text in a text box, unless you flatten the form, using a technique that will be explained in section 8.5. Note that alignment is referred to as quadding in the PDF reference. There’s also a setQuadding() method in the PdfFormField class.
Listing 8.7 uses the setVisibility() method to set some flags in the annotation dictionary:
- VISIBLE— The field is visible on screen and can be printed.
- HIDDEN— The field is invisible.
- VISIBLE_BUT_DOES_NOT_PRINT— The field is visible on screen, but is not printed.
- HIDDEN_BUT_PRINTABLE— The field is invisible on screen, but is printed.
When you created annotations, you needed to use setFlags() with the FLAGS_PRINT parameter to make sure the annotation was printed. For widget annotations, iText always uses VISIBLE as default.
FAQ
How can I add a tooltip to a text field? You need to set the /TU key in the field dictionary with the setUserName() method. This is an alternate name that’s used in place of the actual field name wherever the field is identified in the UI. This alternate field name will show up when the user moves the mouse pointer over the field.
You can set flags in the field dictionary with the setOptions() method. You can or ('|') the following values:
- READ_ONLY— The end user won’t be able to change the value of the field.
- REQUIRED— The end user won’t be able to submit the form unless this field is filled in.
- MULTILINE— For text fields: the field can consist of multiple lines.
- DO_NOT_SCROLL— Scrolling will be disabled for the field.
- PASSWORD— The text entered in a text field will be obfuscated.
- FILE_SELECTION— The field will be used to upload a file.
- DO_NOT_SPELL_CHECK— Spell checking (when available) will be disabled.
- EDIT— The values that are presented in a choice field can be edited.
- MULTISELECT— The end user can select more than one value in a choice field.
- COMB— An equal amount of space will be used for every character in the text in a text field.
These are the field flags that can be set when you’re using a BaseField class to create the form field. Note that some of the flags only make sense for specific classes.
The COMB flag, for instance, is used in text fields to distribute the characters over a fixed number of small boxes. In figure 8.2, these boxes are drawn by Adobe Reader using the border style and properties of the widget annotation. COMB is often used to enter data that needs to match boxes on preprinted forms; for example, bank forms that can be used to wire money from one account to another.
For every value in the BaseField options list, you’ll find a corresponding value in the PdfFormField class. For instance, the value TextField.PASSWORD is equal to PdfFormField.FF_PASSWORD. These were the original flags that could be set using the setFieldFlags() method. There were also flags to define the field type. If you wanted to create a pushbutton in earlier iText versions, you had to set the flag FF_PUSHBUTTON, but nowadays this is implicitly done by the BaseField class.
8.3.2. Filling out text fields
You’ve already filled out text fields programmatically in section 6.3.5, but now you’ll see not only how to change the value of a field, but also its properties.
Listing 8.8. TextFields.java
PdfReader reader = new PdfReader(src);
PdfStamper stamper
  = new PdfStamper(reader, new FileOutputStream(dest));
AcroFields form = stamper.getAcroFields();
System.out.println(form.getField("text_4"));
form.setField("text_1", "Bruno Lowagie");
form.setFieldProperty("text_2", "fflags", 0, null);
form.setFieldProperty("text_2", "bordercolor", BaseColor.RED, null);
form.setField("text_2", "bruno");
form.setFieldProperty("text_3",
                         "clrfflags", TextField.PASSWORD, null);
form.setFieldProperty("text_3",
                    "setflags", PdfAnnotation.FLAGS_PRINT, null);
form.setField("text_3", "12345678", "xxxxxxxx");
form.setFieldProperty("text_4", "textsize", new Float(12), null);
form.regenerateField("text_4");
stamper.close();
You can retrieve the value of a field from an existing form with the getField() method. In previous examples, you’ve used the setField() method to change this value. Up until now, you’ve only used this method with two parameters: fieldname and value.
For text fields, it can also make sense to use a third parameter: display. This extra String can be used to create the appearance of the text field. If you want to set the value of a field to "1970-06-10" (because that’s the way my birthday is stored in your database of dates to remember), but you want that value to be displayed as "10 Jun 1970" in the form, you can use this line:
form.setField("birthday", "2007-06-10", "10 Jun 1970");
As soon as the user clicks the text field to change it, the actual value of the field will be displayed.
Changing the Flags in the Annotation or Flag Dictionary
The annotation and field flag can be changed using the setFieldProperty() method. The first parameter refers to the field name, and the second is one of the values in table 8.2.
Table 8.2. Changing the flags in the annotation or flag dictionary
|
Property |
Description |
|---|---|
| "flags" | Replaces all the flags of the widget annotation. |
| "setflags" | Sets one or more flags of the widget annotation. |
| "clrflags" | Removes one or more flags of the widget annotation. |
| "fflags" | Replaces all the flags of the form field. |
| "setfflags" | Sets one or more flags of the form field. |
| "clrfflags" | Removes one or more flags of the form field. |
If the second parameter is "flags", "setflags", or "clrflags", the third parameter is one of the flags that can be found in the PdfAnnotation class. For instance, adding FLAGS_PRINT to the password field will change the visibility of that field from TextField.VISIBLE_BUT_DOES_NOT_PRINT to TextField.VISIBLE.
If the second parameter is "fflags", "setfflags", or "clrfflags", the third parameter should be one of the BaseField options (or a PdfFormField constant starting with FF_). For instance, removing the TextField.PASSWORD flag will change the password field into an ordinary text field.
The fourth parameter wasn’t used in listing 8.8; you just passed null. If the field was represented by more than one widget (as is the case for radio fields), you could pass an array of int values, to sum up the indexes of the widgets for which you want to change the property. Passing null means you want to process all the widgets associated with the field.
Changing the Properties of Widget Annotations in Existing Forms
There’s also a setFieldProperty() method to change the other properties of a field. Pass the field name as the first parameter. Table 8.3 explains the meanings of the second and third parameters. The fourth parameter has the same meaning as for the setFieldProperty() method that was used to change flags.
Table 8.3. Changing the properties of a field
|
Property |
Value |
Description |
|---|---|---|
| "textfont" | BaseFont | Changes the font used in the field. |
| "textcolor" | BaseColor | Changes the text color. |
| "textsize" | Float | Changes the font size. |
| "bgcolor" | BaseColor | Changes the background color. |
| "bordercolor" | BaseColor | Changes the border color. |
FAQ
I’ve changed the properties of a field, yet I don’t see any changes. Why not? iText only creates new appearances for fields when the field value has changed. For example, you change the font size of the field "text_4" in listing 8.8, but you don’t change its value. If you want to see the font size change, you also have to use the regenerateField() method.
Up until now, we’ve avoided one property in the examples: you haven’t used setFont() yet, nor have you changed the "textfont" property.
8.3.3. Text fields and fonts
Figure 8.3 shows three different PDF files with a text field. The text added for the three text fields is identical.
Figure 8.3. Creating text fields containing Unicode characters

As you can see, the Chinese names are missing in the upper example; they’re present in the second and third PDFs, but different fonts are used. The code used to create the three different PDFs doesn’t differ much.
Listing 8.9. TextFieldFonts.java

So far you’ve been creating forms without ![]() and
and ![]() . This worked because you were only using Western characters. The Chinese characters in the TEXT aren’t shown in the appearance of the text field because iText doesn’t know where to find a font file containing those characters.
. This worked because you were only using Western characters. The Chinese characters in the TEXT aren’t shown in the appearance of the text field because iText doesn’t know where to find a font file containing those characters.
You can work around this by setting the NeedAppearances flag ![]() . When set, this flag instructs the PDF viewer to create the appearances for the widget annotations. This way you pass the
responsibility for rendering the text correctly to the application that’s used to view the PDF. The same mechanism is triggered
when the end user clicks the text field to change the text. This won’t work on all systems: the PDF viewer needs to have access
to a font with the Chinese glyphs.
. When set, this flag instructs the PDF viewer to create the appearances for the widget annotations. This way you pass the
responsibility for rendering the text correctly to the application that’s used to view the PDF. The same mechanism is triggered
when the end user clicks the text field to change the text. This won’t work on all systems: the PDF viewer needs to have access
to a font with the Chinese glyphs.
![]() offers another workaround. With the setExtensionFont() method, you define the main font that should be used for the field. In this case, the default font Helvetica. Helvetica doesn’t
know how to draw Chinese characters, so you use the setSubstitutionFonts() method to add Arial Unicode. Whenever iText detects a character that can’t be rendered with the extension font, it will go
through the list of substitution fonts. The first font that has a glyph definition for the needed character will be used (see
the third window in figure 8.3). In this case, iText will embed a subset of Arial Unicode in the PDF file.
offers another workaround. With the setExtensionFont() method, you define the main font that should be used for the field. In this case, the default font Helvetica. Helvetica doesn’t
know how to draw Chinese characters, so you use the setSubstitutionFonts() method to add Arial Unicode. Whenever iText detects a character that can’t be rendered with the extension font, it will go
through the list of substitution fonts. The first font that has a glyph definition for the needed character will be used (see
the third window in figure 8.3). In this case, iText will embed a subset of Arial Unicode in the PDF file.
Adding Unicode to Text Fields
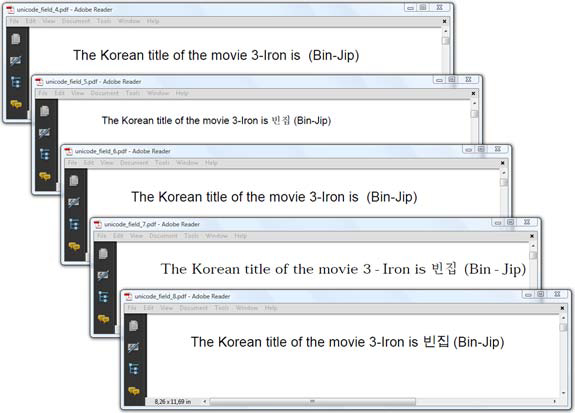
As soon as you try to fill out the form with other Asian characters than the ones that were in the TEXT string, you’ll run into trouble. That’s shown in the first and third windows of figure 8.4, which replace the English-Chinese text with a text containing some Korean characters. The upper three windows correspond
to the three windows from figure 8.3. As you can see, the workaround ![]() still works (for me, on my OS), but
still works (for me, on my OS), but ![]() fails because iText doesn’t know where to find a font containing the Korean glyphs.
fails because iText doesn’t know where to find a font containing the Korean glyphs.
Figure 8.4. Filling out text fields containing Unicode characters
Again there are two ways to work around this.
Listing 8.10. TextFieldFonts.java

In the first workaround, you change the "textfont" property ![]() . I’m using a CJK font (see chapter 11) because I want to render Korean characters, and CJK fonts don’t need to be embedded. If I had used Arial Unicode, iText
would have embedded the complete font file, which would have resulted in a huge file size. It’s important to choose your font wisely.
. I’m using a CJK font (see chapter 11) because I want to render Korean characters, and CJK fonts don’t need to be embedded. If I had used Arial Unicode, iText
would have embedded the complete font file, which would have resulted in a huge file size. It’s important to choose your font wisely.
In the second workaround, you add a substitution font ![]() . This is similar to the workaround you used when creating the text field, and it has the same disadvantage: as soon as the
end user starts typing something else in the text field, you depend entirely on the fonts that are available to the viewer
application on the OS.
. This is similar to the workaround you used when creating the text field, and it has the same disadvantage: as soon as the
end user starts typing something else in the text field, you depend entirely on the fonts that are available to the viewer
application on the OS.
We’ll conclude this section about text fields with an example that uses JavaScript to validate and adapt the content that was entered by an end user.
8.3.4. Validating text fields
Table 7.4 contained an overview of all the additional actions that could be added to an interactive form field. You’ve used some of these actions to write an application in PDF, but their primary use is to enhance the user experience when filling out a form.
Listing 8.11. TextFieldActions.java

The first action ![]() is triggered after the end user has filled in the date field. Adobe Reader comes with canned functions that let you validate
and format dates, times, currencies, and so on. The method AFDate_FormatEx() is one them. For instance, if you enter "10 Jun 1970", it will be converted to "10-06-1970". If you enter something that can’t be recognized as a date, the field is cleared.
is triggered after the end user has filled in the date field. Adobe Reader comes with canned functions that let you validate
and format dates, times, currencies, and so on. The method AFDate_FormatEx() is one them. For instance, if you enter "10 Jun 1970", it will be converted to "10-06-1970". If you enter something that can’t be recognized as a date, the field is cleared.
The second action ![]() is performed upon every keystroke. You change the key that was pressed to uppercase using the event object.
is performed upon every keystroke. You change the key that was pressed to uppercase using the event object.
With what you learned in chapter 7, you can create every validation script you need, but now we’ll continue with another type of field that can be created using the TextField class.
8.4. Selecting options with choice fields
Choice fields are defined in section 12.7.4.4 of ISO-32000-1. A choice field contains several text items, one or more of which shall be selected as the field value. The items may be presented to the user in one of the following two forms:
- A scrollable list box— The end user can select one or more values from a fixed list.
- A combo box— A drop-down list. The combo box may be accompanied by an editable text box in which the user can type a value other than the predefined choices.
Figure 8.5 demonstrates the different types of choice fields.
Figure 8.5. A PDF file with different choice fields

The first two are list boxes. As soon as you click the word “French” next to “Language of the movie,” a scrollbar appears. The second list box was made big enough that scrollbars aren’t needed. The lower two choice fields are combo boxes. If you click the arrow to the right, the full list of choices is shown. Let’s find out how these fields were created.
8.4.1. Creating lists and combo boxes
The fields shown in figure 8.5 were created using this code.
Listing 8.12. ChoiceFields.java

Observe that you’re using the TextField convenience class once again. This is an iText design decision, based on the fact that drawing the appearance of a list or combo box isn’t all that different from drawing the appearance of a text box. Instead of using getTextField() to obtain a PdfFormField instance, you now have to use the methods getListField() or getComboField(). You can use the same methods to set properties as you used for the text field widgets.
The values that are shown to the end user are set with the method setChoices(). In listing 8.12, the LANGUAGES array consists of five languages. In ![]() and
and ![]() , you use setExportValues(), passing the EXPORTVALUES array. That array looks like this:
, you use setExportValues(), passing the EXPORTVALUES array. That array looks like this:
String[] EXPORTVALUES = { "EN", "DE", "FR", "ES", "NL" };
Every export value has to correspond with an option in the choice array. When the form is submitted to a server, the export value will be used. For instance, if the end user selects "English" and submits the form, the corresponding export value "EN" will be submitted. Note that these export values aren’t used when you preselect an option—the setChoiceSelection() method expects an int. For multiple select lists, you can also use the setChoiceSelections() method with a list of integers.
You don’t define export values in ![]() and
and ![]() ; in this case, the full language name will be sent to the server. In
; in this case, the full language name will be sent to the server. In ![]() , you set the EDIT flag, so the end user filling out the form can even add languages that aren’t present in the LANGUAGES array.
, you set the EDIT flag, so the end user filling out the form can even add languages that aren’t present in the LANGUAGES array.
Now let’s find out how to manipulate the values of the choices in an existing PDF document.
8.4.2. Manipulating lists and combo boxes
Let’s take the PDF you created in section 8.4.1 and pretend that you forgot which options and export values are available in the choice fields of the form. How could you retrieve those values? And how would you change the selection?
Listing 8.13. ChoiceFields.java (continued)

You already know the setField() method, but now you can also use the setListSelection() method to choose more than one value in a multiple-select list box. You can use the methods getListOptionDisplay() and getListOptionExport() to determine the available options. If you’re not happy with the available options, you can use the setListOption() method to replace the sets of existing display and export values with new arrays. Or, if the field is an editable combo box, you can set a value that isn’t present in the choice field.
Now that you know all the types of fields that can be used in an interactive form, let’s have a look at issues you may encounter when filling out form fields.
8.5. Refining the form-filling process
Up until now, you’ve used field names without any structure. In this section, you’ll learn how to create a field hierarchy. We’ll also look at ways to speed up the form-filling process and to get more control over the flattening process.
Figure 8.6 shows a form with four fields: a name, a login, a password, and a field for extra info.
Figure 8.6. Before: a form with four fields
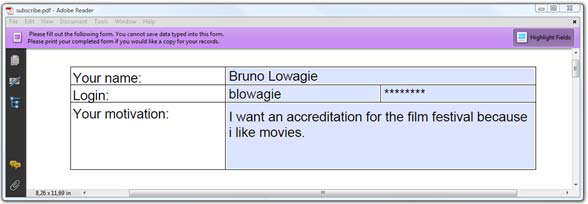
On the outside, there’s no significant difference between this form and the forms we’ve created before, but when you start manipulating this form with iText, you’ll notice that something is different on the inside: the fields have dots in their names.
8.5.1. Choosing field names
In previous examples, the fields had no (or almost no) hierarchy. The only exception was for radio fields: the parent field had different unnamed children, one for every possible value of the field. A similar hierarchy exists in the form shown in figure 8.6. An empty field was created like this:
PdfFormField personal = PdfFormField.createEmpty(writer);
personal.setFieldName("personal");
This is a purely structural element. It’s not one of the types of fields we’ve discussed so far in this chapter. It’s the parent of a series of child fields that are “adopted” and positioned in a cell event.
Listing 8.14. ChildFieldEvent.java
public class ChildFieldEvent implements PdfPCellEvent {
  protected PdfFormField parent;
  protected PdfFormField kid;
  protected float padding;
  public ChildFieldEvent(PdfFormField parent,
    PdfFormField kid, float padding) {
    this.parent = parent;
    this.kid = kid;
    this.padding = padding;
  }
  public void cellLayout(PdfPCell cell,
    Rectangle rect, PdfContentByte[] cb) {
    try {
       parent.addKid(kid);
       kid.setWidget(new Rectangle(
         rect.getLeft(padding), rect.getBottom(padding),
         rect.getRight(padding), rect.getTop(padding)),
         PdfAnnotation.HIGHLIGHT_INVERT);
      }  catch (Exception e) {
         throw new ExceptionConverter(e);
      }
  }
}
Here, the names of the kids you’re adding to the form are "name", "loginname", "password", and "reason". These are the partial names of the field. When you fill out the form using iText, you need the fully qualified name, which is constructed from the partial field names of the field and all of its ancestors. The names are separated by a period. In the simple form in figure 8.6, the parent element "personal" has four children: "personal.name", "personal.loginname", "personal.password", and "personal.reason".
You can have two different fields with the same partial name, such as "name", provided they have a different parent, such as "sender.name" and "receiver.name". Fully qualified field names are unique in the sense that fields with the same fully qualified name must have the same field type, value, and default value. You can have different representations of fields with the same fully qualified name, provided that they have the same parent, have no children of their own, and differ only in properties that specify their visual appearance.
This is important as soon as you start to fill out the form using iText.
8.5.2. Optimizing the filling process
When you filled out the movie data sheet in chapter 6, iText inspected the same form 120 times—once for every movie in the database. Part of that work was redundant. When filling out the same form multiple times, you can optimize the process significantly by allowing iText to reuse objects that would otherwise have to be created from scratch every time the form is filled out with different data.
Filling Out the Same Form Multiple Times
In this example, the form in figure 8.6 is filled out three times.
Listing 8.15. Subscribe.java

Every time you fill out a form, you need to create new PdfStamper and AcroFields instances. Inside the AcroFields object, iText will create a TextField object for every text and choice field that’s encountered. This is an expensive operation: the original form is read and every property is copied into the new TextField object.
You can get a significant speed advantage if you create an empty HashMap ![]() and use it as a cache for these objects with the setFieldCache() method
and use it as a cache for these objects with the setFieldCache() method ![]() . The first time iText has to fill a form, an entry will be added to the cache for every text or choice field that’s filled.
This entry will be a key-value pair consisting of the field name and a TextField object. The next time the form is filled out, iText will fetch that TextField object, which will then be used to create a new appearance based on the new value that was filled in with setField().
. The first time iText has to fill a form, an entry will be added to the cache for every text or choice field that’s filled.
This entry will be a key-value pair consisting of the field name and a TextField object. The next time the form is filled out, iText will fetch that TextField object, which will then be used to create a new appearance based on the new value that was filled in with setField().
In some cases, it may be necessary to adjust the appearance of a text field.
Adjusting the Offset of a Text Field
Appearances created by iText are an approximation of the way Adobe Reader renders the content of a text field. Depending on the tool used to create the form and the viewer used to open the form, the appearance created by iText won’t always correspond to the appearance of the field when you click on it. This can be a serious problem when you want to flatten a form; there could be a consistent discrepancy of the baseline and the X-offset for all of the text fields.
You can work around this problem by using the setExtraMargin() method ![]() , which corrects the offset in X and Y directions by specifying extra margins to be applied to every text field in the form.
, which corrects the offset in X and Y directions by specifying extra margins to be applied to every text field in the form.
There’s more going on in listing 8.15: you’re also removing and renaming fields. Moreover the form is flattened, but only partially.
8.5.3. Partial form flattening
In section 6.3.5, you created a template using Open Office. The fields were used as placeholders; once they were filled in, you were no longer interested in the form. You didn’t have the intention to change the data. With the setFormFlattening() method, you threw away the internal form structure. Only the content of the fields was kept; it was added at the absolute positions defined in the template. You won’t want this to happen if you’re going to use iText to prefill a form, but you may want to make part of the form read-only.
Suppose that the form shown in figure 8.6 is one of your standard forms. The first time an end user is confronted with it, he or she has to enter a name, login name, password, and motivation to get an accreditation for the festival. The form is then submitted to the server. The username and password are checked, and if the credentials are correct, you want to allow the end user to change the motivation entry, but not the name and login name. You also don’t need the user’s password anymore. You want the form to look like figure 8.7.
Figure 8.7. After: a form with two fields

The form resembles the form shown in figure 8.6, with a few exceptions:
- The password field is removed.
- Internally, one of the field names has been changed.
- The values of the name and loginname fields are still visible, but the end user can no longer change them.
Let’s look at the different methods that can be used to achieve this.
Removing or Renaming Fields
There are three different methods that allow you to remove a field:
- removeFieldFromPage(int page)— Removes all field widgets from a page. Fields are removed if they have no other widgets on at least one other page.
- removeField(String name, int page)— Removes the widgets from the field with name name from page page. The field isn’t removed entirely if it has widgets on another page.
- removeField(String name)— Removes the entire field and all its widgets.
In this example, it’s better to remove the password field instead of flattening it because it doesn’t make sense to print a series of stars where the password field used to be. You don’t want to remove the field named "personal.reason", you only want to reuse it. In section 6.4.3, you used renameField() before concatenating forms, and you can also use this method to change "reason" into "motivation", but there are some caveats:
- You can only use this method for fields that don’t have named children. The following line won’t work:
form.renameField("personal", "sender"); - If you rename a field, you can only change the partial name; the first part of the fully qualified name has to be identical.
This line won’t work either:
form.renameField("personal.reason", "motivation");
There are two ways to make a field read-only. Which is the better way to do it depends on your requirements.
Making a Field Read-Only
In figure 8.7, you made the login name read-only with the setFieldProperty() method. You set the flag TextField.READ_ONLY, and as a result the end user can no longer change the login name in the form. The field isn’t flattened: you can still ask the form for the content of this field. The following line will return "blowagie" when used on the form shown in figure 8.7:
System.out.println(form.getField("personal.loginname"));
Note that it’s possible to remove the read-only flag with iText, Acrobat, or another tool. You can even remove it using a JavaScript action executed in the PDF viewer.
If you want the field to be removed, but you want to keep the content, you can use setFormFlattening() but restrict the flattening process to a limited number of fields. Only those fields will be flattened for which partialFormFlattening() was used. Flattening will remove the field structure, so the following line will return null when used on the form shown in figure 8.7:
System.out.println(form.getField("personal.name"));
Suppose that the way iText flattens PDF forms doesn’t meet your needs, in spite of the tips and tricks we’ve looked at so far. You can work around this by taking control over the flattening process.
8.5.4. Customized form flattening
I was once asked to work on a project that involved ads for used cars that had to appear in newspapers and magazines. The design of the advertisement was always the same: it contained the logo and the address of the company that sold used cars, but the main part of the ad consisted of photos, descriptions, and the prices of cars that were on sale that week. That content changed every week, because cars were constantly being bought and sold.
Creating an Advertisement
I’ve made a simplified version of that assignment using the movie database for the Foobar Film Festival. See figure 8.8.
Figure 8.8. Advertisement for the Foobar Film Festival

Two forms are involved in this example. Take a look at figure 8.9. The form in the back was created using Open Office. The form consists of a nice background and a number of rectangular fields.
Figure 8.9. Forms involved in the Foobar Film Festival ad

The second form is the PDF shown in the foreground of figure 8.9. It’s a rectangle with three fields. The upper field is used for an image: a picture of a used car in the real-world example, a movie poster in our example. The middle field is used for text: a description of the car or information about the film. The lower field could be filled with the car price or the production year.
Combining What You Already Know
If we combine all the knowledge you’ve learned so far in chapters 6 to 8, we should be able to get close to a solution that looks like the PDF in figure 8.8.
Listing 8.16. MovieAds.java

There’s no new functionality in listing 8.16, except that you haven’t learned yet what the fillTemplate() method is about. You use this method in ![]() and you can assume that it returns a document containing information about a single movie as a byte[]. You create a PdfReader instance with this small PDF and use it as an icon for one of the 16 buttons on the larger template
and you can assume that it returns a document containing information about a single movie as a byte[]. You create a PdfReader instance with this small PDF and use it as an icon for one of the 16 buttons on the larger template ![]() . Once 16 movies have been added, the large template is full. You add the full page to a new document using PdfSmartCopy
. Once 16 movies have been added, the large template is full. You add the full page to a new document using PdfSmartCopy ![]() , and you continue on the next page.
, and you continue on the next page.
This may look like a complex example, but this is the code that was written for the used cars advertisement. The fillTemplate() method is the only piece missing from the puzzle.
The Missing Piece of the Puzzle
The field with the information about the used car (in our case, the movie information) is a multiline text field. It’s impossible to fill such a field using different font styles (normal, bold, italic), nor can text be left and right justified. You’ll also want the font size to adapt to the length of the description. Because of all these specific requirements, it’s necessary to bypass the automatic form flattening.
Listing 8.17. MovieAds.java (continued)

There’s nothing new in ![]() and
and ![]() , but let’s take a look at
, but let’s take a look at ![]() . You grab a direct content layer using the method getOverContent(). You try adding a paragraph with the movie information to a rectangle obtained with the getFieldPositions() method. First you try a 12 pt font size, and you add the content using ColumnText in simulation mode. If the paragraph doesn’t fit, you try with font size 11.8 pt, and so on. You continue until the complete
text fits the rectangle, or until the font has decreased to 6 pt (in which case you truncate the content).
. You grab a direct content layer using the method getOverContent(). You try adding a paragraph with the movie information to a rectangle obtained with the getFieldPositions() method. First you try a 12 pt font size, and you add the content using ColumnText in simulation mode. If the paragraph doesn’t fit, you try with font size 11.8 pt, and so on. You continue until the complete
text fits the rectangle, or until the font has decreased to 6 pt (in which case you truncate the content).
The getFieldPositions() method returns a List of FieldPosition objects. Each contains the page number (f.page), and the Rectangle object defining the coordinates of a widget (f.position).
With this example, we’ve explored the limits of what is possible with AcroForms. It’s time to have a look at the other type of forms supported in PDF: forms based on the XML Forms Architecture.
8.6. Introducing the XML Forms Architecture (XFA)
In this section, you’ll be introduced to the XML structure that’s used to define an XFA form, and we’ll try out different alternatives to fill out different types of XFA forms.
If you look at figure 8.10, it’s hard to see any difference between it and the forms you’ve created and used in previous examples. End users won’t notice this is a different kind of form.
Figure 8.10. A static XFA form
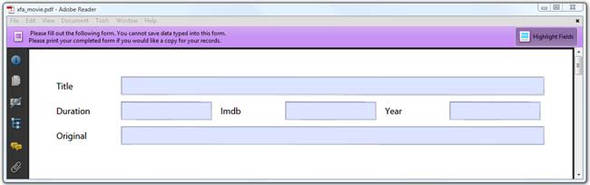
With the next listing, you can inspect the PDF from the inside, and you’ll find out it’s an XFA form.
Listing 8.18. XfaMovie.java

In this method, you use the method isXfaPresent() to find out if the form is an XFA form or an AcroForm. You also list the names of the fields.
This is the content of the text file with the results:

iText tells us that this is an XFA form ![]() , and it returns a list of fields with square brackets in their name
, and it returns a list of fields with square brackets in their name ![]() . These square brackets are typical for XFA. When listing 8.18 generates a result like this, your PDF contains two different form descriptions: one using XFA technology and one using AcroForm
technology. You can conclude that this is a static XFA form.
. These square brackets are typical for XFA. When listing 8.18 generates a result like this, your PDF contains two different form descriptions: one using XFA technology and one using AcroForm
technology. You can conclude that this is a static XFA form.
8.6.1. Static XFA forms
Let’s pretend you don’t know you’re working with a static XFA form, and fill in the form using the AcroFields class and the setField() method. This code will work correctly for most of the forms you’ll encounter.
Listing 8.19. XfaMovie.java (continued)
public void fillData1(String src, String dest)
  throws IOException, DocumentException {
  PdfReader reader = new PdfReader(src);
  PdfStamper stamper
    = new PdfStamper(reader, new FileOutputStream(dest));
  AcroFields form = stamper.getAcroFields();
  form.setField("movies[0].movie[0].imdb[0]", "1075110");
  form.setField("movies[0].movie[0].duration[0]", "108");
  form.setField("movies[0].movie[0].title[0]", "The Misfortunates");
  form.setField("movies[0].movie[0].original[0]",
    "De helaasheid der dingen");
  form.setField("movies[0].movie[0].year[0]", "2009");
  stamper.close();
}
iText will fill out the AcroForm (as it did in all previous examples), and it will make a fair attempt at filling out the XFA form simultaneously. In most cases, this works transparently: you don’t even notice that the two different technologies exist next to each other. However, if you look at figure 8.11, you’ll see that this is an example where iText fails. Although you provided values for the year, duration, and the IMDB ID, the corresponding fields remain empty.
Figure 8.11. Partially filled-in form

I deliberately created the three fields in a way that isn’t supported by iText. This way I can explain the mechanism of XFA form filling with iText. There are different workarounds to deal with this problem, but let’s inspect the XFA form first.
XFA Forms: Internal Structure
When creating an AcroForm using iText, you implicitly create PdfDictionary, PdfArray, and other PdfObject instances. XFA forms are totally different; they aren’t defined using PDF objects. XFA forms are described in an XML stream that’s embedded in the PDF file.
You can extract this XML into a separate file.
Listing 8.20. XfaMovie.java (continued)

Note that the Document in this code snippet isn’t a com.itextpdf.text.Document object, but an instance of org.w3c.dom.Document. Transforming this Document into an XML file is done using different classes from the javax.xml.transform package.
This is a shortened version of the resulting file.
Listing 8.21. movie_xfa.xml
<?xml version="1.0" encoding="UTF-8" standalone="no"?>
<xdp:xdp>
  <config>...</config>
  <template>...</template>
  <xfa:datasets>
    <xfa:data>
      <movies>
        <movie duration="" imdb="" year="">
          <title/>
        </movie>
       </movies>
     </xfa:data>
    <dd:dataDescription>
      <movies>
        <movie dd:maxOccur="-1"
          dd:reqAttrs="duration imdb year"
          duration="" imdb="" year="">
          <title/>
          <original dd:minOccur="0" dd:nullType="exclude"/>
        </movie>
      </movies>
    </dd:dataDescription>
  </xfa:datasets>
</xdp:xdp>
If you want to understand the full XML file that was extracted, you’ll need to consult the XFA specification for more info about the elements that can be found inside an XFA form:
- config, localeSet, xmp, ...—The XFA XML can contain application-defined information and XFA grammar: configuration information, localization info, metadata, information about web connections, and so on. Except for the config tag, I’ve omitted these tags, because they’re outside the scope of this book.
- template— This is where the appearance and behavior of the form is defined.
- datasets— This contains all the sets of data used with the form.
- data— Contains the data held by fields in the form.
- dataDescription— Defines the schema for the data.
As you can see, XFA separates data from the XFA template, which allows greater flexibility in the structure of the data supported and allows data to be packaged separately from the form.
FAQ
Can I use iText to change the properties and appearance of an XFA form? Yes and no. In the previous sections of this chapter, you’ve used iText to manipulate the appearance of AcroForm fields, but none of these examples will change the XML definition inside the XFA stream. Changing an XFA form has to be done using XML tools. First extract the XFA XML from the PDF. Then add, remove, and update the tags and attributes between the <template> and </template> tags. Once this is done, use iText to replace the existing XFA stream with the updated one.
The template specification is described in about 300 pages in the XFA reference. It would lead us too far off topic to get into the details of manipulating an XFA form, but we’ll look at how to replace the full XFA XML in the next example, after changing the data.
The Data Specification
The datasets section of the XFA form consists of a data and a dataDescription element. You can use any schema you want for the data. This is one of the major advantages of choosing the XFA approach instead of using AcroForms.
The dataDescription specification comprises 16 pages in the XFA reference. Here’s the introduction:
The XFA data description syntax is more concise and readable than XML Schema but does not do as much. XFA data descriptions do not include defaults and do not support validation of text content. They do, however, fully describe the namespaces, element names, attribute names, and the hierarchy which joins them.
XML Forms Architecture (XFA) Specification Version 3.1 Part 2 Chapter 21
Let’s take a look at the changes made by iText to the data element to find out why three fields weren’t filled out in figure 8.11. We’ll reuse listing 8.20 on the resulting PDF file to have a look at the data element that was filled by iText.
Listing 8.22. movie_filled.xml
<movies>
  <movie duration="" imdb="" year="">
    <title>The Misfortunates</title>
    <imdb>1075110</imdb>
    <duration>108</duration>
    <original>De helaasheid der dingen</original>
    <year>2009</year>
  </movie>
</movies>
The data description in listing 8.21 expects the content of the fields "imdb", "duration", and "year" to be added as attributes of the movie tag. When you filled the form using listing 8.19, iText used a shortcut: it wrongly assumed that all data should be added between tags, not as attributes. There are three workarounds for this problem:
- Change the form— Make sure the form doesn’t expect data added as attributes. This may not be an option, because you want the data inside the XFA form to be an identical match with the XML files you’re using in your business process.
- Use XML tools to fill out the data— This is the most elegant solution. We’ll discuss two possible ways to achieve this. In listing 8.23 we’ll replace the complete XFA XML; then, in section 8.6.2, we’ll let iText replace the data element in a programmer-friendly way.
- Remove the XFA form, keep the AcroForm— This is your only option if you want to flatten the form. The resulting form will no longer contain XFA technology—the result will be a pure AcroForm.
The first option should be done with the tool that was used to create the form in the first place. Replacing the XML data can be done the hard way or the easy way; let’s look at the hard way first.
Replacing the XFA Stream
Suppose that you’ve updated the XFA XML manually and saved it in a file named xml. Now you want to take the XFA form src and replace the XFA stream with the new XFA form dest as a result.
Listing 8.23. XfaMovie.java (continued)

For this example, I’ve changed the XFA XML manually. I’ve replaced the XML snippet shown in listing 8.22 with this one.
Listing 8.24. xfa.xml
<movies>
  <movie duration="108" imdb="1075110" year="2009">
    <title>The Misfortunates</title>
    <original>De helaasheid der dingen</original>
  </movie>
</movies>
The result is shown in figure 8.12. All the fields are now filled in correctly.
Figure 8.12. Correctly filled-out XFA form

The code in listing 8.23 is rather complex. We’ll find a better way to replace only the data XML in section 8.6.2. You can use this method, however, if you want to change other parts of the XFA form. For instance, if you want to change the appearance of the form.
Note that iText doesn’t parse what’s inside the template tag. One of the consequences is that you have to use an XML tool to apply changes to the form. Another consequence is that iText can’t flatten a pure XFA form; iText can’t translate the XFA syntax to draw a form field, captions, and lines into PDF syntax. A form can only be flattened with iText if it’s also defined using AcroForm technology.
Changing an XFA Form Into an Acroform
If a form is defined twice, once using XFA technology once as an AcroForm, you can choose to remove the XFA technology with the removeXfa() method.
Listing 8.25. XfaMovie.java (continued)

If you run listing 8.18 on the resulting form, you get the following output:
AcroForm
movies[0].movie[0].title[0]
movies[0].movie[0].duration[0]
movies[0].movie[0].imdb[0]
movies[0].movie[0].year[0]
movies[0].movie[0].original[0]
After this operation, you can use all the iText functionality discussed in sections 8.2 to 8.5. That’s an advantage. The disadvantage is that you lose all the benefits you can have from XFA. This only works for static XFA forms with an AcroForm counterpart; it won’t work for dynamic XFA forms.
8.6.2. Dynamic XFA forms
One of the major advantages of XFA is you can define forms that can grow dynamically. In traditional PDF files, the layout of the content is fixed: the coordinate of every dot, every line, every glyph on the page is known in advance. PDF was created because there was a need for a document format that was predictable. When you create a document containing three pages, you don’t want it to be rendered as a document with two or four pages when opened on another OS or using a different viewer application. XFA makes an exception to this rule. A dynamic XFA form can grow dynamically depending on the data that’s entered.
XML Data
Suppose that your movie data is stored as an XML file using this XML schema.
Listing 8.26. movies.xsd
<?xml version="1.0" encoding="UTF-8"?>
<xs:schema xmlns:xs="http://www.w3.org/2001/XMLSchema"
 elementFormDefault="qualified">
 <xs:element name="movies">
  <xs:complexType><xs:sequence>
    <xs:element maxOccurs="unbounded" ref="movie"/>
    </xs:sequence></xs:complexType>
  </xs:element>
 <xs:element name="movie">
  <xs:complexType>
   <xs:sequence>
    <xs:element ref="title"/>
    <xs:element minOccurs="0" ref="original"/>
    <xs:element ref="directors"/>
    <xs:element ref="countries"/>
   </xs:sequence>
   <xs:attribute name="duration" use="required" type="xs:string"/>
   <xs:attribute name="imdb" use="required" type="xs:string"/>
   <xs:attribute name="year" use="required" type="xs:string"/>
  </xs:complexType>
  </xs:element>
 <xs:element name="title" type="xs:string"/>
 <xs:element name="original" type="xs:string"/>
 <xs:element name="directors">
  <xs:complexType><xs:sequence>
    <xs:element maxOccurs="unbounded" ref="director"/>
   </xs:sequence></xs:complexType>
 </xs:element>
 <xs:element name="director" type="xs:string"/>
 <xs:element name="countries">
  <xs:complexType><xs:sequence>
    <xs:element maxOccurs="unbounded" ref="country"/>
  </xs:sequence></xs:complexType>
 </xs:element>
 <xs:element name="country" type="xs:string"/>
</xs:schema>
Here is a shortened example of an XML file that follows this schema. The full version contains 120 movies.
Listing 8.27. movies.xml
<?xml version="1.0" encoding="UTF-8" ?>
<movies>
  <movie duration="141" imdb="0062622" year="1968">
    <title>2001: A Space Odyssey</title>
    <directors><director>Kubrick, Stanley</director></directors>
    <countries>
      <country>United Kingdom</country>
      <country>United States</country>
    </countries>
  </movie>
  ...
</movie>
If you want to create a form that can be filled with all the information in this XML file, regardless of the number of movies, the number of directors per movie, and the number of countries per movie, you need to use Adobe LiveCycle Designer.
Creating a Dynamic XFA Form
Adobe LiveCycle Designer can be started as a separate product, but as it’s shipped with Acrobat, you can also start it from the Acrobat menu: Forms > Start Form Wizard.
You want to create a form from scratch, so select No Existing Form (Create an Adobe Form from Scratch or from a Template). A dialog box opens, assisting you in creating the form by offering the following options:
- Getting Started— Choose the Use a Blank Form option.
- Document Setup— Choose the defaults and click Next.
This is shown in figure 8.13. Observe the difference between Acrobat in the background and Adobe LiveCycle Designer in the foreground.
Figure 8.13. Creating a new form with Adobe LiveCycle Designer

You could start adding text boxes manually, but that’s a lot of work. It’s easier to create a new data connection: File > New Data Connection. A dialog box opens, and you can import the XSD from listing 8.26: XML Schema > movies.xsd > Finish. You can see the result in the Data View panel to the left in figure 8.14.
Figure 8.14. Using an XSD as a data connection to create the form

The next step is easy. You can drag the movies tree from the Data View panel to your form. Designer will automatically create a form with all the text fields you need. The form consists of fields that are organized in subforms.
The yellow triangle in the upper-right corner of the rectangle enclosing the fields indicates that there’s an inconsistency between the top-level subform and the underlying subforms. You can solve this problem by selecting the outer rectangle corresponding with the top-level subform. Right-click and choose Palettes > Object. An extra panel will open. Checking the Allow Page Breaks within Content check box will remove the warning.
Let’s reorganize the fields. In the Object panel at the bottom right, change the Content setting of the top-level subform from Positioned to Flowed. Then select the subform named movie and set that Content value to Positioned. You can now move around the fields. If you lose the overview, select the Hierarchy panel that’s shown on the left in figure 8.15.
Figure 8.15. Reorganizing the fields in the form

If you want the form to start a new page if a movie doesn’t fit on the current page, you have to uncheck the Allow Page Breaks within Content check box in the Object panel. Now save this form as a dynamic form, and you’ll get a PDF as shown in figure 8.16.
Running listing 8.18 with this form as resource will give you the following result:
XFA form
The form you’ve just created is a pure XFA form. There are no AcroForm fields inside the PDF.
Filling a Dynamic XFA Form
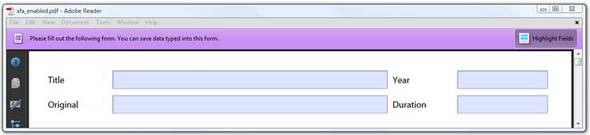
The PDF shown in figure 8.16 is a dynamic form, so when you fill it with an XML file containing 120 movies, you’d expect it to look like figure 8.17.
Figure 8.16. Empty dynamic XFA form

Figure 8.17. Dynamic XFA form filled with movie XML

The original form only had one page, but the resulting PDF counts 23 pages! Because the form is dynamic, the movie subform is repeated 120 times. Observe that the same goes for the lists with the directors and countries. If there are two directors, the director field is duplicated; if there are two countries, the country field is duplicated.
You can use iText to fill such a dynamic PDF form.
Listing 8.28. XfaMovies.java
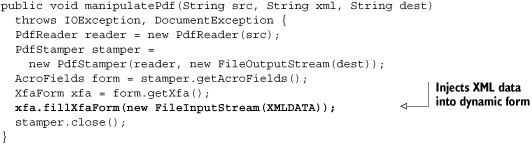
In this example, XMLDATA is the path to the XML file from listing 2.27. As you can see, XFA technology is very powerful. This is a simple example, containing only text fields, but this code also works with barcode fields, check boxes, and so on. A good graphical designer skilled at creating forms with Adobe LiveCycle Designer can create very complex dynamic forms. All you need to do to fill them out is inject an XML stream using the fillXfaForm() method. There’s one major caveat: if your form is Reader-enabled, filling it out will break the Reader-enabling.
8.7. Preserving the usage rights of Reader-enabled forms
With what you’ve learned so far, you can use iText to fill out PDF forms created with Open Office, Adobe Acrobat, LiveCycle Designer, or other tools. When creating a form using Adobe products, the form’s designer can enable usage rights that unlock extra functionality when the form is opened in Adobe Reader. This section explains how to preserve these rights.
Figure 8.18 shows a PDF form that’s significantly different from the forms we’ve dealt with before. There’s a strip below the toolbar with the text: “Please fill out the following form. You can save data typed into this form.”
Figure 8.18. A Reader-enabled form can be filled out and saved in Adobe Reader
Up until now, we’ve only worked with forms that showed the following message: “Please fill out the following form. You can’t save data typed into this form. Please print your completed form if you would like a copy for your records.”
FAQ
Can I fill out any PDF form and save it locally using Adobe Reader? No, you can only save forms filled out manually with Adobe Reader if they have been “Reader-enabled.”
If you provide a PDF form in a web application, people can fill out the form in their browser and submit the data to your server. We’re going to look at how to do this in the next chapter. If you want to allow people to save the data locally before submitting the form, you need to enable your form using the LiveCycle Reader Extensions or the full Acrobat.
8.7.1. Reader-enabling a form using Adobe Acrobat
Choose Advanced > Extend Features in Adobe Acrobat. A dialog box titled Enable Usage Rights in Adobe Reader will open, explaining which features will become available in the free Adobe Reader: saving a form locally, but also commenting, signing, and so on.
FAQ
Can I create a Reader-enabled form using iText? The technology that’s used to enable a form is based on public-key cryptography, where the viewer of the document (in this case Adobe Reader) has the public key and the authoring software for the document has the private key. Because iText (or any other non-Adobe software) has no access to Adobe’s private key, you can only enable documents using Adobe products.
Once you’ve made the form Reader-enabled, you can prefill it using iText; but you have to be aware that users risk being confronted with the alert box shown in figure 8.19.
Figure 8.19. Filling out a form programmatically can break Reader-enabling
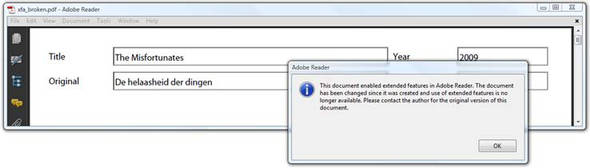
The full text of the warning tells you exactly what happened:
This document enabled extended features in Adobe Reader. The document has been changed since it was created and use of extended features is no longer available. Please contact the author for the original version of this document.
When making a document Reader-enabled using Acrobat, a hash of the content was signed with Adobe’s private key. Adobe Reader decrypts this embedded hash and compares it with the current content. If the content hasn’t changed, there’s a match, and the additional usage rights are active. When filling out a form, iText changes the document structure, and therefore breaks Reader-enabling.
8.7.2. Filling out Reader-enabled forms using iText
If you don’t want to confront your end users with this warning, you can remove the usage rights. You’ll end up with a “normal” form, without the extra features. Or, you can use PdfStamper in append mode. The result of these two workarounds is shown in figure 8.20. The code for both workarounds is in listing 8.29.
Figure 8.20. Two workarounds to fill out a Reader Enabled form

The form in the background can no longer be saved locally. The extended features of the form in the foreground remain intact.
Listing 8.29. ReaderEnabledForm.java

The meaning of the parameters remove and preserve is explained in table 8.4.
Table 8.4. Filling out a Reader-enabled form
|
remove |
preserve |
Result |
|---|---|---|
| false | false | You fill out the form as before. This breaks Reader-enabling and causes a scary warning. |
| true | false | You fill out the form as before, with removal of the usage rights. With Reader-enabling gone, there’s also no more scary warning. |
| false | true | You fill out the form, but not as before. By using a different constructor for PdfStamper, you’ll create the new PDF in append mode. This means that iText will keep the original PDF intact and append all the changes instead of reorganizing the internal structure. |
Although a static XFA form is used in this example, this also works for plain old AcroForms.
8.8. Summary
In this chapter, we’ve explored the two types of interactive forms that are supported in the PDF specification.
One of these technologies uses PDF objects to define a form; these forms are called AcroForms, and they can easily be created and manipulated using iText. You learned how to create different types of button, text, and choice fields. At the same time, you found out how to change the properties of these fields in an existing PDF document.
We focused on filling out forms. Form fields can be organized hierarchically, which changes how forms are filled out. You learned to optimize the process using a field cache. We also looked at flattening a form partially and taking over the flattening process altogether.
Then we looked at the other type of form. XFA forms are based on the XML Forms Architecture, and they come in two flavors: static XFA forms and dynamic XFA forms. Most of the static XFA forms can be filled with iText in the same way as AcroForms, using the same code. But when we inspected what an XFA form looks like on the inside, you discovered that there were exceptions. You created a dynamic XFA form using Adobe LiveCycle Designer, and you used iText to inject an XML data file into that form.
Finally, you learned more about Reader-enabled forms. Filling such a form with iText can break the extra features that are added to the form, but you learned how to avoid this.
This chapter concludes the second part of this book about manipulating existing PDF files. You had an overview of the different manipulation classes in chapter 6; you added links, bookmarks, and annotations to existing documents in chapter 7; and you’ve learned almost everything about filling out interactive forms in this chapter.
In the next chapter, you’ll discover how to integrate the standalone examples we’ve looked at so far in a Java servlet; for instance, how to integrate a PDF form in a web application.