
Chapter 9. Integrating iText in your web applications
- Making interactive forms “web ready”
- Converting HTML and XML to PDF
- Using iText in servlets
Every month, I visit Google Analytics to look at the statistics for my different sites; I click Export > PDF and save a printable report for my archives. When I want to travel by train or by plane, I can download a ticket or a boarding pass from a website. When you download an eBook from Manning, your email address is automatically stamped on every page. Most of these reports, vouchers, stamped books, and so on, are “powered by iText.” iText was one of the first libraries that combined ease of use with speed, and that’s why it’s omnipresent in applications generating PDFs for the web.
Let’s take a look at how these applications work and see how easy it is to integrate iText in a Java servlet.
9.1. Creating a PDF from a servlet
Up until now, you’ve only worked with standalone examples. You compiled them using the javac command and executed them with java, resulting in one or more PDF documents.
For this chapter, you need to install an application server. If you’ve written and deployed Java servlets before, you shouldn’t have any problem setting up the examples. If you don’t have any experience with J2EE applications, please consult a book about writing web applications in Java, as this is outside the scope of this book.
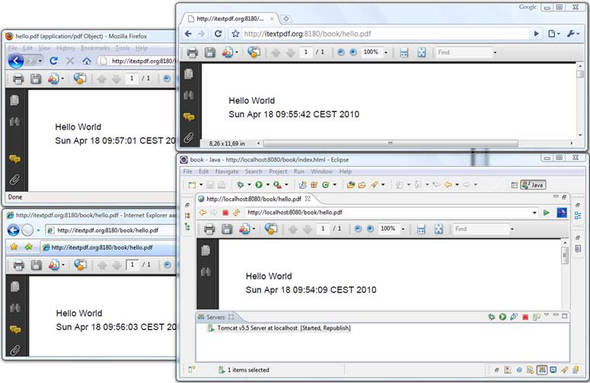
I use Tomcat in combination with Eclipse. This allows me to choose Run As > Run on Server instead of Run As > Java Application. Eclipse will start up an instance of Tomcat, and a browser window opens inside my IDE. If I’m pleased with the result, I deploy the application on my web server. See figure 9.1. The window at the lower right in the foreground is Eclipse; the windows in the background are browser windows: Firefox, Google Chrome, Microsoft Internet Explorer (MSIE).
Figure 9.1. Hello World servlet opened in Eclipse, Firefox, Chrome, and MSIE

To get to this result, you need to integrate the five steps in the PDF creation process in a servlet.
9.1.1. The five steps of PDF creation in a web application
When we discussed step 2 in the PDF creation process, writing a simple Hello World example to a FileOutputStream, you learned that we could have used any other OutputStream. For instance, a ServletOutputStream obtained from the HttpServletResponse with the getOutputStream() method.
Listing 9.1. Hello.java
The difference between this and the standalone “Hello World” example from chapter 1 is that here you subclass HttpServlet and override the doGet() or doPost() method, or both. You copy and paste the five steps into this method:
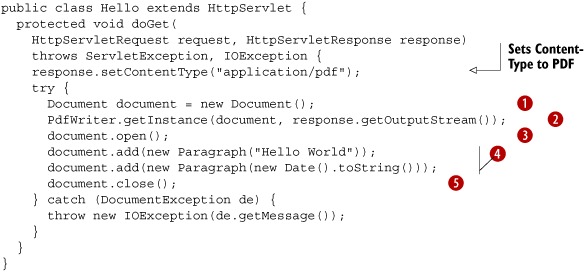
 Create the Document.
 Create an instance of PdfWriter and use response.getOutputStream() for the second parameter.
 Open the Document.
 Add content.
 Close the Document.
This is probably the simplest iText servlet you can write.
If you want to deploy it in a web application, you have to adapt the web.xml configuration file of your application. Note that most IDEs have a wizard that updates this XML file for you. I made my web.xml file using a wizard in Eclipse.
Listing 9.2. web.xml
<?xml version="1.0" encoding="UTF-8"?>
<web-app id="WebApp_ID" version="2.4" ...>
  <display-name>book</display-name>
  <servlet>
    <description></description>
    <display-name>Hello</display-name>
    <servlet-name>Hello</servlet-name>
    <servlet-class>part3.chapter09.Hello</servlet-class>
  </servlet>
  <servlet-mapping>
    <servlet-name>Hello</servlet-name>
    <url-pattern>/hello.pdf</url-pattern>
  </servlet-mapping>
</web-app>
You’ll put all the examples from this chapter in a web application named book. As you move on, you’ll have to add more servlet and servlet-mapping tags to this file.
You’ll use /hello.pdf as the URL pattern for your first servlet. The URL to run the servlet on the localhost will look like this: http://localhost:8080/book/hello.pdf. You can also see the servlet in action on http://itextpdf.org:8180/book/hello.pdf; that’s where I deployed the WAR file of the application. You can use the ANT files that come with the examples to create your own WAR file if you want to test this functionality on your own server.
The screenshots in figure 9.1 prove that this servlet works for recent versions of the most common browsers and PDF viewers, but you may experience problems that are not iText-related with specific browser and viewer combinations. How can you determine whether a problem is caused by the browser, by the server, or by (the wrong use of) iText?
9.1.2. Troubleshooting web applications
Let’s start with rules of thumb that can save you from a lot of frustration when trying to get your PDF servlet online. These rules may seem trivial, but they’re very important.
- Always begin writing code that runs as a standalone example. If the example doesn’t work in its standalone version, it won’t work in a web application either, but at least you can rule out all problems related to the server or the browser.
- Start with simple code samples based on the examples in this book. Gradually add complexity until something goes wrong. Look at the stack trace in the server logs. Most of the time, the error messages will tell you exactly what to do. If not, post the stack-trace to the iText mailing list, and don’t forget to mention what application server you’re using, as well as the Java version and the iText release number.
- Always test your application on different machines, using different browsers, even if there isn’t any problem. Some web applications won’t show any problems when tested on one type of browser, but will fail when using another browser.
- Create a file on the server’s filesystem if no file appears in the browser. An easy way to find out if a problem is caused by iText or by the browser is to replace the ServletOutputStream in step with a FileOutputStream (for debugging reasons only). If the file is generated correctly on your server, you can rule out iText as the cause of the
problem.
By following this last rule, you should be able to determine whether the problem is a client-side or a server-side problem.
Server-Side Problems
Throughout the years, I’ve compiled a list of things that can go wrong on the server side, based on what other users have posted on the mailing list.
- Bad Exception handling The first thing you shouldn’t like about listing 9.1 is the way the DocumentException is handled. If something goes wrong in the try block, an IOException is thrown, resulting in an internal server error. If you’re using Tomcat, an HTML page with the header “HTTP Status 500” is sent to the browser, showing (part of) the stack trace of the exception. That’s not something you want to show to the visitors of your site. You’re probably used to providing error pages that are less technical than the one generated by Tomcat, but remember that you’re creating PDFs. If you send HTML to a PDF viewer, it will throw an error saying “the file doesn’t begin with %PDF.”
- Mixing HTML and PDF syntax Be careful not to mix HTML error messages in a stream of PDF bytes. If a PDF viewer is already opened as a browser plug-in, it will tell you that the PDF is corrupt because it can’t interpret the HTML code. The best way to debug problems like this is by saving the stream that is sent to the browser as a file. First try opening it in Adobe Reader. If it doesn’t open correctly, have a look at it in a text editor that preserves binary characters. Don’t forget to scroll down beyond the %EOF end of file marker (if possible). I’ve seen web applications that were adding a stream of plain HTML to the PDF file. Newer versions of the Adobe Reader plug-in may ignore the HTML, but older versions will complain that the file is corrupt.
- The blank-page problem If you don’t find HTML syntax, but you see an unusual amount of question marks inside blocks marked with stream and endstream, the problem is server-related. The question marks should be binary characters. You’ll probably be able to open the PDF in the browser plug-in because the page structure of the PDF is OK, but you’ll only see blank pages because the content of the pages is corrupted. This can happen when your server flattens all bytes with a value higher than 127. Consult your web (or application) server manual to find out how to make sure binary data is sent correctly to the browser.
- Problems with JARs For instance, a ClassNotFoundException is thrown. Check whether you have added all the JARs you need to the classpath of your web application. If an iText class is missing, make sure you don’t have more than one version of the iText.jar in the classpath; for instance, one version in the lib directory of your web application, and a different version in the lib directory of the application server. Different versions can lead to conflicts. Finally, check whether the application is compiled with the correct compiler. iText is compiled with Java 5, you can’t run it on a server that is running in an older Java Runtime Environment (JRE).
- A resource can’t be found Many server-related problems are caused by an image, a font, or another resource that can’t be found. A file that was available for the standalone example might not be available for the web application. Normally, the exception will give you an indication where to look. Maybe the working directory of the servlet is different from what you expected. The problem can also be caused by permission issues, or simply by the fact that a resource isn’t present on the server. If the cause isn’t obvious, try reproducing the problem in a servlet that doesn’t involve iText. For instance, read the bytes of the resource file, and write them to the ServletInputStream. If this fails, your problem isn’t iText-related.
If the file generated on the server side is OK, or if none of the situations mentioned so far matches your problem, chances are that your problem is browser-related.
The Browser Doesn’t Recognize the File as a PDF
When an end user installs Adobe Reader, the browsers on the user’s OS should be detected and configured automatically. When a browser is installed, it should detect Adobe Reader if it’s present. If there’s no PDF viewer on the end user’s system, or if the PDF viewer isn’t configured correctly, the user will see content that looks like gibberish starting with %PDF-1.4 %âãÏÒ.
If this “gibberish problem” only occurs for a handful of end users, not for all your users, you’ll have to ask these people to install or reinstall their PDF viewer. If all users experience the same problem, the problem is caused on the server side. The viewer receives the PDF syntax, but shows it as if it were plain text. Maybe you didn’t set the content type correctly, in which case you need to add this line to your servlet:
response.setContentType("application/pdf");
Old versions of MSIE ignore the content type; they only look at the file extension. PDFs ending with .pdf are rendered fine, but if you use a different URL pattern, the browser plug-in isn’t opened. The most elegant way to solve this problem is by using a URL pattern as shown in listing 9.2. If this is not an option, you could add a parameter ending in .pdf. For instance,
- http://myserver.com/servlet/MyServlet?dummy=dummy.pdf;
Use this solution as a last recourse. A better solution is to set the content disposition in the response header:
response.setHeader("Content-Disposition", " inline; filename="my.pdf"");
Note that not every version of every browser deals with this header correctly.
The PDF is Corrupt For Only a Couple of Browsers
When no content length is specified in the header of your dynamically generated file, the browser reads blocks of bytes sent by the web server. Most browsers detect when the stream is finished and use the correct size of the dynamically generated file. Some browsers are known to have problems truncating the stream to the right size—the real size of the PDF is smaller than the size assumed by the browser. The surplus of bytes can contain gibberish, and this can cause the viewer plug-in to show an error message saying the file is corrupt.
If you can’t ask the end user to upgrade to a more recent browser and reader combination, there’s only one solution. You have to specify the content length of the PDF file in the response header. Setting this header has to be done before any content is sent. Unfortunately, you only know the length of the file after you’ve created it. This means you can’t send the PDF to the ServletOutputStream obtained with response.getOutputStream() right away. Instead, you must create the PDF on your filesystem or in memory first (the next listing), so you can retrieve the length, add it to the response header, and send the PDF. This is also true for some other binary file formats.
Listing 9.3. PdfServlet.java

Mailing list subscribers have shared their experience with the community and told us that it’s also safe to set extra response
header values ![]() . These headers make sure that the end user always gets the most recent version of the PDF, and not a PDF that is loaded from
the cache on the client side. This is important if the content of the PDF changes frequently, which would happen if it reports
about real-time data.
. These headers make sure that the end user always gets the most recent version of the PDF, and not a PDF that is loaded from
the cache on the client side. This is important if the content of the PDF changes frequently, which would happen if it reports
about real-time data.
![]() solves the problem caused by old browser and PDF viewer configurations. Note that there are several serious downsides to
this solution. When you need to generate large files, you risk an OutOfMemoryException on the server side, and a timeout on the client side. You can work around the server-side problem by writing the PDF to a
temporary file on the server and asking the end user to fetch the file when it’s finished. Don’t forget to delete the file
once it’s served to the browser.
solves the problem caused by old browser and PDF viewer configurations. Note that there are several serious downsides to
this solution. When you need to generate large files, you risk an OutOfMemoryException on the server side, and a timeout on the client side. You can work around the server-side problem by writing the PDF to a
temporary file on the server and asking the end user to fetch the file when it’s finished. Don’t forget to delete the file
once it’s served to the browser.
The second problem, avoiding a browser timeout, can be solved by moving the five steps of the PDF creation process to a separate thread. You can add your Runnable implementation as an attribute to the HttpSession object. As long as the PDF document isn’t ready, send an HTML page to the browser that is refreshed on a regular basis, such as every three seconds. Check the thread with every hit; serve the PDF as soon as the document is closed. Not only does this solution solve the technical timeout problem, it also works on a psychological level. People tend to be impatient. They don’t like to wait for that internet page to come, not knowing if the connection got lost, whether or not they should hit the reload button, or if the server went down... Give them feedback—if possible, a progress bar showing the percentage of data that has been processed—and time seems to go a lot faster!
Usually, I implement the doPost() method to accept parameters and to set up the thread; then I cause a redirect to trigger the doGet() method that serves the HTML and eventually the finished PDF.
Get Versus Post
A trivial problem, but one that is easily overlooked, is what happens when people bookmark pages that are the result of a POST action. When they want to return to that page using the bookmark, they initiate a GET request, getting a result that differs from what they expect. You can do the experiment with the example from listing 9.3.
Figure 9.2 shows the URL http://itextpdf.org:8180/book/ opened in a Firefox window. This page contains two simple forms: one that uses the GET method, the other using the POST method. Recall that neither doGet() nor doPost() were implemented in listing 9.3. Instead you overrode the service() method that works in both cases.
Figure 9.2. PDFs created with GET and POST actions
We’ll conclude the list of client-side issues with the “multiple-hit” problem.
Problems Caused By Multiple Hits
In web analytics, a hit is when an end user requests a page from your web server and this page is sent to the user’s browser directly. For example, when you enter the URI http://itextpdf.org:8180/book/hello.pdf in the location bar, one PDF file opens in your browser window using a PDF viewer plug-in. If I look in my server logs, I should see one line corresponding with this hit. This is true for most browsers, but some browsers hit the server several times for every dynamically generated binary file. You can’t predict how many hits a single request will generate; it could be two or three hits, or occasionally just one.
If you want to avoid this multiple-hit problem, you can try setting the cache parameters like this:
response.setHeader("Cache-control",
    "must-revalidate, post-check=0, pre-check=0");
Another way to solve the multiple-hit problem is to embed the PDF in an HTML page using the embed tag.
Listing 9.4. embedded.html
<html>
<body leftMargin="0" topMargin="0" scroll="No">
  <embed src="/book/hello.pdf" width="100%" height="100%"
    type="application/pdf" fullscreen="yes" />
</body>
</html>
If you skip to section 9.3, you’ll also find an example of how to embed a PDF in an HTML page using the object tag.
Using the tips and tricks summed up in this section, you should be able to tackle all the problems that can occur when writing a servlet that produces a PDF document. Writing a JSP page generating a PDF is another story.
9.1.3. Generating a PDF from a JSP page
It’s a bad idea to use JSP to generate binary content. That’s considered improper use of the technology. JSP wasn’t created to produce images, PDF files, or any other binary file type.
But that doesn’t mean it’s impossible. Go to http://itextpdf.org:8180/book/helloworld.jsp and you’ll see a JSP page in action.
Listing 9.5. helloworld.jsp
<%@
page import="java.io.*, com.itextpdf.text.*, com.itextpdf.text.pdf.*"
%><%
response.setContentType( "application/pdf" );
Document document = new Document();
ByteArrayOutputStream buffer = new ByteArrayOutputStream();
PdfWriter.getInstance( document, buffer );
document.open();
document.add(new Paragraph("Hello World"));
document.close();
DataOutput output = new DataOutputStream( response.getOutputStream() );
byte[] bytes = buffer.toByteArray();
response.setContentLength(bytes.length);
for( int i = 0; i < bytes.length; i++ ) { output.writeByte( bytes[i] ); }
%>
Please take my advice and don’t use this example. I’m only including it because the question, “How can I produce a PDF from a JSP page?” turns up on the mailing list on a regular basis. Let me explain why that is a bad idea, using this (working!) example.
Several things can go wrong if you ignore my advice and deploy the code from listing 9.5 on your server. If you write the bytes of the ByteArrayOutputStream to a file on the server, the PDF will be OK, but this doesn’t mean that the PDF will be OK when you send the same bytes to the browser. These are some potential problems:
- The blank page problem for JSP pages It’s possible that the PDF opens when served on the client, showing nothing but blank pages. Some servers assume that JSP output isn’t binary, and every byte higher than 127 will show up as a question mark.
- Whitespace corrupting the binary data JSP pages are compiled to a servlet internally. If you think writing a PDF servlet is more difficult than writing a PDF JSP page, think again. If you copy listing 9.5 and start working from there, you’ll probably add indentation, newlines, spaces, and carriage returns, inside as well as outside the <% and %> marks to make the JSP file more readable. Although this is good practice when you write JSP that produces HTML, it can be deadly if you want to generate binary content. If you look at the code of the servlet that is automatically generated based on the JSP file, you’ll see that the whitespace characters outside these marks are written to the OutputStream. This has the same effect as when you would open a JPG in a text editor and insert whitespace characters in arbitrary places.
- OutputStream opened twice Your JSP code may go wrong even before you get the chance to corrupt your PDF file. If you’ve added whitespace before invoking response.getOutputStream(), an exception will be thrown, saying “getOutputStream() has already been called for this response.” Calling this method was done implicitly the moment the first unwanted whitespace characters appeared, and it’s forbidden to call that method a second time.
If you take all these warnings into consideration, you might be able to write a PDF-producing JSP page, but sooner or later you’ll run into troubles. Maybe a colleague will open that JSP in an IDE that automatically formats the code to make it more readable. While debugging problems like this, you’ll probably end up inspecting the servlet that is generated, and eventually, you may want to replace the JSP page with a servlet. That’s why it’s better to stay away from JSP in the first place if you want to produce a PDF document. Write a servlet, and you’ll save time not only for yourself, but also for your employer. Maybe you can use this argument if using JSP is a requirement in your project.
Enough about JSP already. Let’s continue with servlets that involve PDF forms.
9.2. Making a form “web ready”
Now that you know how to integrate iText in a web application, you can combine this knowledge with what you learned about interactive PDF forms in the previous chapter. In this section, you’ll add buttons to submit the data entered in a PDF form to the server; then you’ll interpret this data and create a new PDF (pre)filled with the submitted data. Note that most of the functionality discussed in this section is AcroForm-specific; it won’t work for XFA forms.
9.2.1. Adding a submit button to an existing form
Figure 9.3 shows a form you created in section 8.5 (see figure 8.6) opened with the Adobe Reader plug-in in Google Chrome. I’ve manually filled out the form with my name, login, and the most obvious reason why I want to visit the Foobar Film Festival. I’ve also added buttons to the form that will allow you to submit this data to a server.
Figure 9.3. Adding submit buttons to an existing form
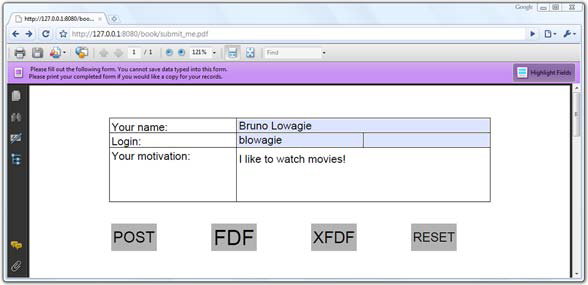
There are four ways to submit this data:
- As an HTML form— The server will receive a query string
- As FDF— This is the Forms Data Format
- As XFDF— This is the XML version of the Forms Data Format
- As PDF— The full PDF, including the data that was entered, is sent to the server
Sending the form as a full PDF is only possible if the end user is filling out the form in the full Acrobat, so there’s no button for that option in figure 9.3. In this example, we’re only looking at the first three options. The fourth button in the form, Reset, can be used to reset the data that was entered manually.
Listing 9.6. SubmitForm.java

Note
There’s one button missing in figure 9.3 and listing 9.6: a button that submits the form using the option PdfAction.SUBMIT_PDF. This was a deliberate choice, because this button won’t work if the end user only has Adobe Reader, not the full Acrobat.
You’ll recognize the methods to create and shape the PushbuttonField and to obtain the corresponding PdfFormField. The key methods in this code snippet are two static methods from the PdfAction class we haven’t discussed before.
- createSubmitForm()— Expects three parameters. The first parameter is a String representing a URL. In listing 9.6, you specify the path /book/request. This is a path to a servlet in the book application. We’ll have a look at this servlet in listing 9.7. The second parameter is an array of Object values. You can pass an array of String values with field names, or an array of PdfAnnotation values representing fields. This can be used to limit the data that is sent to the server. The third parameter defines the submit method and extra options.
- createResetForm()— Expects two parameters. The first parameter has the same meaning as the second parameter of the createSubmitForm() method. The second parameter is a flag, specifying whether the fields in the array should be included (0) or excluded (1). The use of null and 0 in listing 9.6 will reset all the fields.
Before discussing the different submit methods and options, we’ll take a look at what happens on the server side if you use the /request URL pattern. This pattern corresponds with this ShowData servlet.
Listing 9.7. ShowData.java
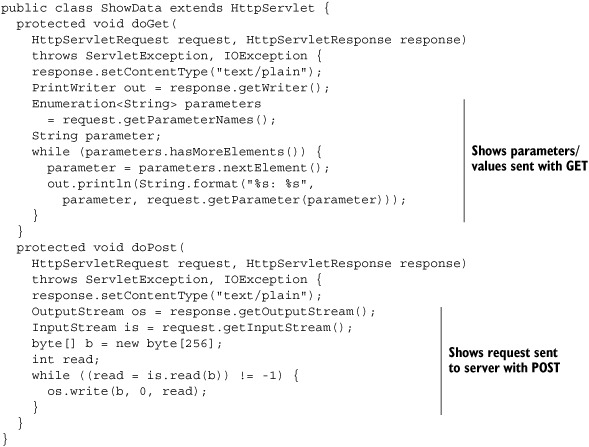
This is an interesting servlet for debugging web applications. If you send a GET request to it, you’ll get an overview of the query string parameters and values that are received on the server side. If you use the POST method, the servlet returns the byte stream that was received by the request. We can use this servlet to inspect the data that is sent to the server from the PDF form.
Submitting a PDF Form as HTML Post
If you create a submit button with the flag PdfAction.SUBMIT_HTML_FORMAT, the form will be submitted as if the PDF document were an HTML form. It will use the POST method. Figure 9.4 shows what the ShowData servlet received.
Figure 9.4. InputStream of the HttpServletRequest (POST)
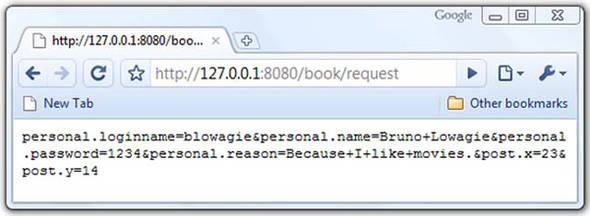
You’ll recognize the fields personal.loginname, personal.name, personal.password, and personal.reason, as well as two unexpected fields: post.x and post.y. You created a submit button with the name post, measuring 50 pt x 30 pt. You also added the PdfAction.SUBMIT_COORDINATES option. As a result, the server receives the X and Y coordinates of the position you’ve clicked inside the 50 pt x 30 pt rectangle. Using this option turns your button into a clickable map.
Note
The PDF specification also provides the option to submit the data using the GET method (adding the option PdfAction.SUBMIT_HTML_GET), but I don’t advise you to do so (just like with using JSP, use this at your own risk).
The default submit option for AcroForms is submit as FDF.
Submitting a PDF Form as FDF
When you click the second button shown in figure 9.3, the request servlet will return a file in the FDF. See figure 9.5.
Figure 9.5. InputStream of the HttpServletRequest (FDF)

FDF is based on PDF; it uses the same syntax and the same file structure. This format is used to export form data to standalone files that can be stored, transmitted electronically, and imported back into the corresponding PDF interactive form. In the next section, you’ll take an FDF file similar to the one shown in figure 9.5 and you’ll use iText to import the data embedded in the FDF file into a form. FDF is an interesting and compact format if you want to take the data that was posted by end users and save it on the filesystem on server side.
You don’t need to set any flags to create a submit button that posts an FDF file; just use 0 if you don’t need any options. In listing 9.6, you set the option PdfAction. SUBMIT_EXCL_F_KEY. If you omit this option, the URL of the original form (for instance, http://127.0.0.1:8080/book/submit_me.pdf) will be added to the FDF document. There are some other options, but most of them only work if the end user has the full Acrobat; they don’t work with Adobe Reader.
There’s also a limited XML implementation of the FDF: XFDF.
Submitting a PDF Form as XFDF
If you look at figure 9.6, you’ll see that the XFDF result is more human readable than what was returned in figure 9.5.
Figure 9.6. InputStream of the HttpServletRequest (XFDF)

The value of the personal.name field can be found in the value tag that is nested inside the field tags with names personal and name.
This concludes the overview of the submit methods. In the upcoming examples, you’ll use these methods to submit data to a servlet that fills out a form on the server side.
9.2.2. Filling out a form on the server side
Typically, you won’t use iText to create interactive forms, but Acrobat, Open Office, or another authoring tool. You’ll use iText to automatically fill out forms that were designed manually. In section 9.1.1, we’ve integrated the five steps of PDF creation in a servlet; now we’ll do the same with a PDF manipulation example.
Listing 9.8. FormServlet.java

This example accepts parameters that correspond with the fields in the subscribe.pdf form you created in section 8.5. This form is in the root of the book web application. ![]() creates an InputStream to read the original form from the WAR file, or from the book subdirectory of the webapps folder of your Tomcat installation. You can use this InputStream to construct a PdfReader instance
creates an InputStream to read the original form from the WAR file, or from the book subdirectory of the webapps folder of your Tomcat installation. You can use this InputStream to construct a PdfReader instance ![]() . The second parameter in this constructor is reserved for the password of the PDF. Since you’re not using a password-protected file, you can pass null. From here on, you can use all the functionality that was discussed in the previous chapter. In
. The second parameter in this constructor is reserved for the password of the PDF. Since you’re not using a password-protected file, you can pass null. From here on, you can use all the functionality that was discussed in the previous chapter. In ![]() , you use the input sent to the request to fill out the form. You also clear the password flag from the password field and
flatten the form.
, you use the input sent to the request to fill out the form. You also clear the password flag from the password field and
flatten the form.
In your application, you could get info from the database, and use that data to prefill the form. That’s just a matter of combining what you learned in chapter 8 with the tips and tricks from section 9.1.2. We’ll continue with examples that use FDF and XFDF as formats to store and transmit data from the client to the server, and vice versa.
9.2.3. FDF and XFDF in web applications
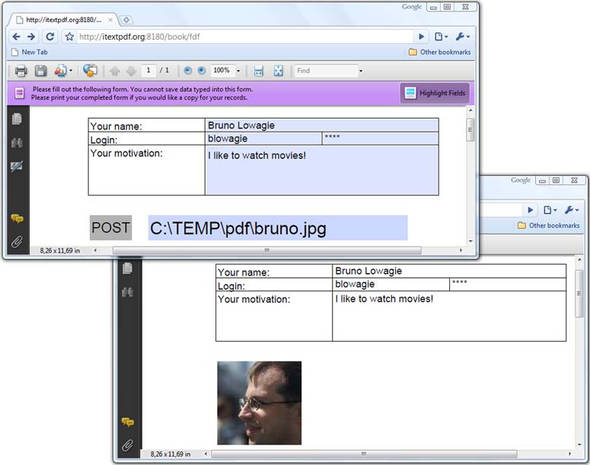
Suppose you’re working for the Foobar Film Festival, and you need to create a form that allows people to subscribe, but you also need to ask them to post a photograph of the applicant. Figure 9.7 shows the original subscribe.pdf form with an extra field that allows the end user to upload a file. In the example, I added a picture of myself from the c:TEMPpdf directory. You can see the uploaded picture in the resulting PDF at the bottom of figure 9.7.
Figure 9.7. Uploading a file using FDF
If you submit this form as HTML, the server will receive a multipart/form-data request. Processing such a request increases the complexity of your servlet. It may be a better idea to post the data as FDF—the uploaded file will be embedded inside the FDF document as an attachment.
Transmitting Data as FDF
There are benefits to this approach.
Listing 9.9. FDFServlet.java
In the doGet() part of listing 9.9, you add a submit button and a text field that will act as an <input type="File"> field in an HTML form. You also add an additional action that opens a “browse for file” dialog box. That way, the end user doesn’t have to enter the file path manually.
The doPost() method is more interesting. In listing 9.7, you sent the FDF bytes back to the browser; now you use them to create an instance of FdfReader ![]() . You could use FdfReader to retrieve the data with the getFieldValue() method. For instance,
. You could use FdfReader to retrieve the data with the getFieldValue() method. For instance,
fields.setField("personal.name", fdf.getField("personal.name"));
But it’s easier to set the fields all at once with the setFields() method ![]() . This method loops over all the fields in the FDF document and sets the value of the corresponding fields in the AcroForm.
. This method loops over all the fields in the FDF document and sets the value of the corresponding fields in the AcroForm.
![]() demonstrates how easy it is to extract the uploaded file from the FDF stream. You use it to create an Image that will be added to the form.
demonstrates how easy it is to extract the uploaded file from the FDF stream. You use it to create an Image that will be added to the form.
This is a useful FDF example if you want to transmit data from the browser to the server. You can also benefit from FDF if you want to store data on a filesystem.
Storing Data as FDF
Suppose you’re organizing a conference. People who want to register need to enter data into an HTML form on your site. As soon as they’ve paid the conference fee, you have to print a configuration letter that will be sent by snail mail. You can put all the registrations in a database, but depending on your requirements, storing the data on the filesystem as a series of FDF documents (one per subscriber) may be a valid alternative. The window on the left in figure 9.8 shows a simple HTML form where I’ve added information about myself. Let’s submit that form. Instead of storing the data on the server side, we’ll use a servlet that sends the FDF back to the client. See the download bar on the bottom of the Google Chrome window with the button labeled “subscribe.fdf”. If you open that file, it will try to find the form that corresponds with the data, open that form, and fill it out with the data from the FDF. This is shown in the left window of figure 9.8.
Figure 9.8. Creating FDF based on data sent from an HTML form

Listing 9.10. CreateFDF.java
Up until now, you’ve used the application/pdf content type. For FDF files, you need to use application/vnd.adobe.fdf ![]() . You want the end user to download the file, so you’re also setting the Content-Disposition header. As opposed to the previous example, you use the word attachment (instead of inline) to force the browser to download the file locally (instead of showing it in the browser window)
. You want the end user to download the file, so you’re also setting the Content-Disposition header. As opposed to the previous example, you use the word attachment (instead of inline) to force the browser to download the file locally (instead of showing it in the browser window) ![]() . You create the FDF document with the FdfWriter class. The contents of the file will be kept in memory until you write the file to an OutputStream.
. You create the FDF document with the FdfWriter class. The contents of the file will be kept in memory until you write the file to an OutputStream.
You can set fields in different ways. Listing 9.10 uses setFieldAsString(), but it’s also possible to use setFieldAsName(). The former method stores the field value as a PdfString object; the latter stores it as a PdfName. There are also different setFields() methods to which you can pass an AcroFields object, a PdfReader, or an FdfReader instance.
An FDF file can contain a reference to a PDF document containing a form that accepts the FDF data. If you save the file subscribe.fdf in the same directory as subscribe.pdf, clicking the FDF file will open the PDF file as shown in the left window of figure 9.8. Note that you can also use a URL to open the form online, but this can cause security issues, depending on the version of the PDF viewer.
iText doesn’t offer a class to create XFDF files, but it’s easy to write your own server-side script to transform the key-value pairs from an HTML submit into an XFDF file.
Transmitting Data as XFDF
If you create a button to submit data using the XFDF format, you can read the incoming stream with the XfdfReader class.
Listing 9.11. XFDFServlet.java
protected void doPost(
  HttpServletRequest request, HttpServletResponse response)
  throws ServletException, IOException {
  response.setContentType("application/pdf");
  try {
    XfdfReader xfdf = new XfdfReader(request.getInputStream());
    InputStream is
      = getServletContext().getResourceAsStream("/subscribe.pdf");
    PdfReader reader = new PdfReader(is, null);
    ByteArrayOutputStream baos = new ByteArrayOutputStream();
    PdfStamper stamper = new PdfStamper(reader, baos);
    AcroFields fields = stamper.getAcroFields();
    fields.setFields(xfdf);
    stamper.close();
    OutputStream os = response.getOutputStream();
    baos.writeTo(os);
    os.flush();
  } catch (DocumentException e) {
    throw new IOException(e.getMessage());
  }
}
Note that XFDF is more limited than FDF. For example, you can’t upload files with XFDF. Another limitation of both FDF and XFDF is that they are based on AcroForm technology; these examples won’t work for XFA forms.
We have one web example left involving forms.
9.3. JavaScript communication between HTML and PDF
In this section, we’ll write an example that demonstrates how to establish communication between JavaScript in an HTML page and JavaScript inside a PDF document.
Imagine the following situation: you have a catalog with thousands of items stored in a database. People can purchase these items online using a PDF form. How will you create that form? Surely you don’t want to embed your complete article database in a choice field inside your PDF. It would be much easier to provide browse or search functionality in an HTML page, then find a way to pass this data from the HTML pages to the PDF form.
Figure 9.9 shows an HTML page with a form and an embedded PDF document. The HTML form has two fields and a button. If you fill out a name and login and click the button, the values entered in the fields are passed as a message to the PDF document. The PDF document accepts these values and fills out the corresponding fields in the AcroForm.
Figure 9.9. JavaScript communication between HTML and PDF
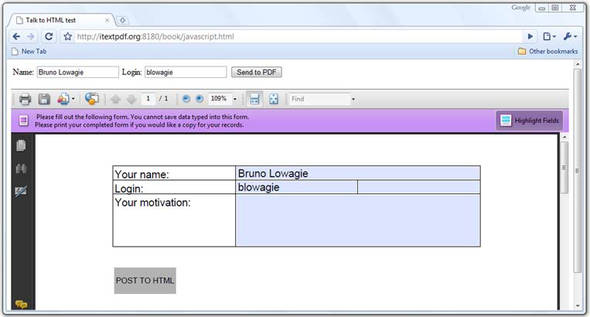
Passing the values in the opposite direction is also possible. If you change the name and login in the PDF form, and click the Post To HTML button, the entries are passed from the PDF form to the HTML form.
Embedding a PDF Document as an HTML Object
Let’s start by looking at the HTML side of this functionality. This example shows the JavaScript needed to accept the data from the PDF, and how to embed the PDF inside the HTML page.
Listing 9.12. javascript.html

In listing 9.4, you used the embed tag to embed a PDF document inside an HTML file. In listing 9.12, the PDF is treated as an object. If you give it an id, such as myPdf, you can create a variable using document.getElementById("myPdf"). You use this variable in ![]() to accept data from the PDF, and in
to accept data from the PDF, and in ![]() to send data to the PDF.
to send data to the PDF.
HTML to PDF Communication
The JavaScript sendToPdf() method is triggered when the end user clicks the button in the HTML form. It passes a message to the PDF object. This message is an array of String values. It will only be accepted if the PDF is disclosed and if there’s a message handler in place. The JavaScript code shown next was added as an Open action to the javascript.pdf document.
Listing 9.13. post_from_html.js
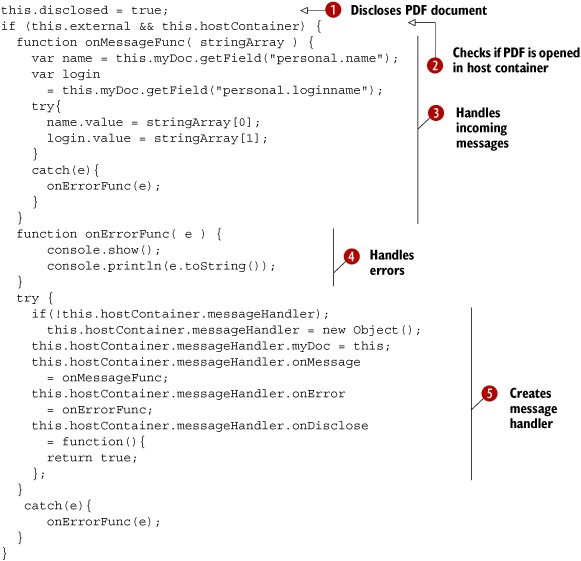
JavaScript communication between documents is only possible if the document is disclosed ![]() . You also need to check if the document is opened in an external window. If so, you need access to the host container
. You also need to check if the document is opened in an external window. If so, you need access to the host container ![]() . In this case, the host container is the web browser.
. In this case, the host container is the web browser.
Note
The hostContainer property doesn’t work on Mac OS X. Because of that limitation, this example may not work for you or for a segment of your customers.
![]() creates a message handler for the host container. It also defines a function to handle messages
creates a message handler for the host container. It also defines a function to handle messages ![]() and errors
and errors ![]() . The postMessage() method in the HTML passes a message to the onMessage method of the messageHandler. In this implementation, the first entry in the message array is used to fill in the personal.name field, the second entry to fill in the personal.loginname field.
. The postMessage() method in the HTML passes a message to the onMessage method of the messageHandler. In this implementation, the first entry in the message array is used to fill in the personal.name field, the second entry to fill in the personal.loginname field.
Now let’s take a look at the communication in the opposite direction.
PDF to HTML Communication
When an end user clicks the Post to HTML button in the PDF document, this JavaScript snippet is executed.
Listing 9.14. post_to_html.js
if(this.hostContainer) {
  var names = new Array();
  names[0] = this.getField("personal.name").value.toString();
  names[1] = this.getField("personal.loginname").value.toString();
  try{
    this.hostContainer.postMessage(names);
  }
  catch(e){
    app.alert(e.message);
  }
}
In the example, you check whether the PDF is opened in a host container. If it is, you put the values you want to transmit
to the HTML JavaScript in an array and use the postMessage() method of the host container. This message will only be accepted if there’s a message handler in place for the PDF object.
This message handler is created in the createMessageHandler() (![]() in listing 9.12) that was triggered when the HTML page was loaded; see the onLoad attribute of the body tag. This method is similar to what you did in listing 9.13. The onMessage:function accepts an array of String values. In this implementation, these values are used to fill out fields in the HTML form.
in listing 9.12) that was triggered when the HTML page was loaded; see the onLoad attribute of the body tag. This method is similar to what you did in listing 9.13. The onMessage:function accepts an array of String values. In this implementation, these values are used to fill out fields in the HTML form.
This example was a little bit out of scope for a book about iText. You’ll find more information about HTML to PDF communication (and vice versa) in the JavaScript for Acrobat API Reference. We’ll continue looking at web-related functionality with examples that convert HTML snippets and XML files into a sequence of iText building blocks.
9.4. Creating basic building blocks from HTML and XML
You created many different basic building blocks through code in chapters 2 and 4. You’ve written createObject() methods and a PojoToElementFactory class for your convenience. In this section, you’ll learn how to take a shortcut, and to let iText create these objects for you.
In section 9.4.1, we’ll take HTML as the source to create objects, in section 9.4.2, we’ll use XML.
9.4.1. Parsing HTML
One of the frequently asked questions on the iText mailing list is, “Does iText provide HTML2PDF functionality?” The official answer is no. Usually you’ll get advice to use another product; for instance, xhtmlrenderer, aka Flying Saucer—a project that is built on top of iText. You can find the URL of that project in appendix B.
In some cases, you don’t need a full-blown HTML renderer. Many web applications come with a small HTML editor that allows users to post messages with limited markup. For example, perhaps only <b> and <i> tags are allowed. Often these HTML snippets are stored in a database or somewhere on the filesystem. The initial question for HTML to PDF functionality could be rephrased as: “Can we insert those HTML snippets into a PDF file using iText?” The answer is yes; you can do this with iText if you use HTMLWorker.
HTML Snippets
You can use the method parseToList() to parse a snippet of HTML into a List of iText Elements.
Listing 9.15. HtmlMovies1.java
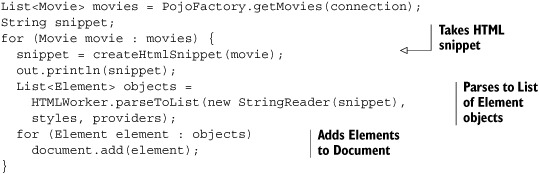
The method createHtmlSnippet() returns a very simple HTML snippet containing information about a movie. If you want to know what it looks like, you can open the file movies_1.html that is generated simultaneously with the PDF file (the out object is an instance of a PrintStream). It has entries like this:
<span class="title">Little Miss Sunshine</span><br />
<ul>
  <li class="country">United States</li>
</ul>
Year: <i>2006 minutes</i><br />
Duration: <i>101 minutes</i><br />
<ul>
  <li><span class="director">Dayton, Jonathan</span></li>
  <li><span class="director">Faris, Valerie</span></li>
</ul>
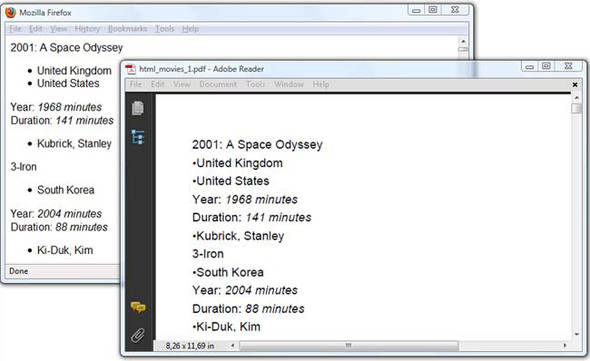
HTMLWorker will parse this snippet to a java.util.List of Paragraph and com.itextpdf.text.List objects. Figure 9.10 compares the HTML file opened in Firefox with the corresponding PDF opened in Adobe Reader.
Figure 9.10. HTML snippets converted to PDF without using styles
Note that the content is rendered differently. That’s to be expected: HTML wasn’t designed to define the exact layout of a document. You can tune the way an object is created by using the StyleSheet object and by creating a HashMap with providers.
Defining Styles
The styles and providers parameters were null in the previous example. You’ll reuse listing 9.15 in the next example, but this time you’ll create instances for these parameters.
Listing 9.16. HtmlMovies2.java
HtmlMovies2 movies = new HtmlMovies2();
StyleSheet styles = new StyleSheet();
styles.loadTagStyle("ul", "indent", "10");
styles.loadTagStyle("li", "leading", "14");
styles.loadStyle("country", "i", "");
styles.loadStyle("country", "color", "#008080");
styles.loadStyle("director", "b", "");
styles.loadStyle("director", "color", "midnightblue");
movies.setStyles(styles);
HashMap map = new HashMap();
map.put("font_factory", new MyFontFactory());
map.put("img_provider", new MyImageFactory());
movies.setProviders(map);
With the loadTagStyle() method, you can adapt the style of specific tags. In listing 9.16, you change the indentation of unordered lists and reduce the leading of the list items. The method loadStyle() is used to change the style of the tags with a class attribute. The style for country elements is changed to italic; the style is changed to bold for the director class. The color is changed too. The result is shown in figure 9.11.
Figure 9.11. HTML snippets converted to PDF using styles
Observe that, although you didn’t specify a font face or size in the StyleSheet, another font was used. You could change the font using loadTagStyle() or loadStyle(). For instance,
styles.loadTagStyle("li", "face", "courier");
styles.loadStyle("country", "size", "10pt");
For this example, you can use a custom FontProvider instead.
Implementing the FontProvider Interface
The next listing is a simple example of how you can implement the two methods of the FontProvider interface. The getFont() method returns a Times-Roman font, no matter what font is defined in the HTML snippet or the StyleSheet.
Listing 9.17. HtmlMovies2.java
public static class MyFontFactory implements FontProvider {
  public Font getFont(String fontname,
    String encoding, boolean embedded, float size,
    int style, BaseColor color) {
    return new Font(FontFamily.TIMES_ROMAN, size, style, color);
  }
  public boolean isRegistered(String fontname) {
    return false;
  }
}
Another implementation of the FontProvider interface can be found in iText’s source code. If you don’t define a font_factory, HTMLWorker will use the class FontFactoryImp, which is much more elaborate than this simple MyFontFactory example. This class will be discussed in more detail in chapter 11.
Figure 9.11 also shows that the HTML snippet used in this second HTML example is a tad more complex than the snippet used in the first one. It now involves a <table> tag that will result in a PdfPTable object and an <img> tag that should result in an Image object.
Implementing the Imageprovider Interface
The <img> tag, more specifically its src attribute, can cause a problem when you’re using relative paths for the images. You’re creating an HTML file with the HTML snippets in the ./results/part3/chapter09/ directory, but you’re referring to images that are in the ./resources/posters/ folder. This is an example of such an <img> tag:
<img src="../../../resources/posters/0062622.jpg" />
If you use HTMLWorker without an ImageProvider, iText won’t be able to find this image because it will be looking for it in the directory ../../../resources/posters/ instead of in the ./resources/posters/ folder. You can resolve this by defining an img_provider in listing 9.16. Here is the implementation.
Listing 9.18. HtmlMovies2.java
public static class MyImageFactory implements ImageProvider {
  public Image getImage(String src, HashMap h,
    ChainedProperties cprops, DocListener doc) {
    try {
      return Image.getInstance(String.format("resources/posters/%s",
        src.substring(src.lastIndexOf("/") + 1)));
    } catch (DocumentException e) {
      e.printStackTrace();
    } catch (IOException e) {
      e.printStackTrace();
    }
    return null;
  }
}
We’re working with HTML snippets in these examples. We haven’t defined at which point a snippet becomes a complete HTML page. If you inspect the source code of the HtmlMovies2 example, you’ll see that there’s also a createPdf() method that parses the complete HTML file. It’s certainly possible to use iText to parse larger HTML files, but remember that iText wasn’t designed for this kind of work. It’s not a full-blown HTML parser; there are better tools available if converting HTML to PDF is your main purpose.
The same goes for parsing XML. When talking about XML and PDF, people often refer to Formatting Objects (FO), and Formatting Objects Parsers (FOP), such as Apache FOP. But that doesn’t mean you can’t use iText to convert XML to PDF, as you’ll see in the next section.
9.4.2. Parsing XML
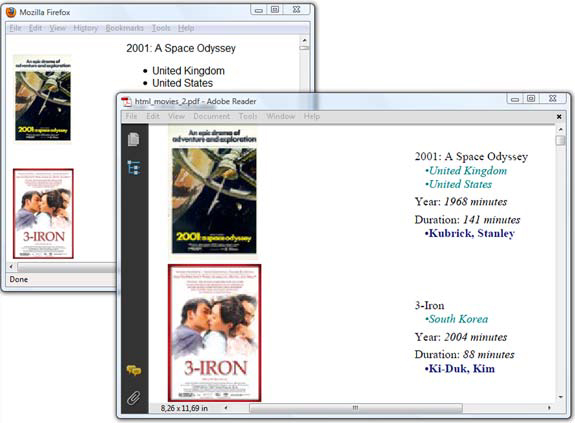
In chapter 8, you injected an XML file containing information about movies into an XFA form. Here you’re going to use the same XML file to create a PDF document from scratch. The XML file is shown on the right in figure 9.12. The result is shown in the Adobe Reader window to the left.
Figure 9.12. An XML file converted to PDF

The schema used for the movie information is custom made; iText doesn’t know what the tags movie, title, directors, and so on, mean. You’ll have to tell iText how to interpret these tags by writing your own XML handler.
Writing an XML Handler
You need to extend org.xml.sax.helpers.DefaultHandler and implement at least three methods:
- The characters() method—To put all the characters that are encountered between the tags of the XML file into a Chunk object.
- The startElement() method—To create specific TextElementArray objects that correspond with each tag that is encountered. You can also inspect the attributes to define the properties of the basic building blocks. Once a TextElementArray is created, you can push it to a Stack, where it will wait for further processing.
- The endElement() method—To update or flush the Stack.
A possible implementation for the XML file shown in figure 9.12 can be found in the next example.
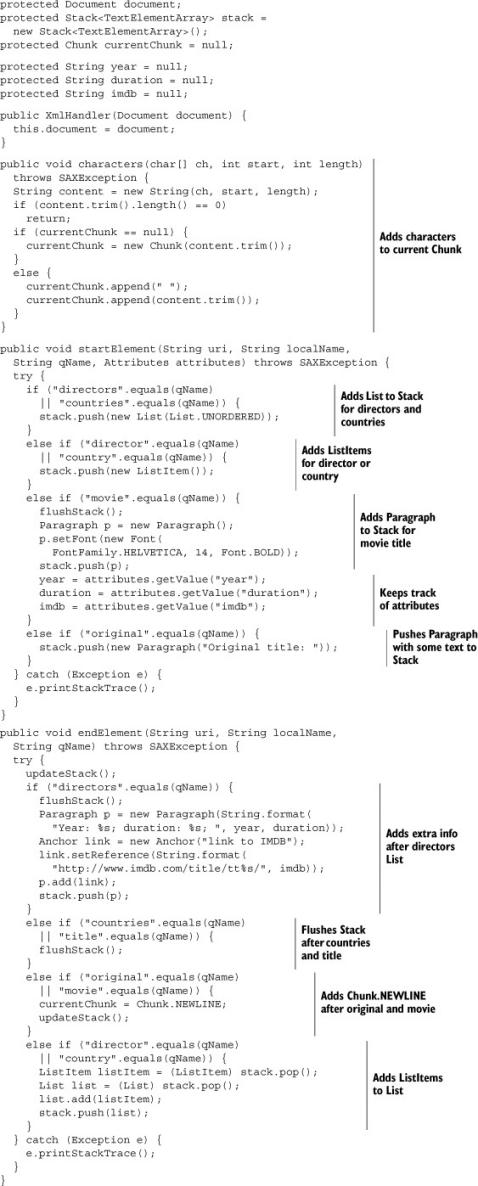
Listing 9.19. XmlHandler.java
The helper method updateStack() adds the current Chunk to the top TextElementArray on the Stack. If the Stack is empty, a Paragraph is created and added to the Stack. The helper method flushStack() will try to compose elements on the Stack; for instance, adding Phrase objects to a Paragraph. It will try to add TextElementArrays to the Document as soon as possible.
Parsing the XML File Using the Handler
Once you’ve written your XmlHandler implementation, creating the PDF is a matter of a handful of lines. All it takes is a servlet that reads the XML from the server and serves a PDF to the browser.
Listing 9.20. MovieServlet.java
public class MovieServlet extends HttpServlet {
  protected void doGet(
    HttpServletRequest request, HttpServletResponse response)
    throws ServletException, IOException {
    try {
      Document document = new Document();
      PdfWriter.getInstance(document, response.getOutputStream());
      document.open();
      InputStream is
        = getServletContext().getResourceAsStream("/movies.xml");
      SAXParser parser = SAXParserFactory.newInstance().newSAXParser();
      parser.parse(new InputSource(is), new XmlHandler(document));
      document.close();
    } catch (DocumentException e) {
      throw new IOException(e.getMessage());
    } catch (ParserConfigurationException e) {
      throw new IOException(e.getMessage());
    } catch (SAXException e) {
      throw new IOException(e.getMessage());
    }
  }
}
This may not be the easiest way to create a PDF document, but as soon as you’ve gained experience implementing the different DefaultHandler methods, you can create very powerful XML converters. I’ve frequently used this functionality in projects where the XML schema is unlikely to change, but the XML content changes frequently; for instance, in projects where the content of a letter is described in XML. The structure of the letter—defined in the XML schema—is always the same, but because of changing rules and laws, some of the clauses have to be adapted on a regular basis. For this situation, I wrote the XmlHandler once upon a time, very long ago, but I’m asked to change the content of the XML file on a regular basis.
Up until now, HTML and XML to PDF conversion hasn’t been part of the core business of iText because there are plenty of other tools that have made it their specialty. But as we’re moving more and more toward XFA, you’ll probably see more activity on the iText XML front in the years to come. For now, let’s summarize what we’ve done in this chapter.
9.5. Summary
Generating PDFs for the web isn’t all that different from generating PDFs in a standalone application. That’s what could be concluded after the first example in this chapter, where you integrated the five steps of the PDF creation process in a servlet. Nevertheless, there are different pitfalls that have been reported on the mailing list over the years. You can benefit from the experience of other developers by following some simple rules of thumb. When in need, you’ll be able to fall back on the section about troubleshooting web applications. Generating PDFs using JSP isn’t impossible, but it’s not done.
In the previous chapter, you created interactive PDF forms. In this chapter, you learned how to make these forms “web ready” by adding buttons that allow end users to submit data to a server in different formats. You filled a form on the server-side using data that was submitted as an HTML POST, but you also explored the possibilities of the FDF. You used FDF as a means to transmit data, including file uploads. You also found out that you can use FDF and XFDF to store data on the filesystem. You used a PDF form to demonstrate how to establish the communication between a PDF document and its host container, the web browser, and you sent messages back and forth between an HTML page and a PDF document.
Finally, you learned how to use HTMLWorker to convert HTML snippets to basic building blocks, and eventually to PDF. You also converted XML to PDF using a custom-made XmlHandler.
In the next chapter, we’ll look at another aspect that we discussed in previous parts but that needs to be discussed in more detail: images and colors.