Chapter 2. Using iText’s basic building blocks
- An overview of the database used in the book’s examples
- An overview of the basic building blocks: Chunk, Phrase, Paragraph, List, ListItem, Anchor, Chapter, Section, and Image
This chapter describes a series of high-level objects that can be used as basic building blocks. These objects allow you to generate PDF documents without having to bother with PDF syntax. Figure 2.1 is a UML diagram that serves as a visual table of contents, presenting the building blocks discussed in this chapter.
Figure 2.1. UML class diagram, presenting the building blocks that will be discussed in this chapter

This class diagram is far from complete. All the methods, as well as a number of member variables, were omitted for the sake of clarity. The diagram will help you to understand in one glance how the interfaces and classes relate to each other.
We’ll discuss a first series of objects in section 2.2: Chunk, Phrase, Paragraph, and List. In section 2.3, we’ll cover a second series: Anchor, Chapter, Section, and Image. But before starting to build documents using these building blocks, let’s have a look at the database you’ll publish to different PDF files in the upcoming examples.
2.1. Illustrating the examples with a real-world database
The main theme of the examples in this book is movies. I’ve made a selection of 120 movies, 80 directors, and 32 countries, and I’ve put all this information in a database. The entity relationship diagram (ERD) in figure 2.2 shows how the data is organized. There are three main tables, consisting of movies, directors, and countries. Furthermore, there are two tables connecting these tables.
Figure 2.2. Film database entity relationship diagram

For the examples in this book, we’ll use the HSQL database engine (http://hsqldb.org/). This is a lightweight database that doesn’t need to be installed. Just add hsqldb.jar to your classpath and you’re set. You’ll find this JAR in the lib directory. The HSQL database is in the db subdirectory of the resources folder. When you execute an example using the movie database, the contents of the filmfestival.script file will be loaded into memory, and you’ll see temporary files appear in the directory as soon as you start using the database.
I wrote a couple of convenience classes to hide the complexity of the database. The abstract class DatabaseConnection wraps the java.sql.Connection class, and it’s extended by the HsqldbConnection class.
Listing 2.1. DatabaseTest.java

This is a small standalone example to test the database connection. It writes the 32 countries from the film_country table to a file named countries.txt.
I’ve also created a class named PojoFactory, along with a series of plain old Java objects (POJOs), such as Movie, Director, and Country. These classes hide most of the database querying. In the examples that follow, you’ll find code that looks like this:
List<Movie> movies = PojoFactory.getMovies(connection);
for (Movie movie : movies) {
  document.add(new Paragraph(movie.getTitle()));
}
Each instance of the Movie class corresponds with a record in the film_movietitle table.
In the following sections and chapters, you’ll create numerous PDF files from a database, but you’ll hardly ever be confronted with difficult database queries or database-related Java syntax. The database aspects of the examples won’t get any more complex than in the first examples of the next section.
2.2. Adding Chunk, Phrase, Paragraph, and List objects
The general idea of step ![]() in listing 1.1 in the PDF-creation process using document.add() is that you add objects implementing the Element interface to a Document object. Behind the scenes, a PdfWriter and a PdfDocument object analyze these objects and translate them into the appropriate PDF syntax, positioning the content on one or more pages,
taking into account the page size and margins.
in listing 1.1 in the PDF-creation process using document.add() is that you add objects implementing the Element interface to a Document object. Behind the scenes, a PdfWriter and a PdfDocument object analyze these objects and translate them into the appropriate PDF syntax, positioning the content on one or more pages,
taking into account the page size and margins.
In this section, we’ll explore text elements that implement the TextElementArray interface. As the name of the interface indicates, these objects will be composed of different pieces of text; most of the time, it will be text wrapped in Chunk objects.
2.2.1. The Chunk object: a String, a Font, and some attributes
A Chunk is the smallest significant piece of text that can be added to a Document. The Chunk object contains a StringBuffer that represents a chunk of text whose characters all have the same font, font size, font style, and font color. These properties are defined in the Font object. Other properties of the Chunk, such as the background color, the text rise—used to simulate subscript and superscript—and the underline values—used to underline text or strike a line through it—are defined as attributes. These attributes can be changed with a series of setter methods.
Listing 2.1 wrote the names of 32 countries to a text file to test the database. Here you’re creating a PDF document with nothing but Chunks as building blocks.
Listing 2.2. CountryChunks.java

This example is rather unusual: in normal circumstances you’ll use Chunk objects to compose other text objects, such as Phrases and Paragraphs. Typically, you won’t add Chunk objects directly to a Document, except for some special Chunks, such as Chunk.NEWLINE.
The Space Between Two Lines: Leading
A Chunk isn’t aware of the space that is needed between two lines. That’s why you set the leading in ![]() . The word leading is pronounced as ledding, and it’s derived from the word lead (the metal). When type was set by hand for printing presses, strips of lead were placed between lines of type to add space—the
word originally referred to the thickness of these strips of lead that were placed between the lines. The PDF Reference redefined
the leading as “the vertical distance between the baselines of adjacent lines of text” (IS0-32000-1, section 9.3.5). As an
exercise, you could remove setInitialLeading(16) from line
. The word leading is pronounced as ledding, and it’s derived from the word lead (the metal). When type was set by hand for printing presses, strips of lead were placed between lines of type to add space—the
word originally referred to the thickness of these strips of lead that were placed between the lines. The PDF Reference redefined
the leading as “the vertical distance between the baselines of adjacent lines of text” (IS0-32000-1, section 9.3.5). As an
exercise, you could remove setInitialLeading(16) from line ![]() . If you compile and execute the altered example, you’ll find that all the text is written on the same line.
. If you compile and execute the altered example, you’ll find that all the text is written on the same line.
The Font Object
Figure 2.3 shows the PDF created by listing 2.2. You can see all the fonts that are present in the document by choosing File > Properties > Fonts.
Figure 2.3. Country chunks, produced with listing 2.2

The document properties reveal that two fonts were used: Helvetica and Helvetica-Bold. These fonts weren’t embedded. When I open the file on Windows, Adobe Reader replaces Helvetica with ArialMT and Helvetica-Bold with ArialBoldMT. These fonts look very similar, but nevertheless, there’s a difference!
The first font in the list in figure 2.3 is the default font used for the Chunks created in listing 2.2 ![]() .
.
FAQ
What is the default font used in iText, and can I change it? The default font in iText is Helvetica with size 12 pt. There’s no way to change this. If you need objects with another default font, just create a factory class that produces objects with the font of your choice.
In ![]() , you specify a different font from the same family: Helvetica with style Bold. You define a different font size (6 pt) and
set the font color to white. It would be difficult to read white text on a white page, so you also change one of the many
attributes of the Chunk object: the background color
, you specify a different font from the same family: Helvetica with style Bold. You define a different font size (6 pt) and
set the font color to white. It would be difficult to read white text on a white page, so you also change one of the many
attributes of the Chunk object: the background color ![]() . The setBackground() method draws a colored rectangle behind the text contained in the Chunk. The extra parameters of the method define extra space (expressed in user units) to the left, bottom, right, and top of the
Chunk. In this case, the ID of each country will be printed as white text on a black background.
. The setBackground() method draws a colored rectangle behind the text contained in the Chunk. The extra parameters of the method define extra space (expressed in user units) to the left, bottom, right, and top of the
Chunk. In this case, the ID of each country will be printed as white text on a black background.
You use setTextRise() ![]() to print the country ID in superscript. The parameter is the distance from the baseline in user units. A positive value simulates
superscript; a negative value simulates subscript. You’ll discover more Chunk attributes as you read on in the book.
to print the country ID in superscript. The parameter is the distance from the baseline in user units. A positive value simulates
superscript; a negative value simulates subscript. You’ll discover more Chunk attributes as you read on in the book.
Finally you add Chunk.NEWLINE to make sure that every country name starts on a new line. In the next subsection, we’ll combine Chunks into a Phrase.
2.2.2. The Phrase object: a List of Chunks with leading
When I created iText, I chose the word chunk for the atomic text element because of its first definition in my dictionary: “a solid piece.” A phrase, on the other hand, is defined as “a string of words.” It’s a composed object. Translated to iText and Java, a Phrase is an ArrayList of Chunk objects.
A Phrase with Different Fonts
When you create methods that compose Phrase objects using different Chunks, you’ll usually create constants for the different Fonts you’ll use.
Listing 2.3. DirectorPhrases1.java

The createDirectorPhrase() method produces the Phrase exactly the way you want it. You’ll use it 80 times to list the 80 directors from the movie database. It’s good practice to create a factory class containing different createObject() methods if you need to create Chunk, Phrase, or other objects in a standardized way.
The Leading of a Phrase
The method createDirectorPhrase() from listing 2.3 is used in this listing in which you’re repeating the five steps in the PDF creation process.
Listing 2.4. DirectorPhrases1.java

Observe that you no longer need to set the initial leading in step ![]() . Instead, the default leading is used.
. Instead, the default leading is used.
FAQ
What is the default leading in iText? If you don’t define a leading, iText looks at the font size of the Phrase or Paragraph that is added to the document, and multiplies it by 1.5. For instance, if you have a Phrase with a font of size 10, the default leading is 15. For the default font—with a default size of 12—the default leading is 18.
In the next example, you’ll change the leading with the setLeading() method.
Database Encoding Versus the Default Charset Used by the JVM
In listing 2.3, some Strings were created using the UTF-8 encoding explicitly:
new String(rs.getBytes("given_name"), "UTF-8")
That’s because the database contains different names with special characters. If you look at the HSQL script filmfestival.script, you’ll find INSERT statements like this:
INSERT INTO FILM_DIRECTOR VALUES(
  41,'Iu00c3u00b1u00c3u00a1rritu','Alejandro Gonzu00c3u00a1lez')
That’s the record for the director Alejandro González Iñárritu. The characters á—(char) 226—and ñ—(char) 241—can be stored as one byte each, using the ANSI character encoding, which is a superset of ISO-8859-1, aka Latin-1. HSQL stores them in Unicode using multiple bytes per character. To make sure that the String is created correctly, listing 2.3 uses ResultSet.getBytes() instead of ResultSet.getString().
This isn’t always necessary. In most database systems, you can define the encoding for each table or for the whole database. The JVM uses the platform’s default charset, for instance, in the new String(byte[] bytes) constructor.
FAQ
Why is the data I retrieve from my database rendered as gibberish? This can be caused by an encoding mismatch. The records in your database are encoded using encoding X; but the String objects obtained from your ResultSet assume that they are encoded using your platform’s charset Y. For instance, the name González could be rendered as González if the Unicode characters are interpreted as ANSI characters.
Once you’ve created the PDF document correctly, you no longer have to worry about encodings. One of the main reasons why people prefer PDF over any other document format is because PDF, as the name tells us, is a portable document format. A PDF document can be viewed and printed on any platform: UNIX, Macintosh, Windows, Linux, and others, regardless of the encoding or the character set that is used.
In theory, a PDF document should look the same on any of these platforms, using any viewer available on that platform, but there’s a caveat! If you take a close look at figure 2.4, you can see that this isn’t always true.
Figure 2.4. A PDF file opened in Adobe Reader and Evince on Ubuntu

Font Substitution for Nonembedded Fonts
In figure 2.3, you could see that Helvetica was replaced by ArialMT. Figure 2.4 shows that the choice of the replacement font is completely up to the document viewer.
Adobe Reader on Ubuntu (see the left window in figure 2.4) replaces Helvetica with Adobe Sans MM and Times-Roman with Adobe Serif MM. The MM refers to the fact that these are Multiple Master fonts. Wikipedia tells us that MM fonts are “an extension to Adobe Systems’ Type 1 PostScript fonts ... From one MM font, it is conceivable to create a wide gamut of typeface styles of different widths, weights and proportions, without losing the integrity or readability of the character glyphs.”
Adobe Reader for Linux uses a generic font when it encounters a nonembedded font for which it can’t find an exact match. Looking at the output of File > Properties > Fonts in Evince (Ubuntu’s default document viewer; see the right window in figure 2.4), you might have the impression that the actual Times-Bold, Times-Roman, and Helvetica fonts are used, but that’s just Evince fooling you. Helvetica and Times-Roman aren’t present on my Linux distribution; Evince is using other fonts instead. On Ubuntu Linux, you can consult the configuration files in the /etc/fonts directory. I did, and I discovered that on my Linux installation, Times and Helvetica are mapped to Nimbus Roman No9 L and Nimbus Sans—free fonts that can be found in the /usr/share/fonts/type1/gsfonts directory.
Note that we are looking at the same document, on the same OS (Ubuntu Linux), yet the names of the directors in the document look slightly different because different fonts were used. We were very lucky that the names were legible.
FAQ
Why are the special characters missing in my PDF document? This isn’t an iText problem. You could be using a character that has a description for the corresponding glyph on your system, but if you don’t embed the font, that glyph can be missing on an end user’s system. If the PDF viewer on that system can’t find a substitution font, it won’t be able to display the glyph. The solution is to embed the font. But even if you embed the font, some glyphs can be missing because they weren’t present in the font you tried to embed. The solution here is to use a different font that does have the appropriate glyph descriptions. This will be discussed in great detail in chapter 11.
Not embedding fonts is always a risk, especially if you need special glyphs in your document. Not every font has the descriptions for every possible glyph.
Note
Characters in a file are rendered on screen or on paper as glyphs. ISO-32000-1, section 9.2.1, states: “A character is an abstract symbol, whereas a glyph is a specific graphical rendering of a character. For example: The glyphs A, A, and A are renderings of the abstract ‘A’ character. Glyphs are organized into fonts. A font defines glyphs for a particular character set.”
In the next example, you’ll see how to avoid possible problems caused by font substitution by embedding the font.
Embedding Fonts
Up until now, you’ve created font objects using nothing but the Font class. The fonts available in this class are often referred to as the standard Type 1 fonts. These fonts aren’t embedded by iText.
Note
The standard Type 1 fonts used to be called built-in fonts or Base 14 fonts. The font programs for fourteen fonts—four styles of Helvetica, Times-Roman, and Courier, plus Symbol and ZapfDingbats—used to be shipped with the PDF viewer. This is no longer the case; most viewers replace these fonts. It’s important to understand that these fonts have no support for anything other than American/Western-European character sets. As soon as you want to add text with foreign characters, you’ll need to use another font program.
The next example is a variation on the previous one. You don’t have to change listing 2.4; you only have to replace listing 2.3 with this one.
Listing 2.5. DirectorPhrases2.java

You tell iText where to find the font programs for Times New Roman (times.ttf) and Times New Roman Bold (timesbd.ttf) by creating a BaseFont object. You ask iText to embed the characters (BaseFont.EMBEDDED versus BaseFont.NOT_EMBEDDED) using the ANSI character set (BaseFont.WINANSI). You’ll learn more about the BaseFont object in chapter 11. For now, it’s sufficient to know that you can create a Font instance using a BaseFont object and a float value for the font size.
Figure 2.5 looks very similar to figure 2.4; only now the PDF file is rendered the same way in both viewers.
Figure 2.5. A PDF file opened in Adobe Reader and Evince on Ubuntu

Observe that there’s more space between the names in this version because listing 2.5 used setLeading() to change the leading. The names of the directors are also underlined differently compared to the previous example, because you don’t define the underlining as a property of the Font, but as an attribute of the Chunk.
With the Chunk.setUnderline() method, you can set the line thickness (in the example, 0.2 pt) and a Y position (in the example, 2 pt below the baseline). The parameter that sets the Y position allows you to use the same method to strike a line through a Chunk. There’s also a variant of the method that accepts six parameters:
- A BaseColor, which makes the line a different color than the text.
- The absolute thickness.
- A thickness multiplication factor that will adapt the line width based on the font size.
- An absolute Y position.
- A position multiplication factor that will adapt the Y position based on the font size.
- The end line cap, defining what the extremities of the line should look like. Allowed values are PdfContentByte.LINE_CAP_BUTT (the default value), PdfContentByte.LINE_CAP_ROUND, and PdfContentByte.LINE_CAP_PROJECTING_ SQUARE. The meaning of these options will be explained in table 14.6.
One thing may look peculiar when you look at figure 2.5. Why do both viewers still list Helvetica? You won’t find any explicit reference to it in listings 2.4 and 2.5, but it’s added implicitly in this line:
document.add(Chunk.NEWLINE);
Chunk.NEWLINE contains a newline character in the default font; and the default font is Helvetica. You could have avoided this by replacing that line with this one:
document.add(new Chunk("
", NORMAL));
But an even better solution would be to use a Paragraph object instead of a Phrase.
2.2.3. Paragraph object: a Phrase with extra properties and a newline
Although the analogy isn’t entirely correct, I often compare the difference between a Phrase and a Paragraph in iText with the difference between <span> and <div> in HTML. If you had used a Paragraph instead of a Phrase in the previous examples, it wouldn’t have been necessary to add a newline.
Listing 2.6. MovieTitles.java
List<Movie> movies = PojoFactory.getMovies(connection);
for (Movie movie : movies) {
  document.add(new Paragraph(movie.getTitle()));
}
The Paragraph class is derived from the Phrase class. You can create instances of Paragraph exactly the same way as you’ve been creating Phrase objects, but there’s more: you can also define the alignment of the text, different indentations, and the spacing before and after the paragraph.
Experimenting with Paragraphs
Let’s experiment with these Paragraph features in some examples. Listing 2.7 shows two helper methods that create Paragraphs:
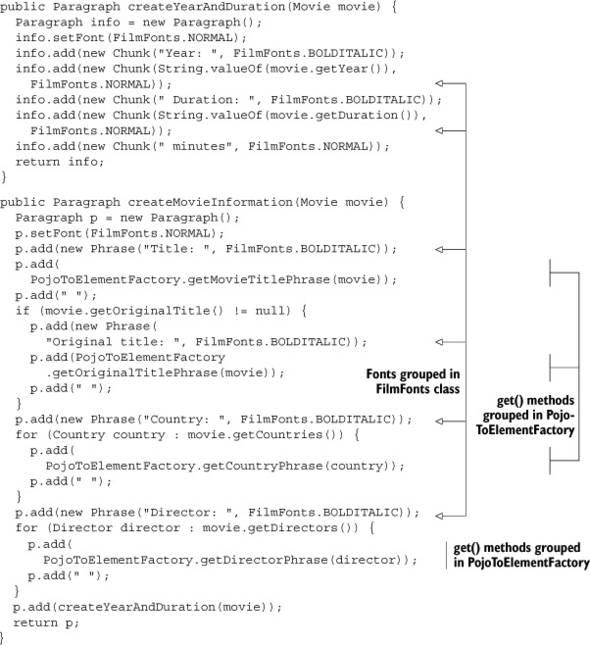
- createYearAndDuration() creates a Paragraph that is composed of Chunk objects.
- createMovieInformation() does the same using Phrase objects and one Paragraph object that is treated as if it were a Phrase.
These methods are convenience methods that will be reused in different examples.
Listing 2.7. MovieParagraphs1
Note that you’re already introducing rationalizations that will keep your code maintainable as the application grows.
Rationalizations
You’re using Font objects that are grouped in the FilmFonts class. Generic names NORMAL, BOLD, ITALIC, and BOLDITALIC are chosen, so that you don’t need to refactor the names if your employer doesn’t like the font family you’ve chosen. If he wants you to switch from Helvetica to Times, you have to change your code in only one place.
The createMovieInformation() method from listing 2.7 is used here.
Listing 2.8. MovieParagraphs1
List<Movie> movies = PojoFactory.getMovies(connection);
for (Movie movie : movies) {
  Paragraph p = createMovieInformation(movie);
  p.setAlignment(Element.ALIGN_JUSTIFIED);
  p.setIndentationLeft(18);
  p.setFirstLineIndent(-18);
  document.add(p);
}
Next, you’ll convert POJOs into Phrase objects using a PojoToElementFactory. As your application grows, you’ll benefit from reusing methods such as getMovieTitlePhrase() and getDirectorPhrase() that are grouped in such a separate factory.
Listing 2.9. MovieParagraphs2
List<Movie> movies = PojoFactory.getMovies(connection);
for (Movie movie : movies) {
  Paragraph title = new
     Paragraph(PojoToElementFactory.getMovieTitlePhrase(movie));
  title.setAlignment(Element.ALIGN_LEFT);
  document.add(title);
  if (movie.getOriginalTitle() != null) {
    Paragraph dummy = new Paragraph("u00a0", FilmFonts.NORMAL);
    dummy.setLeading(-18);
    document.add(dummy);
    Paragraph originalTitle = new Paragraph(
PojoToElementFactory.getOriginalTitlePhrase(movie));
    originalTitle.setAlignment(Element.ALIGN_RIGHT);
    document.add(originalTitle);
  }
  Paragraph director;
  float indent = 20;
  for (Director pojo : movie.getDirectors()) {
    director = new Paragraph(PojoToElementFactory.getDirectorPhrase(pojo));
    director.setIndentationLeft(indent);
    document.add(director);
    indent += 20;
  }
  Paragraph country;
  indent = 20;
  for (Country pojo : movie.getCountries()) {
    country = new Paragraph(PojoToElementFactory.getCountryPhrase(pojo));
    country.setAlignment(Element.ALIGN_RIGHT);
    country.setIndentationRight(indent);
    document.add(country);
    indent += 20;
  }
  Paragraph info = createYearAndDuration(movie);
  info.setAlignment(Element.ALIGN_CENTER);
  info.setSpacingAfter(36);
  document.add(info);
}
The resulting PDFs list all the movie titles in the database, including their original title (if any), director, countries where they were produced, production year, and run length. These documents probably won’t win an Oscar for best layout, but the examples illustrate a series of interesting Paragraph methods.
You can tune the layout by changing several Paragraph properties.
Changing the Alignment
In listing 2.8, the alignment was set to Element.ALIGN_JUSTIFIED with the setAlignment() method. This causes iText to change the spaces between words and characters—depending on the space/character ratio—in order to make the text align with both the left and right margins. Listing 2.9 shows the alternative alignments: Element.LEFT, Element.ALIGN_CENTER, and Element.RIGHT. Element.ALIGN_JUSTIFIED_ALL is similar to Element.ALIGN_JUSTIFIED; the difference is that the last line is aligned too. If you don’t define an alignment, the text is left aligned.
Changing the Indentation
There are three methods for changing the indentation:
- setIndentationLeft()— Changes the indentation to the left. A positive value will be added to the left margin of the document; a negative value will be subtracted.
- setIndentationRight()— Does the same as setIndentationLeft(), but with the right margin.
- setFirstLineIndent()— Changes the left indentation of the first line, which is interesting if you want to provide an extra visual hint to the reader that a new Paragraph has started.
In listing 2.8, a positive indentation of 18 pt (valid for the whole paragraph) was defined. The negative indentation of 18 pt for the first line will be subtracted from the left indentation, causing the first line of each paragraph to start at the left margin. Every extra line in the same Paragraph will be indented a quarter of an inch.
Spacing Between Paragraphs
Another way to distinguish different paragraphs is to add extra spacing before or after the paragraph. In listing 2.9, you used setSpacingAfter() to separate the details of two different movies with a blank line that is half an inch high. There’s also a setSpacingBefore() method that can produce similar results.
Finally, listing 2.9 does something it shouldn’t: it uses a workaround to write the English and the original title on the same line, with the English title aligned to the left and the original title aligned to the right. It achieves this by introducing a dummy Paragraph with a negative leading, causing the current position on the page to move one line up. While this works out more or less fine in this example, it will fail in other examples. For instance, if the previous line causes a page break, you won’t be able to move back to the previous page. Also, if the English and the original title don’t fit on one line, the text will overlap. You’ll learn how to fix these layout problems in section 2.2.6.
In the next section, we’ll have a look at what happens when the end of a line is reached.
2.2.4. Distributing text over different lines
In the movie_paragraphs_1.pdf document (listing 2.8), all the information about a movie is in one Paragraph. For most of the movies, the content of this Paragraph doesn’t fit on one line, and iText splits the string, distributing the content over different lines. The default behavior of iText is to put as many complete words to a line as possible. iText splits sentences when a space or a hyphen is encountered, but you can change this behavior by redefining the split character.
The Split Character
If you want to keep two words separated by a space character on the same line, you shouldn’t use the normal space character, (char)32; you should use the nonbreaking space character (char)160.
Next you’ll create a StringBuffer containing all the movies by Stanley Kubrick, and you’ll concatenate them into one long String, separated with pipe symbols (|). In the movie titles, you’ll replace the ordinary space character with a nonbreaking space character.
Listing 2.10. MovieChain.java
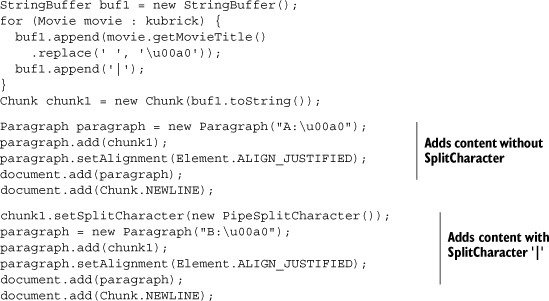
Because you’ve replaced the space characters, iText can’t find any of the default split characters in chunk1. The text will be split into different lines, cutting words in two just before the first character that no longer fits on the line. Then you add the same content a second time, but you define the pipe symbol (|) as a split character.
Next is a possible implementation of the SplitCharacter interface. You can add an instance of this custom-made class to a Chunk with the method setSplitCharacter().
Listing 2.11. PipeSplitCharacter.java
import com.lowagie.text.SplitCharacter;
import com.lowagie.text.pdf.PdfChunk;

public class PipeSplitCharacter implements SplitCharacter {

  @Override
  public boolean isSplitCharacter(
    int start, int current, int end, char[] cc,
    PdfChunk[] ck) {
    char c;
    if (ck == null)
      c = cc[current];
    else
      c = (char)ck[Math.min(current, ck.length - 1)]
                  .getUnicodeEquivalent(cc[current]);
    return (c == '|' || c <= ' ' || c == '-'),
  }
}
The method that needs to be implemented looks complicated, but in most cases it’s sufficient to copy the method shown in the previous listing and change the return line. If you’re working with Asian glyphs, you may also add these ranges of Unicode characters:
(c >= 0x2e80 && c < 0xd7a0) || (c >= 0xf900 && c < 0xfb00)
|| (c >= 0xfe30 && c < 0xfe50)  || (c >= 0xff61 && c < 0xffa0)
The result is shown in the upper part of figure 2.6.
Figure 2.6. Splitting paragraphs

In Paragraph A, the content is split at unusual places. The word “Love” is split into “Lo” and “ve,” and the final “s” in the word “Paths” is orphaned. For the Chunks in Paragraph B, a split character was defined: the pipe character (|). Paragraph C shows what the content looks like if you don’t replace the normal spaces with nonbreaking spaces.
Hyphenation
This listing is similar to listing 2.10, except it doesn’t replace the ordinary space characters. Another Chunk attribute is introduced: hyphenation.
Listing 2.12. MovieChain.java (continued)

In this listing, you create a HyphenationAuto object using four parameters. iText uses hyphenation rules found in XML files named en_US.xml, en_GB.xml, and so on. The first two parameters refer to these filenames. The third and fourth parameters specify how many characters may be orphaned at the start or at the end of a word. For instance, you wouldn’t want to split the word elephant like this: e-lephant. It doesn’t look right if a single letter gets cut off from the rest of the word.
FAQ
I use setHyphenation(), but my text isn’t hyphenated. Where do I find the XML file I need? If you try the example in listing 2.12, and not one word is hyphenated, you’ve probably forgotten to add the itext-hyph-xml.jar to your classpath. In this JAR, you’ll find files such as es.xml, fr.xml, de_DR.xml, and so on. These XML files weren’t written by iText developers; they were created for Apache’s Formatting Objects Processor (FOP). The XML files bundled in itext-hyph-xml.jar are a limited set, and your code won’t work if you’re using a language for which no XML file was provided in this JAR. In that case, you’ll have to find the appropriate file on the internet and add it to a JAR in your classpath. Don’t forget to read the license before you start using a hyphenation file; some of those files can’t be used for free.
The hyphenated text is added twice: once with the default space/character ratio, and once with a custom space/character ratio.
The Space/Character Ratio
The Paragraph objects D and E from listing 2.12, have a justified alignment. This alignment is achieved by adding extra space between the words and between the characters. In Paragraph D, you see the default spacing. The ratio is 2.5, meaning that iText has been adding 2.5 times more space between the words than between the characters to match the exact length of each line.
You can change this ratio with the PdfWriter.setSpaceCharRatio() method. This is done for Paragraph E. On the lower-right side of figure 2.6, you can see that no extra space is added between the characters, only between the words, because the ratio was changed to NO_SPACE_CHAR_RATIO (which is in reality a very high float value).
2.2.5. The List object: a sequence of Paragraphs called ListItem
In the previous examples, you’ve listed movies, directors, and countries. In the next example you’ll repeat this exercise, but instead of presenting the data as an alphabetically sorted series of movie titles, you’ll create a list of countries, along with the number of movies in the database that were produced in that country. You’ll list those movies, and for every movie you’ll list its director(s).
Ordered and Unordered Lists
To achieve this, you’ll use the List object and a number of ListItem objects. As you can see in the UML diagram (figure 2.1), ListItem extends Paragraph. The main difference is that every ListItem has an extra Chunk variable that acts as a list symbol.
A first version of this report was created using ordered and unordered lists. The list symbol for ordered lists can be numbers—which is the default—or letters. The letters can be lowercase or uppercase—uppercase is the default. The default list symbol for unordered lists is a hyphen.
Listing 2.13. MovieLists1.java

Note that it’s not always necessary to create a ListItem instance. You can also add String items directly to a List; a ListItem will be created internally for you.
Changing the List Symbol
Next is a variation on the same theme.
Listing 2.14. MovieLists2.java

For the list with countries, you now define an indentation of half an inch for the list symbol. You also define a different list symbol for every item, namely the database ID of the country. The difference for the movie list is subtler: you tell iText that it shouldn’t realign the list items. In listing 2.13, iText looks at all the items in the List and uses the maximum indentation for all the items. By adding the line movielist.setAlignindent(false) in listing 2.14, every list item now has its own list indentation based on the space taken by the list symbol. That is, unless you’ve added the line list.setAutoindent(false), in which case the indentation specified with setSymbolIndent() is used.
As you can see in figure 2.7, a period (.) symbol is added to each list symbol for ordered lists. You can override this behavior with the methods setPreSymbol() and setPostSymbol(). In listing 2.14, the pre- and postsymbols are defined in such a way that you get “Director 1:”, “Director 2:”, and so on, as list symbols (shown at the top-right in figure 2.7).
Figure 2.7. List and ListItem variations
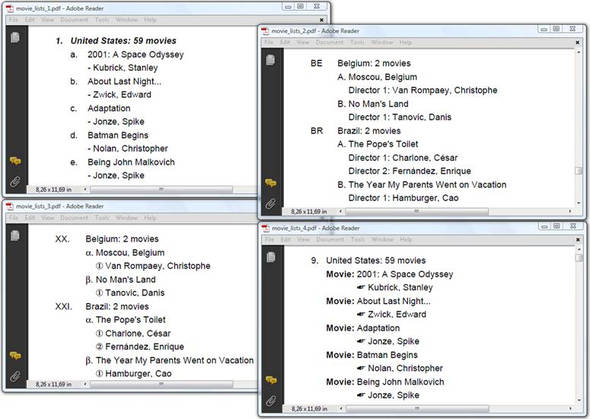
Special Types of Lists
Four more variations are shown in figure 2.7. First, in listing 2.15, you’ll create List objects of type RomanList, GreekList, and ZapfDingbatsNumberList. In listing 2.16, you’ll create a ZapfDingbatsList.
Listing 2.15. MovieLists3.java
List list = new RomanList();
...
List movielist = new GreekList();
movielist.setLowercase(List.LOWERCASE);
..
List directorlist = new ZapfDingbatsNumberList(0);
Be careful not to use ZapfDingbatsNumberList for long lists. This list variation comes in four different types defined with a parameter in the constructor that can be 0, 1, 2, or 3, corresponding to specific types of numbered bullets. Note that the output will only be correct for items 1 to 10, because there are no bullets for numbers 11 and higher in the font that is used to draw the bullets.
ZapfDingbats is one of the 14 standard Type 1 fonts. It contains a number of special symbols, such as a hand with the index finger pointing to the right: (char)42. This symbol is used in listing 2.16 for the director list. The special list class for this type of list is called ZapfDingbatsList. This is the superclass of ZapfDingbatsNumberList.
Listing 2.16 also shows how to change the first index of an ordered list using setFirst(), and how to set a custom list symbol for the entire list with setListSymbol().
Listing 2.16. MovieLists4.java
List list = new List(List.ORDERED);
list.setFirst(9);
..
List movielist = new List();
movielist.setListSymbol(new Chunk("Movie: ", FilmFonts.BOLD));
..
List directorlist = new ZapfDingbatsList(42);
We’ll conclude this section with a number of objects that aren’t shown on the class diagram in figure 2.1: vertical position marks and separator Chunks.
2.2.6. The DrawInterface: vertical position marks, separators, and tabs
In section 1.3.4, you learned that there are different ways to add content to a page using iText. In this chapter, you’ve been using document.add(), trusting iText to put the content at the correct position in a page. But in some cases, you might want to add something extra. For instance, you might want to add a mark at the current position in the page (for example, an arrow); or you might want to draw a line from the left margin to the right margin (which is different from underlining a Chunk).
This can be achieved using DrawInterface. If you want to benefit from all the possibilities of this interface and its VerticalPositionMark implementation, you’ll need some techniques that will be explained in the next chapter. For now, figure 2.8 shows classes that can be used without any further programming work.
Figure 2.8. Class diagram of DrawInterface implementations

Vertical Position Marks
Suppose that you want to create an alphabetical list of directors, and to list the movies directed by these filmmakers that are present in the database. To this list, you want to add an arrow that indicates which directors have more than two movies in the database. You also want to indicate all the movies that were made in the year 2000 or later. See figure 2.9 for an example.
Figure 2.9. Vertical position marks

You can achieve this by subclassing VerticalPositionMark.
Listing 2.17. PositionedArrow.java

You could use Document.add() to add instances of this PositionedArrow class to the Document because it extends VerticalPositionMark, which means it also implements the Element interface. When this Element is encountered, the custom draw() method will be invoked, and this method has access to the canvas to which content is added. It also knows the coordinates defining the margins of the page, (llx, lly) and (urx, ury), as well as the current y position on the page. In the draw() method of the PositionedArrow class, listing 2.17 uses llx and urx to draw an arrow in the left or right margin of the page, and it uses the y value to position the arrow.
Observe that in this example PositionedArrow is not added directly to the Document.
Listing 2.18. DirectorOverview1.java

The arrow refers to the content of a Paragraph, and it’s better to add it to the corresponding object, as is done in ![]() and
and ![]() . Otherwise a page break could cause the text to be on one page and the arrow on the next; that could be your intention in
some situations, but that’s not the case here.
. Otherwise a page break could cause the text to be on one page and the arrow on the next; that could be your intention in
some situations, but that’s not the case here.
Line Separators
When you need to draw a line, you want to know the current vertical position of the text of a page. In that situation, you
can get a long way using the LineSeparator class. In ![]() of listing 2.18, you create a line separator with the following parameters:
of listing 2.18, you create a line separator with the following parameters:
- The line width— In this case, a line with a thickness of 1 pt.
- The percentage that needs to be covered— In this case, 100 percent of the available width.
- A color— In this case, null, meaning that the default color will be used.
- The alignment— This only makes sense if the percentage isn’t 100 percent.
- The offset— In this case, 2 pt below the baseline.
If this object isn’t sufficient for your needs, you can write your own subclass of VerticalPositionMark, or your own (custom) implementation of the DrawInterface.
Listing 2.19. StarSeparator.java
public class StarSeparator implements DrawInterface {
  ...
  public void draw(PdfContentByte canvas,
    float llx, float lly, float urx, float ury, float y) {
    float middle = (llx + urx) / 2;
    canvas.beginText();
    canvas.setFontAndSize(bf, 10);
    canvas.showTextAligned(Element.ALIGN_CENTER,
      "*", middle, y, 0);
    canvas.showTextAligned(Element.ALIGN_CENTER,
      "*  *", middle, y -10, 0);
    canvas.endText();
  }
}
Observe that the StarSeparator object doesn’t implement the Element interface. This means you can’t add it directly to the Document. You need to wrap it in a Chunk object first.
Separator Chunks
Listing 2.9 applied a dirty hack using negative leading to create a line layout with a Paragraph to the left (the English movie title) and a Paragraph to the right (the original movie title). I told you that’s not the way it’s should be done. Now let’s have a look at the proper way to achieve this.
Listing 2.20. DirectorOverview2.java

Listing 2.20 wraps a DottedLineSeparator in a Chunk and uses it to separate the name of a filmmaker from the number of movies they have directed. The DottedLineSeparator is a subclass of the LineSeparator, with the main difference being that it draws a dotted line instead of a solid line. You can also set the gap between the dots using the setGap() method.
Some of the VerticalPositionMarks in figure 2.10 act as separators to distribute content over a line. The name of the class no longer applies—you aren’t adding a mark at a vertical position anymore. Instead you’re using the object to separate the movie title from the year when the movie was produced. You could use multiple separators to distribute the title, the run length, and the production year: iText will look at the remaining white space for every line and distribute it equally over the number of separator Chunks.
Figure 2.10. Dotted line and other separators

Another way to distribute the content of a line is to use tabs.
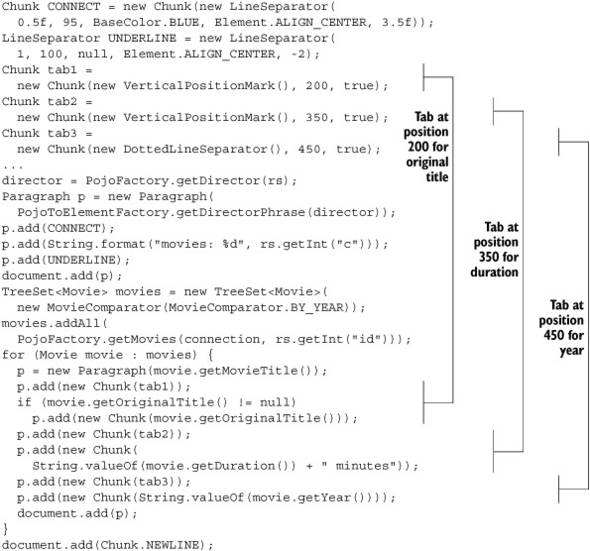
Tab Chunks
Figure 2.11 shows how you can distribute the English movie title, the original title, the run length, and the year the movie was produced over one or more lines using tabs. If ordinary separator Chunks were used, the content wouldn’t have been aligned in columns.
Figure 2.11. Chunks acting as tab positions

One English movie title and its corresponding original title don’t fit in the available space. A new line is used because of the way you’ve defined the tab Chunk. If you change true into false in the tab Chunk constructors, no line break will occur; the text will overlap instead.
Listing 2.21. DirectorOverview3.java
You can use any DrawInterface to create a separator or tab Chunk, and you can use these Chunks to separate content horizontally (within a paragraph) or vertically (lines between paragraphs). Now it’s time to discuss the other building blocks shown in the class diagram in figure 2.1.
2.3. Adding Anchor, Image, Chapter, and Section objects
In the previous examples, you’ve used every field shown in the ERD in figure 2.2, except for one: the field named imdb. This field contains the ID for the movie on imdb.com, which is the Internet Movie Database (IMDB).
Wouldn’t it be nice to link to this external site from your documents? And what kind of internal links could you add to a document? If you browse the resources that come with the book, you’ll see that the imdb field is also used as part of the filename for the movie poster of each movie. The movie Superman Returns has the ID 0348150 at IMDB. This means that you’ll find a 0348150.jpg file in the posters directory, which is a subdirectory of the resources folder.
In this section, you’ll work with different types of links: internal and external. You’ll create a table of contents automatically and get bookmarks for free, using the Chapter and Section objects. Finally, you’ll learn how to add images.
2.3.1. The Anchor object: internal and external links
What would the internet be without hypertext? How would you browse the web without hyperlinks? It’s almost impossible to imagine a web page without <a> tags. But what about PDF documents?
There are different ways to add a link to a PDF file using iText. In this section, you’ll add references and destinations using the Anchor object, as well as by setting the reference and anchor attributes of a Chunk. You’ll discover more alternatives in chapter 7.
Adding Anchor Objects
In listing 2.22, three Anchor objects are created. The first Anchor, with a country name as its text, will act as a destination. It’s the equivalent of <a name="US"> in HTML, where US is the id of a country in the database. The third anchor, with the text “Go back to the first page.” will be an internal link acting as <a href="#US">. It will allow the reader to jump to the destination with name “US” (located on the first page). iText recognizes this reference as a local destination because you’re adding a number sign (#) to the name, just as you would do in HTML.
Listing 2.22. MovieLinks1.java

The second Anchor is a link to an external resource. In this case, to a specific page on the IMDB website. http://www.imdb.com/title/tt0348150/ refers to a page with information about the movie Superman Returns.
There’s also another way to achieve the same result.
Remote Goto, Local Destination, and Local Goto Chunks
Listing 2.23 creates a PDF document with an opening paragraph, a list of countries, and a closing paragraph. The closing paragraph contains a link to jump to the top of the page. The other links are external.
Listing 2.23. MovieLinks2.java

In previous examples, you’ve set attributes of the Chunk object to underline text, to change the background color, and so on. You can also set attributes that provide even more functionality than the Anchor class:
- Chunk.setLocalDestination()— Corresponds to Anchor.setName(). You can use it to create a destination that can be referenced from within the document, or from another document.
- Chunk.setLocalGoto()— Corresponds to Anchor.setReference(), where the reference is a local destination. You don’t need to add a # sign when using this method.
- Chunk.setRemoteGoto()— Can refer to any of the following:
- An external URL— Defined by a String or a java.net.URL object; this corresponds to Anchor.setReference().
- A page in another PDF document— The document created in the MovieLinks2 example refers to page 1 in the file movie_links_1.pdf, a file generated by MovieLinks1.
- A destination in another PDF document— Listing 2.23 refers to the country code in movie_links_1.pdf.
You can use the movie_links_2.pdf file, which lists 32 countries, as a clickable table of contents (TOC) for the movie_links_1.pdf file, which lists the movies that were produced in these countries.
The next example will explain how to create a different type of TOC: the bookmarks panel in Adobe Reader. Note that bookmarks are often referred to as outlines in the context of PDF.
2.3.2. Chapter and Section: get bookmarks for free
If you scroll in the bookmarks panel shown in figure 2.12, you’ll see entries numbered from 1 to 7: Forties, Fifties, Sixties, Seventies, Eighties, Nineties, and Twenty-first century. You can create these entries by organizing the content in chapters. Every Chapter in this PDF document contains one or more Section objects. In this case, years that belong to the forties, fifties, and so on. In figure 2.12, there are also subsections with titles of movies.
Figure 2.12. A PDF with bookmarks

Let’s compare listing 2.24 and figure 2.12. The chapter number is passed as a parameter when constructing the Chapter object. By default, a dot is added to the number, but you can change this with the setNumberStyle() method. Sections are created using the addSection() method. The title passed as a parameter when constructing a Chapter or Section is shown on the page and is used as the title for the bookmark. If you want to use a different title in the outline tree, you can use setBookmarkTitle(). You can change the indentation of a Chapter or Section by using different methods: setIndentation() changes the indentation of the content but doesn’t affect the title; setIndentationLeft() and setIndentationRight() apply to the content and the title. Observe that the subsections aren’t numbered 5.4.1., 5.4.2, 5.4.3 ... but 1., 2., 3. ... because the number depth has been reduced to 1 with setNumberDepth().
Listing 2.24. MovieHistory.java

As shown in the class diagram in figure 2.1, Section also implements an interface named LargeElement. In chapter 1, you learned that iText tries to write PDF syntax to the OutputStream, freeing memory as soon as possible. But with objects such as Chapter, you’re creating content in memory that can only be rendered to PDF when you add them to the Document object. This means that the content of several pages can be kept in memory until iText gets the chance to generate the PDF syntax.
There are two ways to work around this:
- Define the Chapter as incomplete, and add it to the Document in different pieces; you’ll see how to do this in chapter 4, after we discuss another LargeElement, PdfPTable.
- Create the outline tree using PdfOutline instead of putting content in Chapter or Section objects. This will be discussed in chapter 7, where you’ll discover that PdfOutline offers much more flexibility.
We’ve covered almost all the objects in the class diagram. Only two objects remain: Rectangle and Image.
2.3.3. The Image object: adding raster format illustrations
You created Rectangle objects in chapter 1 to define the page size, but there’s very little chance you’ll ever need to add a Rectangle object with Document.add(). We’ll find better ways to draw shapes in chapter 3, but let’s take a look at a simple example for the sake of completeness.
Listing 2.25. MoviePosters1.java
Rectangle rect = new Rectangle(0, 806, 36, 842);
rect.setBackgroundColor(BaseColor.RED);
document.add(rect);
The code draws a small red square in the upper-left corner of the first page.
Adding an Image
To add an Image to a PDF document, do this:
Listing 2.26. MoviePosters1.java (continued)
document.add(new Paragraph(movie.getMovieTitle()));
document.add(
  Image.getInstance(String.format(RESOURCE, movie.getImdb())));
iText comes with different classes for different image types: Jpeg, PngImage, GifImage, TiffImage, and so on. All these classes are discussed in detail in chapter 10. They either extend the Image class, or they are able to create an instance of the Image class.
You could use these separate classes to create a new Image, but it’s easier to let the Image class inspect the binary image and decide which class should be used, based on the contents of the file. That’s one thing less to worry about.
The Image Sequence
The result of the code in listing 2.26 is shown to the left in figure 2.13. Observe that the poster of the movie Betty Blue didn’t fit on page 3. As a result, the title of the next movie, The Breakfast Club, is added on page 3, and the poster is added on page 4. This is the default behavior: iText tries to add as much information as possible on each page.
Figure 2.13. Adding images to a PDF document
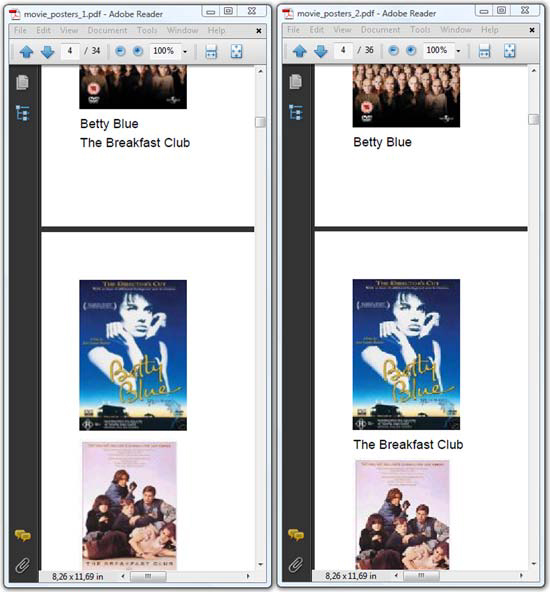
This may be considered undesired behavior in some projects. If that’s the case, you can use this method:
Listing 2.27. MoviePosters2.java
PdfWriter.getInstance(document,
  new FileOutputStream(filename)).setStrictImageSequence(true);
The resulting PDF is shown on the right in figure 2.13. The method setStrictImageSequence() allows you to force iText to respect the order in which content is added.
Changing the Image Position
In figure 2.14, the alignment of the image is changed so that the film information is put next to the movie poster.
Figure 2.14. Resized images

This is done with the setAlignment() method. Possible values for this method are:
- Image.LEFT, Image.CENTER, or Image.RIGHT— These define the position on the page.
- Image.TEXTWRAP or Image.UNDERLYING— By default, iText doesn’t wrap images. When you add an Image followed by text to a Document, the text will be added under the image, as shown in figure 2.13. With TEXTWRAP, you can add text next to the Image, except when you’re using Image.CENTER. With UNDERLYING, the text will be added on top of the Image (text and image will overlap).
All of this doesn’t apply if you use the method setAbsolutePosition(). With this method, you can define coordinates (X, Y) that will be used to position the lower-left corner of the image. The image will not follow the flow of the other objects.
Changing the Border
The PDF shown in figure 2.14 was generated using methods that are inherited from the Rectangle object. Listing 2.28 shows how to define a border, and how to change its width and color.
Listing 2.28. MoviePosters3.java
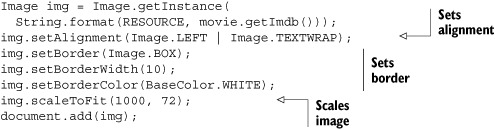
The Image.BOX value is shorthand for Rectangle.LEFT | Rectangle.RIGHT | Rectangle.TOP | Rectangle.BOTTOM, meaning that the image should have a border on all sides. You’ll learn more about drawing Rectangle objects in chapters 3 and 14.
Resizing Images
In listing 2.28, you’re also using scaleToFit(). You’re passing an unusually high width value (1000 pt) compared to the height value (72 pt). This ensures that all the images will have a height of one inch. The width will vary depending on the aspect ratio of the image.
FAQ
What is the relationship between the size and the resolution of an image in iText? Suppose you have a paper image that measures 5 in. x 5 in. You scan this image at 300 dpi. The resulting image is 1500 pixels x 1500 pixels, so if you get an iText Image instance, the width and the height will be 1500 user units. Taking into account that 1 in. equals 72 user units, the image will be about 20.83 in. x 20.83 in. when added to the PDF document. If you want to display the object as an image of 5 in. x 5 in., you’ll need to scale it. The best way to do this is with scalePercent(100 * 72 / 300).
There are different ways to change the dimensions of an image:
- The width and height parameters of scaleToFit() define the maximum dimensions of the image. If the width/height ratio differs from the aspect ratio of the image, either the width, or the height, will be smaller than the corresponding parameter of this method.
- The width and height parameters will be respected when using scaleAbsolute(). The resulting image risks being stretched in the X or Y direction if you don’t choose the parameters wisely. You can also use scaleAbsoluteWidth() and scaleAbsoluteHeight().
- scalePercent() comes in two versions: one with two parameters, a percentage for the width and a percentage for the height; and another with only one parameter, a percentage that will be applied equally to the width and the height.
It’s a common misconception that resizing images in iText also changes the quality of the image. It’s important to understand that iText takes the image as is: iText doesn’t change the number of pixels in the image.
FAQ
IText is adding the same image more than once to the same document. How can I avoid this? Suppose that you have an image.jpg file with a size of 100 KB. If you create ten different Image objects from this file, and add these objects to your Document, these different instances referring to image.jpg will consume at least 1000 KB, because the image bytes will be added 10 times to the PDF file. If you create only one Image instance referring to image.jpg, and you add this single object 10 times to your Document, the image bytes will be added to the PDF file only once. In short, you can save plenty of disk space if you reuse Image objects for images that need to be repeated multiple times in your document. For example, a logo that needs to be added to the header of each page.
When creating an Image instance from a file, you won’t always know its dimensions before or even after scaling it. You can get the width and height of the image with these methods:
- getWidth() and getHeight() are inherited from the Rectangle object. They return the original height and width of the image.
- getPlainWidth() and getPlainHeight() return the width and height after scaling. These are the dimensions of the image used to print it on a page.
- getScaledWidth() and getScaledHeight() return the width and height needed to print the image. These dimensions are equal to the plain width and height, except in cases where the image is rotated.
The difference between scaled width/height and plain width/height is shown in the next example.
Changing the Rotation
The rotation for images is defined counterclockwise. Listing 2.29 uses the setRotationDegrees() method to rotate an image –30 degrees; that’s 30 degrees to the right.
Using setRotation() with a rotation value of (float) -Math.PI / 6 would have had the same effect.
Listing 2.29. RiverPhoenix.java
Paragraph p = new Paragraph(text);
Image img = Image.getInstance(
  String.format("resources/posters/%s.jpg", imdb));
img.scaleToFit(1000, 72);
img.setRotationDegrees(-30);
p.add(new Chunk(img, 0, -15, true));
If you look at the poster for the movie Stand by Me, you’ll find out that it’s made up of 100 pixels x 140 pixels. These values are returned by getWidth() and getHeight(). When scaled to fit a rectangle of 1000 pixels x 72 pixels, the dimensions are changed into 51.42857 x 72—those are the values returned by getPlainWidth() and getPlainHeight().
In figure 2.15, you can see that the image needs more space. Due to the rotation, the horizontal distance between the lower-right corner and the upper-left corner of the image is 80.53845. The vertical distance between the upper-right corner and the lower-left corner is 88.068115. These values are returned by getScaledWidth() and getScaledHeight().
Figure 2.15. Rotated images, wrapped in Chunk objects

Something else is different in figure 2.15: each Image has been added to a Paragraph object, wrapped in a Chunk.
Wrapping Images in Chunks
This is yet another example of setting attributes for a Chunk. By creating a Chunk using an Image as the parameter, you can add the Image to other building blocks as if it were an ordinary chunk of text. The extra parameters in this Chunk constructor define an offset in the X and Y directions. The negative value in listing 2.29 causes the image to be added 15 pt below the baseline. You can also indicate whether the leading should be adapted to accommodate the image. If you don’t set the final parameter to true, the image risks overlapping with the other text (if the height of the image is greater than the leading).
This isn’t a definitive overview of what you can do with images. You’ve learned enough to change the properties of an image, but there’s more to learn about the bits and bytes of specific image types (TIFF, animated GIF, and so on), about using java.awt.Image, and about using image masks. All of this will be covered in chapter 10; now it’s time to round up what we’ve covered in chapter 2.
2.3.4. Summary
We’ve covered a lot of ground in this chapter. You learned about Chunk objects and several—not all—of a Chunk’s attributes; you’ll discover more attributes as you read on in part 1 of this book. You’ve worked with Phrases and Paragraphs, and you’ve been introduced to the Font and BaseFont classes. You’ve made Lists containing ListItems, and you’ve discovered different ways to use separator Chunks.
With the Anchor object and its alternatives, you’ve created internal and external links and destinations. The Chapter and Section classes were used to create bookmarks, but you’ll learn more about the outline tree and the LargeElement object in the chapters that follow. That’s also true for the Image object: you’ve learned how to use the most common methods, but you’ll learn more about the bits and bytes of images in chapter 10.
Up until now, you’ve worked with the building blocks of iText, which are often referred to as high-level objects. In the next chapter, you’ll discover the world of low-level PDF creation.