Chapter 3. Adding content at absolute positions
- Low-level access to page content, aka direct content
- Convenience methods for writing direct content
- Using the ColumnText object
- Reusing content with the PdfTemplate object
In chapter 1, you learned that there are different ways to add content to a document when generating a PDF file from scratch. In chapter 2, you learned to add high-level objects to a Document. Now you’re going to learn an approach that’s totally different: you’ll add content to a page using methods that are referred to as low-level operations because they write PDF syntax directly to the content stream of the page.
A complete overview of the PDF operators and operands will follow in chapter 14. This chapter will cover the basics, but will quickly move on to convenience methods that hide some of the complexity of PDF. We’ll also unleash the power of the ColumnText object, an object that allows you to add basic building blocks at absolute positions.
We’ll start with an example that mixes the high-level and low-level approaches.
3.1. Introducing the concept of direct content
As a first example, you’ll use high-level objects to create a postcard inviting people to the movie that will open the Foobar Film Festival; then you’ll add extra content at absolute positions in the document using low-level methods.
The page to the left in figure 3.1 is created by adding a Paragraph with the text “Foobar Film Festival” and an Image of the poster of Lawrence of Arabia. The Image was positioned using the setAbsolutePositions() method. The order in which these Elements were added doesn’t matter; document.add() always adds images to the image layer under the text layer.
Figure 3.1. Adding content using low-level methods to a page created with high-level objects

To the right is another page with the same Paragraph and Image, but now with a colored rectangle added under the image layer, and the text “SOLD OUT” added over the text layer. This can be achieved by writing to the direct content.
3.1.1. Direct content layers
Here is the source code used to create the PDF shown in figure 3.1.
Listing 3.1. FestivalOpening.java

How does this work? When you add content to a page—be it with Document.add() or otherwise—iText writes PDF syntax to a ByteBuffer that is wrapped in a PdfContentByte object. When a page is full, these buffers are added to the PDF file in a specific order. Each buffer can be seen as a separate layer, and iText draws these layers in the sequence indicated in figure 3.2.
Figure 3.2. The four content layers: 2 and 3 for the high-level objects; 1 and 4 for direct content

When a page is initialized, two PdfContentByte objects are created for the basic building blocks:
- A PdfContentByte object for text—The content of Chunks, Phrases, Paragraphs, and so on
- A PdfContentByte for graphics—The background of a Chunk, Images, the borders of a PdfPCell, and so forth
You can’t access the PdfContentByte objects of layers ![]() and
and ![]() directly—these layers are managed by iText internally. But there are two extra PdfContentByte objects: layers
directly—these layers are managed by iText internally. But there are two extra PdfContentByte objects: layers ![]() and
and ![]() .
.
- A layer that goes on top of the text and graphics— You can get an instance of this upper layer with the method PdfWriter.getDirectContent().
- A layer that goes under the text and graphics— You can get access to this lower layer with the method PdfWriter.getDirectContentUnder().
In iText terminology, adding content to these extra layers is called writing to the direct content, or low-level access because you’re performing low-level operations on a PdfContentByte object, as shown in listing 3.1. You’re also going to change the state, draw lines and shapes, and add text at absolute positions. But before you can do any of that, you need to know what the PDF reference says about the graphics state.
3.1.2. Graphics state and text state
The graphics state stack is defined in ISO-32000-1, section 8.4.2, as follows:
A PDF document typically contains many graphical elements that are independent of each other and nested to multiple levels. The graphics state stack allows these elements to make local changes to the graphics state without disturbing the graphics state of the surrounding environment. The stack is a LIFO (last in, first out) data structure in which the contents of the graphics state may be saved and later restored.
Let’s analyze this by means of a simple example.
Graphics State
In listing 3.1 you constructed a rectangle to be drawn under the existing content using the rectangle() method. This rectangle is a graphical element, and you’ll add five of them in the next example. See figure 3.3 and the next listing.
Figure 3.3. Repeating the same rectangle using different graphics states

Here you’ll change the way the graphical objects are rendered by changing the graphics state. In between, you’ll also save or restore the previous state.
Listing 3.2. GraphicsStateStack.java
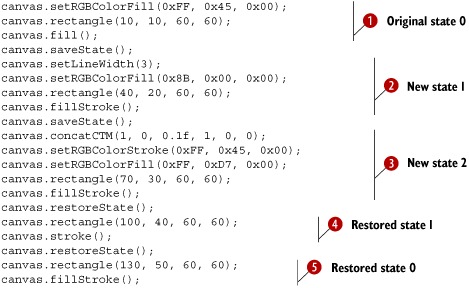
This is how the code should be interpreted:
- The first element is a rectangle measuring 60 by 60 user units—a square with sides of 60 pt. The square doesn’t have a border; it’s filled with the color orange, because you use the fill() method after changing the fill color to orange (#FF4500).
- The second square is colored dark red (#8B0000). It has a border in the default line color—black—because you use the fillStroke() method. Note that the border is 3 pt thick because you change the line width with the setLineWidth() method.
- This line width is kept for the third element, but the stroke color is changed to orange (#FF4500). The fill color is gold (#FFD700), but the shape is no longer a square. You use the same rectangle() method with the same width and height as before, but you change the current transformation matrix (CTM) in such a way that the square is skewed. The CTM will be discussed in detail in section 14.3.3.
- All the changes made to the graphics state to draw the third element are now discarded, and the graphics state used for the second element is restored. You might expect a square that is identical to the second element, but because you use stroke() instead of fillStroke() only the border is drawn, and the shape isn’t filled.
- For the final element, the original graphics state is restored. You use the fillStroke() method, so a border is drawn in the default line color, with the default line width: 1 user unit. It’s important that the saveState() and restoreState() methods are balanced in your code. You can’t invoke restoreState() if you haven’t performed a saveState() first; for every saveState(), you need a restoreState(). If they aren’t balanced, an Illegal-PdfSyntaxException will be thrown by the PdfContentByte.sanityCheck() method.
Note
In this chapter, you’re adding content at absolute positions. These absolute positions are defined with (x,y) coordinates with the lower-left corner of the page as the origin of the coordinate system.
The graphics state stack also applies to text.
Text State
Text state is a subset of graphics state. In section 2.2, you learned that a computer font is a program that knows how to draw glyphs. These glyphs are shapes that are filled with a fill color. No borders are drawn unless you change the text-rendering mode with setTextRenderingMode(). You used this text state operator in listing 3.1 to draw the words “SOLD OUT” in white letters with a red border. You also used setFontAndSize() to choose a font and a font size, setTextMatrix() to change the text matrix, and showText() to draw the glyphs. You’ll find an overview of all the possible graphics state and text state operators in section 14.4.
In the next section, you’ll add three tables to the film database and use the content of those tables to create a real-world example involving direct content.
3.1.3. A real-world database: three more tables
Figure 3.4 shows the ERD diagram of a film festival database. You’ll recognize one table: film_movietitle. That’s the same table you used in chapter 2. It is now connected to three new tables with a “festival_” prefix. These tables contain extra information about a movie in the Foobar Film Festival.
Figure 3.4. Festival database entity relationship diagram

The festival_entry table will help you find the movies that are shown at a certain edition of the film festival. Currently, the database only contains entries for the 2011 edition of the Foobar Film Festival, but you could easily add entries for other years. Every festival entry also refers to a category.
All the categories are described in the festival_category table. Categories have a name, a short keyword, possibly a parent—because there’s a hierarchy in the categories—and a color code that will be used when drawing movies on a timetable.
Every movie can have multiple screenings, listed in the festival_screening table. A screening is defined by a day, a time, and a place. Some screenings are reserved for the press only.
Creating a Timetable
The Foobar Film Festival involves three movie theaters: Cinema Paradiso, Googolplex, and The Majestic. Any resemblance to theaters in movies, or to the favorite multiplex cinema in The Simpsons, is purely coincidental.
In the examples that follow, you’ll create a timetable that looks like figure 3.5. Observe that three screens are reserved for the festival at Cinema Paradiso: CP.1, CP.2, and CP.3; four screens at the Googolplex: GP.3, GP.4, GP.7, and GP.8; and two at The Majestic: MA.2 and MA.3. During the film festival, different movies will be projected on these screens between 9:30 a.m. and 1:30 a.m. the next day.
Figure 3.5. Film festival timetable

You’ll start by drawing the grid with the different locations and time slots, using a series of graphics state operators and operands.
Drawing the Grid
In listing 3.2, you drew rectangles using the rectangle() method. Now you’ll use a sequence of moveTo(), lineTo(), and closePath() operators to construct a path that will be drawn with the stroke() method.
Listing 3.3. MovieTimeTable.java

In this case, it would have been simpler to use the rectangle() method, but as soon as you need to draw other shapes, you’ll use these methods to draw straight lines. You’ll use the different curveTo() methods to draw curves.
Listing 3.3 also shows that you can combine closePath() and stroke() in one closePathStroke() method. Or, in PDF syntax, the h and the S operators can be replaced by s. This is an example of a shorthand notation inherent to the PDF specification.
iText also offers convenience methods that combine operators to compensate for operations that can’t be done with only one PDF operator. For instance, there’s no operator to draw an arc or a circle in the PDF syntax. In iText, you can use the methods arc(), ellipse(), and circle(), which will invoke a sequence of curveTo() methods to draw the desired shape.
Next you need to draw the dashed lines for the time slots. The width of each time slot, defined in the constant WIDTH_TIMESLOT, corresponds to half an hour.
Listing 3.4. MovieTimeTable.java (continued)

In listing 3.3, you used stroke() or closePathStroke() after drawing every shape, but that wasn’t really necessary. You can postpone changing the state until after you’ve constructed all the paths. When you call stroke() in listing 3.4, the lines are drawn as 0.3 pt thick, gray dashed lines.
You’ve constructed the grid using the methods drawTimeTable() and drawTimeSlots(); now it’s time to add screenings to the grid.
Drawing Time Blocks
Just like you did on many occasions in chapter 2, you can let the PojoFactory query the database for you. Besides Movie, Director, and Country objects, the PojoFactory can create collections of Category, Entry, and Screening POJOs. Here you’ll use a method that returns a List of locations (String objects) and festival days (java.sql.Date).
Listing 3.5. MovieTimeBlocks.java

You reuse the drawTimeTable() method from listing 3.3 to draw the table to the lowest direct content layer, and the drawTimeSlots() method to draw dashed lines to the upper direct content layer.
The drawBlock() method that is called for every screening shouldn’t hold too many secrets for you.
Listing 3.6. MovieTimeBlocks.java (continued)

The fill color will correspond to the color of the category; see the color field in the festival_category table. The position, a Rectangle object, will be calculated based on the location and time stored in the festival_screening table. The “paint” of the rectangle will be added to the lower direct content layer. The border will be drawn in the default state (black, 1 pt thick) to the upper direct content layer. This means that the border will cover some of the dashed lines of the time slots, but the dashed lines will cover the colored rectangle. That way, you’ll be able to estimate the run length of each movie, based on the number of time slots intersecting with the rectangle. Figure 3.6 shows the results so far.
Figure 3.6. Timetable with movie time blocks

This timetable isn’t very useful because you haven’t yet added any text. You’ll do this in the next section, using the convenience methods available to add text to the direct content.
3.2. Adding text at absolute positions
In listing 3.1, you wrote “SOLD OUT” on top of a poster of the movie that is opening the film festival. You used methods such as setTextRenderingMode(), setTextMatrix(), and so on, but it’s not easy to create a complete document using these low-level methods. It’s easier to use convenience methods that do part of the work for you. They’ll demand fewer lines and reduce the complexity of your code.
3.2.1. Convenience method: PdfContentByte.showTextAligned()
There was a lot of math involved when you added the words “SOLD OUT” in listing 3.1. You had to calculate the sine and the cosine of the rotation angle. You had to measure the length of the String “SOLD OUT” to determine the (x,y) coordinates so that the text was more or less centered. This length doesn’t depend solely on the characters in the String; you also needed to know which font was used to render it. The words “SOLD OUT” will have a different length in Helvetica than the same String in Times-Roman, even if the same font size is used.
Measuring a String
You can calculate the length of a String if you have an instance of the BaseFont class that will be used to draw the glyphs. In listing 3.7, you’ll measure the length of the String “Foobar Film Festival” using the getWidthPoint() method. This will return a width in points. For example, when you use the getWidthPoint() method with the font Helvetica and a font size of 12 pt, the resulting length is 108.684 pt. When you use the font program times.ttf with the same font size, the result is 100.572 pt. That’s a difference of 0.11 in.
Listing 3.7. FoobarFilmFestival.java

Note that the Chunk object also has a getWidthPoint() method. You could use it to measure the width of a Chunk in points. While you’re at it, you could also measure the ascent and descent of the String.
Ascent and Descent of the String
The ascent is the space needed by a glyph above the baseline, and the descent is the space below the baseline. In listing 3.8, you’ll calculate the ascent and descent of the font Helvetica using the getAscentPoint() and getDescentPoint() methods.
Listing 3.8. FoobarFilmFestival.java (continued)
document.add(new Paragraph("Ascent Helvetica: "
  + bf_helv.getAscentPoint(foobar, 12)));
document.add(new Paragraph("Descent Helvetica: "
  + bf_helv.getDescentPoint(foobar, 12)));
You can calculate the height of a String by subtracting the descent from the ascent.
Note
The font size isn’t the height of any specific glyph; it’s an indication of the vertical space used by a line of text.
Looking at figure 3.7, you might assume that the font size is about 9 pt, but you would be wrong. The ascent for the String in Helvetica is 8.328. You need to add the descent to the ascent, but the value of the descent is unusually low in this example because it doesn’t include glyphs like “g”, “j”, “p”, “q”, or “y”, which have a descent that exceeds –0.18.
Figure 3.7. Measuring and positioning text: width, ascent, and descent of a String

The word “Foobar” is magnified so you can see the descent caused by the rounding of the glyphs “o”, “b”, and “a”. In the same screenshot, you can see that the same String was added a couple of times more, at absolute positions relative to a grid of lines.
Positioning a String
Now that you know how to measure the length of a String, you can compute the (x,y) coordinates and use them to change the text matrix so that the text is right aligned or centered (listing 3.9). Fortunately, there’s an easier way to achieve this. You can use the setTextAligned() method, which will act as a shorthand notation for two types of transformations: a translation and a rotation. You’ve already seen the result in figure 3.7.
Listing 3.9. FoobarFilmFestival.java (continued)
canvas.beginText();
canvas.setFontAndSize(bf_helv, 12);
canvas.showTextAligned(Element.ALIGN_LEFT, foobar, 400, 788, 0);
canvas.showTextAligned(Element.ALIGN_RIGHT, foobar, 400, 752, 0);
canvas.showTextAligned(Element.ALIGN_CENTER, foobar, 400, 716, 0);
canvas.showTextAligned(Element.ALIGN_CENTER, foobar, 400, 680, 30);
canvas.showTextAlignedKerned(Element.ALIGN_LEFT, foobar, 400, 644, 0);
canvas.endText();
- The text starts at position x = 400; the baseline y = 788.
- The text ends at position x = 400; the baseline y = 752.
- The text is centered at position x = 400, y = 716.
- The text is centered at position x = 400, y = 680, and rotated 30 degrees. The showTextAlignedKerned() method in listing 3.9 shows the same String, but it takes into account the kerning of the glyphs that were used.
Kerning
Kerning is the process of adjusting the space between the glyphs in a proportional font. When taking advantage of kerning, you can save some space between a series of specific glyph combinations. For instance, you can move the glyphs of the word “AWAY” closer to each other, due to the shapes of the A and the W. In listing 3.9, the kerned version of the String “Foobar Film Festival” is only slightly shorter than the nonkerned version. Here you compute the width of this String measured in points.
Listing 3.10. FoobarFilmFestival.java (continued)
width_helv = bf_helv.getWidthPointKerned(foobar, 12);
c = new Chunk(foobar + ": " + width_helv, helvetica);
document.add(new Paragraph(c));
The result indicates that the kerned version measures 107.664 pt; the String without kerning measures 108.684 pt.
Adding Text to the Timetable
Returning to the film festival timetable, you can now add the names of the movie theaters and the screens, the time slot information, and the information about the day and date. For instance, you can add the text “Day 5” and “2011-10-16” shown in figure 3.5.
Listing 3.11. MovieTextInfo.java
protected void drawDateInfo(Date day, int d,
  PdfContentByte directcontent) {
  directcontent.beginText();
  directcontent.setFontAndSize(bf, 18);
  float x, y;
  x = OFFSET_LOCATION;
  y = OFFSET_BOTTOM + HEIGHT + 24;
  directcontent.showTextAligned(Element.ALIGN_LEFT,
    "Day " + d, x, y, 0);
  x = OFFSET_LEFT + WIDTH;
  directcontent.showTextAligned(Element.ALIGN_RIGHT,
    day.toString(), x, y, 0);
  directcontent.endText();
}
Note that the sanityCheck() method mentioned in section 3.1.2 that checks for unbalanced saveState() and restoreState() sequences also looks for possible problems related to text state:
- Unbalanced beginText() and endText() combinations
- Text state operators outside a beginText() and endText() sequence
- Text for which you forgot to set a font and size
The showTextAligned() examples you’ve worked with so far have been very straightforward, but wouldn’t it be nice if you could create a Phrase object, and add that object at an absolute position? That’s what you’ll do in the next section with the showTextAligned() method of the ColumnText object.
3.2.2. Convenience method: ColumnText.showTextAligned()
Next, instead of adding a String after selecting a BaseFont object and a font size, as you did in listing 3.9, you create a Phrase containing text in a certain Font.
Listing 3.12. FoobarFilmFestival.java (continued)
Phrase phrase = new Phrase(foobar, times);
ColumnText.showTextAligned(canvas,
  Element.ALIGN_LEFT, phrase, 200, 572, 0);
ColumnText.showTextAligned(canvas,
  Element.ALIGN_RIGHT, phrase, 200, 536, 0);
ColumnText.showTextAligned(canvas,
  Element.ALIGN_CENTER, phrase, 200, 500, 0);
ColumnText.showTextAligned(canvas,
  Element.ALIGN_CENTER, phrase, 200, 464, 30);
ColumnText.showTextAligned(canvas,
  Element.ALIGN_CENTER, phrase, 200, 428, -30);
Apart from the fact that you no longer need beginText() and endText() sequences, there seems to be little difference, but you’ll need fewer lines of code and less math for more complex Phrases.
Positioning a Phrase
A Phrase can be composed of a series of Chunk objects. By adding a Phrase at an absolute position, you can easily switch fonts, font sizes, and font colors. iText will calculate the offset of every Chunk inside the Phrase, and change the text state accordingly for you.
In the next step, you draw a big “P” with a white font color on top of all the colored rectangles that represent preview screenings that are reserved for the press.
Listing 3.13. MovieTextInfo.java (continued)
Font f = new Font(bf, HEIGHT_LOCATION / 2);
f.setColor(BaseColor.white);
press = new Phrase("P", f);
...
protected void drawMovieInfo(Screening screening,
  PdfContentByte directcontent)
  throws DocumentException {
  if (screening.isPress()) {
    Rectangle rect = getPosition(screening);
    ColumnText.showTextAligned(directcontent,
      Element.ALIGN_CENTER, press,
       (rect.getLeft() + rect.getRight()) / 2,
       rect.getBottom() + rect.getHeight() / 4, 0);
  }
}
Although you’re working with high-level objects here, it’s possible to change their text state by setting Chunk attributes that we haven’t discussed yet.
Chunks: Scaling, Skewing, Rendering Mode
On the left side in figure 3.8, you can see the result of listing 3.12: the String “Foobar Film Festival” is added at an absolute position using different alignment options and different angles.
Figure 3.8. Adding text with ColumnText.showTextAligned()

On the right side of figure 3.8, the same String is added left aligned, but the text is scaled or skewed, or the rendering mode was changed.
Listing 3.14. FoobarFilmFestival.java (continued)

You can change the width of a Chunk with the setScaling() method. In the top right of figure 3.8, the words “Foobar Film Festival” are scaled to 50 percent of their width, but the height of the glyphs is preserved. This means that the aspect ratio of the letters is changed. You have to be careful not to exaggerate the scaling. At some point, your text will become almost illegible.
The setSkew() method expects two parameters. With the first parameter, you change the angle of the baseline. That’s what happened in the second line on the right side of figure 3.8: the angle of the baseline is changed to 15 degrees. The second parameter can be used to define the angle between the characters and the baseline. The third line on the right in figure 3.8 looks as if an italic font were used. In reality, the glyphs were skewed 25 degrees.
Note
If you have to use a font for which you can’t find the corresponding font with italic or oblique style, you can use setSkew(0,25) to simulate italics.
Finally, there’s the setTextRenderMode() method. These are possible values for the first parameter:
- PdfContentByte.TEXT_RENDER_MODE_FILL— This is the default rendering mode; the glyph shapes are filled, not stroked.
- PdfContentByte.TEXT_RENDER_MODE_STROKE— This causes the glyphs to be stroked, not filled. This is shown in figure 3.8: the letters are hollow.
- PdfContentByte.TEXT_RENDER_MODE_FILL_STROKE— This changes the text state so that the glyphs are filled and stroked. This state was used in figure 3.1 to cover existing content with the words “SOLD OUT” in white letters with red contours.
- PdfContentByte.TEXT_RENDER_MODE_INVISIBLE— This will make all the text that is added invisible. The text will be there, but it won’t be visible.
Two extra parameters define the line width and the color that will be used to stroke the glyph. If you pass a null value for the stroke color, the fill color (defined in the Chunk’s Font object) will be used. The final line in figure 3.8 looks as if a bold font were used.
Tip
If you have to use a font for which you can’t find the corresponding font with bold style, you could use setTextRenderMode(PdfContentByte .TEXT_ RENDER_MODE_FILL_STROKE, 0.5f, null) to simulate bold.
These attributes also work if you’re adding Chunks with document.add().
The timetable for the film festival is almost finished, as you can see in figure 3.9.
Figure 3.9. Timetable without movie titles

The only bits of information missing in the figure are the movie titles. It would be nice if you could add the text to the rectangles without having to scale the text or downsize the font size if the title is too long to fit the width of the rectangle. This can’t be done with the showTextAligned() method, to which you only pass a single set of (x,y) coordinates; you need an instance of the ColumnText object instead.
3.3. Working with the ColumnText object
In this section, you’ll learn about the different ways to use the ColumnText object: text mode if you only use Chunks and Phrases, composite mode if you want to use other types of high-level objects as well.
In listing 3.13, you wrote a showMovieInfo() method. If a screening was reserved for the press, you marked the corresponding time block of the movie with a white, uppercase “P”. You could try adding the movie title the same way, but the showText-Aligned() method isn’t able to wrap text. You also can’t use newlines in Strings or Chunks using any version of this method.
Let’s extend the previous example and reuse almost all of its methods. The only change involves the drawMovieInfo() method.
Listing 3.15. MovieCalendar.java

The result is shown in figure 3.10. Now you’re ready to go to the film festival!
Figure 3.10. The finished timetable, now with the movie titles

We aren’t finished discussing the ColumnText object yet. This example worked out fine because you were able to fit the content inside the rectangles reserved for the screenings. But what would have happened if the text didn’t fit? Also, you’ve been adding a Phrase object to the column to display its contents at an absolute position. Can you add other objects such as Paragraphs, Lists, and Images with the ColumnText object? The answer to the first question will be explained in section 3.3.1; the answer to the second question is “yes,” but not in text mode, only in composite mode.
3.3.1. Using ColumnText in text mode
In section 2.3.3, you created PDF documents with movie information that was organized in Paragraphs. Suppose you want to repeat this exercise, but now you want to organize the same information in columns, as is shown in figure 3.11.
Figure 3.11. Movie information, organized in columns

Instead of the setSimpleColumn() method from listing 3.15, which can be used for a single Phrase, you’ll use addText() to add a series of Phrases and Chunks.
Adding Content with Addtext()
Take a look at the code used to produce the columns shown in figure 3.11.
Listing 3.16. MovieColumns1.java

- Just as in listing 3.15, you create a ColumnText object, passing a PdfContentByte object as a parameter.
- You add content (Phrase and/or Chunk objects) to this column with the addText() method.
- You set the properties for the text that will be rendered, such as the alignment, the leading, extra space between paragraphs, and special indentations.
- You perform some initializations. The linesWritten parameter informs you about the number of lines that have been written. The column variable (keeping track of the column number) and the status of the ColumnText object are more important.
- You want all the content added to the ColumnText object to be rendered, so you invoke the go() method in a loop as long as the ColumnText.NO_MORE_TEXT bit isn’t set in the status value.
- You define the dimensions of the column where the next block of text will be added. In this case, COLUMNS is a two-dimensional array, containing two sets of four values (one rectangle for each column). You also define the Y position; that’s the vertical start position of the text in the column.
- Lines of text are written as soon as you invoke the go() method. Text that didn’t fit the current column remains in the ColumnText object. The content that was rendered is consumed; it’s no longer present in the ColumnText object.
- Each time a column is written, you have to switch to the next column. If there are no more columns on the current page, you have to go to a newPage(). In this example, you’re changing the properties of the text. The setAlignment() method is similar to the Paragraph method with the same name. It takes the same parameters: Element.ALIGN_LEFT, Element.ALIGN_RIGHT, Element.ALIGN_JUSTIFIED, and Element.ALIGN_JUSTIFIED_ALL. The setLeading() method comes in two flavors: in listing 3.16, you define an absolute leading of 0 pt and a relative leading of 1.2. The resulting leading will be 0 + 1.2 x 12 pt (the font size) = 14.4 pt. In listing 3.17, you’ll use the other setLeading() method to define a leading of 14 pt. Let’s examine the properties that can be set for the text that has to be rendered.
Columntext Properties
Although you aren’t using Paragraph objects here (when in text mode, Paragraphs are treated as Phrase objects) the setExtraParagraphSpace() method gives you a means to help the reader distinguish different paragraphs in a visual way. In listing 3.16, you tell iText to add 6 pt whenever a new portion of text is started on a new line. Another visual aid can be provided with the setFollowingIndent() method—this sets the left indentation of the lines that follow the first line. Listing 3.17 shows its counterpart: setIndent() can be used to change the indentation of the first line. There’s also a setRightIndent() method.
In section 2.2.4, you learned how to change the character/space ratio at the PdfWriter level for all the basic building blocks at once. With ColumnText, it’s possible to change the character/space ratio in a more fine-grained way. See the setSpaceCharRatio() method in listing 3.17.
Adding Content in Small Portions
In listing 3.16, you filled a ColumnText object with all the movie information that is present in the movie database. Then you rendered all that content until the ColumnText object had no more data.
There are 120 movies in the database, so at some point you have a ColumnText object that contains 120 Phrase objects. Maybe it’s better to invoke go() more frequently to avoid the memory building up in the ColumnText object.
Listing 3.17. MovieColumns2.java

You now invoke the go() method in the same loop that is used to add movies to the ColumnText object. The content is consumed immediately; if it doesn’t fit the current column, it’s added to the next one.
This brings us to the next question: what if you want to keep all the information about a specific movie together in one column? What if you don’t want the information to be split into two parts?
Adding Content in Simulation Mode
To answer the previous questions, you use a special go() method introduced here.
Listing 3.18. MovieColumns3.java

Listing 3.18 is almost identical to listing 3.17, except that you now invoke the go() method twice. The first time go() is simulated: nothing is added for real, but the content is consumed. If all the content of the column is gone, you need to go back to the initial Y position obtained with the getYLine() method, fill the column a second time, and then perform go() for real. If the content wasn’t entirely consumed, you have to switch to the next column and add the entire portion of movie information there.
Note
The getYLine() method returns the Y position on the page after the last line was written, either for real or in simulation mode. You can use this method to find out the height that is needed to show the content, given a certain column width. If you want to center text vertically inside a column, you can add the text in simulation mode first to determine the height that is needed; then you can compute the offset like this: (available height – needed height) / 2. You can use this offset when adding the column for real.
It’s important to notice that you don’t use addText() just before the second go(). Instead you use setText(). The setText() method removes all the unconsumed text that may still be present in the column; otherwise you’d add portions of the movie information twice.
Note
The basic building blocks discussed in chapter 2 can be reused. They can be added more than once to the same, or to a different, document. This isn’t true for the ColumnText object. Each ColumnText object belongs to a specific PdfWriter, and it can’t be used more than once; the go() method consumes its content.
This technique is also used in the PDF shown in figure 3.12. There was space available in the first column of the page to the right, but the content was added to the second column to keep it together.
Figure 3.12. Irregular columns

This screenshot also demonstrates another feature that is available when in text mode: irregular columns. As you can see, the columns in figure 3.12 are no longer rectangular. The border of each column is defined as a polygon, resulting in an irregular shape, so the text flows around the boxes.
Irregular Columns
Setting irregular columns is possible by using a variation on the original example in listing 3.16.
Listing 3.19. MovieColumns4.java

The drawRectangles() method draws the squares that are shown in figure 3.12. This example is almost identical to the previous one, except that you no longer use the setSimpleColumn() method, but setColumns(). The parameters RIGHT and LEFT look like this:
public static final float[][] LEFT =
  { { 36,806, 36,670, 108,670, 108,596, 36,596, 36,36 },
    { 299,806, 299,484, 336,484, 336,410, 299,410, 299,36 } };
public static final float[][] RIGHT =
  { { 296,806, 296,484, 259,484, 259,410, 296,410, 296,36 },
    { 559,806, 559,246, 487,246, 487,172, 559,172, 559,36 } };
LEFT contains the coordinates of the line that is used for the left border of the two columns. RIGHT defines the right borders.
Using irregular columns isn’t allowed in composite mode.
3.3.2. Using ColumnText in composite mode
So far, you’ve only used Phrase and Chunk objects and added them to a ColumnText object using the methods addText() and setText(). In this section, you’ll add other building blocks using the addElement() method. Invoking the addElement() method on the ColumnText object automatically switches you from text mode to composite mode.
Adding Content with Addelement()
Figure 3.13 shows a page in landscape format with four columns defined. Image, Paragraph, List, and Chunk objects have been added to it.
Figure 3.13. Columns in composite mode

Listing 3.20 shows how the content was added to the ColumnText object.
Listing 3.20. ColumnsMovies1.java
public void addContent(ColumnText ct, Movie movie, Image img) {
  ct.addElement(img);
  ct.addElement(new Paragraph(movie.getTitle(), FilmFonts.BOLD));
  if (movie.getOriginalTitle() != null) {
    ct.addElement(
      new Paragraph(movie.getOriginalTitle(), FilmFonts.ITALIC));
  }
  ct.addElement(PojoToElementFactory.getDirectorList(movie));
  ct.addElement(PojoToElementFactory.getYearPhrase(movie));
  ct.addElement(PojoToElementFactory.getDurationPhrase(movie));
  ct.addElement(PojoToElementFactory.getCountryList(movie));
  ct.addElement(Chunk.NEWLINE);
}
This addContent() method is used in this bit of code ![]() which doesn’t differ that much from the listings in the previous section demonstrating text mode.
which doesn’t differ that much from the listings in the previous section demonstrating text mode.
Listing 3.21. ColumnsMovies1.java (continued)

Again, you’re using the go() method twice—once in simulation mode, and once for real—to keep the information about a movie together in the same column.
Line ![]() is important because it makes sure the content is added only once! Omit this line, and you’ll notice that part of the content
is added twice.
is important because it makes sure the content is added only once! Omit this line, and you’ll notice that part of the content
is added twice.
Properties of the Columntext Object Versus Element Properties
As soon as you start using addElement(), all the content that was added in text mode previously and that hasn’t been rendered yet will be cleared. ColumnText properties, such as the leading and the alignment, will be ignored. Instead, the properties of the Elements that were added will be used.
Figure 3.14 shows four columns with Paragraphs that are centered, right-aligned, and justified.
Figure 3.14. Alignment in composite mode

You can reuse listing 3.21 to create the result in figure 3.14 by just changing the addContent() method from listing 3.20 to what is shown next.
Listing 3.22. ColumnsMovies2.java
public void addContent(ColumnText ct, Movie movie) {
  Paragraph p;
  p = new Paragraph(new Paragraph(movie.getTitle(), FilmFonts.BOLD));
  p.setAlignment(Element.ALIGN_CENTER);
  p.setSpacingBefore(16);
  ct.addElement(p);
  if (movie.getOriginalTitle() != null) {
    p = new Paragraph(movie.getOriginalTitle(), FilmFonts.ITALIC);
    p.setAlignment(Element.ALIGN_RIGHT);
    ct.addElement(p);
  }
  p = new Paragraph();
  p.add(PojoToElementFactory.getYearPhrase(movie));
  p.add(" ");
  p.add(PojoToElementFactory.getDurationPhrase(movie));
  p.setAlignment(Element.ALIGN_JUSTIFIED_ALL);
  ct.addElement(p);

  p = new Paragraph(new Chunk(new StarSeparator()));
  p.setSpacingAfter(12);
  ct.addElement(p);
}
It’s not possible to create irregular columns in composite mode, but you could work around this by adding the content in small portions, changing the column definition after every go().
The difference between text mode and composite mode will also matter in the next chapter when you create PdfPCell objects, but first we’ll return to the movie timetable. We won’t change the content. The result will look identical to the PDF shown in figures 3.5 and 3.10, but you’ll learn how to reduce the file size by reusing data that is added multiple times.
3.4. Creating reusable content
In this section, we’ll discuss two types of reusable content: Images and PdfTemplate objects.
Do you remember section 2.3.3 about the Image object? In an FAQ, I explained that you can add the same image to a document more than once, but that you should reuse the same Image instance if you want to avoid the image bytes being added more than once. In normal circumstances, the bits and bytes of an image are stored in separate stream objects in the PDF file. Pages that contain such an image refer to this external object. Such an object is also known as an XObject.
An external object (XObject) is an object defined (in ISO-32000-1, section 8.2) outside the content stream and referenced as a named resource. The interpretation of an XObject depends on its type. An image XObject defines a rectangular array of color samples to be painted; a form XObject is an entire content stream to be treated as a single graphics object.
There are other types of XObjects, but image and form XObjects are the most important ones.
3.4.1. Image XObjects
You’ve already worked with image XObjects when you added Images to a Document. In figure 3.2, you saw that iText adds these images under the text objects for which you’ve used document.add(). But what if you want to add an image on top of the text?
Adding an Image to the Top Layer
Figure 3.15 shows a PDF document that resembles the one shown in figure 3.1. The code to create it is in listing 3.23. The Paragraph “Foobar Film Festival” was added to the Document, but the text is covered by an Image. Note that the text is present in the content stream: if you look closely at figure 3.15, you can see that I was able to select the text. If I copied the content to the clipboard, it would read: “Foobar Film Festival”. Adobe Reader also offers to look up the word “Foobar”.
Figure 3.15. Image covering text

Listing 3.23. ImageDirect.java

If you look inside the PDF, you’ll see the following PDF syntax:
q
BT
30 386 Td
11.87 -33 Td
/F1 22 Tf
(Foobar Film Festival)Tj
-11.87 0 Td
ET
Q
q 232 0 0 362 25.5 27 cm /img0 Do Q
The part between the first q/Q sequence is responsible for drawing the words “Foobar Film Festival”. The part between the second q/Q changes the current transformation matrix (CTM). Using the Do operator, you add an image of 232 by 362 user space units at position x = 25.5 and y = 27. The content of the image (the bits and bytes) are kept outside the content stream.
Each page has a page dictionary with numerous key-value pairs. The value corresponding to the /Resources key will tell you where to find the resources that are used in the page:
/Resources<</XObject<</img0 1 0 R>> ... >>
As you can see, there’s an entry for XObjects, and it tells you that /img0 can be found in object 1: the stream containing the image bytes. Note that I omitted some of the other types of resources, such as references to the fonts that were used.
In the previous chapter, you learned how to translate, scale, and rotate Image objects, but adding an image to the direct content gives you more power: using the CTM, you can create any two-dimensional transformation you want.
Skewing Images
If you want to know how I created figure 3.2, you should take a look at the code used to create figure 3.16, shown in listing 3.24.
Figure 3.16. Skewing an image

There’s plenty of algebra involved in this skewing transformation. The details will be explained in section 14.3.3.
Listing 3.24. ImageSkew.java
Image img = Image.getInstance(RESOURCE);
writer.getDirectContent().addImage(img,
  img.getWidth(), 0,
  0.35f * img.getHeight(), 0.65f * img.getHeight(), 30, 30);
The extra parameters passed to the addImage() method in listing 3.24 are reflected in the PDF syntax.
q 232 0 126.7 235.3 30 30 cm /img0 Do Q
If you want to prevent the creation of an image XObject, you can add the image as an inline object.
Inline Images
An image is considered inline when its bits and bytes are part of the content stream.
Listing 3.25. ImageInline.java
Image img = Image.getInstance(RESOURCE);
img.setAbsolutePosition(
  (PageSize.POSTCARD.getWidth() - img.getScaledWidth()) / 2,
  (PageSize.POSTCARD.getHeight() - img.getScaledHeight()) / 2);
writer.getDirectContent().addImage(img, true);
Now if you look at the PDF syntax in the content stream of the page, you’ll see information about the image between the operators BI—begin image—and EI—end image. To keep this code to a reasonable length, I replaced the bits and bytes of the image with an ellipsis.

It should be evident that inline image data can’t be reused, so this is probably not the best way for you to add images. It’s better to use an image XObject.
Another important type of XObject is a form XObject. This is an entire content stream that is treated as a single graphics object.
3.4.2. The PdfTemplate object
The use of the word form may be confusing in this context: we aren’t talking about forms that can be filled in. To avoid confusion with AcroForm and XFA forms, the iText object corresponding to a form XObject is called PdfTemplate.
Pdftemplate: Another Name for Form Xobject
A PdfTemplate is a PDF content stream that is a self-contained description of any sequence of graphics objects. PdfTemplate extends PdfContentByte and inherits all its methods. A PdfTemplate is a kind of extra template layer with custom dimensions that can be used for different purposes.
Suppose that you would like to present all the posters of the movies in your film database on one page. As an extra visual element, you’d like to draw different strips of film, so that it looks as if the posters were photographed or filmed. See figure 3.17 for an example.
Figure 3.17. Mimicking strips of film using a PdfTemplate
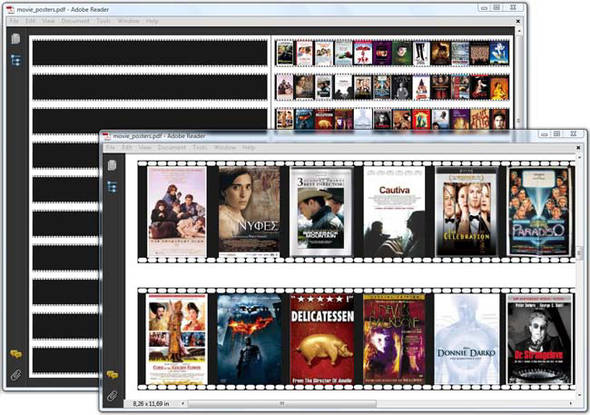
There are 120 movie titles in the movie database, so if you put 12 movies on one strip, you’d need a page with 10 strips. You only need to create the strip once.
Listing 3.26. MoviePosters.java

You create a PdfTemplate for a specific content layer, passing its dimensions. In ![]() , you create a layer that will have the same width as the page, and one tenth of the height of the page. You draw one large
rectangle and a series of small rounded rectangles representing the perforations. Line
, you create a layer that will have the same width as the page, and one tenth of the height of the page. You draw one large
rectangle and a series of small rounded rectangles representing the perforations. Line ![]() is special. You probably expected celluloid.fill(), but that would also fill the perforations using the fill color. By using eoFill(), the shape is filled using the even odd rule; fill() uses the nonzero winding number rule. If you’re not familiar with these rules, they’ll be explained in detail in section 14.2.2.
is special. You probably expected celluloid.fill(), but that would also fill the perforations using the fill color. By using eoFill(), the shape is filled using the even odd rule; fill() uses the nonzero winding number rule. If you’re not familiar with these rules, they’ll be explained in detail in section 14.2.2.
The most important thing to know is that the XObject stream is stored in a separate object:
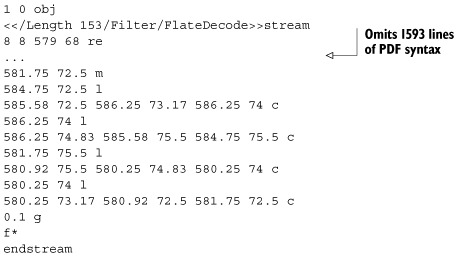
The complete stream is much longer than the snippet. If you look at the complete file, you’ll see that the XObject is the
first object in the file, both logically—the object number is 1—and physically—the object starts on the 15th byte. This isn’t
standard behavior in iText. Normally PdfTemplate objects are kept in memory until you invoke Document.close(), unless you explicitly use writer.releaseTemplate() as is done in line ![]() . This is done on purpose—you’ll find out the benefits of keeping form XObjects in memory in chapter 5.
. This is done on purpose—you’ll find out the benefits of keeping form XObjects in memory in chapter 5.
Adding Pdftemplate Objects
Instead of adding this long sequence of PDF syntax 10 times to the content stream of the page, you refer to it like this:
q 1 0 0 1 0 0 cm /Xf1 Do Q
q 1 0 0 1 0 84.2 cm /Xf1 Do Q
q 1 0 0 1 0 168.4 cm /Xf1 Do Q
q 1 0 0 1 0 252.6 cm /Xf1 Do Q
q 1 0 0 1 0 336.8 cm /Xf1 Do Q
q 1 0 0 1 0 421 cm /Xf1 Do Q
q 1 0 0 1 0 505.2 cm /Xf1 Do Q
q 1 0 0 1 0 589.4 cm /Xf1 Do Q
q 1 0 0 1 0 673.6 cm /Xf1 Do Q
q 1 0 0 1 0 757.8 cm /Xf1 Do Q
This snippet of PDF syntax is easy to interpret: the form XObject /Xf1 is added in its original size at position (0,Y) with Y being a value going from 0 to 757.8 in steps of 84.2 user units.
Here’s how you first add the strips of film, followed by the images. The method addTemplate() is used to add the PdfTemplate object celluloid at a specific x,y position.
Listing 3.27. MoviePosters.java (continued)
for (int i = 0; i < 10; i++) {
  canvas.addTemplate(celluloid, 0, i * 84.2f);
}
List movies = PojoFactory.getMovies(connection);
Image img;
float x = 11.5f;
float y = 769.7f;
for (Movie movie : movies) {
  img = Image.getInstance(String.format(RESOURCE, movie.getImdb()));
  img.scaleToFit(1000, 60);
  img.setAbsolutePosition(x + (45 - img.getScaledWidth()) / 2, y);
  canvas.addImage(img);
  x += 48;
  if (x > 578) {
    x = 11.5f;
    y -= 84.2f;
  }
}
Figure 3.18 demonstrates the use of another version of the addTemplate() method.
Figure 3.18. Adding the same PdfTemplate object using different transformations

In figure 3.18, the strip of film is added four times, but it’s translated, scaled, skewed, and rotated.
Listing 3.28. MoviePosters.java (continued)

The extra parameters of the addTemplate() method ![]() are elements of the current transformation matrix, as discussed briefly in the previous subsection. You can use this method
to compose complex transformations.
are elements of the current transformation matrix, as discussed briefly in the previous subsection. You can use this method
to compose complex transformations.
If you only need to move, scale, or rotate the template, you can improve the readability of your code by wrapping the PdfTemplate in an Image object ![]() .
.
Wrapping a Pdftemplate Inside an Image
The syntax generated using addTemplate() looks like this:
q 0.8 0 0.35 0.65 0 600 cm /Xf1 Do Q
You’ll recognize the elements from the transformation matrix.
The syntax generated for the templates wrapped in an Image object looks like this:
q 1 0 0 1 0 480 cm /Xf1 Do Q
q 0.69282 0.4 -0.4 0.69282 63.68 500 cm /Xf1 Do Q
q 0 0.8 -0.8 0 267.36 300 cm /Xf1 Do Q
As you can see, the object is still treated as a form XObject; it’s not converted into an image XObject, nor is it rasterized. Wrapping a PdfTemplate inside an Image is an elegant way to avoid having to calculate the transformation matrix yourself.
To conclude this chapter, we’ll reduce the file size of the film festival’s timetable—as promised.
Adapting the Timetable Example
In section 3.1.3, you added a grid with locations and time slots to every page of your timetable document. It would have been a better idea to draw the grid with the locations to one PdfTemplate object, and the grid with the time slots to another.
Listing 3.29. MovieTemplates.java

The MovieTemplates example (listing 3.29) extends MovieCalendar (listing 3.15) so that methods such as drawTimeTable() and drawTimeSlots() can be reused. If you open both PDFs in Adobe Reader, you’ll see no difference at all between them, except when you go to File > Properties > Description. The PDF generated with MovieCalendar has a size of 18.82 KB; the one generated with MovieTemplates has a size of 14.29 KB. This means we’ve saved almost 25 percent in file size by using form XObjects in this example. Isn’t that a nice way to conclude chapter 3?
3.5. Summary
In the first section of this chapter, you learned how iText adds content to a page. High-level objects are written to two layers in the middle. You have low-level access to an extra level on top of these layers and an extra level below. Low-level access means that you can change the graphics state to fill and stroke lines and shapes; you change the text state to draw glyphs.
You used this knowledge to make a visual representation of the data in the film festival database. You drew a grid with locations and time slots, on which you added blocks representing movie screenings. Movie titles were added with the ColumnText object. This object forms a bridge between the high-level objects and low-level access. You added content in columns, and you experienced the difference between text mode (Chunk and Phrase objects added with addText()) and composite mode (implementations of the Element interface added with addElement()). You also used ColumnText in simulation mode to keep content that belongs together in the same column.
Finally, the PdfTemplate object was introduced, allowing you to create extra layers that can be reused on the same page or on different pages.
In the next chapter, you’ll learn how to organize the information about the film festival movies in tabular form using PdfPTable and PdfPCell. You’ll learn that each PdfPCell uses a ColumnText internally to draw the content of a cell at the correct position.