Chapter 10. Brightening your document with color and images
This chapter covers
- Using color in PDF documents
- Introducing transparency
- Using images in PDF documents
You’ve already used color and images in previous chapters. You set the background and changed the font color of a Chunk using the BaseColor class in chapter 2. You used setColorFill() and setColorStroke() methods when you painted movie blocks on a calendar sheet in chapter 3. But that doesn’t mean we’ve talked about everything. One could write an entire book about color.
The same goes for images. We looked at the Image class in chapter 2, but there are many other classes involved when creating an Image object: Jpeg, GifImage, TiffImage, and so on. It would lead us too far astray to go into too much detail about color and images, but this chapter will help you if you need more color or image functionality than we covered in part 1.
10.1. Working with the iText color classes
Colors are defined using values, and these values are interpreted according to a color space. Color spaces are expressed as PDF dictionaries, and there are eleven different color spaces available in PDF. You can find a reference to these dictionaries in the resources entry of a PDF stream. This is explained in great detail in the PDF reference; but don’t worry, iText provides color classes that hide the complex theory.
The most common group of color spaces is the device color space family.
10.1.1. Device colors
Device colors enable a conforming writer to control color precisely for a particular device. The family consists of three color spaces:
- DeviceRGB— The iText BaseColor class defines an RGB color. This is an additive color: red, green, and blue light is used to produce the other colors. If you add red light (#FF00000) to green light (#00FF000), for example, you get yellow light (#FFFF00). This is how a TV screen works: the colors are composed of red, green, and blue dots. RGB is typically used for graphics that need to be rendered on a screen.
- DeviceCMYK— The opposite of RGB is a subtractive color model. If you look at an object using white light, you see a color because the object reflects and absorbs some of the wavelengths that make up the white light. A yellow object absorbs blue and reflects red and green. White (#FFFFFF) minus blue (#0000FF) equals yellow (#FFFF00). The subtractive color model is used when printing a document. You don’t use red, green, and blue, but cyan, magenta, yellow, and black. The CMY in CMYK correspond with the colors in the cartridge of an ink-jet printer. The K (key) stands for black. Such a color can be created using one of BaseColor’s subclasses: CMYKColor.
- DeviceGray— The default color space when drawing lines or shapes in PDF is gray. It is expressed as the intensity of achromatic light, represented by a single number in the range 0 to 1, where 0 corresponds to black, 1 to white, and intermediate values to different gray levels. The corresponding class in iText is GrayColor, another subclass of BaseColor.
The BaseColor, CMYKColor, and GrayColor classes have different constructors. The color values can be expressed as int values from 0 to 255, or as float values from 0.0 to 1.0. The BaseColor and GrayColor classes also have a series of predefined colors.
Listing 10.1. DeviceColor.java

Observe that you don’t need a BaseColor class when writing to the direct content. You can instead use a number of variations on the setColorFill() method.
Note
By convention, integers for colors are written in their hexadecimal form in iText. This isn’t an obligation, but it improves the readability of the code if you’re familiar with the way colors are expressed in HTML. The expression new BaseColor(0, 128, 128) is the equivalent of new BaseColor(0x00, 0x80, 0x80), but in the latter, you’ll recognize the HTML notation #008080, aka teal.
In part 4, we’ll talk about different flavors of PDF. One of the first ISO specifications for PDF was PDF/X. The X stands for exchange. It was proposed by the prepress sector to make PDF documents more predictable when printing. Among other restrictions, it’s forbidden to use RGB in a PDF/X document, because the results of the transformation of the red, green, and blue values to cyan, magenta, yellow, and black ink might not be consistent for all printers.
There are also printing devices that work with special colors that can’t be achieved with CMYK. For instance, metallic colors, fluorescent colors, and special textures. If that’s the case, you probably need spot colors.
10.1.2. Spot colors
A spot color is any color generated by an ink (pure or mixed) that is printed in a single run. Section 8.6.6.4 of ISO-32000-1, titled “Separation Color Spaces,” contains the following note:
When printing a page, most devices produce a single composite page on which all process colorants (and spot colorants, if any) are combined. However, some devices, such as image setters, produce a separate, monochromatic rendition of the page, called a separation, for each colorant. When the separations are later combined—on a printing press, for example—and the proper inks or other colorants are applied to them, the result is a full-color page.
The term separation is often misused as a synonym for an individual device colorant. In the context of this discussion, a printing system that produces separations generates a separate piece of physical medium (generally film) for each colorant. It is these pieces of physical medium that are correctly referred to as separations. A particular colorant properly constitutes a separation only if the device is generating physical separations, one of which corresponds to the given colorant. The Separation color space is so named for historical reasons, but it has evolved to the broader purpose of controlling the application of individual colorants in general, regardless of whether they are actually realized as physical separations.
ISO-32000-1, section 8.6.6.4
Every colorant in the Separation color space has a name. Every color value consists of a single tint component in the range 0.0 to 1.0. A tint value of 0.0 denotes the lightest color that can be achieved with the given colorant, and 1.0 is the darkest. Listing 10.2 shows how the PdfSpotColor class is used to define the colorant; the actual color is created with the SpotColor class.
Listing 10.2. SeparationColor.java

Observe that I’ve used dummy names—iTextSpotColorRGB and iTextSpotColorCMYK—referring to the way the spot color was created.
Note
The dominant spot-color printing system in the United States is Pantone. Pantone Inc. is a New Jersey company, and the company’s list of color names and values is its intellectual property. Free use of the list isn’t allowed, but if you buy a house style, and the colors include Pantones, you can replace the dummy names with the names of your Pantone colors as well as the corresponding color values.
The next type of color isn’t really a color in the strict sense of the word. It’s listed with the special color spaces in ISO-32000-1.
10.1.3. Painting patterns
When stroking or filling a path, you’ve always used a single color in this book, but it’s also possible to apply paint that consists of repeating graphical figures or a smoothly varying color gradient. In this case, we’re talking about pattern colors that use either a tiled pattern (a repeating figure) or a shading pattern (a smooth gradient).
Tiling Patterns
To create a tiled pattern color, you must construct a pattern cell. This cell is a subclass of PdfTemplate named PdfPatternPainter. You can obtain such a cell from the PdfContentByte object with the method createPattern(). This cell will be repeated at fixed horizontal and vertical intervals when you fill a path. See figure 10.1.
Figure 10.1. Tiling patterns
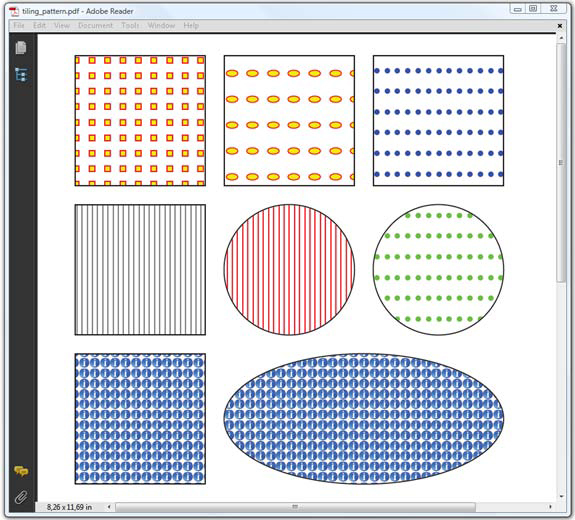
There are two kinds of tiling patterns: colored tiling patterns and uncolored tiling patterns. A colored tiling pattern is self-contained. In the course of painting the pattern cell, the pattern’s content stream explicitly sets the color of each graphical element it paints. An uncolored tiling pattern has no inherent color. You can define a default color, but normally you specify the actual color whenever the pattern is used. The content stream defines a stencil through which the color is poured.
Listing 10.3. TilingPatternColor.java

Observe that there are different versions of the createPattern()method. The simplest version accepts two float values: one for the width and one for the height of the pattern cell. Additionally, you can also specify an X and Y step. This is the desired horizontal and vertical spacing between pattern cells. These are the methods used to create a colored pattern.
When you add a default color (or null), you create an uncolored pattern. This default color is used when you create a PatternColor object, but typically you’ll want to use an uncolored pattern with the setPatternFill() method, passing the PdfPatternPainter object and a different color. Uncolored patterns are monochrome, whereas a colored pattern can consist of different colors. It can even contain images, as demonstrated with img_pattern. In listing 10.3, you use the method setPattern-Matrix() to scale and mirror the cell; this method corresponds to the setMatrix() method in PdfTemplate and PdfContentByte.
The other pattern type is more complex. Let’s look at simple examples to get an idea.
Shading Patterns
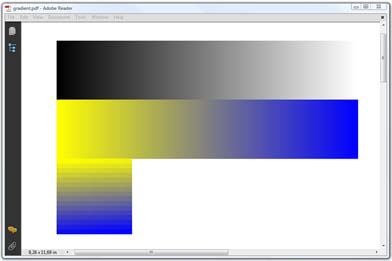
Shading patterns provide a smooth transition between colors across an area to be painted. ISO-32000-1 lists seven types of shading; iText provides convenience methods for two: axial shading and radial shading. These two shadings are demonstrated in figure 10.2.
Figure 10.2. Shading patterns

The background color of the first page of figure 10.2 (the left half) changes from orange in the lower-left corner to blue in the upper-right corner. This is an axial shading. The circular shape on the second page (the right half) is the result of a radial shading:
- Axial shadings (Type 2 in ISO-32000-1)— These define a color blend that varies along a linear axis between two endpoints and extends indefinitely perpendicular to that axis. In the iText object PdfShading, a static simpleAxial() method allows you to pass the start and end coordinates of the axis, as well as a start and end color.
- Radial shadings (type 3 in ISO 32000-1)— These define a color blend that varies between two circles; see the shape in the right side of figure 10.2. This shape was created with the static simpleRadial() method. With this method, you define two circles, using the coordinates of the center point and a radius. You also pass a start and end color.
The methods simpleAxial() and simpleRadial() also accept two boolean values that indicate whether or not you want the shading to be extended at the start and end. These values were true for the axial shading on the left side of figure 10.2 and false for the radial shading on the right side.
Listing 10.4. ShadingPatternColor.java
PdfContentByte canvas = writer.getDirectContent();
PdfShading axial = PdfShading.simpleAxial(writer,
  36, 716, 396, 788, BaseColor.ORANGE, BaseColor.BLUE);
canvas.paintShading(axial);
document.newPage();
PdfShading radial = PdfShading.simpleRadial(writer,
  200, 700, 50, 300, 700, 100,
  new BaseColor(0xFF, 0xF7, 0x94),
  new BaseColor(0xF7, 0x8A, 0x6B),
  false, false);
canvas.paintShading(radial);
PdfShadingPattern shading
  = new PdfShadingPattern(axial);
colorRectangle(canvas,
  new ShadingColor(shading), 150, 420, 126, 126);
canvas.setShadingFill(shading);
canvas.rectangle(300, 420, 126, 126);
canvas.fillStroke();
The first part of this code snippet shows how to create and paint the shading with the method paintShading(). In the second part, you use the shading to create a PdfShadingPattern and a ShadingColor.
Note
Shadings are created using specific types of functions. So far we’ve seen an example involving type 2 and type 3 functions. ISO-32000-1 includes five more types. If you want to use the other types, you need to combine one or more of the static type() methods of the PdfShading class. Please consult ISO-32000-1, section 8.7.4, for more info, and inspect the implementation of the simpleAxial() and simpleRadial() methods in the iText source code for inspiration.
We’ve looked at drawing different graphical objects in different colors. If these objects overlap, as shown in figures 3.1 and 3.2, the color at each point on the page will, by default, be the color of the topmost object. But you can change this. You can introduce transparency so that the color is composed using a combination of the color of the topmost object with the colors of the objects below, aka the backdrop.
10.1.4. Transparency
Transparency is very complex matter, but let me try to select the most important rules from chapter 11 of ISO-32000-1:
A given object shall be composited with a backdrop. Ordinarily, the backdrop consists of the stack of all objects that have been specified previously. The result of compositing shall then be treated as the backdrop for the next object. However, within certain kinds of transparency groups, a different backdrop may be chosen.
During the compositing of an object with its backdrop, the color at each point shall be computed using a specified blend mode, which is a function of both the object’s color and the backdrop color ...
Two scalar quantities called shape and opacity mediate compositing of an object with its backdrop ... Both shape and opacity vary from 0.0 (no contribution) to 1.0 (maximum contribution) ... Shape and opacity are conceptually very similar. In fact, they can usually be combined into a single value, called alpha, which controls both the color compositing computation and the fading between an object and its backdrop. However, there are a few situations in which they shall be treated separately; see knockout groups.
ISO-32000-1 11.2
You’ve already used transparency to draw the layers in figures 3.2 and 6.2. These figures were created with the source code shown in listing 10.5 taken from an example in chapter 6. This code snippet draws the transparent white rectangle that was used as the background for every page. When you overlap the PdfImportedPage objects, you can see what is beneath each page.
Listing 10.5. Layers.java (from chapter 6)

When transparency is involved, you need to create a PdfGState object and apply it with the method setGState(). The rectangle that is drawn in listing 10.5 has an opaque black border, but the setFillOpacity() method is used to change the opacity of the white “paint” to 0.6.
Let’s look at examples to learn more about transparency groups, isolation, and knockout.
Transparency Groups
Figure 10.3 shows four identical paths. The background is a square that is half gray, half white. Inside the square, three circles are painted. The first one is red, the second is yellow, and the third is blue. Each version of these paths is filled using a different transparency model.
Figure 10.3. Transparency groups

In the two upper figures, the circles are painted as independent objects (no grouping). There’s no transparency involved in the upper-left figure; the circles in the upper-right figure are drawn with an opacity of 0.5 causing them to composite with each other and with the gray and white backdrop.
In the two lower figures, the circles are combined as a transparency group. At the left, the individual circles have an opacity of 1 within the group, but the group as a whole is painted in the Normal blend mode with an opacity of 0.5. The objects overwrite each other within the group, but the resulting group composites transparently with the backdrop. At the right, the circles have an opacity of 0.5 within the group, and the group as a whole is painted against the backdrop with an opacity of 1.0, but in a different blend mode.
The pictureCircles() method draws the figures shown in figure 10.3. You’ll use this method in different graphics states.
Listing 10.6. Transparency1.java

To group objects, you create a PdfTemplate object. When you define a PdfTransparencyGroup for this XObject, the objects drawn to it—in this case, circles—belong to the same transparency group. Observe the difference between the lower-left figure where you set the opacity for the complete group and the lower-right figure where you set the opacity and blend mode within the group.
The PdfTransparencyGroup class has two methods: setIsolated() and setKnockout(). Let’s find out what these concepts are about.
Isolation and Knockout
Figure 10.4 shows four squares filled with a shading pattern. Four circles are added inside these squares as a group.
Figure 10.4. Isolation and knockout

The code that draws the four figures is identical. All the circles have the same CMYK color: C, M, and Y are set to 0 and K to 0.15. Their opacity is 1.0 and the blend mode is Multiply; the only difference is the isolation and knockout modes.
- Isolation— For the two upper squares, the group is isolated: it doesn’t interact with the backdrop. For the two lower squares, the group is nonisolated: the group composites with the backdrop.
- Knockout— For the squares at the left, knockout is set to true: the circles don’t composite with each other. For the two on the right, it’s set to false: they composite with each other.
Listing 10.7 shows how the upper-right figure was drawn. The other figures are created by changing the boolean values for the methods setIsolated() and setKnockout().
Listing 10.7. Transparency2.java
tp = cb.createTemplate(200, 200);
pictureCircles(0, 0, tp);
group = new PdfTransparencyGroup();
group.setIsolated(true);
group.setKnockout(true);
tp.setGroup(group);
cb.addTemplate(tp, gap, 500);
Note that figure 10.3 was inspired by figure L.16 in ISO-32000-1. Figure 10.4 is very similar to figure L.17. You may also want to take a look at the overview of the different blend modes in figures L.18 (RGB) and L.19 (CMYK). The blend modes are listed in section 11.3.5 of ISO-32000-1. They are all supported in iText (see the constant values starting with BM_ in the PdfGState class), but it would lead us too far off topic to discuss them in detail.
It would be interesting to apply transparency to images, but before you can do so, you need to know which types of images are supported in iText.
10.2. Overview of supported image types
When we needed images in the previous chapters, we used Image.getInstance(), passing the path to an image without considering which type of image we were using. Figure 10.5 shows a document with 12 images.
Figure 10.5. Different image types

The first nine images were created with the getInstance() method; the last three are special cases. Let’s start with the standard types.
10.2.1. JPEG, JPEG2000, GIF, PNG, BMP, WMF, TIFF, and JBIG2
Table 10.1 lists the types of images supported by the Image class and indicates which format is best to use in which context. For example, JPEG is a better format for photographs than GIF. GIF is better for charts than JPG.
Table 10.1. Standard image types supported by com.itextpdf.text.Image
|
Type |
Extension |
Description |
|---|---|---|
| JPEG JPG | .jpg | JPEG (Joint Photographic Experts Group) is commonly used to refer to a lossy compression technique, reducing the size of a graphic file by as much as 96 percent. Usually this is the best file format for photographs on the web. |
| JPEG 2000 | .jp2 .j2k | The successor to JPEG, providing better efficiency in compression. JPEG 2000 has multiple versions for use, including a lossless version and a tiling version that allows for zooming in to detailed areas of the image file. |
| GIF | .gif | GIF (Graphics Interchange Format) is a format that is suitable for images containing large areas of the same color. GIF files of simple images are often smaller than the same files would be if stored in JPEG format, but GIF doesn’t store photographic images as well as JPEG. A GIF file can contain multiple frames, in which case it’s referred to as an animated GIF. |
| PNG | .png | The PNG (Portable Network Graphics) format was designed as the successor to GIF. It features compression, transparency, and progressive loading, like GIF. |
| BMP | .bmp .dib | BMP (Windows bitmap) is a common form of bitmap file in Microsoft Windows. Most BMP files have a relatively large file size due to the lack of any compression. |
| WMF | .wmf | WMF (Windows Metafile) is a vector graphics format for Windows-compatible computers, used mostly for word processing clip art. |
| TIFF | .tiff .tif | TIFF (Tagged Image File Format) is commonly used for digital scanned images. It was originally a binary image format with only two possible values for each pixel. Nowadays, it’s a popular format for high color-depth images, along with JPEG and PNG. A TIFF image can consist of multiple pages. |
| JBIG2 | .jb2 | JBIG2 (Joint Bi-level Image Experts Group) is an image compression standard for bilevel images. Bi-level images are digital images in which each pixel is represented by only one bit. For instance, a pixel can be either black or white. JBIG2 is intended for images sent using a fax. A JBIG2 image can consist of multiple pages. |
Image is an abstract class, which means you can’t construct an instance directly. The getInstance() method returns an instance of a specific image implementation. iText has a separate image class for each type that is supported. These classes process the image data, and possibly change the bits and bytes into a format that is supported in PDF. For instance, JPEG images are copied as is into an image XObject, but a BMP will be decoded into raw image bytes that are compressed using the zlib/deflate compression method. A WMF file will be translated into PDF syntax; if you look inside the PDF, you’ll see that the WMF image is changed into a form XObject.
Table 10.2 gives an overview of the most important image classes and how they relate to each other. The second column indicates whether the class is a subclass of com.itextpdf.text.Image.
Table 10.2. Image classes in iText
|
Classname |
Subclass |
Produces |
|---|---|---|
| Jpeg | Yes | The image is copied byte by byte into the PDF. Inspecting the PDF, you’ll find out that the DCTDecode filter can be used to decompress the data. DCT stands for Discrete Cosine Transform. |
| Jpeg2000 | Yes | The filter used for these images is JPXDecode. This means that the image was encoded using the wavelet-based JPEG 2000 standard. |
| ImgRaw | Yes | Raw images can either be compressed using zlib/flate compression or using the CCITT facsimile standard. See sections 10.2.2 and 10.2.3 for more details. |
| GifImage | No | Although PDF supports images with LZW compression, iText decodes the GIF image into a raw image. If you create an Image with a path to a GIF file, you’ll get an instance of the ImgRaw class. |
| PngImage | No | Just like GIF images, iText decodes PNG images into raw images. If the color space of the image is DeviceGray and if it only has 1 bit per component, CCITT is used as compression. In all other cases, the image data is zlib/flate compressed. |
| BmpImage | No | Just like GIF images, iText decodes BMP images into raw images. Likewise, the filter in the image dictionary is FlateDecode. |
| ImgTemplate | Yes | This is an image that consists of PDF syntax. If you look inside the PDF, you won’t find an image XObject, but a form XObject. In iText lingo, it’s a PdfTemplate wrapped in an Image object for reasons of convenience when scaling, rotating, and adding the image to the document. |
| ImgWMF | Yes | If you create an Image using a WMF file, you’ll get an instance of ImgWMF, but internally the image will be translated into a PdfTemplate. Inside the PDF, you’ll find a form XObject instead of an image XObject. |
| ImgCCITT | Yes | The filter for these images is CCITTFaxDecode. The data was encoded using the CCITT facsimile standard. It’s typically a monochrome image with 1 bit per pixel. See section 10.2.3. |
| TiffImage | No | The TiffImage class will inspect the TIFF file and, depending on its parameters, it can return an ImgCCITT, an ImgRaw, or even a Jpeg instance. |
| ImgJBIG2 | Yes | An ImgJBIG2 object is an Image instance produced by the JBIG2Image. |
In table 10.2, you’ll find some image types that don’t map directly to an image type in table 10.1. For instance, what do we mean when we talk about a raw image?
10.2.2. Creating a raw image
An image consists of a series of pixels, and each pixel has a color. The color value of the sequence of pixels can be stored in a byte array, and the byte array can be compressed, for instance using zlib/flate compression. Figure 10.6 shows images that were created byte by byte.
Figure 10.6. Images built using raw image data
This source code was used to create the images in figure 10.6.
Listing 10.8. RawImage.java

You’re creating three images in listing 10.8. The first one has 256 pixels x 1 pixel. The color space is DeviceGray (1 component), and you’re using 8 bits per component
(bpc) ![]() . When you create the image data, you let the color value vary from 0 to 255. This results in the gradient from black to white
in figure 10.6 (note that the height of the image is scaled).
. When you create the image data, you let the color value vary from 0 to 255. This results in the gradient from black to white
in figure 10.6 (note that the height of the image is scaled).
For the second and third images, you use three components with 8 bits per component. This means that you’ll need 256 bytes
x 3 bytes to describe an image that consists of 256 pixels. You use the image data to create an image of 256 pixels x 1 pixel
![]() , and to create an image of 16 pixels x 16 pixels
, and to create an image of 16 pixels x 16 pixels ![]() . Note that this image uses the DeviceRGB color space; if you create an image with four components, you’re working in the
DeviceCMYK color space. The getInstance() method used in listing 10.8 also accepts an extra parameter to define a transparency range. We’ll discuss transparency for images in more detail in section 10.3.1.
. Note that this image uses the DeviceRGB color space; if you create an image with four components, you’re working in the
DeviceCMYK color space. The getInstance() method used in listing 10.8 also accepts an extra parameter to define a transparency range. We’ll discuss transparency for images in more detail in section 10.3.1.
What you’re doing manually in this example is done automatically with GIF, PNG, BMP, and some TIFF images internally. These bytes are added to a zipped stream using the zlib/flate algorithm, except for some TIFF and PNG images that are CCITT-encoded.
10.2.3. CCITT compressed images
CCITT stands for Comité Consultatif International Téléphonique et Télégraphique, a standards organization that is now part of the International Telecommunication Union (ITU). This organization is responsible for defining many of the standards for data communications. PDF supports Group 3 and Group 4 compression, which are facsimile (fax) standards.
With iText, you can insert CCITT-encoded images using the following method:
Image.getInstance(int width, int height, boolean reverseBits,
    int typeCCITT, int parameters, byte[] data)
The reverseBits parameter indicates whether the bits need to be swapped (bit 7 swapped with bit 0, and so on). The type can be Element.CCITTG31D, Element. CCITTG32D, or Element.CCITT4. The parameters value is a combination of the following flags:
- Element.CCITT_BLACKIS1— A flag indicating whether 1 bits are interpreted as black pixels and 0 bits as white pixels.
- Element.CCITT_ENCODEDBYTEALIGN— A flag indicating whether the filter expects extra 0 bits before each encoded line so that the line begins on a byte boundary.
- Element.CCITT_ENDOFLINE— A flag indicating whether end-of-line bit patterns are required to be present in the encoding.
- Element.CCITT_ENDOFBLOCK— A flag indicating whether the filter expects the encoded data to be terminated by an end-of-block pattern.
The CCITT protocols described in this section are used to send a document as an image from one fax to another. You could use iText to import a stream received from your fax into a PDF file. iText also uses CCITT internally to create images that need to be read by a machine, such as two-dimensional barcodes.
10.2.4. Creating barcodes
You may not look at barcodes as images, but in iText it’s common to add a barcode to a document as an instance of the Image object. The same goes for matrix codes, which are often referred to as two-dimensional barcodes. Listing 10.9 shows how these barcodes were created.
Figure 10.5 has a barcode in the EAN-13 format containing the ISBN number of this book. The second barcode is a matrix code in the PDF417 format containing the text “iText in Action, a book by Bruno Lowagie.” Internally, the first barcode is added to the document as an instance of ImgTemplate; the second one is an ImgCCITT object.
Listing 10.9. ImageTypes.java
BarcodeEAN codeEAN = new BarcodeEAN();
codeEAN.setCodeType(Barcode.EAN13);
codeEAN.setCode("9781935182610");
img = codeEAN.createImageWithBarcode(
  writer.getDirectContent(), null, null);
document.add(img);
BarcodePDF417 pdf417 = new BarcodePDF417();
String text = "iText in Action, a book by Bruno Lowagie.";
pdf417.setText(text);
img = pdf417.getImage();
document.add(img);
The classes to create regular (one-dimensional) barcodes extend the abstract class Barcode.
Normal Barcodes
Table 10.3 shows an overview of these subclasses, along with the types of barcodes they can produce.
Table 10.3. Barcode classes and barcode types
|
iText class |
Barcode type |
Description |
|---|---|---|
| BarcodeEAN | EAN-13, UPC-A, EAN-8, UPC-E | EAN stands for European Article Number code; UPC for Universal Product Code. Each type represents a number with a different number of digits. |
| BarcodeEANSUPP | Supplemental 2, Supplemental 5 | EAN-13, UPC-A, EAN-8, and UPC-E allow for a supplemental two- or five-digit number to be appended to the main barcode. For instance, if you add a supplemental five-digit barcode to an EAN-13 barcode representing an International Standard Book Number (ISBN), you get a Bookland code. |
| Barcode128 | Plain code 128, raw code 128, UCC/EAN-128 | Code 128 provides much more detail than the single-product EAN barcodes. It’s used to describe properties such as the number of products included, weight, dates, and so on. |
| BarcodeInter25 | Interleaved 2 of 5 | A numerical barcode that encodes pairs of digits: the first digit is encoded in the bars; the second digit is encoded in the spaces interleaved with them. Two out of every five bars or spaces are wide (hence 2 of 5). |
| BarcodePostnet | POSTNET, PLANET | The United States Postal Service (USPS) uses a combination of the Postal Numeric Encoding Technique (POSTNET) sorting code and the Postal Alphanumeric Encoding Technique (PLANET) code to direct and identify mail. Currently, three forms of POSTNET codes are in use: a 5-digit ZIP code, a 9-digit ZIP+4, and an 11-digit delivery point code. The PLANET code is an 11-digit code assigned by USPS. |
| Barcode39 | Barcode 3 of 9, 3 of 9 extended | The 3 of 9 code can encode numbers, uppercase letters (A–Z), and symbols (- . ‘ ’$ / + % *). |
| BarcodeCodabar | Codabar | Codabar is used to store numerical data only, but the letters A, B, C, and D are used as start and stop characters. |
The value that has to be shown by the barcode is set with the method setCode(), except for BarcodeEANSUPP. The example shows how to create a Bookland barcode composed of two BarcodeEAN instances: one with type EAN13 and one with type SUPP5.
Listing 10.10. Barcodes.java
document.add(new Paragraph("Bookland"));
document.add(new Paragraph("ISBN 0-321-30474-8"));
codeEAN.setCodeType(Barcode.EAN13);
codeEAN.setCode("9781935182610");
BarcodeEAN codeSUPP = new BarcodeEAN();
codeSUPP.setCodeType(Barcode.SUPP5);
codeSUPP.setCode("55999");
codeSUPP.setBaseline(-2);
BarcodeEANSUPP eanSupp = new BarcodeEANSUPP(codeEAN, codeSUPP);
document.add(eanSupp.createImageWithBarcode(cb, null, BaseColor.BLUE));
The barcodes example contains code samples for every type of barcode. The barcodes are added to the document as an Image that is created with the createImageWithBarcode() method. As an alternative, you can write the barcode directly to a PdfContentByte object with placeBarcode(), or create a PdfTemplate with createTemplateWithBarcode(). These methods take three parameters:
- PdfContentByte cb— The direct content of the PdfWriter to which the barcode has to be added
- BaseColor barColor— The color of the bars
- BaseColor textColor— The color of the text
You can also create a java.awt.Image of the barcode using the createAwtImage() method. This method expects two colors of type java.awt.Color (as opposed to com.itextpdf.text.BaseColor). The first one represents the color of the bars; the second one defines the background color. No text is added to these barcodes.
The subclasses of the Barcode class have a lot of properties in common that can be set with methods in the abstract superclass. Table 10.4 presents an overview showing the default value for each property.
Table 10.4. Default properties of the different barcode classes
|
Code: |
EAN |
EANSUPP |
128 |
Inter25 |
39 |
Codabar |
Postnet |
|---|---|---|---|---|---|---|---|
| type | EAN13 | - | CODE128 | - | - | CODABAR | POSTNET |
| x | 0.8f | 0.02f * 72f | |||||
| n | - | 8 | - | 2 | 72f / 22f | ||
| font | BaseFont.createFont(BaseFont.HELVETICA, BaseFont.WINANSI, BaseFont.NOT_EMBEDDED); | - | |||||
| size | 8 | 0.05f * 72f | |||||
| baseline | size | - | |||||
| bar height | size * 3 | 0.125f * 72f | |||||
| text align | - | - | Element.ALIGN.CENTER | - | |||
| guardbars | true | - | - | - | - | - | - |
| generate checksum | User | User | - | false | false | false | - |
| text checksum | - | - | - | false | false | false | - |
| start/stop text | - | - | - | - | true | false | - |
Note that some barcode classes require a value for the type variable. For example, BarcodeEAN can produce barcodes of type EAN13, EAN8, UPCA, UPCE, SUPP2, and SUPP5, whereas BarcodeInter25 can produce only one type of barcode.
The property x—adjustable with the setX() method—holds the minimum width of a bar. Except for the POSTNET code, this value is set to 0.8 by default. You can set the amount of ink spreading with setInkSpreading(). This value is subtracted from the width of each bar. The actual value depends on the ink and the printing medium; it’s 0 by default. The property n holds the multiplier for wide bars for some types, the distance between two barcodes in EANSUPP, and the distance between the bars in the USPS barcodes.
The font property defines the font of the text (if any). If you want to produce a barcode without text, you have to set the barcode font to null with setFont(). You can change the size of the font with setSize(). With setBaseline() you can change the distance between text and barcode; negative values put the text above the bar. Changing the bar height can be done with setBarHeight(). For USPS codes, you can also change the height of the short bar with setSize(). USPS codes don’t have text.
Finally, there are methods to generate a checksum and to make the calculated value visible in the human-readable text (or not). You can also set the start/stop sequence visible for those barcodes that use these sequences.
Matrix Codes
iText supports three types of matrix codes. Table 10.5 lists the classes that are available for each type.
Table 10.5. Overview of the matrix code classes
|
iText class |
Matrix code |
Description |
|---|---|---|
| BarcodePDF417 | PDF417 | In this context, PDF stands for Portable Data File. It’s a stacked linear barcode that can store up to 2,170 characters, and the symbology is capable of encoding the entire ASCII set. |
| BarcodeDatamatrix | Data Matrix | This code consists of black and white pixels arranged in a square or rectangular pattern. A Data Matrix symbol can store up to 2,335 alphanumeric characters. |
| BarcodeQRCode | QRCode | This is a matrix code created for Quick Response. These codes can be read by mobile phones with their camera in the context of mobile tagging. |
The different matrix codes don’t have a common superclass in iText. Each type has its own typical set of properties. PDF417 codes can be segmented, and you can set the aspect ratio. For Data Matrix, you can set the width, height, and encoding options. The same goes for QRCode, where you define a width and a height, along with hints that are listed in the API documentation. But let’s return to real images.
There’s one type of image used in figure 10.5 we haven’t discussed yet. The picture of Alfred Hitchcock was added using a java.awt.Image.
10.2.5. Working with java.awt.Image
You have to pay attention not to confuse the iText object com.itextpdf.text.Image with the standard Java image class java.awt.Image. If you’re using both classes in the same source file, you must use the full class name for at least one of them to avoid ambiguity and compile errors.
This shows how Hitchcock was added to the document shown in figure 10.5.
Listing 10.11. ImageTypes.java
java.awt.Image awtImage
  = Toolkit.getDefaultToolkit().createImage(RESOURCE);
img = com.itextpdf.text.Image.getInstance(awtImage, null);
document.add(img);
The second parameter in the getInstance() method is null in this example. In section 10.3.1, you’ll learn that you can pass a java.awt.Color object. This color will replace the transparent color when the com.itextpdf.text.Image is added to the document. One of the possible reasons why you’d prefer using java.awt.Image is to reduce the quality of an image so that the resulting file size is significantly lower.
10.2.6. Compressing images
The different compression algorithms are listed in table 10.2, but it’s important to realize that iText doesn’t reduce the quality of an image. If you create an Image with a high-quality image, the image will be added to the PDF at the same quality. If you change the width and the height of the image, the resolution will change, but the number of pixels will remain the same.
Changing the Compression Level
You can try to reduce the size of an image that is flate-compressed by changing the compression level.
Listing 10.12. CompressImage.java
Image img = Image.getInstance(RESOURCE);
img.setCompressionLevel(9);
document.add(img);
Compression levels vary from 1 for best speed to 9 for best compression. If you set the compression to 0, the stream won’t be compressed. iText uses default compression: -1. In some cases, a compression level of 9 will result in a smaller stream, but that’s no guarantee.
Usually, you won’t save a lot of space by changing the compression level. The RESOURCE in the example is a BMP image with a size of 492 KB. Before changing the compression, the resulting PDF file is 13 KB; with compression level 9, it’s reduced to 11 KB. (With compression 0, it would have been 370 KB.) Lossless compression won’t result in dramatic file size reduction. However, if lossy compression is acceptable, you could use java.awt.Image to reduce the quality.
Using Java.Awt.Image For JPEG Compression
Figure 10.7 shows the same picture three times. The original hitchcock.png image is 16 KB. Due to the way the Image object is constructed, it’s compressed using JPEG compression. The image in the first PDF in figure 10.7 is shown with a quality of 100 percent; the size of the file is 35 KB. The quality is reduced to 20 percent in the second PDF, resulting in a file size of 6 KB. At 10 percent quality, the size is 5 KB.
Figure 10.7. Compressed image with quality loss

This is how you convert the image from PNG to JPEG.
Listing 10.13. CompressAwt.java
java.awt.Image awtImage
  = Toolkit.getDefaultToolkit().createImage(RESOURCE);
Image img = Image.getInstance(writer, awtImage, quality);
img.setAbsolutePosition(15, 15);
document.add(img);
For the quality parameter, you can pass a float varying from 0.0 to 1.0. Note that if you added the PNG as is, without using.java.awt.Image, the file size of the resulting PDF would have been 17 KB, which is almost half of the file size with the JPEG at 100 percent. If you really want to compress an image, you’ll have to fine-tune your application to make sure you don’t end up with unexpected results.
Note
As an alternative to using this limited functionality to compress images, you may want to use the Java Advanced Imaging (JAI) library or java.awt.Image to preprocess images. You can use standard Java transformations to reduce the size of the image, or even to change the appearance of the image before adding it to a document using iText. Although this is outside the scope of a book about iText, you’ll use this technique in chapter 16 to reduce the resolution of an image in an existing document.
Table 10.1 showed that TIFF, JBIG2, and GIF files can contain more than one image. But when you added these files to obtain figure 10.5, only one image was added. Let’s find out how to retrieve the other images in the file (if there are any).
10.2.7. Images consisting of multiple pages or frames
TIFF and JBIG2 were originally created for scanners and fax machines, and when you scan or fax a document, it can contain
multiple pages. The next listing shows how you can use the TiffImage and JBIG2Image objects to get the number of pages in the image file ![]() , and how to get an Image instance
, and how to get an Image instance ![]() that can be added to a Document.
that can be added to a Document.
Listing 10.14. PagedImages.java
public void addTif(Document document, String path)
  throws DocumentException, IOException {
  RandomAccessFileOrArray ra = new RandomAccessFileOrArray(RESOURCE1);
  int n = TiffImage.getNumberOfPages(ra);
  Image img;
  for (int i = 1; i <= n; i++) {
    img = TiffImage.getTiffImage(ra, i);
    img.scaleToFit(523, 350);
    document.add(img);
  }
}
public void addJBIG2(Document document, String path)
  throws IOException, DocumentException {
  RandomAccessFileOrArray ra = new RandomAccessFileOrArray(RESOURCE2);
  int n = JBIG2Image.getNumberOfPages(ra);
  Image img;
  for (int i = 1; i <= n; i++) {
    img = JBIG2Image.getJbig2Image(ra, i);
    img.scaleToFit(523, 350);
    document.add(img);
  }
}
The GIF format, on the other hand, can be used to create small animations. An animated GIF contains different images that are referred to as frames. That’s why the terminology for extracting the different frames from an animated GIF is slightly different from what you saw in listing 10.14. Instead of getting the number of pages, you get the frame count.
Listing 10.15. PagedImages.java (continued)
public void addGif(Document document, String path)
  throws IOException, DocumentException {
  GifImage img = new GifImage(RESOURCE3);
  int n = img.getFrameCount();
  for (int i = 1; i <= n; i++) {
    document.add(img.getImage(i));
  }
}
Figure 10.8 shows a series of photographs that animate the pangram, “Quick brown fox jumps over the lazy dog.” (A pangram is a phrase that contains all the letters of the alphabet.)
Figure 10.8. Different frames taken from an animated GIF
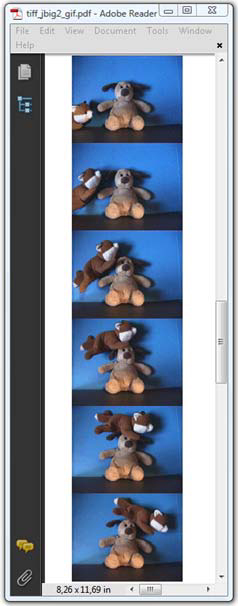
Note that animated GIF images aren’t supported in PDFs. You can only add static GIF images. If you want to add an animation, you need to create a movie file, and add that movie as an annotation, but that will have to wait until you’ve reached chapter 16.
We’ve discussed all the different types of images that are supported in iText; now let’s combine this knowledge about images with what you’ve learned about transparency.
10.3. Making images transparent
All the image types listed in table 10.1 are raster images, except for WMF, which is a vector graphics image, aka line work. A raster graphics image is a data structure representing a rectangular grid of pixels. Suppose you want to add a raster image to a document shaped as a circle instead of a rectangle. There are different solutions for achieving this. Let’s have a look at them one by one.
10.3.1. Images and transparency
Some image types, such as GIF and PNG, support transparency; others, such as JPEG, don’t. Figure 10.9 shows a JPEG image in the background. Three other images were added on top of it.
Figure 10.9. Making images transparent

The circle with the letter “i” is a PNG that is partly transparent. When you add this file to a document, the transparency of the original image is preserved. The other two images are GIFs that aren’t transparent. If you open them in another application, you’ll see that they are completely opaque.
Color Key Masking
You can make part of those images transparent using color key masking.
Listing 10.16. TransparentImage.java

Observe that you can construct a Document object with an Image object because Image extends the Rectangle class ![]() . You don’t need to do anything special for the PNG that is already transparent, but you need to use the setTransparency() method for the two GIF images. This method expects an array specifying a range of colors to be masked out. The array needs
to contain 2 x n values, with n being the number of components in the image’s color space. For an RGB image, you need six values: a range for red, green,
and blue. The GIFs in listing 10.16 use the Indexed color space. In this case, the PDF contains a color map with 256 RGB values. Every pixel of the image can be expressed as
1 byte, corresponding to a color in the color map.
. You don’t need to do anything special for the PNG that is already transparent, but you need to use the setTransparency() method for the two GIF images. This method expects an array specifying a range of colors to be masked out. The array needs
to contain 2 x n values, with n being the number of components in the image’s color space. For an RGB image, you need six values: a range for red, green,
and blue. The GIFs in listing 10.16 use the Indexed color space. In this case, the PDF contains a color map with 256 RGB values. Every pixel of the image can be expressed as
1 byte, corresponding to a color in the color map.
Note
We started this chapter saying that there are 11 color spaces in PDF, but we only discussed 5 of them in section 10.1: DeviceGray, DeviceRGB, DeviceCMYK, Pattern, and Separation. The other six color spaces, including Indexed and ICCBased, are supported in iText when they are needed to embed images in a PDF document. You won’t be confronted with them directly; that’s why they aren’t discussed in detail in this book.
For RESOURCE3, you make the colors with index values of 0 to 16 transparent; the colors blue and orange of the iText logo are made transparent. For RESOURCE4, you make the white pixels transparent.
Transparency and Java.Awt.Image
To create figure 10.10, you’ll use a GIF file that was already transparent. If you add it the way you did in listing 10.16, the foreground will be red, the background will be transparent.
Figure 10.10. Transparency with java.awt.Image

For this example, you’ll use a java.awt.Image object and create four different instances of com.itextpdf.Image with it.
Listing 10.17. TransparentAwt.java

- If you add the image exactly the way you did in listing 10.11, the foreground of the image is red, and the background is transparent.
- With an extra boolean parameter, you can tell iText to change the image into a black and white image (with 1 bit per component). In the second image, all the red is changed into black, and the transparency is preserved.
- You keep the colors, but you tell iText that the transparent pixels should be replaced with a java.awt.Color; in this case, yellow. The image is no longer transparent.
- This is a combination of
 and
and  . The transparent pixels are replaced by another color, but then the image is changed to black and white.
If you look inside the PDF generated with listing 10.17, you’ll see that the transparency of the GIF is achieved using color key masking. The PNG image from listing 10.16 is made transparent using a soft mask.
. The transparent pixels are replaced by another color, but then the image is changed to black and white.
If you look inside the PDF generated with listing 10.17, you’ll see that the transparency of the GIF is achieved using color key masking. The PNG image from listing 10.16 is made transparent using a soft mask.
10.3.2. Masking images
The image used in figure 10.11 is the same JPEG used in figure 10.9. The JPEG format doesn’t support transparency, but you can apply either an explicit mask or a soft mask.
Figure 10.11. Hard and soft image masks
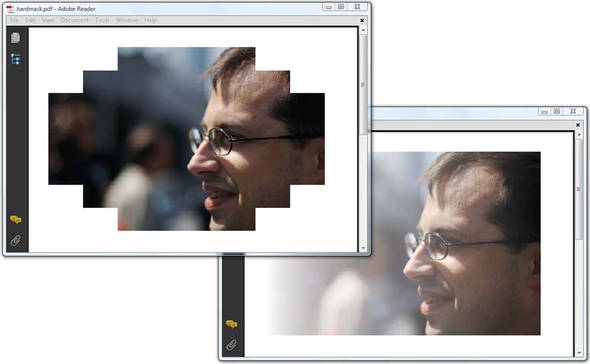
Explicit Masking
The PDF shown to the left in figure 10.11 uses a stencil mask.
Listing 10.18. ImageMask.java

You create an image with 8 pixels x 8 pixels, using one component and 1 bit per component, which makes 64 bits in total. You can store these bits in an array containing 8 bytes. Internally, iText will create a CCITT image.
When you make it a mask with the method makeMask(), you tell iText that this image is a stencil mask. This means that the bit value doesn’t define a color (black or white), but rather whether the pixel is opaque or transparent. Normally, the value 1 will be opaque, and 0 transparent, but you change this with the method set-Inverted(). You can now apply the mask to the JPEG image:
Image img = Image.getInstance(RESOURCE);
img.setImageMask(mask);
The mask parameter can also be a soft mask. That’s the case in the image shown to the right in figure 10.11.
Soft Masking
The code in the next listing should look very familiar. The first part is identical to what you did in listing 10.8 when you created a gradient in the DeviceGray color space.
Listing 10.19. ImageMask.java
byte gradient[] = new byte[256];
for (int i = 0; i < 256; i++)
  gradient[i] = (byte) i;
mask = Image.getInstance(256, 1, 1, 8, gradient);
mask.makeMask();
The only difference here is that you now use the makeMask() method so that you can use the resulting Image as a parameter for the setImageMask() on another Image.
If using masks is too complex for what you need, you can also use simple PDF syntax to clip an image.
10.3.3. Clipping images
The first image in figure 10.5 is a picture of my wife and me, taken at the Flanders International Film Festival in Ghent. In the foreground you see a phenakistoscope. That’s an early animation device, invented in 1832 by Joseph Plateau, (also) a citizen of Ghent. Nowadays, it’s the Belgian version of the Oscar statue. Unfortunately, I didn’t win one of these Belgian Oscars (yet); the picture was an initiative of one of the sponsors of the film festival.
Suppose I want to use only the upper half of this photograph in a PDF document because the lower half shows the name of the sponsor. This is done in figure 10.12. Using a mask isn’t the best way to achieve this. Instead, we’ll clip the image.
Figure 10.12. Clipping images
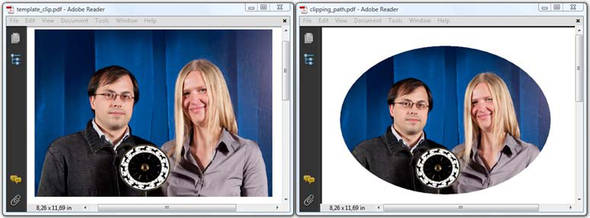
Template Clip
If you want to cut a rectangle out of the original image, as is done in the PDF to the left in figure 10.12, you could create a PdfTemplate object that is smaller than the original picture, and add the Image object to it.
Listing 10.20. TemplateClip.java
Image img = Image.getInstance(RESOURCE);
float w = img.getScaledWidth();
float h = img.getScaledHeight();
PdfTemplate t = writer.getDirectContent().createTemplate(850, 600);
t.addImage(img, w, 0, 0, h, 0, -600);
Image clipped = Image.getInstance(t);
clipped.scalePercent(50);
document.add(clipped);
What happens with the image in the template is true for all the objects you add to the direct content. Everything that is added outside the boundaries of a PdfTemplate or a page will be present in the PDF, but you won’t see it in a PDF viewer. It’s important to understand that iText may change the way the image is compressed, but it doesn’t remove pixels. In this case, the complete picture—including the name of the festival sponsor in the lower half of the image—will be in the PDF file, but it won’t be visible when looking at the PDF document.
If you aren’t satisfied with a rectangle, you can define a clipping path.
Clipping Path
You defined different paths in chapter 3, when you wrote lines and shapes to the direct content. With the combination of the clip() and newPath() methods, you can use such a path as a clipping path. You can reuse listing 10.20 to create the PDF shown to the right in figure 10.12. You only have to add a couple of lines.
Listing 10.21. ClippingPath.java
PdfTemplate t = writer.getDirectContent().createTemplate(850, 600);
t.ellipse(0, 0, 850, 600);
t.clip();
t.newPath();
t.addImage(img, w, 0, 0, h, 0, -600);
Any graphical shape can be used as a clipping path, including text.
Let’s finish this chapter with one more example that demonstrates another, less obvious, way to hide part of an image.
Using a Soft Mask for Direct Content
The PDF in figure 10.13 looks similar to the one in figure 10.12, but it also has a soft mask applied. The main difference between this and what you did for figure 10.11 is that you don’t use the soft mask for the Image object, but for the GState of the direct content.
Figure 10.13. Clipped image with a transparent overlay

The code to achieve this is rather complex, as you can see.
Listing 10.22. TransparentOverlay.java

This is an example that should be studied with this book in one hand and ISO-32000-1 in the other. This isn’t “the definitive chapter” about colors, images, and transparency, but we’ve looked at a selection of the most important functionality from the perspective of the iText developer.
10.4. Summary
We started this chapter with an introduction to color spaces. We discussed three device color spaces (RGB, CMYK, and Gray), as well as two special device color spaces (Separation and Pattern). These are the color spaces for which iText has specific color classes that can be used as font, fill, or stroke color. You also learned about making colors transparent. You can change the opacity and the blend mode of objects added to the direct content using the GState object, and you can group objects in a transparency group for which you can define isolation and knockout.
After this overview of colors and transparency, we took a look at the different image types that are supported by iText. We mapped these image types to the different image classes in iText. You created an image byte by byte, color by color to find out what images are about. You learned that iText changes the way some image types are compressed, but it doesn’t reduce the quality, unless you use java.awt.Image.
Finally, you made images transparent using masking (color key masking, explicit masking, and soft masking) and you learned to clip images. Although you may have the impression that we’ve covered a lot of functionality, we’ve only been scratching the surface. ISO-32000-1 contains much more information about color spaces, blending modes, image types, and so on.
We can’t go into more detail. We have to move on to chapter 11 and take a closer look at fonts, font programs, and glyphs.