
Chapter 4. Organizing content in tables
- Constructing a PdfPTable object
- Exploring the properties of a PdfPCell object
- Adding tables to the Document object
iText has existed for more than ten years now. If you were to ask me which objects have been the most important in the iText-related projects I’ve done in all those years, I wouldn’t have to think twice about the answer. Most of my assignments have consisted of creating reports that render the content of a database to a PDF document. This content had to be organized in tabular form. This can be achieved using two classes that are important enough to be the focus of an entire chapter: PdfPTable and PdfPCell.
We’ll start with simple examples, then move on to more complex tables using the data from the movie database.
4.1. Constructing tables
iText’s table functionality has evolved from a very low-level class in the early versions of iText to the twin classes Table and PdfTable in iText 0.30 (2000). These classes were useful, but they had some flaws. It was hard to fine-tune them due to design decisions made by the iText developers; that is, by me. Developers wanted to define how to split the table upon a page break, to control the way borders are drawn, and so on. The PdfPTable class, introduced by the codeveloper of iText, Paulo Soares, solved this problem.
The Table and PdfTable classes were removed in iText 5 (2009). So were Simple-Table and SimpleCell, two other table classes discussed in the first edition of iText in Action. Only PdfPTable and PdfPCell remain. They will be discussed in this chapter.
4.1.1. Your first PdfPTable
Suppose that you need to create a simple table that looks like figure 4.1. The code to generate this kind of table is pretty simple.
Figure 4.1. Your first PdfPTable

Listing 4.1. MyFirstTable.java
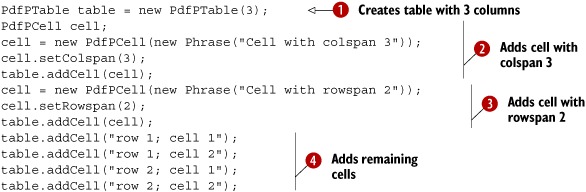
When you create a PdfPTable, you always need to pass the number of columns to the constructor. Creating a table with zero columns results in a RuntimeException. You can add different objects to a PdfPTable object using the addCell() method.
Automatic Creation of Rows
There’s a PdfPRow object in the com.itextpdf.text.pdf package, but you aren’t supposed to address it directly. iText uses this class internally to store the cells that belong to the same row.
In listing 4.1, the table has three columns ![]() . After adding the first cell with column span 3
. After adding the first cell with column span 3 ![]() , the first row is full. The next cell is added to a second row that is created automatically by iText. This cell has to span
2 rows
, the first row is full. The next cell is added to a second row that is created automatically by iText. This cell has to span
2 rows ![]() , so a third row is created, of which the first cell is reserved. Four more cells are then added
, so a third row is created, of which the first cell is reserved. Four more cells are then added ![]() ; the first pair completes the second row; the second pair completes the third row.
; the first pair completes the second row; the second pair completes the third row.
Note
When you add a PdfPTable to a Document, only complete rows are added. If you have a table with three columns and your final row has only two cells, the row won’t be added unless you use the method PdfPTable. completeRow().
You don’t have to worry about creating rows; iText creates them for you. Just make sure you’re adding the correct number of cells.
4.1.2. PdfPTable properties
We’ll talk about cells and cell properties such as text alignment, spacing, and borders in the next section. First, let’s take a look at the properties of the table: the width of the table and its columns, the spacing before and after the table, and the alignment of the table.
The default width of a table is 80 percent of the available width. Let’s do the math for the table created by listing 4.1. The width of the page is 595 pt minus the margins, which are 36 pt. Eighty percent of this width is (595 – (2 * 36)) * 0.80, which amounts to 418.4 pt.
Table Width
Each PdfPTable keeps two values for the width:
- widthPercentage— A percentage of the available width
- totalWidth— The absolute width expressed in user space units
When you add a PdfPTable to a Document, iText looks at one of these values, ignoring the other, depending on the value of lockedWidth. If this value is true, the table will have a fixed width, as defined by the totalWidth variable. By default, the value is false, and the exact width of the table will depend on the width available on the page or the width of the ColumnText object to which it’s added. The default width of the columns is equal to the width of the table divided by the number of columns.
FAQ
Is it possible to have the column width change dynamically based on the content of the cells? PDF isn’t HTML, and a PdfPTable is completely different from an HTML table rendered in a browser; iText can’t calculate column widths based on the content of the columns. The result would depend on too many design decisions and wouldn’t always correspond to what a developer expects. It’s better to have the developer define the widths.
You could say that each column has a relative width equal to 1. You can change this by defining new relative widths, or by setting absolute widths for the columns.
Relative Column Widths
Figure 4.2 shows five tables that look identical, but the widths of the table and columns were changed in five different ways.
Figure 4.2. Changing the widths of tables and columns

In the first three tables you define the column widths using relative values: new int[] {2, 1, 1} or new float{2, 1, 1}. This means that you want to divide the width of the table into four parts (2 + 1 + 1): two parts for the first column, one part for columns two and three.
Listing 4.2. ColumnWidths.java
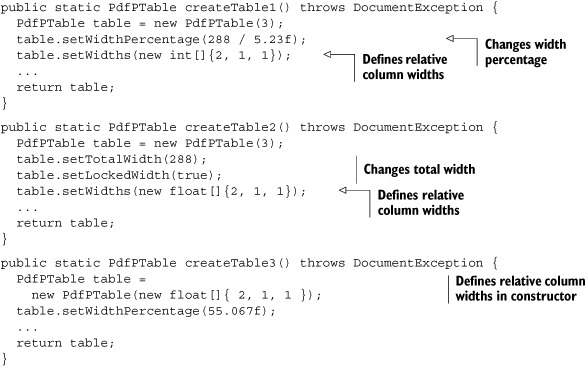
Suppose you want a table with a width of 288 pt instead of 523 pt. You could compute the width percentage like this: (288 / 523) * 100 = 55.067. Or you could use the methods setTotalWidth() and setLockedWidth() instead of setWidthPercentage(), which is easier, because you can avoid the math. Listing 4.2 also demonstrates the use of an alternative constructor: instead of creating a PdfPTable with an int defining the number of columns, you pass the widths array as a parameter for the constructor.
Absolute Column Widths
The last two tables in figure 4.2 are created by code which defines absolute widths for the columns instead of for the whole table. This can be done in two different ways, both shown in this listing.
Listing 4.3. ColumnWidths.java (continued)

The first method—computing the width percentages—isn’t ideal. It will only work if you know the available width in advance. In listing 4.3, you pass a Rectangle object that represents the page size minus the margins.
It’s better to use setTotalWidth() with an array of float values as the parameter, then set the locked width to true.
Spacing Before and After a Pdfptable
The five tables from listings 4.2 and 4.3 are added to the Document using this code.
Listing 4.4. ColumnWidths.java (continued)

If you don’t provide any extra spacing, it’s hard to distinguish the different tables. This can be an advantage! You can create a structure that looks as if it’s one big table by adding a series of smaller, separate tables that are glued to each other.
Table Alignment
In figure 4.3, three tables were added after each other without extra spacing, but the alignment of the tables was changed in between.
Figure 4.3. Three tables with different alignments

The tables in figures 4.1 and 4.2 were centered; that’s the default alignment. You can change the alignment with the setHorizontalAlignment() method.
Listing 4.5. TableAlignment.java
PdfPTable table = createFirstTable();
table.setWidthPercentage(50);
table.setHorizontalAlignment(Element.ALIGN_LEFT);
document.add(table);
table.setHorizontalAlignment(Element.ALIGN_CENTER);
document.add(table);
table.setHorizontalAlignment(Element.ALIGN_RIGHT);
document.add(table);
You’ve now played around with your first table; it’s time to pick up the thread started in the previous examples and return to the movie database.
4.2. Changing the properties of a cell
PdfPCell extends Rectangle, inheriting a plethora of methods to change the way borders are drawn and backgrounds are painted. We’ll discuss these methods later on. First, we’ll focus on the content of a PdfPCell.
Internally, PdfPCell content is kept inside a ColumnText object. The mechanics of a PdfPCell are easy to understand if you know how the ColumnText object works. If you skipped chapter 3 because you were eager to know more about tables, please return to section 3.3 before reading about adding cells in text or composite mode.
4.2.1. PdfPCell in text mode
In this subsection, you’re going to create tables with content that can be expressed as Chunk or Phrase objects. An example of such a table is shown in figure 4.4.
Figure 4.4. Cells in text mode

You won’t use any Paragraph, List, or Image objects here. You’ll work in text mode, and therefore define the alignment and leading of the text using methods of the PdfPCell class.
Colspan, Rowspan, and the Alignment of a Cell
You can experiment with colspan, rowspan, and different alignment methods.
Listing 4.6. MovieTextMode.java

In listing 4.6, cells are added to the table in two ways.
- With a PdfPCell object—You create a PdfPCell using a Phrase as a parameter, and add it to the table with the addCell() method. Before adding the cell, you use methods such as setHorizontalAlignment(), setVerticalAlignment(), and so on, to change the properties of the PdfPCell.
- Without a PdfPCell object—You add a String or a Phrase object straight to the table with addCell(), using the properties of the default cell. The default cell is a special PdfPCell instance owned by the PdfPTable object. It can be accessed with the getDefaultCell() method.
The possible values for the setHorizontalAlignment() method are the same ones you used to set the alignment of the ColumnText object in the previous chapter. The possible values for setVerticalAlignment() are Element.ALIGN_TOP, Element. ALIGN_MIDDLE, and Element.ALIGN_BOTTOM.
Just as with ColumnText, you can use the setIndent() method to define an indentation for the first line of a paragraph in the cell, setFollowingIndent() to specify the indentation of the first line of the paragraphs following the first paragraph, and setRightIndent() to change the indentation to the right. Finally, there’s also a setSpaceCharRatio() to change the ratio of the word spacing if you set the alignment to Element.ALIGN_JUSTIFIED.
In the next example, you’ll experiment with the leading and the padding of a cell.
Spacing in Cells
The cells in the right column of the table shown in figure 4.5 have different leading or padding. Observe that the default leading of the content of a cell in text mode is equal to the font size. Internally, the leading is set like this:
setLeading(0, 1);
Figure 4.5. Different spacing in cells

This is different from the default leading of a Phrase object outside a PdfPCell.
You can change the leading with the same setLeading() methods you’ve used for ColumnText; listing 4.7 is the code that produced the first five rows in figure 4.5. Note that setting the leading to 0 isn’t advised! The text will be added outside the cell, and if the content is split into multiple lines, they will overlap, resulting in illegible gibberish.
Listing 4.7. Spacing.java

The default padding of a PdfPCell is 2 pt, and the setPadding() method can be used to change the default. Rows 6-8 in figure 4.5 are produced with the code in the following listing. Observe that you can differentiate: you can set different values for the top, bottom, left, and right padding.
Listing 4.8. Spacing.java (continued)

Note that setPadding() creates a behavior that is similar to what happens if you use the cellpadding attribute of a <table> tag in an HTML table. There is no equivalent of the cellspacing attribute, but in chapter 5 you’ll mimic that behavior using cell events.
You can adjust the padding depending on the ascender of the first line in the cell. The bottom padding can be adapted to the descender of the last line. By tweaking the boolean values of the setUseAscender() and setUseDescender() methods, you can create rows 9 to 12 in figure 4.5. This listing refers only to row 12.
Listing 4.9. Spacing.java (continued)

Remember that you have measured text in the previous chapter: the ascender was the space needed above the baseline; the descender was the space needed below the baseline.
Changing the leading and padding and using the ascender and descender have an impact on the height of a cell and, by extension, on the height of a row.
Row Height
The height of a row is a value that needs to be computed, but iText doesn’t always have sufficient data to do the math.
Listing 4.10. TableHeight.java

In this example, the height of the table is 0 pt before and 48 pt after you add it to the Document. That’s normal: the height of a table can’t be computed before iText knows its width. The same table with a fixed width of 50 pt has a height of 192 pt. Due to this fixed width, which is much smaller than 80 percent of the available page width, the content in the cells has to be wrapped. This results in a larger table and cell height.
You could tell iText not to wrap the content with the setNoWrap(true) method, but I wouldn’t advise this. Unwrapped text risks exceeding the borders of the table and overlapping with the content of the next cell, or even, as shown in figure 4.6, going outside the page boundaries.
Figure 4.6. Different row height methods for cells and tables

If you don’t like the calculated height, you can use setFixedHeight() to define the height yourself. Rows 3–6 in figure 4.6 are created with listing 4.11. Paragraph p contains the String “Dr. iText or: How I Learned to Stop Worrying and Love PDF.” It is added to the table twice: once to a cell with a fixed height of 72 pt, and once to a cell with a fixed height of 36 pt.
A height of 36 pt isn’t enough, and the words “and Love PDF” aren’t shown. To put it in the terminology we used in chapter 3, the go() method of the internal ColumnText method was invoked, and the content didn’t fit the rectangle. That content is never added to the table! Use this method only if you know for sure the content will fit the cell, or if it’s OK for your application to reduce the lines that are printed.
To assure a certain cell height, without losing any content, you can use the setMinimumHeight() method. If the text fits the rectangle, the height will be equal to the desired height; if the text doesn’t fit, it will be larger.
Listing 4.11. CellHeights.java
cell = new PdfPCell(p);
table.addCell("fixed height (more than sufficient)");
cell.setFixedHeight(72f);
table.addCell(cell);
table.addCell("fixed height (not sufficient)");
cell.setFixedHeight(36f);
table.addCell(cell);
table.addCell("minimum height");
cell = new PdfPCell(new Phrase("Dr. iText"));
cell.setMinimumHeight(36f);
table.addCell(cell);
table.setExtendLastRow(true);
table.addCell("extend last row");
table.addCell(cell);
document.add(table);
Note that the height of the final row is extended to the bottom margin of the page in figure 4.6. This isn’t a cell property; it’s something that has to be defined at the table level with the setExtendLastRow() method.
Note
The setExtendLastRow() method exists in two versions. In listing 4.11, you use one Boolean to tell iText whether the row should be extended (true) or not (false). With a second Boolean, you can indicate whether the final row of the table has to be extended if the table is split and distributed over different pages.
So far, you’ve been working in text mode, but except for the leading, the horizontal alignment, and the indentation, the cell properties we’ve discussed are also valid in composite mode: cell height, padding, and so on. The same goes for the properties that are inherited from the Rectangle class.
Rotation, Background Color, Borders, and Border Colors
You can rotate the content of a cell with the setRotation() method. Just like with images, the rotation is defined counterclockwise. The answer to the questions, “What is horizontal?” and “What is vertical?” is affected by the rotation angle. This matters when setting the alignment. The word “GRAY” in the second row of figure 4.7 is centered horizontally, but not using the setHorizontalAlignment() method. Instead, it’s done by using setVerticalAlignment() with the parameter Element.ALIGN_MIDDLE.
Figure 4.7. Cells and rotation, background color, borders, and border colors
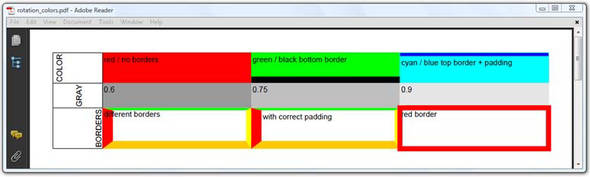
The first thing that jumps to the eye when looking at figure 4.7 is the fact that it’s more colorful than the previous table examples. The background color of the cells in the first row is changed with the setBackground() method. The setGrayFill() method changed the backgrounds of the cells in the second row. Note that the borders are different because the setBorder() method was used. Take a look at the next bit of code, which created some of the cells in figure 4.7, to discover more new Rectangle methods that can be used to change the properties of a cell.
Listing 4.12. RotationAndColors.java

Rectangle.NO_BORDER (which removes the border) is one possible value that can be used for the setBorder() method. To define a top, bottom, left, and right borders, you need Rectangle.TOP, Rectangle.BOTTOM, Rectangle.LEFT, and Rectangle.RIGHT. You’ll probably remember from chapter 2, when we discussed the borders of the Image objects, that Rectangle.BOX is shorthand for the combination of the four borders. Rectangle.BOX is the default value for cell borders.
In listing 4.12, you use setUseBorderPadding(true) ![]() . This adapts the padding to take the border width into account. Otherwise the border could overlap the content of the cell.
This problem is demonstrated in the second cell of row 3 in figure 4.7.
. This adapts the padding to take the border width into account. Otherwise the border could overlap the content of the cell.
This problem is demonstrated in the second cell of row 3 in figure 4.7.
The border width can be set with the setBorderWidth() method, but there are variations for every side of the border. The same goes for the setBorderColor() method. This is demonstrated in the next listing, which is responsible for drawing two more cells in figure 4.7.
Listing 4.13. RotationAndColors.java (continued)

There’s a subtle difference between the row with the variable borders ![]() (cell 2 in row 3 of figure 4.7) and the row with the uniform borders
(cell 2 in row 3 of figure 4.7) and the row with the uniform borders ![]() . Whenever you use a method that changes a property of a single border, the setUseVariableBorders(true) method is invoked. This will cause the borders to be drawn within the cell boundaries and the different parts to be miter
joined. You can also invoke this method youself on a cell with uniform borders. Because you didn’t use this method in
. Whenever you use a method that changes a property of a single border, the setUseVariableBorders(true) method is invoked. This will cause the borders to be drawn within the cell boundaries and the different parts to be miter
joined. You can also invoke this method youself on a cell with uniform borders. Because you didn’t use this method in ![]() , the final cell looks slightly bigger than the others: the thickness of the border is distributed equally inside and outside
the cell dimensions.
, the final cell looks slightly bigger than the others: the thickness of the border is distributed equally inside and outside
the cell dimensions.
And now it’s time to switch to composite mode.
4.2.2. PdfPCell in composite mode
Text mode is meant for Chunk and Phrase objects. As soon as you need Paragraphs, Lists, or Images, you have to work in composite mode. There’s a huge difference between
PdfPCell cell = new PdfPCell(new Paragraph("some text"));
and
PdfPCell cell = new PdfPCell();
cell.addElement(new Paragraph("some text"));
In the first code line, the Paragraph is treated in text mode: Paragraph-specific properties, such as the leading and the alignment, are ignored. Instead, the corresponding properties of the PdfPCell are used.
In the last two lines, you switch to composite mode by using addElement(). All the content that was previously inside the cell in text mode is discarded. Now the leading, alignment, and indentation set for the cell are ignored in favor of the properties of the elements that are added. This is exactly the same mechanism we discussed in the previous chapter when we talked about the ColumnText object..
Movie List
You can now create a table of movie information and introduce Paragraph, List, and Image objects. See figure 4.8.
Figure 4.8. Cells in composite mode

Each movie in the next listing takes only two cells: one with the movie poster ![]() , another one with information about the movie
, another one with information about the movie ![]() .
.
Listing 4.14. MovieCompositeMode.java

Cell 2 consists of Paragraph and List objects with different alignments, leading, spacing, and indentation values ![]() . Because you’re using the addElement() method, you’re working in composite mode, and all the properties that are set for these different Elements are preserved. For Images, you can specify whether or not they have to be scaled.
. Because you’re using the addElement() method, you’re working in composite mode, and all the properties that are set for these different Elements are preserved. For Images, you can specify whether or not they have to be scaled.
Adding Images to a Table
Figure 4.9 shows four movie posters added in four different ways. Listing 4.15 shows that the posters of the first two X-Men movies (directed by Bryan Singer) were added using a special PdfPCell constructor. The poster of the final part in the X-Men trilogy (directed by Brett Ratner) was added straight to the table with addCell(). A fourth poster was added to a cell with addElement(). (FYI: Bryan Singer stepped down as director of X-Men 3 in favor of Superman Returns; he has regretted his mistake ever since.)
Figure 4.9. Cells and images

Listing 4.15. XMen.java

When you create a PdfPCell with an Image as a parameter, the default padding is 0 pt instead of 2 pt. With an extra parameter of type boolean, you can ask iText to scale the image so that it fits the width of the cell ![]() . By default, the value of this boolean is false and the image isn’t scaled
. By default, the value of this boolean is false and the image isn’t scaled ![]() . This is a risk; if the image doesn’t fit within the borders of the cell, it will exceed them and overlap other cells.
. This is a risk; if the image doesn’t fit within the borders of the cell, it will exceed them and overlap other cells.
Adding an Image with addCell() will scale it, but the properties of the default cell will be used ![]() : the third poster in image 4.9 has a padding of 2 pt, and it’s bottom-aligned.
: the third poster in image 4.9 has a padding of 2 pt, and it’s bottom-aligned.
Finally, you can add an image as an element ![]() . The Image is scaled so that it fills 100 percent of the cell width, unless you change the width percentage with the setWidthPercentage() method.
. The Image is scaled so that it fills 100 percent of the cell width, unless you change the width percentage with the setWidthPercentage() method.
Another special object that can be added to a cell is PdfPTable: tables can be nested!
Nested Tables
There was a time when rowspan wasn’t supported for PdfPCells. The only way to work around this was to use nested tables. Cells 1.1 and 1.2 in figure 4.10 are part of a nested table. So are cells 12.1 and 12.2. Because of this, cells 13, 14, and 15 look as if they have their rowspan set to 2.
Figure 4.10. Nested tables

Looking at next listing, you’ll immediately see the difference between the nested table in cell 1 and the nested table in cell 12.
Listing 4.16. NestedTable.java

Just like with the Image object, the padding is 2 pt when the PdfPTable is added with addCell() directly. The padding is 0 pt when you wrap the table in a PdfPCell first.
Complex Table Layouts
You can use nested tables to create layouts that are tabular, but that don’t fit in a traditional grid. Figure 4.11 is an example of such a layout.
Figure 4.11. Nesting tables for complex layouts

This layout is created using the next listing, which is an example of deep nesting. A table is nested inside a nested table.
Listing 4.17. NestedTables.java

The table created with the fullTitle() method was added with the addElement() method. The effect is different from adding a PdfPTable as a parameter of the addCell() method or the PdfPCell constructor. With addElement(), the table is added to the ColumnText object of the cell, and you can add other elements to the same cell.
You’ve now worked with some small, almost academic, table examples to demonstrate the properties of tables and cells, but once you start working with real-world examples, tables can get really large. In the next section, we’ll discuss tips and tricks that are important as soon as a table spans multiple pages.
4.3. Dealing with large tables
The table in figure 4.11 has a header with a date. If you download the example and generate the PDF on your own computer, you’ll see that the table with all the movies spans more than one page for most of the days. The table is nicely split, but unfortunately the header isn’t repeated. In this section, you’ll fix this, and also add a footer while you’re at it.
4.3.1. Repeating headers and footers
Figure 4.12 is another overview of movie screenings on a specific day. The date is shown in the first row. The second row consists of headers that describe the content of the columns: Location, Time, Run Length, Title, and so on. The same information is also added as a footer.
Figure 4.12. Repeating headers and footers

To get the effect in figure 4.12, you add three rows: a black row with the date ![]() , then a light gray row twice
, then a light gray row twice ![]() (once for the header and once for the footer).
(once for the header and once for the footer).
Listing 4.18. HeaderFooter1.java

This may seem strange, adding the footer before you start adding any other content, but this is the twist: first you use the
setHeaderRows() method to tell iText how many rows are part of the header, and you add the row count of the footer. In listing 4.18, you set the value to 3 ![]() . Then you use the setFooterRows() method to tell iText how many of the header rows are actually footer rows. If there are none, there’s no need to do this,
but in this example you set the value to 1
. Then you use the setFooterRows() method to tell iText how many of the header rows are actually footer rows. If there are none, there’s no need to do this,
but in this example you set the value to 1 ![]() .
.
The result is that the first two rows will be added first, followed by the real content of the table. When a new page is necessary, or when there’s no more real data, the third row—the footer row—will be added. If the table continues on another page, the header is repeated. And so is the footer at the end of the table, unless you’ve used setSkipLastFooter(true). This method is useful if you want to add a footer saying, “This table continues on the next page.” It’s obvious that you don’t want to add this text if there is no more data in the table. There’s also a setSkipFirstHeader() method for a similar reason: if you want the header to say something like, “This is the continuation of the table on the previous page.”
All the screenshots so far have showed only one page, or part of a page. But how does iText split a table that runs over to a new page?
4.3.2. Splitting tables
What do you want iText to do if a row doesn’t fit on the page? Do you want iText to start the row on a new page? Or do you want iText to add as much data from that row on the current page, and add the rest to the next page? Both options are possible, and they’re demonstrated in figure 4.13.
Figure 4.13. Different ways to split a table

In the first example, the second Terminator movie doesn’t fit on the upper page. The complete row is forwarded to the next page. This is the default behavior of iText.
In the lower example, most of the data is added to the current page, but one country is printed on the next page.
Listing 4.19. HeaderFooter2.java
PdfPTable table = getTable(connection, day);
table.setSplitLate(false);
document.add(table);
The HeaderFooter2 example extends the HeaderFooter1 example, and it reuses the getTable() method, so the table is constructed in exactly the same way. But with the setSplitLate() method, you decide whether iText should wait to split the cells of the first row that doesn’t fit the page.
By default, iText only splits rows that are forwarded to the next page but that still don’t fit because the row height exceeds the available page height. You can avoid this by using the following line of code:
table.setSplitRows(false);
This is a dangerous line, because now not one row will be split. Rows that are too high to fit on a page will be dropped from the table!
Dealing with large tables isn’t only about repeating headers and footers, or about splitting tables. It’s also about managing the memory that is used by a table, making sure that you don’t consume more memory than is available in the Java Virtual Machine (JVM).
4.3.3. Memory management for LargeElement implementations
In chapter 2, you learned that the Chapter and Section objects implement the LargeElement interface. Just like PdfPTable, you risk consuming a lot of memory adding many Elements to a LargeElement before adding the LargeElement to a Document.
When an object is added to a Document, you can decide to make it eligible for garbage collection (removal from memory). The problem with objects such as PdfPTable and Chapter is that you can’t add the object to the Document until you’ve completed it; or can you? In section 3.2, you constructed a large table that consisted of several small tables that were glued to each other, but that doesn’t work if you want repeating headers and footers that are drawn in the correct place automatically. What you need is to write part of the table to the PdfWriter and its corresponding OutputStream, then find a way to flush that part from memory. You should be able to do this without unwanted side effects affecting the headers, footers, and, in the case of chapters, indentations, titles, and so on.
The LargeElement interface was created to help you solve this problem. Classes implementing this interface need to implement three methods: setComplete(), isComplete(), and flushContent(). The isComplete() and flushContent() methods are used by iText internally. The only method that is important for you is the setComplete() method.
Listing 4.20. MemoryTests.java
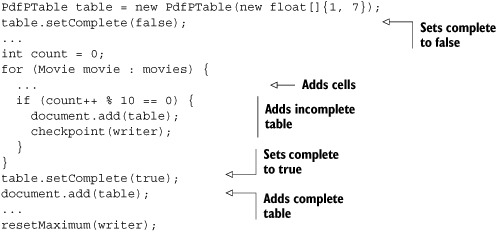
If you know you’ll be adding a LargeElement, and you don’t plan to reuse it, you have to inform iText that you haven’t finished adding content. In listing 4.20, you’re adding the table to the document every ten movies, but you’ve told iText that it isn’t complete yet. Internally, iText will use the method isComplete(). If this method returns true, the flushContent() method will be called.
In previous examples, all the rows were added to the table and they were kept in memory until the table was added to the document. In listing 4.20, rows are written to the PdfWriter at an earlier stage. Once the cell and row objects are rendered to PDF, they’re deleted, so that the JVM can remove them from the memory. Once you’ve finished adding rows, you flag the table as completed, and you add the remaining rows to the document.
The checkpoint() and resetMaximum() methods in listing 4.20 write information about the memory use to a text file. By inspecting this file, you can discover that a table with the information and posters for 120 movies consumes about 4 MB. If you add the table to the document before it’s completed (for instance, every 10 movies), the maximum memory needed by the JVM amounts to about 160 KB. This is a huge difference; using the LargeElement interface can help you fine-tune your application if you’re dealing with a large volume of data.
The setComplete() method is only useful if you’re adding the table with the Document.add() method. In the next section, you’ll add a PdfPTable to the direct content. This will give you more power, but also more responsibility: you’ll need to tell iText where you want to position every part of the table.
4.4. Adding a table at an absolute position
In chapter 2, you created high-level objects, and you let iText decide where they had to be put on the page. In chapter 3, you learned about writing to the direct content, and you discovered how to combine high-level objects with low-level access using the ColumnText object.
Up until now, you’ve used the PdfPTable class as a high-level object. When added to the Document, iText writes the textual content of the cells to the text layer, and all the borders, background colors, and images are written to the layer just beneath. It’s also possible to write a PdfPTable to one of the direct content layers on top of or under the text and graphics layers. See figure 3.2 and read section 3.1.1 for a more elaborate description.
In the next section, you’ll discover that a table also has different layers.
4.4.1. Working with writeSelectedRows()
Figure 4.14 shows a calendar I made for 2011. In the background, you can see a picture taken by one of the editors of the book; in the foreground, you can see a table that was added at an absolute position.
Figure 4.14. A calendar in a PDF with a table added at an absolute position

Listing 4.21 shows how it’s done.
Listing 4.21. PdfCalendar.java

Note that you always have to set the total width ![]() if you intend to add the PdfPTable at an absolute position. You don’t have to lock the width, because iText will ignore the width percentage anyway; that width
only makes sense when using document.add().
if you intend to add the PdfPTable at an absolute position. You don’t have to lock the width, because iText will ignore the width percentage anyway; that width
only makes sense when using document.add().
The table is added to a PdfContentByte object using the writeSelectedRows() method ![]() . Let’s take a look at the parameters.
. Let’s take a look at the parameters.
Selecting the Rows and the Table Position
With the first two parameters, you can define the start and the end of the table rows. In listing 4.21, all the rows are added, because you use 0 as the starting row and –1 as end row. The value –1 means, “show all the remaining rows.”
The next two parameters of the writeSelectedRows() method define the (x,y) coordinates of the upper-left corner of the table. You want the table to end 18 pt above the lower boundary of the page, so you need to calculate the height of the table and add 18 to that value.
Note
The writeSelectedRows() method returns the current Y position after the table is added. If you were to wrap line ![]() inside a System.out.println() statement in listing 4.21, you’d see that every table returns the value 18.
inside a System.out.println() statement in listing 4.21, you’d see that every table returns the value 18.
The final parameter is the PdfContentByte object to which you want to add the table.
Content Canvases
Instead of a single PdfContentByte object, you could pass an array of four PdfContentByte objects as the final parameter of the writeSelectedRow() method. These represent four direct content layers (aka, canvases). Each canvas has a specific name and purpose:
- PdfPtable.BASECANVAS— Anything placed here will be under the table.
- PdfPtable.BACKGROUNDCANVAS— This is the layer where the backgrounds are drawn.
- PdfPtable.LINECANVAS— This is the layer where the lines are drawn.
- PdfPtable.TEXTCANVAS— This is the layer where the text goes. Anything placed here will cover the table.
If you only pass one PdfContentByte object, text will cover lines, lines will cover backgrounds, and backgrounds will cover anything added to the base canvas. Note that iText never adds content to the base canvas. It’s there in case you want to add something that goes under all the other content in a table or a cell event; see chapter 5 for examples.
Splitting a Pdfptable Vertically
Suppose that a table has so many columns that it doesn’t fit the width of a page. In that case, your only option is to split it vertically. This is demonstrated in figure 4.15.
Figure 4.15. Splitting a table vertically

This is a single table listing the movies directed by Zhang Yimou. The total width is set to 600 pt in listing 4.22 ![]() , but the width of a page is only 595 pt.
, but the width of a page is only 595 pt.
In this example the writeSelectedRows() method was used twice, with two extra parameters to select the columns.
Listing 4.22. Zhang.java

Columns 0 to 2 (2 not included) are added at position (236, 806) ![]() on one page. Column 2 and all the remaining columns (–1 is used instead of the real number of columns) are added at position
(36, 806) on the next page
on one page. Column 2 and all the remaining columns (–1 is used instead of the real number of columns) are added at position
(36, 806) on the next page ![]() .
.
This is one way to add a PdfPTable at an absolute position. The other way is to wrap a PdfPTable object inside a ColumnText object.
4.4.2. Wrapping tables in columns
Figure 4.16 shows a table with a header and footer that were added at absolute positions in two separate columns on the same page.
Figure 4.16. A PdfPTable rendered in two columns

In listing 4.23, you use the ColumnText mechanism from chapter 3 in combination with the PdfPTable functionality that repeats headers and footers (explained in section 4.3.1).
Listing 4.23. ColumnTable.java

This section introduced some low-level functionality of the high-level table object. In the next chapter, we’ll return to the PdfPTable and PdfPCell objects, and you’ll use low-level methods to draw tables and cells with rounded corners and other fancy layout features. But first, let’s look back on what you’ve learned in this chapter.
4.5. Summary
This chapter was dedicated entirely to tables. You learned how to create PdfPTable and PdfPCell objects. You were made aware of the PdfPRow class, but you know that you shouldn’t worry about it: rows are created behind the scenes by iText.
You learned how to define the width, alignment, and spacing of the complete table and its columns, and you discovered that cells are very similar to the ColumnText object that was discussed in the previous chapter. You’ve worked with cells in text mode and in composite mode. In the subsection about text mode, you learned more about the properties of a cell. The section with the examples in composite mode focused on special types of cells: cells with images, and cells containing other tables (nested tables).
As soon as you have a table that spans multiple pages, you need to pay special attention to headers and footers if you want them to repeat on every page. You also have to choose whether you want to split the cells of a row if they don’t fit on the current page, or if you want to forward them to the next page. You also learned about the implications on your JVM of having a large table; you learned how to reduce the maximum amount of memory needed when dealing with a large table.
Finally, you added a PdfPTable at absolute coordinates in two different ways: with the writeSelectedRows() method, and by wrapping the table inside a ColumnText object.
In the next chapter, you’ll learn how to fine-tune the layout by using table and cell events.