Chapter 5. Table, cell, and page events
- Cell and table events
- Events for Chunks, Paragraphs, Chapters, and Sections
- Page boundaries
- Adding headers, footers, and watermarks using page events
In chapters 2 and 4, you added content to a document using a plethora of objects and methods available in iText. When adding a Chunk, you were able to use methods to add lines and a background color. When creating a PdfPTable, you could define borders and backgrounds. But what if all of this isn’t sufficient? What if you don’t want a rectangular background for a Chunk, but a custom shape instead, such as an ellipse? What if you want the borders of a PdfPCell to have rounded corners? This chapter explains how to write custom functionality for Chunk, Paragraph, Chapter, Section, PdfPTable, and PdfPCell objects.
In previous examples involving these objects, you’ve seen that iText takes responsibility for creating a new page whenever the content doesn’t fit the current page. You may want to automatically add artifacts with meta-content to each page—perhaps a running head with a title, a footer with the page number, or a watermark. This can be done using page events.
All of this will be covered in this chapter, but let’s first continue with more table examples, and find out how to create table and cell events.
5.1. Decorating tables using table and cell events
Two methods that are present in the API documentation for PdfPTable and PdfPCell were overlooked in chapter 4: PdfPTable.setTableEvent() and PdfPCell.setCellEvent(). The former method expects an implementation of the PdfPTableEvent interface as its parameter; the latter expects a PdfPCellEvent implementation. These interfaces can be used to define a custom layout for tables and cells; for instance, a custom background or custom borders for a table and its cells. You’ll use these events on a table you created in the previous chapter.
5.1.1. Implementing the PdfPTableEvent interface
Suppose you want to add a background color to every other row of a table, as shown in figure 5.1.
Figure 5.1. Table with alternating row backgrounds

One way to achieve this would be to change the background color of the default cell for each row so that odd rows don’t have a background color, and the background of even rows is yellow. This would work, but you must consider a possible side effect. If you look at figure 5.1, you’ll see that you’re able to fit 27 rows on one page, not including header and footer rows. The table continues on the next page. If you alternate the background color of the default cell, the background of row 28 in the table (an even row) will be colored, in spite of the fact that it’s row 1 on the next page (an odd row). Maybe you don’t want this—maybe you want the first row after the header to be a row without a background color. If that’s the case, you should implement the tableLayout() method and use a table event.
Listing 5.1. AlternatingBackground.java

Take a look at the parameters of the tableLayout() method:
- table— The PdfPTable object to which the event is added. Don’t use this method to change the contents of the table; the table has already been rendered at the moment the tableLayout() method is invoked. Consider this object to be read-only.
- widths— A two-dimensional array of float values. A table with m rows and n columns results in an array with a maximum dimension of m x (n + 1). The X coordinate of the left border of the first cell in row r is widths[r] [0]; the right border of the last cell in this row is widths[r][n + 1], provided that all cells in the row have colspan 1. Setting a different colspan can result in a lower number of elements in the row array. This is the case for the first row in figure 5.1 (the header row). The array widths[0] has only two elements: widths[0][0] is the X coordinate of the left border of the table; widths[0][1] is the X coordinate of the right border.
- heights— An array with float values. You can see 30 rows in figure 5.1. The heights array passed to the table event when this part of the table is drawn will contain 31 values. These values are the Y coordinates of the borders of the rows: heights[0] is the Y coordinate of the upper border of the table; heights[30] is the Y coordinate of the lower border.
- headerRows— An int with the same value as table.getHeaderRows(). If you also have footer rows, you should use
 to retrieve the correct number of header and footer rows. This parameter dates from the time when the footer row functionality
wasn’t available yet.
to retrieve the correct number of header and footer rows. This parameter dates from the time when the footer row functionality
wasn’t available yet.
- rowStart— This int value will always be 0 if you add the table with document.add(). If you use writeSelectedRows(), it will be identical to the parameter with the same name passed to this method: the row number of the first row that is drawn.
- canvases— An array of PdfContentByte objects. There are four of them, and you encountered them in section 4.4.1: PdfPtable.BASECANVAS, PdfPtable.BACKGROUNDCANVAS, PdfPtable.LINECANVAS, and PdfPtable.TEXTCANVAS.
In listing 5.1 you loop over the rows, starting with the second row after the header, in steps of two rows. Every row can have a different number of columns. Using the widths and the heights arrays, you define a rectangle encompassing the complete row. Finally, you draw a yellow rectangle to the BASECANVAS. You chose the base canvas because you don’t want to cover background colors that may be defined for some cells. There aren’t any cells with backgrounds in this example, except in the header and footer rows, but this way you can easily reuse this code for other tables.
For the event to take effect, you need to use the setTableEvent() method.
Listing 5.2. AlternatingBackground.java (continued)
List days = PojoFactory.getDays(connection);
PdfPTableEvent event = new AlternatingBackground();
for (Date day : days) {
  PdfPTable table = getTable(connection, day);
table.setTableEvent(event);
  document.add(table);
  document.newPage();
}
Thanks to the information that is passed to the tableLayout() method, you can write text and shapes to the direct content to change the appearance of a table and its cells. A similar mechanism exists for PdfPCell objects.
5.1.2. Implementing the PdfPCellEvent interface
In figure 5.1, you list a number of screenings and include the run length of each movie. Suppose you wanted to add visual information that is identical to the textual info, but that can be read in a glance. This is done in figure 5.2: by looking at the background of the cell with the duration, you immediately get an indication of the run length of the movie.
Figure 5.2. Cells with custom background and extra info added using cell events
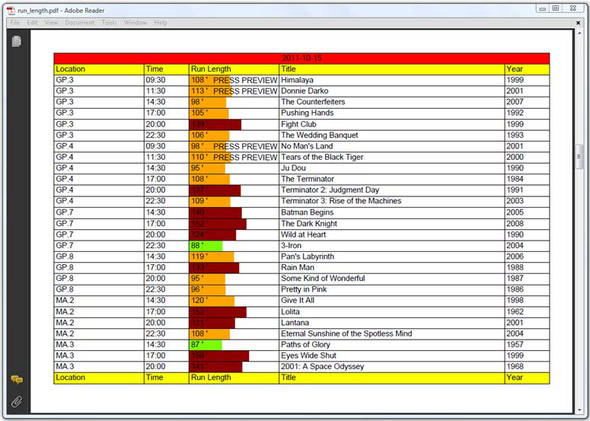
The width of column 3 in figure 5.2 corresponds to 240 minutes. That’s 100 percent. For a two-hour movie (50 percent of four hours), you draw a rectangle in the background that takes half the width of that cell. If a movie has a duration less than 90 minutes, you draw a green rectangle. Movies with a duration greater than 120 minutes are drawn in dark red. Movies with a run length between 90 and 120 minutes get an orange rectangle. All of this is done in the cellLayout() implementation.
Listing 5.3. RunLengthEvent.java
class RunLength implements PdfPCellEvent {
  public int duration;
  public RunLength(int duration) {
    this.duration = duration;
}
  public void cellLayout(PdfPCell cell, Rectangle rect,
    PdfContentByte[] canvas) {
    PdfContentByte cb = canvas[PdfPTable.BACKGROUNDCANVAS];
    cb.saveState();
    if (duration < 90) {
      cb.setRGBColorFill(0x7C, 0xFC, 0x00);
    }
    else if (duration > 120) {
      cb.setRGBColorFill(0x8B, 0x00, 0x00);
    }
    else {
      cb.setRGBColorFill(0xFF, 0xA5, 0x00);
    }
    cb.rectangle(rect.getLeft(), rect.getBottom(),
      rect.getWidth() * duration / 240, rect.getHeight());
    cb.fill();
    cb.restoreState();
  }
}
Observe that the cellLayout() method is a lot easier to understand than the tableLayout() method. There are only three parameters:
- cell— The PdfPCell object to which the event is added. This is just for read-only purposes! Do not try to change the content of this cell—it won’t have any effect. Once the method of the cell event is triggered, the cell has already been rendered.
- rect— The Rectangle object defining the borders of the cell.
- canvas— An array of PdfContentByte objects with the same elements as described in sections 4.4.1 and 5.1.1.
Suppose you’re planning to project the extended version of the Lord of the Rings trilogy. The run length of part 3 is 250 minutes, pauses not included, so the background of the duration cell for The Return of the King will exceed the cell borders. By using cell events, you can extend the background color beyond the cell borders.
Note
The layout methods give you access to direct content layers of the complete page, along with coordinates that are helpful if you want to know the position of the table or cell that was added. It’s up to you to use these coordinates, or not. You can’t change the content and the appearance defined for the original table or cell objects. These objects are already rendered to the page when the layout method is called.
Cell events are declared to a PdfPCell using the setCellEvent() method.
Listing 5.4. RunLengthEvent.java (continued)
PdfPCell runLength = new PdfPCell(table.getDefaultCell());
runLength.setPhrase(
  new Phrase(String.format("%d '", movie.getDuration())));
runLength.setCellEvent(new RunLength(movie.getDuration()));
if (screening.isPress()) {
  runLength.setCellEvent(press);
}
table.addCell(runLength);
In listing 5.4, you use the copy constructor of PdfPCell to create a new cell with the same characteristics as the default cell of the table. You use the setPhrase() method to add content in text mode—this corresponds to the ColumnText.setText() method. Before you add the cell to the table, you add the cell events. First the RunLength event, with the behavior explained in listing 5.3, then an event named press. This is an instance of PressPreview, a cell event that adds the words “PRESS PREVIEW” if the screening is a press preview.
Note
Events are cumulative. The PressPreview event doesn’t replace the RunLength event. The layout methods of both classes will be called if the screening is a press preview. If you want to replace an existing cell event by a new one, you need to remove the old event first. This can be done by setting the event to null, like this: cell.setCellEvent(null);.
Here is the PressPreview class.
Listing 5.5. RunLengthEvent.java (continued)
class PressPreview implements PdfPCellEvent {

  public BaseFont bf;
  public PressPreview() throws DocumentException, IOException {
    bf = BaseFont.createFont();
  }

  public void cellLayout(PdfPCell cell, Rectangle rect,
    PdfContentByte[] canvas) {
    PdfContentByte cb = canvas[PdfPTable.TEXTCANVAS];
    cb.beginText();
    cb.setFontAndSize(bf, 12);
    cb.showTextAligned(Element.ALIGN_RIGHT, "PRESS PREVIEW",
      rect.getRight() - 3, rect.getBottom() + 4.5f, 0);
    cb.endText();
  }
}
Many things that can be done with table events can be done in an easier way with cell events. But cell events can never replace all the table events you need. Usually, you’ll combine the power of table events with the ease of use of cell events.
5.1.3. Combining table and cell events
The table in figure 5.3 mimics the cell spacing you get from using the HTML cellspacing attribute for the <table> tag. There’s more than one way to achieve this look.
Figure 5.3. Mimicking cell spacing using cell and table events

You need a table event to draw the outer border of the complete table, but you can choose what type of event to use to draw the cell borders.
Mimicking HTML Cell Spacing
You can either use the widths and heights arrays from the tableLayout() method to draw these inner borders. Or you can use a cell event for each cell, in which case you get the coordinates of the border as a Rectangle object. Listing 5.6 combines table and cell events.
Listing 5.6. PressPreviews.java

Note that you’re setting the cell event for the default cell so the behavior is valid for all the cells of the table in this particular case.
In the examples so far in this chapter, you’ve used table and cell events for PdfPTable objects that were added with document.add(). This functionality also works if you write a table to the direct content using the writeSelectedRows() method.
Table and Cell Events and Writeselectedrows()
Figure 5.4 shows a calendar sheet created in almost the same way as the calendar you made in the previous chapter (see figure 4.14). The PdfPTable with the information about the month was added at an absolute position.
Figure 5.4. A variation on the calendar example, now with rounded corners
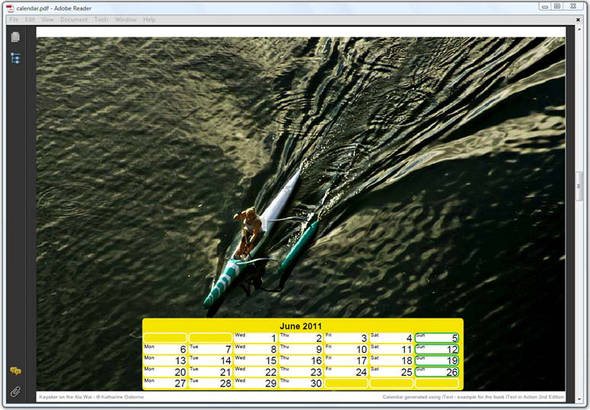
The only difference between the two examples is the style used for the table and its cells. In the previous chapter, you used standard PdfPTable and PdfPCell methods. In this example, you’ll use table and cell events to obtain special effects, such as rounded corners. You’ll use TableBackground, CellBackground, and RoundRectangle.
Listing 5.7. PdfCalendar.java
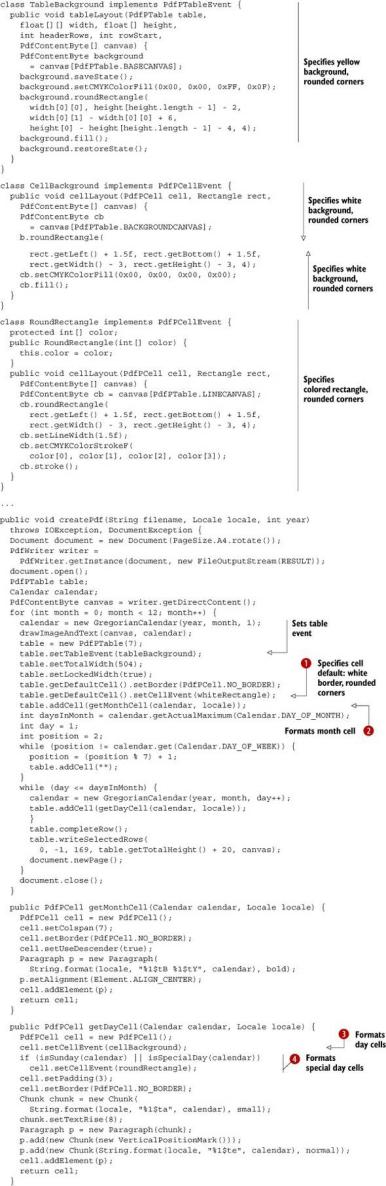
After creating the table, you set the table event to draw the background of the table, and you make sure the default cells
get a rounded rectangle as their border. ![]() doesn’t apply to the cell with the month
doesn’t apply to the cell with the month ![]() . The getMonthCell() method returns a PdfPCell object with the name of the month.
. The getMonthCell() method returns a PdfPCell object with the name of the month. ![]() also doesn’t apply to the cells created with getDayCell(). These cells get a white background with rounded corners
also doesn’t apply to the cells created with getDayCell(). These cells get a white background with rounded corners ![]() . Sundays and special days (holidays) get a colored border
. Sundays and special days (holidays) get a colored border ![]() .
.
There’s a similar mechanism that allows you to write custom functionality for Chunk, Paragraph, and Chapter and Section objects. The layout methods to achieve this are bundled in the PdfPageEvent interface.
5.2. Events for basic building blocks
When you add a basic building block to a Document instance, it’s translated into PDF syntax and written to a PDF file by a PdfWriter object. In this process, there’s an important class you’ll hardly ever need to address directly: PdfDocument. This class is responsible for examining the high-level objects. It’s the invisible rope tying the document to the writer.
The PdfDocument class is also responsible for firing the page events defined by the PdfPageEvent interface. This interface has 11 methods that can be divided into two groups:
- Methods that involve basic building blocks— These are similar to the tableLayout() and cellLayout() methods discussed in the previous section, but instead of tables, they involve Chunks, Paragraphs, Chapters, and Sections. These methods will be discussed in this section.
- Methods that involve the document and its pages— These are called when the document is opened or closed, or when a page starts or ends. We’ll discuss these methods in section 5.4.
The onGenericTag() method is without any doubt the most powerful method in the first category.
5.2.1. Generic Chunk functionality
When we discussed the Chunk object in section 2.2.1, there was an example (shown in figure 2.3) where we displayed country codes using a white font on a black background. This example demonstrated the setBackground() method. Figure 5.5 does something similar, but instead of a rectangular background, you draw a filmstrip for the year, and a blue ellipse for the link to the IMDB.
Figure 5.5. Page events for Chunks and Paragraphs

There are no standard methods to draw special backgrounds for Chunks, but you can write your own custom Chunk functionality by implementing the onGenericTag() method of the PdfPageEvent interface.
Listing 5.8. MovieYears.java

Instead of ![]() , you could have written GenericTags implements PdfPageEvent, but then you’d need to implement all the methods defined in the PdfPageEvent interface. Here you’re only interested in the onGenericTag() method, so it’s easier to extend the PdfPageEventHelper class. This class contains nothing but empty implementations of the interface’s methods. In this example, you override one
specific method, and you can safely ignore the other methods.
, you could have written GenericTags implements PdfPageEvent, but then you’d need to implement all the methods defined in the PdfPageEvent interface. Here you’re only interested in the onGenericTag() method, so it’s easier to extend the PdfPageEventHelper class. This class contains nothing but empty implementations of the interface’s methods. In this example, you override one
specific method, and you can safely ignore the other methods.
The code in listing 5.8 won’t be executed unless you declare the event to a writer. The onGenericTag() method will never be invoked if you don’t define generic tags for Chunks.
Listing 5.9. MovieYears.java (continued)

Before we study the mechanisms used in this code, let’s look at the parameters passed to the onGenericTag() method:
- writer— The PdfWriter object to which the event is added.
- pdfDocument— Not the Document object to which the Paragraph is added. This is a PdfDocument that is created internally when you create a PdfWriter instance. Use this object just for read-only purposes!
- rect— Rectangle defining the boundaries of the Chunk for which a generic tag is set.
- text— The String passed to the Chunk with the setGenericTag() method.
In listing 5.9 you’re tagging the Chunks representing the year with a generic tag named “strip”. When the content is written to the page, the onGenericTag() method is invoked. In the page event implementation, the onGenericTag() method looks at the text, and calls the strip() method to draw a filmstrip over the year.
Note
If a Chunk is split over multiple lines, the onGenericTag() method will be invoked as many times as there are lines. Every line will have its own Rectangle.
The same happens for the IMDB links: the text “ellipse” corresponds with the ellipse() method. You’re using this page event to achieve more or less the same goals as with table and cell events: to add special shapes. But there’s more.
In listing 5.8, you’ll also find a countYear() method. This method is invoked because you’re setting the year as a generic tag for the movie titles. A list of these years and the number of times each year occurs is kept in the member variable years. Here is what you can do with this TreeMap.
Listing 5.10. MovieYears.java (continued)
document.newPage();
writer.setPageEvent(null);
for (Map.Entry entry : event.years.entrySet()) {
  p = new Paragraph(String.format("%s: %d movie(s)",
    entry.getKey(), entry.getValue()));
  document.add(p);
}
You start a new page and remove the page events from the writer by setting the page events to null. You don’t want any of the page events to be active, and figure 5.5 shows that GenericTags wasn’t the only event used in this example—you also used a Paragraph event to draw extra lines. You don’t want these lines to appear when you create an overview of the years for which you have a film in the database, along with the number of times each year occurs. This overview is shown in figure 5.6.
Figure 5.6. Counting movies using the generic tag functionality

Listing 5.9 was far from complete—the lines in figure 5.5 were added using another type of page event. The following line actually came right after GenericTags was set:
writer.setPageEvent(new ParagraphPositions());
ParagraphPositions is an example of how to create events for Paragraph objects.
5.2.2. Paragraph events
The ParagraphPositions class creates Paragraph events.
Listing 5.11. MovieYears.java (continued)
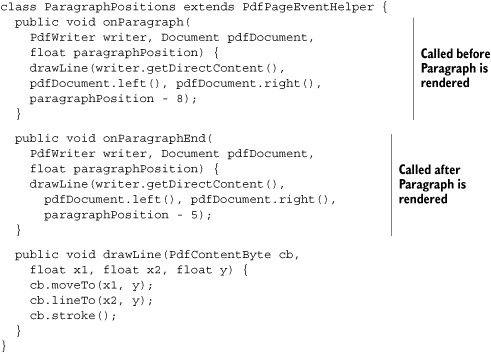
There are two page event methods involving paragraphs. The first two parameters of these methods, writer and pdfDocument, have the same meaning as the onGenericTag() parameters with the same names. I repeat: use pdfDocument for read-only purposes. In this example, you use pdfDocument to get the values of the left and right margins of the page. An extra parameter named paragraphPosition gives you access to a Y coordinate.
These are the two page event methods:
- onParagraph()— Called before a Paragraph is rendered. The paragraphPosition passed to the method is the Y coordinate of the baseline of the first line of the Paragraph, augmented with its leading.
- onParagraphEnd()— Called after a Paragraph is rendered. The paragraphPosition is the Y coordinate of the baseline of the last line of the Paragraph.
There are also page events involving Chapter and Section.
5.2.3. Chapter and Section events
You can use Chapter and Section events for the same reasons you use Paragraph events: to retrieve a Y position and use that coordinate to draw lines or shapes. This is what’s done in figure 5.7.
Figure 5.7. Page events for Chapters and Sections
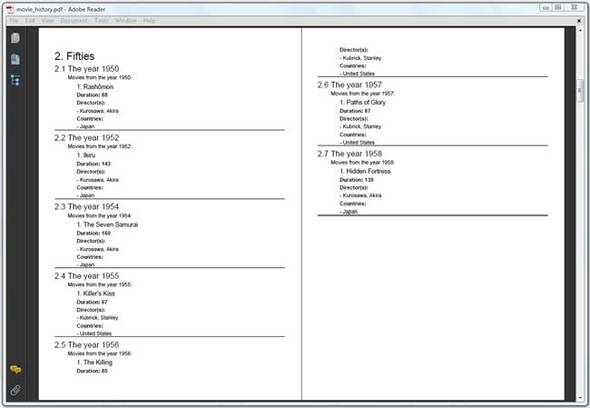
As you know, using Chapter and Section automatically creates an outline tree, visible in the bookmarks pane of Adobe Reader. In the next example, you’ll use page events to create a table of contents that can be printed. See figure 5.8.
Figure 5.8. Page events for Chapters and Sections: reordering pages

Next, you’ll reuse the example from section 2.3.2, but add a page event implementation for events that are triggered when a Chapter, a Section, or both, starts or ends.
Listing 5.12. MovieHistory1.java
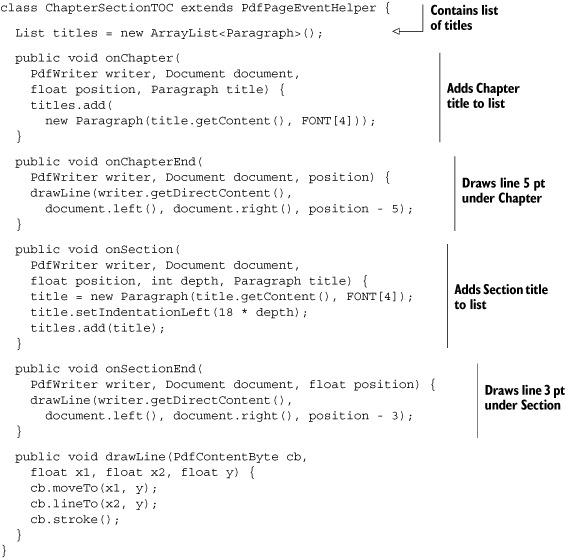
The onChapterEnd() and onSectionEnd() methods are very similar to onParagraphEnd(). The onChapter() and onSection() methods are similar to onParagraph(), but they have extra parameters. The title parameter contains the title you’ve defined for the Chapter or Section; depth tells you how deep the Section can be found in the outline tree.
In this example, you’re adding Paragraphs with the content of the Chapter and Section titles to a list, and you’re using the depth of the Sections to define an indentation. You can create a table of contents if you add all the Paragraphs in this list to the Document. You’ll find this table of contents (TOC) on the last pages of the document. The TOC entries are stored only after Chapters and Sections are rendered. You can’t add the TOC up front.
If you want the document to start with the TOC on the first page, you’ll need to find a way to reorder the pages before the Document is closed.
5.2.4. Page order and blank pages
Before we look at the code to reorder pages, you have to know that pages in a PDF document are usually organized in a page tree with different branches and leaves.
Linear Page Mode
By default, iText creates a balanced tree, because using such a tree optimizes the performance of viewer applications. The simplest page tree structure consists of a single node that references all of the document’s page objects directly.
Reordering pages with iText is only possible if you tell PdfWriter to create this simple structure. To do so, you need to add the following line before opening the document:
writer.setLinearPageMode();
After opening the document, you add all the content. In this case, the content consists of a series of chapters.
Reordering Pages
Once the content is added, you can reorder the pages.
Listing 5.13. MovieHistory1.java (continued)

Let’s examine this code step by step.
- You start on a new page, and you store the current page number. That’s where the table of contents starts before reordering the pages. In this example, the TOC starts on page 27.
- You add the TOC. That’s the list of Paragraphs you’ve created in the page event.
- You need to start a new page before you can count the number of pages that need to be reordered. You obtain this value by calling the reorderPages() method a first time with null as the parameter. In this example, the total number of pages is 30.
- You create an array of int values that will be used to map the new page index to the old page number. The new page with index 0—the new page 1—will be the old page with number toc. In this example, the first page will be the old page 27. The TOC consists of 4 pages. The new page with index 4—that is, page 5—was originally page 1. Creating the new order is a matter of doing some simple math.
- Once this mapping is done, you invoke reorderPages() a second time with the new order as the parameter.
You could replace the two lines marked with
 with the following line:
int total = writer.getPageNumber(); But experience has taught me that this can cause exceptions if the current page is empty.
You may wonder if using document.newPage() won’t result in an unnecessary extra blank page at the end of the document. The answer is no: iText ignores document.newPage() if the current page is empty. iText never adds a blank page to a document unintentionally.
Adding a Blank Page
If adding a blank page is a requirement, you have to tell iText explicitly about this.
Listing 5.14. NewPage.java
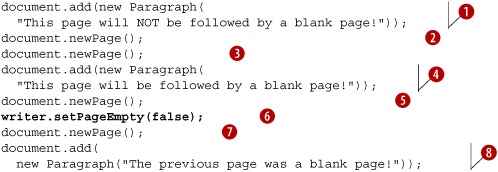
In ![]() , you add a Paragraph to page 1.
, you add a Paragraph to page 1.
With document.newPage() ![]() , you go to page 2, but you don’t add anything to this page: you immediately ask for another new page. Since nothing was added
to page 2,
, you go to page 2, but you don’t add anything to this page: you immediately ask for another new page. Since nothing was added
to page 2, ![]() will be ignored: the second Paragraph
will be ignored: the second Paragraph ![]() will be added on page 2.
will be added on page 2.
Page 2 is no longer empty, so ![]() will take you to page 3. You don’t add any content to page 3, but with
will take you to page 3. You don’t add any content to page 3, but with ![]() you tell iText that the current page should not be treated as an empty page.
you tell iText that the current page should not be treated as an empty page.
![]() takes you to page 4, and that’s where the third Paragraph
takes you to page 4, and that’s where the third Paragraph ![]() will be added.
will be added.
The example about creating a TOC using Chapter and Section events led us somewhat astray and resulted in a discussion about pages. We’ll talk about the second category of page events in section 5.4, but first we’ll take a closer look at the boundaries of a page.
5.3. Overview of the page boundaries
Up until now, you’ve defined the page size using a Rectangle as the value of one of the five different page boundaries that can exist for a page in a PDF document. You’ll learn more about these boundaries in this section, and you’ll work through an example that demonstrates the difference between the two most important page boundaries.
Suppose that I wanted to avoid being accused of false modesty. I could try to print a poster measuring one square meter, featuring myself in a Superman outfit. Seriously! The famous commercial artist Dick Kline once made such a drawing. It was sent to me as a gift by Bill Segraves, a long-time iText user.
The drawing isn’t a raster image. It consists of a sequence of Bézier curves that I’ve copied into a text file named hero.txt. To do this, you’d create a PdfTemplate from such a text file.
Listing 5.15. Hero1.java
public PdfTemplate createTemplate(PdfContentByte content, Rectangle rect,
  int factor) throws IOException {
  PdfTemplate template = content.createTemplate(
    rect.getWidth(), rect.getHeight());
  template.concatCTM(factor, 0, 0, factor, 0, 0);
  FileReader reader = new FileReader(RESOURCE);
  int c;
  while ((c = reader.read()) > -1) {
    template.setLiteral((char)c);
  }
  return template;
}
As you can see, you can write literal PDF syntax to the direct content using the setLiteral() method. It accepts a char, a float, or a String value.
Warning
Incorrect use of this method can result in seriously damaged PDF files. Please don’t use it before you’ve read chapter 14. In the next chapter, we’ll return to this example and find a much better way to reuse existing content.
The original drawing is intended to be added on an A4 page, but I want to put it on an A0 document, so I have to scale it with a factor 4 (see ISO-216). I could create a Document with PageSize.A0 like this:
Document document = new Document(PageSize.A0);
This line defines the media box of the first page in the document.
5.3.1. The media box
So far, you’ve been creating documents with only one type of boundary: the media box.
The media box defines the boundaries of the physical medium on which the page is to be printed. It may include any extended area surrounding the finished page for bleed, printing marks, or other such purposes. It may also include areas close to the edges of the medium that cannot be marked because of physical limitations of the output device. Content falling outside this boundary may safely be discarded without affecting the meaning of the PDF file.
ISO-32000-1:2008, section 14.1.2
The A0 rectangle used in the code line at the end of the previous section is defined like this:
public static final Rectangle A0 = new RectangleReadOnly(2384,3370);
This corresponds to a physical medium measuring 2384 pt x 3370 pt (or 84.10 cm x 118.89 cm, or 33.11 in x 46.81 in).
Note
The values 2384 and 3370 in this constructor match the width and height of the page, but they really form the coordinates of the upper-right corner of a rectangle. The values for the coordinate of the lower-left corner are omitted because they are zero: the lower-left coordinates are (0,0).
When you learned how to add lines, shapes, and text at absolute positions in chapter 3, you assumed that the origin of the coordinate system coincided with the lower-left corner of the page. This assumption is correct as long as the media box is defined with (0,0) as the coordinate for its lower-left corner, but that’s not mandatory. It’s perfectly OK for an application to create a media box with a different origin. It might be interesting to have the origin of the coordinate system in the upper-left corner of the page. Or you could place the origin in the middle of a page, so that you can distinguish four quadrants for your drawing operations. That’s what I did when I created my Superman poster in PDF.
The cross that is drawn in figure 5.9 (close to my navel) marks the origin of the coordinate system.
Figure 5.9. A PDF with a different origin

Listing 5.16. Hero1.java (continued)

If you look at all the PDFs that can be found in the wild, you’ll discover that the lower-left corner is the origin of the coordinate system for most PDF documents. This example proves that you shouldn’t assume that this is true for every possible PDF. Knowing this will be important when you start manipulating existing PDFs in the next chapter. When you add content at an absolute position, you’ll need to take the (x,y) value of the origin into account if it’s different from (0,0). Otherwise, you risk adding content in the wrong place, maybe even outside the visible area of the page.
You also have to make sure not to add anything outside the crop box of the page.
5.3.2. The crop box
The crop box is another type of boundary that can be defined as a rectangle that differs from the media box.
The crop box defines the region to which the contents of the page shall be clipped (cropped) when displayed or printed. Unlike the other boxes, the crop box has no defined meaning in terms of physical page geometry or intended use; it merely imposes clipping on the page contents. However, in the absence of additional information ..., the crop box determines how the page’s contents shall be positioned on the output medium. The default value is the page’s media box.
ISO-32000-1:2008, section 14.1.2
Suppose I want to print my A0 Superman poster, but I have a printer that is only able to print A4 pages. As defined in ISO-216, an A4 page can be obtained by folding an A0 page 4 times. My printing problem could be solved if I manage to split the single page shown in figure 5.9 into 16 smaller pages. See figure 5.10 for the result.
Figure 5.10. An A0 sized page divided into 16 A4 pages
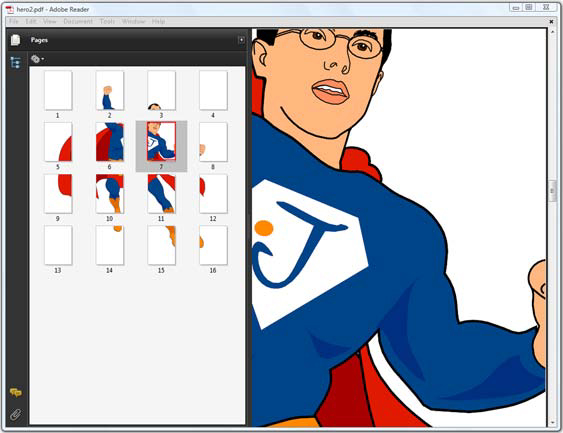
Now I can print the A0 as 16 separate pages, and I can start gluing them together into one large page. To achieve this, I’ll specify a media box with size A0, but I’ll use the setCropBox() method to define a crop box with size A4.
Listing 5.17. Hero2.java
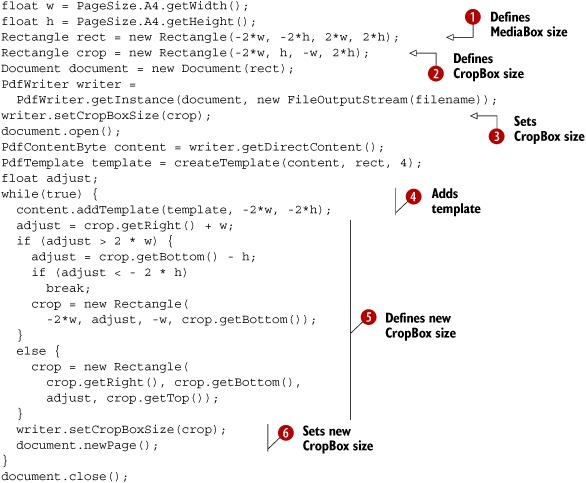
This code snippet crops the large image into smaller parts, sixteen times in a row. First I create a Rectangle that is about the size of an A0 page ![]() . I’ll use this object as the media box. Note that this line defines an origin with a negative X and Y, just like in the previous example. Then I create a page that’s the size of an A4 page
. I’ll use this object as the media box. Note that this line defines an origin with a negative X and Y, just like in the previous example. Then I create a page that’s the size of an A4 page ![]() . Compared to the Rectangle defined in
. Compared to the Rectangle defined in ![]() , it’s positioned in the top-left corner of the media box. I’ll use this second rectangle as the crop box
, it’s positioned in the top-left corner of the media box. I’ll use this second rectangle as the crop box ![]() .
.
Next, I add the Superman template multiple times to the document in a loop ![]() . Because of the crop box, the first page will be blank. The visible area on the A0 poster is cropped to the size of an A4
page in the upper-left corner. For the next pages, I redefine the crop box
. Because of the crop box, the first page will be blank. The visible area on the A0 poster is cropped to the size of an A4
page in the upper-left corner. For the next pages, I redefine the crop box ![]() . I continue with the next A4 rectangle that fits inside the A0 page to the right of the previous page. If that’s not possible,
I start with the first A4 rectangle on the next row. As long as I can create valid A4 pages, I use these rectangles to set
a new crop box value that will be valid for the next page
. I continue with the next A4 rectangle that fits inside the A0 page to the right of the previous page. If that’s not possible,
I start with the first A4 rectangle on the next row. As long as I can create valid A4 pages, I use these rectangles to set
a new crop box value that will be valid for the next page ![]() .
.
The result will be a PDF document with 16 pages, each page clipped to an A4 that reveals part of the complete A0 poster.
But suppose that I don’t want to print the poster myself. Instead I want to send the PDF to a graphical designer, asking them to add a nice caption, some publicity for this book, and so on. However, I don’t want the image altered or overwritten, so I need to define a region that is preserved for the Superman drawing. I could use an art box to pass this information to a third party. That’s one of the three remaining page boundaries discussed in the next section.
5.3.3. Other page boundaries
You can set the media box in the Document constructor, or with the setPageSize() method. You can define a crop box with the setCropBox() method, but there’s also a setBoxSize(String boxName, Rectangle size) method that’s more generic. Allowed names for boxName are crop, bleed, trim, and art.
The bleed box defines the region to which the contents of the page shall be clipped when output in a production environment. This may include any extra bleed area needed to accommodate the physical limitations of cutting, folding, and trimming equipment. The actual printed page may include printing marks that fall outside the bleed box. The default value is the page’s crop box.
The trim box defines the intended dimensions of the finished page after trimming. It may be smaller than the media box to allow for production-related content, such as printing instructions, cut marks, or color bars. The default value is the page’s crop box.
The art box defines the extent of the page’s meaningful content (including potential white space) as intended by the page’s creator. The default value is the page’s crop box.
ISO-32000-1:2008, section 14.1.2
Note that the crop, bleed, trim, and art boxes shouldn’t extend beyond the boundaries of the media box. If they do, they are reduced to their intersection with the media box.
These values are important primarily for the PDF consumer. Setting these boundaries doesn’t have any effect on the way iText creates the document. For instance, setting the art box doesn’t affect the page margins.
Listing 5.18. Hero3.java
Document document = new Document(PageSize.A4);
PdfWriter writer =
  PdfWriter.getInstance(document, new FileOutputStream(filename));
Rectangle art = new Rectangle(50, 50, 545, 792);
writer.setBoxSize("art", art);
document.open();
PdfContentByte content = writer.getDirectContent();
PdfTemplate template = createTemplate(content, PageSize.A4, 1);
content.addTemplate(template, 0, 0);
document.close();
In the first example of the next section, you’ll use the art box to retrieve information that can be used to add a header and footer.
5.4. Adding page events to PdfWriter
After the intermezzo about page boundaries, containing some self-glorifying examples, it’s time to return to the real topic of this chapter: page events. We have already discussed seven methods of the PdfPageEvent interface; four more methods involving the document and its pages remain:
- onOpenDocument()— Triggered when a document is opened. This is a good place to initialize variables that will be needed throughout the document.
- onStartPage()— Triggered when a new page is started. Use this method for initializing variables or for setting parameters that are page-specific. Do not use this method to add content.
- onEndPage()— Triggered just before starting a new page and before closing the document. This is the best place to add a header, a footer, a watermark, and so on.
- onCloseDocument()— Triggered just before the document is closed. This is the ideal place for any finalizations and to release resources (if necessary).
Let’s use these methods to solve common issues that are often mentioned in mailing-list questions. For instance, how can you add a page header while creating a PDF document.
5.4.1. Adding a header and a footer
Let’s return to the Chapter and Section example from section 2.3.2. You’ll make two small changes: you’ll define an art box, and you’ll add an event to the writer. This event, an instance of the HeaderFooter class, will add a header and a footer to the document as shown in figure 5.11.
Figure 5.11. Adding headers and footers using page events
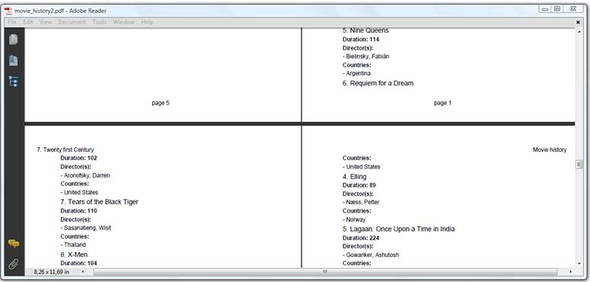
First, take a look at the footer: you want to add page numbers that start with “page 1” every time a new chapter begins. The text should be put under the actual content of the page, as a centered String. As for the header, you want it to alternate between the chapter title aligned to the left, and the String “Movie history” aligned to the right. The following implementation of the PdfPageEvent interface meets these requirements.
Listing 5.19. MovieHistory2.java

There are no surprises in this code sample. You define two member variables:
- header— An array with two Phrase objects. One is set in onOpenDocument(), and it’s valid for the full document. The other varies depending on the current chapter. It’s set in the onChapter() method.
- pagenumber— A custom page number that is reset to 1 every time a new chapter starts. It’s augmented in the onStartPage() method.
No content is added in the page event until a page has been completed. The header and footer are written to the direct content in the onEndPage() method. The parameters writer and document are to be used in the same way as done in section 5.2.
Note that you ask the writer for the art box rectangle using the getBoxSize() method. You use this rectangle to position the header and the footer. This will only work if you’ve defined that specific page boundary between steps 2 and 3 in the PDF creation process. Otherwise, the getBoxSize() method will return null.
FAQ
Why is it not advised to add content in the onStartPage() method? You’ll remember from section 5.2.4 that iText ignores newPage() calls when the current page is empty. This method is executed—or ignored—when you call it explicitly from your code, but it’s also invoked implicitly from within iText on multiple occasions. It’s important that it’s ignored for empty pages; otherwise you’d end up with plenty of unwanted new pages that are unintentionally left blank. If you add content in an onStartPage() method, there’s always a risk of having unwanted pages. Consider it more safe to reserve the onEndPage() method for adding content.
In the next example, you’ll put the page number in the header, and you’ll add the total number of pages.
5.4.2. Solving the “page X of Y” problem
An example of a “page X of Y” header is shown in figure 5.12.
Figure 5.12. Solving the page X of Y problem with page events

Retrieving the value of X is easy. You have access to the PdfWriter object in the onEndPage() method, so you can get the page number with getPageNumber(). But how can you retrieve the value for Y? There’s no way of knowing the total number of pages when the headers for the first pages are written. You only know the value of Y for sure when iText has finished writing the last page.
There are two ways to solve this problem. One solution will be discussed in the next chapter. It involves creating the PDF in two passes. You add the content in the first pass and the header or footer in a second pass. The other solution involves a PdfTemplate object and page events.
When we discussed form XObjects in section 3.4.2, I explained that iText only writes a PdfTemplate to the OutputStream when you explicitly use the releaseTemplate() method. Otherwise the object is kept in memory until you close the Document. This opens possibilities: you can add a template to page 1, and wait until the final page to write content to this template. Even if the content stream of the first page has already been sent to the OutputStream, the content added to the template afterwards will still be shown on the first page.
Listing 5.20. MovieCountries1.java
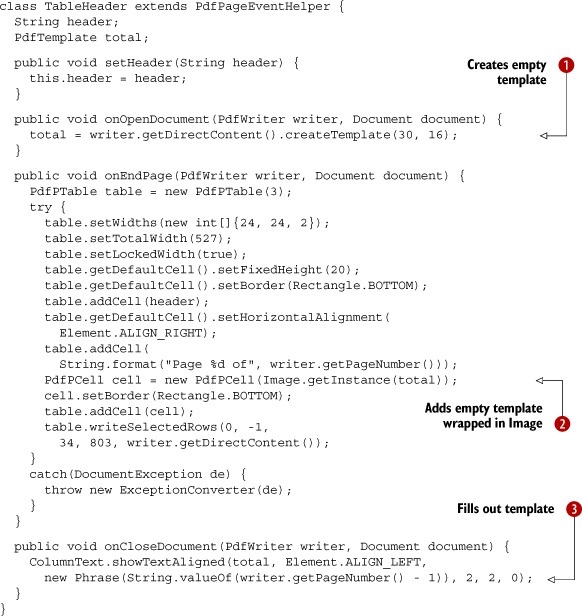
When the document is opened, you create a template with a size of 30 pt x 16 pt ![]() . This time, you use a table with one row and three columns to draw the header. In the first cell, you add the text for the
header. In this example, you’re listing movies by country, so you’ll let the header reflect the name of the country. This
name is set using the setHeader() setter method.
. This time, you use a table with one row and three columns to draw the header. In the first cell, you add the text for the
header. In this example, you’re listing movies by country, so you’ll let the header reflect the name of the country. This
name is set using the setHeader() setter method.
In the second cell, you add “page X of” where X is the value returned by writer.getPageNumber(). The third cell is special: you add the template created in the onOpenDocument() method, wrapped in an Image ![]() . No content has been added to this template yet—it’s just an empty canvas. It isn’t until the onCloseDocument() method is invoked that you add the page number of the final page to this small canvas
. No content has been added to this template yet—it’s just an empty canvas. It isn’t until the onCloseDocument() method is invoked that you add the page number of the final page to this small canvas ![]() .
.
Note
When the document is closed, the newPage() method is triggered to perform finalizations on the current page. When newPage() is called, the page number is augmented, so you need to use (writer.getPageNumber() - 1) if you want to add the total number of pages in the onCloseDocument() method.
In the previous example, you added a header and footer with the showTextAligned() method. This example demonstrates that it’s sometimes more interesting to use PdfPTable and writeSelectedRows(). You can define a bottom border for each cell so that the header is underlined. This is the most elegant way to add headers and footers, because the table mechanism allows you to position and align lines, images, and text.
Another common requirement when creating documents is to add a watermark.
5.4.3. Adding a watermark
The next example extends the previous one. The main difference is one extra feature, demonstrated in figure 5.13: we’ve added a watermark.
Figure 5.13. Adding a watermark using page events

The code to create this document is almost identical to the code used in the previous example. You only need to add one extra page event, the Watermark class.
Listing 5.21. MovieCountries2.java
class Watermark extends PdfPageEventHelper {
  Font FONT =
    new Font(FontFamily.HELVETICA, 52, Font.BOLD, new GrayColor(0.75f));
  public void onEndPage(PdfWriter writer, Document document) {
    ColumnText.showTextAligned(writer.getDirectContentUnder(),
      Element.ALIGN_CENTER, new Phrase("FOOBAR FILM FESTIVAL", FONT),
      297.5f, 421, writer.getPageNumber() % 2 == 1 ? 45 : -45);
  }
}
If your watermark is an image, you have options: you can add it with the PdfContentByte.addImage() method, or you can wrap it in a ColumnText object, or you can put it inside a cell in a table.
Note
If you add an Image in a page event, be sure you create the Image object only once, such as in the event’s constructor or in the onOpenDocument() method. If you create the Image object in onStartPage() or onEndPage(), your PDF will become bloated: you risk adding the same byte sequence over and over again. This will cost you not only in performance, but also in file size.
We’ll conclude this chapter with one more example, introducing functionality that creates a document that can be displayed as a presentation, similar to a PowerPoint presentation.
5.4.4. Creating a slideshow
When you read a PDF document on screen, you usually hit a key, click a button, or use a scrollbar to go to the next page. But you can also let the viewer go to the next page automatically after a number of seconds, define a transition, or both.
In the example, you’ll set the viewer preferences to “Full Screen” mode ![]() , because you want to use the PDF as a presentation.
, because you want to use the PDF as a presentation.
Listing 5.22. MovieSlideShow.java

There are two new special methods in onStartPage():
- setDuration()— This method’s parameter defines for how many seconds the page is shown. If no duration is defined, user input is expected to go to the next page.
- setTransition()— This method expects a Transition object. The main constructor of this class takes two parameters: a transition type and a value for the duration of the transition. Don’t confuse this with the value for the page duration.
There are different groups of transition types:
- Dissolve— The old page gradually dissolves to reveal a new one (DISSOLVE).
- Glitter— Similar to dissolve, except that the effect sweeps across the page in a wide band: diagonally (DGLITTER), from top to bottom (TBGLITTER), or from left to right (LRGLITTER).
- Box— A rectangular box sweeps inward from the edges (INBOX) or outward from the center (OUTBOX).
- Split— The lines sweep across the screen horizontally or vertically, depending on the value that was passed: SPLITHIN, SPLITHOUT, SPLITVIN, or SPLITVOUT.
- Blinds— Multiple lines, evenly spaced across the screen, sweep in the same direction to reveal the new page horizontally (BLINDH) or vertically (BLINDV).
- Wipe— A single line sweeps across the screen from one edge to the other: from top to bottom (TWIPE), from bottom to top (BWIPE), from right to left (RLWIPE), or from left to right (LRWIPE).
If you don’t specify a type, BLINDH is used. The default duration of a transition is 1 second. This is a nice example showing how onStartPage() can be used to set page parameters, because you need to set the transition and duration for every page.
With this example, we’ve covered all the methods of the PdfPageEvent interface. It’s high time for a short summary of this chapter, and of part 1 as a whole.
5.5. Summary
After a short introduction to what you can do with PDF, we started with the basic mechanics of iText’s PDF creation process. You created several “Hello World” examples that demonstrated the famous “five steps” that were used in every example of part 1.
Two chapters dealt with building blocks offered by iText, allowing you to create PDF documents using high-level concepts. In chapter 2, you learned about Chunks, Phrases, Paragraphs, Lists, ListItems, Anchors, Images, Chapters, and Sections. Chapter 4 was dedicated entirely to the PdfPTable and PdfPCell objects.
Chapter 3 explained how to add content at a lower level: you added lines, shapes, and text to different direct content layers. You also discovered two other important objects: using the ColumnText object, you added high-level objects at absolute positions; with PdfTemplate you learned how to reuse content as an XObject.
You’ve made good use of that knowledge in this chapter. First you found a way to extend the functionality of PdfPTable and PdfPCell using table and cell events. Then you learned how to use the PdfPageEvent interface. Initially you added custom features to Chunk, Paragraph, Chapter, and Section objects. After an intermezzo about pagination, involving reordering pages, adding blank pages, and defining page boundaries, you used a second series of page events to solve a number of common issues: adding headers and footers, adding “page X of Y” to every page, adding watermarks, and even defining a duration and a transition for each page.
Now that you’ve finished part 1, you’re ready to start writing a prototype application that creates PDF documents from scratch. If you need to integrate this prototype into a web application, you’ll have to read further in part 3. That’s where you’ll learn how to generate a PDF document using Java servlet technology. Also, when you want to make your application production-ready, you’ll probably want to know more about using special fonts, about protecting your documents, and so on. Part 3 will teach you these essential iText skills.
But first, we’ll take a look at another aspect of iText programming. In part 2, you’ll learn how to manipulate existing PDF documents: how to import pages from one PDF document into another, how to stamp content on an existing PDF document, how to split one PDF into smaller PDFs, how to combine different PDFs into one large document, and so on. You’ll also learn how to fill out interactive forms using iText.