In this recipe, we will invoke an OSB proxy service from an SCA composite. This is the opposite of the recipe, Invoking, a, SCA, composite, from, an, OSB, service.
The OSB service consists of a proxy service CustomerManagement accepting the call from a SOA Suite Mediator component through the SB transport. Because the CustomerManagement WSDL defines a synchronous request/reply message exchange pattern, the Mediator will wait for the proxy service to return it response message:

Copy the soa-suite-invoking-osb-service-sync-from-sca-composite holding the JDeveloper project from chapter-8getting-readyinvoking-osb-service-sync-from-sca-composite into a local workspace folder.
Import the base OSB project containing the base implementation of the proxy service together with the WSDL and XML schemas into Eclipse from chapter-8getting-readyinvoking-osb-service-sync-from-sca-composite.
We start on the OSB side and change the CustomerManagement proxy service, available with the base OSB project imported from the getting-ready folder, so that it can be invoked by the SCA composite. The proxy service implements a synchronous interface and contains a pipeline pair, which always returns the same response.
In Eclipse OEPE, perform the following steps:
- Open the
CustomerManagementproxy service located in theproxyfolder. - Go to the Transport tab where we need to change the protocol.
- Choose sb as the Protocol.
- Deploy the project to the OSB server.
Next, we will create a Mediator, which will call the proxy service synchronously through a direct binding reference. In JDeveloper, perfom the following steps:
- Open the
osb-cookbookworkspace in JDeveloper by selecting File | Open and navigating to theosb-cookbook.jwsfile. - Click on the
composite.xmllocated in theCustomerManagementproject to open up the SCA composite view. - Drag a Mediator component from the Service Components section of the Component Palette on the right and drop it on the Components area.
- Enter
CustomerManagementSyncinto the Name field. - Choose Synchronous Interface for the value of the Template drop-down listbox.
- Click on the magnifying glass button right to the Input field.
- In the Type Chooser window expand the CustomerMessages.xsd below the Project Schema Files node.
- Select the FindCustomer node and click on OK:

- Click on the magnifying glass button right to the Output field.
- In the Type Chooser window expand the CustomerMessages.xsd below the Poject Schema Files node.
- Select the FindCustomerResponse node and click on OK:

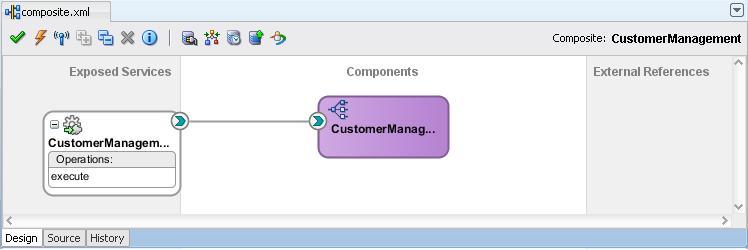
- Click on OK. This will create a new Mediator component with an exposed SOAP binding as shown i the following screenshot:
Now let's invoke the OSB proxy service from the Mediator. For that, we need to add a direct binding to the composite. In JDeveloper, perform the following steps:
- On the Component Palette, drag the Direct Binding from the Service Adapters section and drop it on the External References section of the SCA composite.
- Enter
CustomerManagementDirectinto the Name field. - Choose Reference for the Type drop-down listbox.
- Choose Oracle Service Bus for the Reference Target drop-down listbox.
- Click on the icon with the green arrow right to the WSDL URL field.
- On the SOA Resource Browser pop-up window select Resource Palette and then expand theApplicationServerConnection as shown in the following screenshot:

- Navigate to the CustomerManagment (direct) proxy service and click on OK.
- Enable copy wsdl and its dependent artifacts into the project option and click on OK:

- Confirm the popup window by clicking OK.
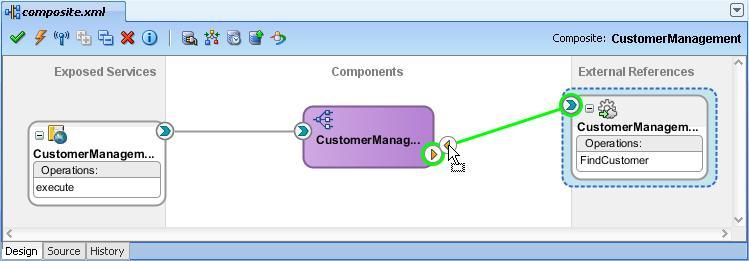
- Drag a wire from the CustomerManagementDirect external reference to the CustomerManagementSync Mediator component:
Next, we will change the Mediator component so that the request as well as the response message is passed through by the static routing rule:
- Double-click on the CustomerManagementSync Mediator component.
- Click on the icon right to the Assign Value of the request.
- In the Assign Value pop-up window, click on the green plus icon.
- In the From section, select expression for the Type drop-down listbox.
- Enter
$in.request/inp1:FindCustomerinto the Expression field. - In the To section, select expression for the Type drop-down listbox.
- Enter
$out.parameters/inp1:FindCustomerinto the Expression field and click on OK to close the Assign Value dialog:
- Click on OK.
- Click on the icon right to the Assign Value of the synchronous reply.
- In the Assign Values pop-up window click on the green plus icon.
- In the From section, select expression for the Type drop-down listbox.
- Enter
$in.parameters/tns:FindCustomerResponseinto the Expression field. - In the To section, select expression for the Type drop down listbox.
- Enter
$out.reply/tns:FindCustomerResponseinto the Expression field and click on OK to close th Assign Value dialog. - Click on OK:

Now, we can deploy the SCA composite to the SOA Suite server. In JDeveloper, perform the following steps:
- Right-click on the
CustomerManagementproject and select Deploy | CustomerManagement. - Select Deploy to Application Server from the list of deployment actions and click on Next.
- Enable the Overwrite any existing composites with the same revision ID check box and click on Next.
Select the ApplicationServerConnection from the list of application servers and click on Finish.
- Check the SOA-Log status window for errors. The deployment was successful, if a BUILD SUCCESSFUL message is shown.
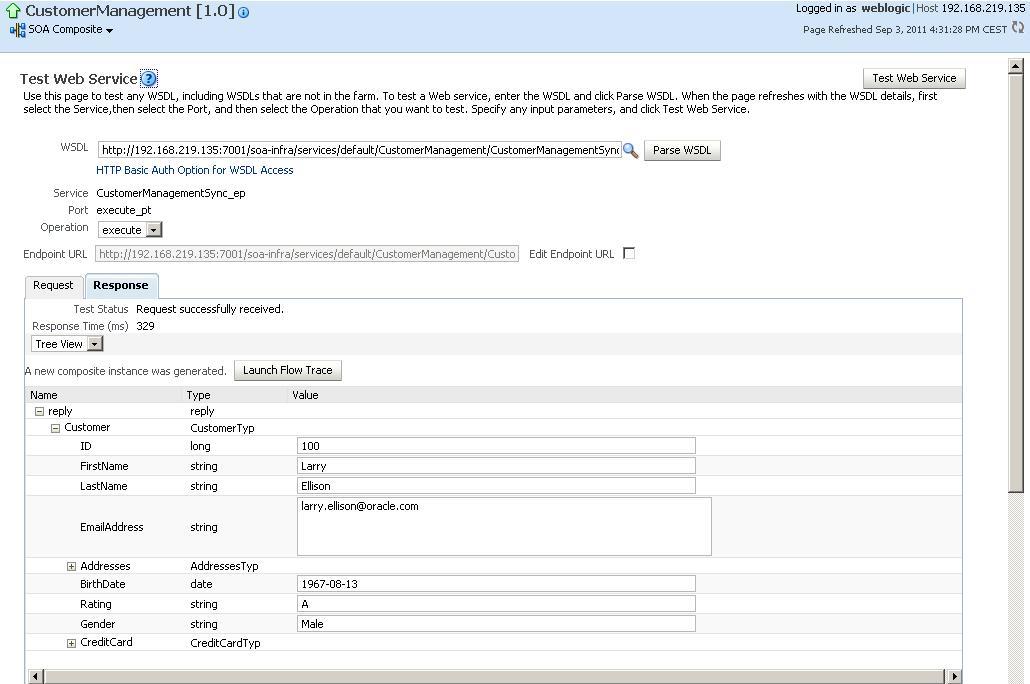
- Next, let's test the CustomerManagement composite. In Enterprise Manager, perform the following steps:
- Expand the SOA node in the tree on the left.
- Expand soa-infra node and click on the default node.
- Click on CustomerManagement [1.0] in the list of composites. The details of the composite are displayed.
- Click on the Test tab.
- The Test Web Service screen is shown, which allows us to test the SOAP Binding of the composite.
- On the Request tab, in the Input Arguments section enter
100into the ID field. - Click on the Test Web Service button in the top-right corner.
- The result of the test is shown in the Response tab: