
In this recipe, we will configure an outbound DB adapter, so that it can be used to update data in one or more tables. The adapter will be invoked from a business service, which can be generated using Eclipse OE:

The business service implements a WSDL-based interface. The WSDL and XSD being used for that interface are generated by the DB adapter and are dependent on the database tables and their columns.
In this recipe, we will show how to wrap that business service with a proxy service using its own WSDL and XSD. By that we use a contract-first approach and have full control over the interface we offer to our consumers.
For the configuration of the DB adapter, we will use JDeveloper and then switch to Eclipse to implement the proxy service wrapping the inbound DB adapter.
For this recipe, we will use the database tables created with the OSB Cookbook standard environment. Make sure that the connection factory is set up in the database adapter configuration, as shown in the Introduction of this chapter.
You can import the OSB project containing the base setup for this recipe into Eclipse from chapter-7getting-readyusing-db-adapter-to-update-to-table.
First we create the DB adapter, which will implement the update to the database. In JDeveloper, perform the following steps:
- Open the file
composite.xmlof the projectUpdateToDB. - From the Component Palette, select the SOA components if not already done.
- Drag the Database Adapter to the External References lane.
- Enter
UpdateCustomerin the Service Name field and click on Next. - Select the OsbCookbookConnection from the Connection listbox.
- Check that eis/DB/OsbCookbookConnection is the value of JNDI Name field and click on Next.
- On the Operation Type screen, select Perform an Operation on a Table.
- Check the Insert or Update (Merge) checkbox, uncheck all others, and click on Next.
- Click on Import Tables, click on Query and move the table
CUSTOMER_Tto the selected list and click on OK. - Back on the main wizard screen, click on Next three times.
- On the Advanced Options screen, click on Search located below the Sequence listbox.
- Select CUSTOMER_SEQ from the Sequence listbox.
- Click on Next, and then on Finish.
Due to a bug in the current version of the DB adapter generator, one of the generated files must be tweaked. Otherwise we will get an error in the OSB project in Eclipse OEPE.
- Open the file
UpdateCustomer-or-mappings.xml. - Locate the line
<sequence-field table="CUSTOMER_T" name="ID"/>. - Modify the line to
<sequence-field name="ID"/>. - Save the project.
The DB adapter used to create or update a customer is now ready to be used.
The work in JDeveloper is now done, let's switch to Eclipse OEPE and perform the following steps:
- On the OSB project, hit Refresh (F5). The artifacts generated by JDeveloper in the previous steps will show up.
- Right-click on the
UpdateCustomer_db.jcafile and select Oracle Service Bus | Generate Service from the context menu. - Select the
businessfolder for the location of the business service. - Leave the Service Name and WSDL name as suggested by the wizard and click on OK.
Next we will create the proxy service, which implements the
StoreCustomeroperation defined in theCustomerManagement.wsdl. In Eclipse OEPE, perform the following steps: - In the
proxyfolder, create a proxy service and name itCustomerManagement. - On the General tab, select WSDL Web Service and click on Browse.
- Select wsdl | CustomerManagement.wsdl | CustomerManagementSOAP (binding) and click on OK.
- Confirm the pop-up window by clicking on Yes.
- Navigate to the Message Handling tab and select the Transaction Required checkbox.
- Navigate to the Message Flow tab, insert a Route node and name it
InvokeDBRoute. - Insert a Routing action into the Route node.
- On the Properties tab of the Routing action, click on Browse and select the UpdateCustomer_db.biz business service, and click on OK.
- Select merge for the Invoking drop-down listbox.
We have created the proxy service that invokes the business service using the DB adapter. What we have not yet done is formatting the message according to the interface of the UpdateCustomer_jca business service. Next we will create an XQuery mapping file, which transforms the request message from the proxy service interface to the message the business service/DB adapter expects. In Eclipse OEPE, perform the following steps:
- On the
transformationfolder, right-click and select New | XQuery Transformation. - Enter
createUpdateCustomerMsginto the File name field and click on Next. - For the input parameter, select wsdl | CustomerManagement.wsdl | StoreCustomer and click on Add.
- Enter
storeCustomerinto the Parameter Name field and click on Next. - For the second input parameter, select the adapter | UpdateToDB | xsd | UpdateCustomer_table.xsd | CustomerTCollection and click on Add.
- Click on Finish and confirm the pop-up window with Yes.
- Create the mapping by dragging elements from the left onto elements on the right. The last element ccCvc is mapped using the following expression:
xs:string($storeCustomer1/Customer/ns2:CreditCard/ns1:CardValidationCode). Select the target element, that is, ccCvc, navigate to the Target Expression tab to specify the expression, and click on Apply. You have to be in the XQuery Transformation perspective. The end result should look similar to the one shown in the following screenshot: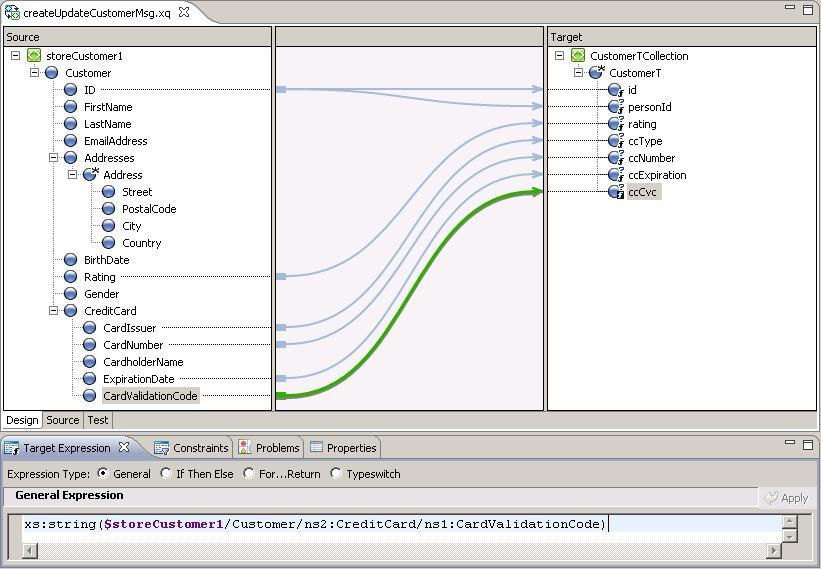
- Switch back to the Oracle Service Bus perspective and reopen the CustomerManagement proxy service.
- In the message flow, insert a Replace action into the Request Action flow of the Routing action.
- On the Properties tab of the Replace, enter
bodyinto the In Variable field. - Click on Expression, navigate to the XQuery Resources tab, and click on Browse.
- Select the transformation | createUpdateCustomerMsg.xq and click on OK.
- Enter
$body/cus:StoreCustomerinto the Binding field for the storeCustomer1 parameter and click on OK. - Back on the Properties of the Replace action; select the Replace node contents option.
So we have made sure that the message sent to the DB adapter is properly formatted. Next, we also have to treat the response that we get from the business service/DB adapter and format it appropriately. In Eclipse OEPE, perform the following steps:
- In the message flow, insert an Assign action into the Response Action flow of the Routing action.
- On the Properties tab of the Assign, enter
bodyinto the Variable field. - Click on the Expression link and enter the following XML fragment into the Expression field:
<soap-env:Body> <cus:StoreCustomerResponse> <cus:ID>{$body/upd:CustomerTCollection/upd:CustomerT/upd:id}</cus:ID> </cus:StoreCustomerResponse> </soap-env:Body> - Navigate to the Namespace Definitions tab on the right and click on Add.
- Enter
updinto the Prefix field andhttp://xmlns.oracle.com/pcbpel/adapter/db/top/UpdateCustomerinto the URI field. - Click on OK twice.
- Deploy the project to the OSB server.
Before we can test the proxy service, the connection factory used by the DB adapter must be modified, so that the sequencePreallocationSize property matches the database sequence increment, which is set to
1for theCUSTOMER_SEQsequence, as shown in the following screenshot: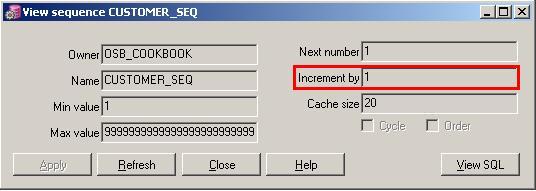
In the WebLogic Console, perform the following steps:
- On the left side in the Domain Structure view, navigate to osb_cookbook_domain | Deployments.
- In the list of deployments, click on the DbAdapter and select the tab Configuration, then select the tab Outbound Connection Pools.
- Expand the javax.resource.cci.ConnectionFactory node and click on eis/DB/OsbCookbookConnection.
- On the Properties tab, click on the Property Value field of the row sequencePreallocationSize. The field gets editable.
- Enter
1into the Property Value field and press Enter (this is important because otherwise the entered value will not be saved). - Click on Save.
- Navigate back to the list of deployments and check the DbAdapter checkbox.
- Click on Update (on top of the list).
- Click on Finish.
The service can now be tested. In the Service Bus console, navigate to the test console and execute:

This modifies an existing customer with PK 1. When the row <cus1:ID>1</cus1:ID> is removed, a new customer will be inserted in the table.
The merge operation of the DB adapter detects itself whether a record is already available in the table or not. Depending on that, either a SQL UPDATE or INSERT is applied. If there is no customer ID provided or the provided one could not be found, a new record is created.
If an ID is provided but no record can be found, the provided value will be used as the primary key of the new record. If no ID is provided, the value for the primary key will be retrieved from the database sequence before inserting the new record.
Note that, we have set the Transaction Required flag of the CustomerManagement proxy service. Setting this flag starts an XA transaction, even though the inbound protocol (HTTP) is not transactional.
Technically, the DB adapter is executed by the DbAdapter component, which is deployed on WebLogic server as a resource adapter. The adapter we created uses resources of the DbAdapter component. Therefore, we had to configure the connection factory there, which in turn uses the data source resource configured on WebLogic server as a standard data source.
The CUSOMER_SEQ database sequence is used by the DB adapter in case of an INSERT to generate a unique identifier for the primary key.
Instead of using the Merge operation of the DB adapter, we could have chosen an update-only or an insert-only operation or even execute a pure SQL statement, which allows a completely self-written, self-tuned SQL statement, and permits bind parameters.
Two flags of the DB adapter deserve special mentioning, as their consequences and side effects are not always obvious:
The Detect Omissions flag can be set on the last page (Advanced Options screen) of the DB adapter wizard. The behaviour of this flag is sometimes mysterious to the beginner. It takes two values , which are as follows:
- Detect Omissions = true: The DB adapter interprets missing elements in the target XML as leave as default or do not touch. For a
MERGE, this will prevent valid but unspecified values from being overwritten withNULL. ForINSERToperations, they will be omitted from theINSERTstatement, allowing default values to take effect. - Detect Omissions = false: The DB adapter interprets a missing element as set all left out values in the table explicitly to NULL.
The latter behaviour (DetectOmissions = false) is often useful, as in an XQuery transformation, it is mostly easier to express a NULL value by the absence of an element rather than adding the attribute xsi:nil="true" to the element. This behaviour however, often steps in unexpectedly at first sight. Imagine the following situation: The CVC field of a credit card is often entered in a separate step in an application. If we design a service which allows updating only the CVC column in the CUSTOMER_T table, then a call to the DB adapter with only the CVC element set in the XML would clear out all other fields of the record. So, be cautious when setting Detect Omissions to false and prefer adding an xsi:nil="true" attribute, even though it looks like more work in the first place!
One more flag to be set on the Advanced Options screen is the Get Active UnitOfWork. It is intended to pin a JDBC connection to the global XA transaction. One side effect of setting this flag however, is that it delays all writes to the database until the commit of the global transaction.
By that, errors on inserts or updates due to constraints or trigger failures occur only when these operations are no longer under control of a proxy service. Such errors cannot be cached by an error handler in a proxy service. In cases where it is essential to be able to handle such errors, the Get Active UnitOfWork flag should not be enabled.