
In this recipe, we will show how to REST-enable an existing service. We will reuse the CRM mock service used in Chapter 1, Creating a Basic OSB Service, but instead of exposing it as a SOAP-based web service as shown in Chapter 1, Creating a Basic OSB Service; we will expose it as a RESTful web service.
For that we first implement a business service that wraps the SOAP-based web service of the CRM system (a soapUI mock service). Then we create a proxy service using the HTTP transport and conditionally executing an action based on the HTTP method passed by the consumer:

Import the SoapUI project CustomerServiceCRM-soapui-project.xml from the location chapter-5getting-readyexposing-restful-servicesoapui into your SoapUI. Start the mock service CustomerServiceSOAP MockService.
Import the base OSB project containing the right folder structure and the necessary XQuery transformations into Eclipse from chapter-5getting-readyexposing-restful-service.
We will start with the business service, which will wrap the SOAP-based web service of the CRM system (the soapUI mock service).
In Eclipse OEPE, perform the following steps:
- In the
businessfolder of theexposing-restful-serviceproject, create a new business service and name itCustomerServiceCRM. - On the General tab select WSDL Web Service for the Service Type and click Browse.
- Navigate to
CustomerServiceCRM.wsdlfrom thewsdlfolder and select the CustomerManagementSOAP (port). - Click OK and confirm the pop-up window with Yes.
- Navigate to the Transport tab and change the Endpoint URI to
http://localhost:8088/mockCustomerServiceSOAP.Now, we can create the proxy service that will expose the RESTful interface. In Eclipse OEPE, perform the following steps:
- In the
proxyfolder create a new proxy service and name itCustomerService. - On the General tab select Messaging Service for the Service Type option.
- Navigate to the Messaging tab and select XML for both Request Message Type and Response Message Type.
- Navigate to the Transport tab and select http for the Protocol.
- Change the Endpoint URI to
/exposing-restful-service/CustomerService. - Navigate to the Message Flow tab.
- Drag a Conditional Branch node from the Design palette and drop it below CustomerService.
- On the Properties of the Conditional Branch node, navigate to the Flow tab and enter
MethodBranchinto the Name Field - Navigate to the Conditional Branch tab and click on
<XPath>link. - Enter
./ctx:transport/ctx:request/http:http-method/text()into the Expression field and click OK. - Enter inbound into the In Variable field.
- On the Conditional Branch node, add three new branches by clicking the Add Branch three times:

- Click on the first branch, branch1 and navigate to the Properties tab.
- Enter
GETinto the Label field. - Leave = selected for the Operator drop-down listbox.
- Enter
'GET'(don't forget the quotes) into the Value field - Repeat the last three steps for the other three branches and use PUT, DELETE, and POST for the Label and the Value fields:

We have now created the basic structure of our RESTful service with the four HTTP methods representing the CRUD operations. Let's now implement each of the four operations. We start with the
GETmethod, which will invoke the RetrieveCustomerByCriteria operation on the business service. - Drag a Route node and drop it on the GET branch and change the name to RetrieveCustomerRoute.
- Right-click on the Route node and select Insert Into | Communication | Routing.
- On the Properties of the Routing node, click on Browse and select the business service CustomerServiceCRM.
- Select RetrieveCustomerByCriteria for the Invoking drop-down listbox.
- Right-click on the Request Action and select Insert Into | Message Processing | Replace.
- Enter
bodyinto the In Variable and click on <Expression>. - Navigate to the XQuery Resources tab, click on Browse, select the
HttpGetToSoap.xqresource from thetransformationfolder and click OK. - Enter
$inbound/ctx:transport/ctx:request/http:query-string/text()into the Binding field of thequeryStringvariable and click OK. - Select the Replace node contents option.
- Copy the Replace action and paste it into the Response Action of the same Routing action.
- On the Properties, click on the Expression link to replace it by the correct XQuery.
- On the XQuery Resources, click on Browse, select the
SoapToHttpGet.xqresource from thetransformationfolder and click OK. - Enter
$body/cus:RetrieveCustomerByCriteriaResponseinto the Binding field of theretrieveCustomerByCriteriaResponse1variable. - Add a new namespace and enter
cusinto the prefix andhttp://www.crm.org/CustomerService/into the URI field. - Click OK twice.
- Add a Transport Header action after the Replace action in the Response Action.
- Select Inbound Response for the Direction drop-down listbox.
- Click Add Header.
- Select Defined | http | Content-type for the Name part.
- Enter
'text/xml; charset=utf-8'into the Set Header to field of the Action part. - Click Add Header.
- Select Other in the Name part and enter
Content-Lengthinto the field to the right of it. - Enter
string-length($body)into the Set Header to field of the Action part. - Click Add Header.
- Select Defined | http | Date for the Name part.
- Enter
fn-bea:dateTime-to-string-with-format("E, dd MMM yyyy hh:mm:ss",fn:current-dateTime())into the Set Header to field of the Action part. - Click Add Header.
- Select Other in the Name part and enter Content-Encoding into the field to the right of it.
- Enter
'UTF-8'into the Set Header to field of the Action part. - Click Add Header.
- Select Other in the Name part and enter
Allowinto the field to the right of it. - Enter
'GET, POST, PUT, DELETE'into the Set Header to field of the Action part: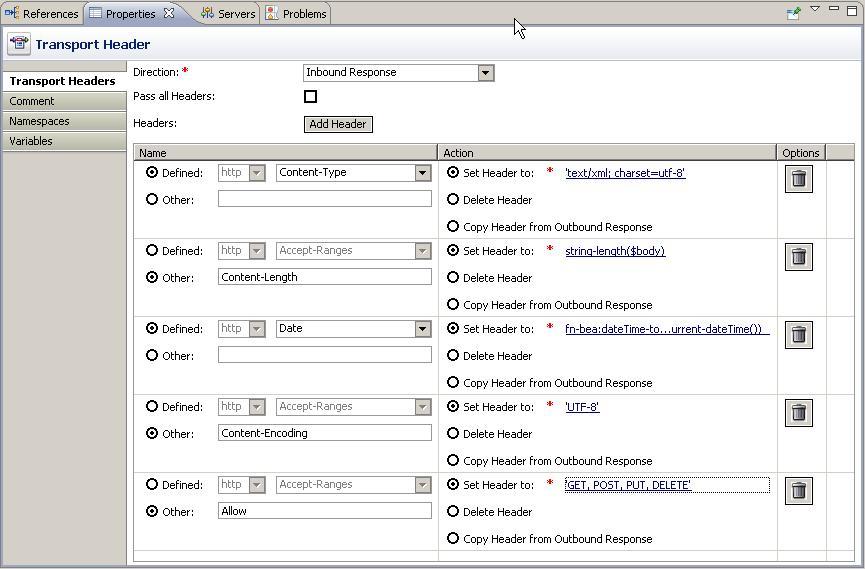
We have completed the implementation of the
GEToperation and the flow should look as shown in the following screenshot: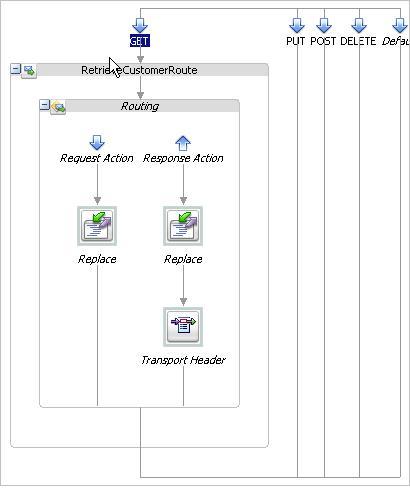
Next let's implement the PUT method, which will invoke the UpdateExistingCustomer operation on the business service.
- Copy the RetrieveCustomerRoute node and paste it into the PUT flow.
- Change the name to
UpdateExistingCustomerRoute. - On the Properties tab of the Routing action, select the UpdateExistingCustomer operation for the Invoking drop-down listbox.
- On the Properties tab of the Replace action in the Request Action of the UpdateExistingCustomerRoute, click on the Expression link.
- On the XQuery Resources, click on Browse, select the
HttpPutToSoap.xqresource from thetransformationfolder and click OK. - Enter
$body/cus1:Customerinto the Binding field of thecustomer1variable. - Add a new namespace and enter
cus1into the prefix andhttp://www.somecorp.com/customerinto the URI field. - Click OK.
- On the Properties of the Replace action in the Response Action flow of UpdateExistingCustomerRoute, click on the Expression link.
- Enter the following XML fragment into the Expression field:
<status>
    <code>OK</code>
    <message>record updated</message>
</status>
Next, let's implement the
POSTmethod, which will invoke the CreateNewCustomer operation on the business service. - Copy the RetrieveCustomerRoute node and paste it into the POST flow.
- Change the name to
CreateNewCustomerRoute. - On the Properties tab of the Routing action, select the CreateNewCustomer operation for the Invoking drop-down listbox.
- Insert an Assign action into the Request Action flow, right before the Replace action.

- On the Properties tab of the Assign action, click on <Expression> and enter
$bodyinto the Expression field. - Enter
origRequestinto the Variable field. - On the Properties tab of the Replace action in the Request Action of the CreateNewCustomerRoute, click on the Expression link.
- On the XQuery Resources, click on Browse, select the
HttpPostToSoap.xqresource from thetransformationfolder and click OK. - Enter
$body/cus1:Customerinto the Binding field of thecustomer1variable. - Add a new namespace and enter
cus1into the prefix andhttp://www.somecorp.com/customerinto the URI field. - Click OK.
- On the Properties of the Replace action in the Response Action flow of CreateNewCustomerRoute, click on the Expression link.
- On the XQuery Resources, click on Browse, select the
SoapToHttpPost.xqresource from thetransformationfolder and click OK. - Enter
$body/cus:CreateNewCustomerResponseinto the Binding field of thecreateNewCustomerResponse1variable. - Enter
$origRequest/cus1:Customerinto the Binding field of thecustomer1variable and click OK.Last but not least, let's implement the
DELETEmethod, which will invoke the DeleteExistingCustomer operation on the business service. - Copy the UpdateExistingCustomerRoute node and paste it into the DELETE flow.
- Change the name to
DeleteExistingCustomerRoute. - On the Properties tab of the Routing action, select the DeleteExistingCustomer operation for the Invoking drop-down listbox.
- On the Properties tab of the Replace action in the Request Action of DeleteExistingCustomerRoute, click on the Expression link.
- On the XQuery Resources, click on Browse, select the
HttpDeleteToSoap.xqresource from thetransformationfolder and click OK. - Enter
$inbound/ctx:transport/ctx:request/http:query-parameters/http:parameter/@value[$inbound/ctx:transport/ctx:request/http:query-parameters/http:parameter/@name='id']into the Binding field of theidvariable and click OK. - On the Properties of the Replace action in the Response Action of DeleteExistingCustomerRoute, click on the Expression link.
- Change message element content to
record deletedand click OK.Now we have implemented all required HTTP methods for the CRUD operations. But there are two other HTTP methods (
OPTIONSandHEADER), which we won't need and which will trigger the default branch. Therefore, we will raise an error to communicate that these methods are not supported. - Add a Pipeline Pair node to the default branch and name it
NotSupportedMethodPipeline. - Add a Stage to the Pipeline Pair node and name it
RaiseErrorStage. - Insert a Raise Error action into the Stage.
- On the Properties of the Raise Error action, enter
NOT_SUPPORT_HTTP_METHODinto the Code field andUnsupported HTTP Methodinto the Message field. - Deploy the project to the OSB server.
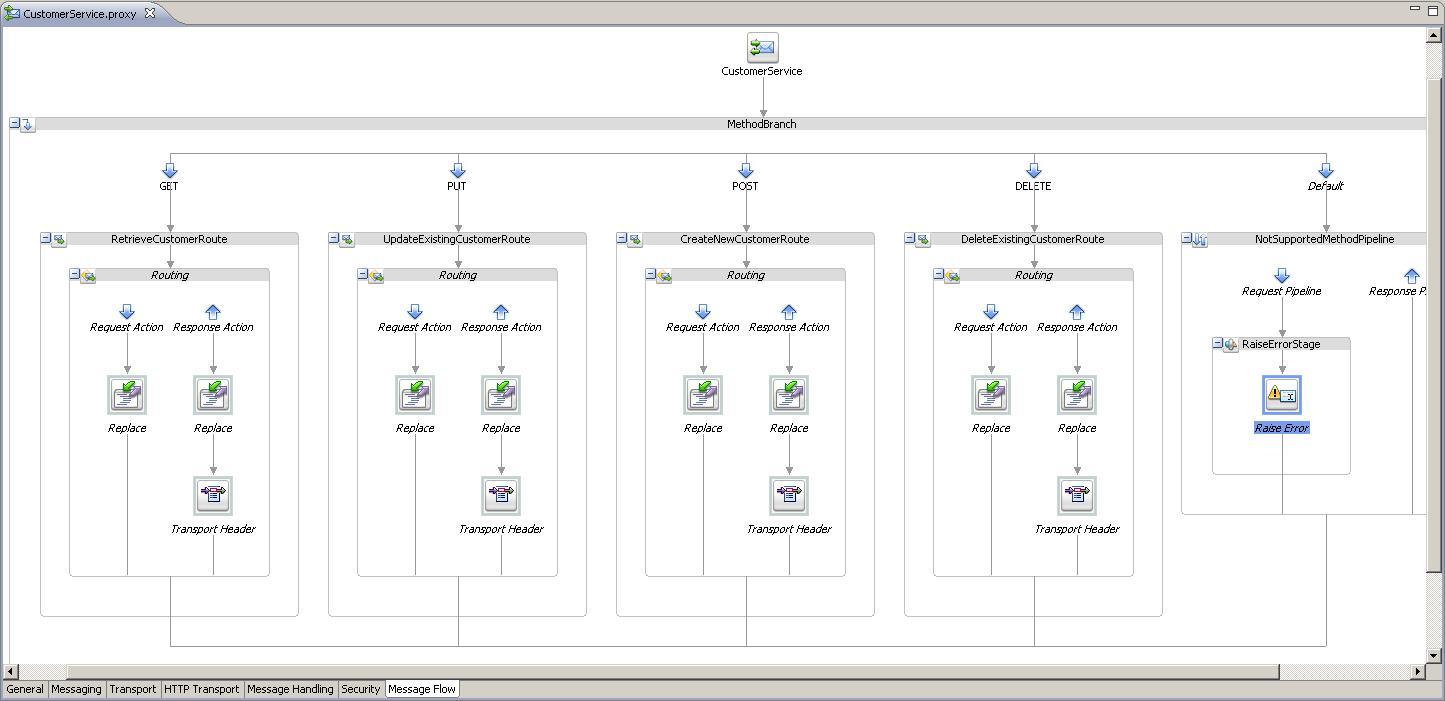
The completed message flow definition is shown in the following screenshot:
Now let's test our RESTful service. There are multiple ways for testing a RESTful service.
For testing the GET method, we can use a Web browser and enter the following URL: http://localhost:7001/exposing-restful-service/CustomerService?id=100:

For testing the other implemented HTTP methods, we can use the Service Bus console.
To test the PUT method, perform the following steps in Service Bus console:
- In the Project Explorer, navigate to exposing-restful-service | proxy and click on the Launch Test Console icon for the CustomerService proxy service.
- Expand the Transport section.
- Enter
PUTinto thehttp-methodfield. - Enter the following XML fragment into the Payload field.
<cus1:Customer xmlns:soapenv="http://schemas.xmlsoap.org/soap/envelope/" xmlns:cus="http://www.crm.org/CustomerService/" xmlns:cus1="http://www.somecorp.com/customer">
    <cus1:ID>1</cus1:ID>
    <cus1:FirstName>Peter</cus1:FirstName>
    <cus1:LastName>Sample</cus1:LastName>
    <cus1:EmailAddress>[email protected]</cus1:EmailAddress>
    <cus1:Addresses>
        <cus1:Address>
            <cus1:Street>Somestreet</cus1:Street>
            <cus1:PostalCode>98999</cus1:PostalCode>
            <cus1:City>Somewhere</cus1:City>
        </cus1:Address>
    </cus1:Addresses>
    <cus1:Rating>A</cus1:Rating>
    <cus1:Gender>M</cus1:Gender>
</cus1:Customer>
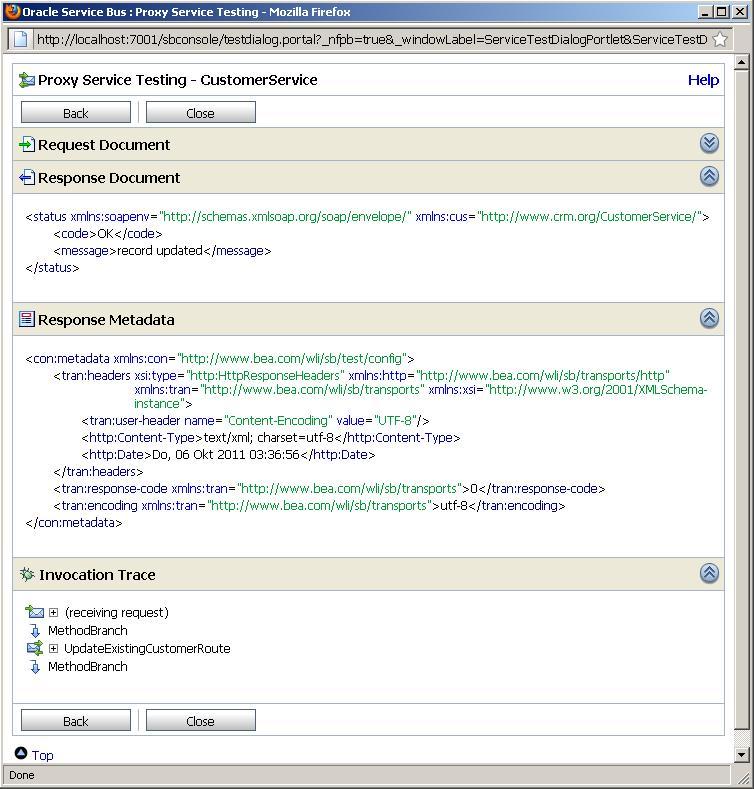
- Click Execute.
- The Response Document shows the record updated message and in soapUI a new request has been logged on the mock service.
Testing the other HTTP methods is similar to the PUT, just replace the HTTP method and pass another message. To test the DELETE and GET, enter the value of the query string (that is, id=100) into the query-string field.
In this recipe, we created a REST interface for an existing SOAP service. We have mapped each of the available HTTP methods to one of the CRUD operations of the customer service.
The HTTP methods we implemented are PUT, POST, DELETE, and GET.
Working with the HTTP methods is similar to working with a WSDL with multiple operations. But we can't use an operational branch for handling the different methods; we have to use a conditional branch. The conditional branch decides which HTTP method has been passed and triggers the right behavior.
For each method we have to transform the message we get through the RESTful interface to the message the backend SOAP-based web service expects. For that, we have used the Replace action together with XQuery scripts.
For the GET and DELETE method, all the necessary values are passed in the query string, that is, in the URL of the request. For example, to read the customer with id=100, we have defined and used the following URL:
http://localhost:7001/exposing-restful-service/CustomerService?id=100
The request URL will end up in the $inbound variable, the part with the information about the request is shown here:
<con:transport>
    <con:uri>/exposing-restful-service/CustomerService</con:uri>
    <con:request>
    <tran:headers>
        <http:Content-Type>text/plain; charset=utf-8</http:Content-Type>
    </tran:headers>
    <tran:encoding>utf-8</tran:encoding>
    <http:query-string>id=100</http:query-string>
    <http:query-parameters>
        <http:parameter name="id" value="100"/>
    </http:query-parameters>
    <http:http-method>GET</http:http-method>
    </con:request>
</con:transport>
We can see that the there is a separate element http:query-string only holding the value of the query string. Additionally there is a http:query-parameters collection with one element for each parameter.
In the implementation of the GET method, we have used the http:query-string element to pass the value of the query-string to the XQuery script by using the following XPath expression:
$inbound/ctx:transport/ctx:request/http:query-string/text()
The XQuery then uses the following FLOWER expression to create the criteria structure to be passed to the SOAP web service of the CRM system.
<criterias>
{
for $nameValue in fn:tokenize($queryString,"&")
return
<criteria>
<criteriaField>{ fn:substring-before($nameValue,'=') }
</criteriaField>
<criteriaValue>{ fn:substring-after($nameValue,'=') }</criteriaValue>
</criteria>
}
</criterias>The implementation of the DELETE method is using the http:query-parameters collection to retrieve the value of the id parameter using the following expression:
$inbound/ctx:transport/ctx:request/http:query-parameters/http:parameter/@value[$inbound/ctx:transport/ctx:request/http:query-parameters/http:parameter/@name='id']
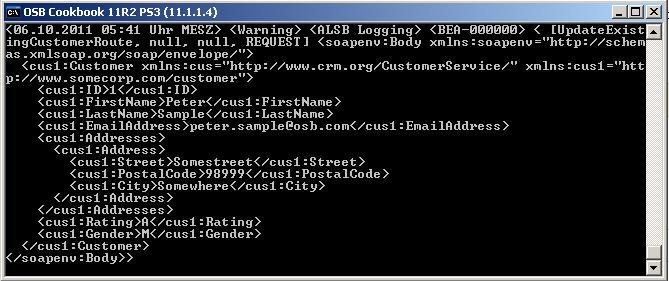
For the PUT and POST method, the message is passed as an XML fragment, which will end up in the $body variable in the message flow. The following screenshot shows the content of the $body for the PUT request when logged through a Log action.
In the previous recipe, we used the query string part of the URL to pass the values to the GET and DELETE method. Another way of passing these values is as so-called clean URLs, which are purely structural URLs that do not contain a query string but instead define the path of the resource through the URL. So instead of using the following URL for the GET:
http://localhost:7001/exposing-restful-service/CustomerService?id=100
we could use a clean URL, such as this one:
http://localhost:7001/exposing-restful-service/CustomerService/id/100
Even if the request URL is longer, the existing proxy listening on Endpoint-URI /exposing-restful-service/CustomerService will still be triggered. The interesting part of the $inbound variable in this case would hold the following values:
<con:transport>
    <con:uri>/exposing-restful-service/CustomerService</con:uri>
    <con:request>
        <tran:headers>
            <http:Content-Type>text/plain; charset=utf-8</http:Content-Type>
        </tran:headers>
        <tran:encoding>utf-8</tran:encoding>
        <http:relative-URI>id/100</relative-UR>
        <http:http-method>GET</http:http-method>
    </con:request>
</con:transport>
We can see that the part of the path after the Endpoint-URI of the proxy can be found in the http:relative-URI element. Using a tokenize function, it's easy to access the different values, for example, for the value of the id we could use:
fn:tokenize($inbound/ctx:transport/ctx:request/http:relative-URI/text(),'/')[2]