
Networking
In the 1990s Sun Microsystems®, a server hardware company and the creator of Java, had an advertising campaign with the slogan, "The network is the computer". Given the date, their proclamation has had remarkable foresight. Today there are few things that you do on a computer that do not use network access and many computing devices are built specifically for use with a network connection of some form. You might often find that your devices become far less useful to you when they are not connected.
At a basic level, networking is just having computers talk to one another. This allows them to share information and for programs on one computer to react to things that happen on another computer. So far we have written programs that only run locally and only deal with data they can read as files.1 In this chapter we will branch out beyond that and learn how to make programs that can talk to other computers.
23.1 TCP and UDP
When computers talk via a network they basically send bits either over a wire or through wireless signals. In order for other computers to understand those bits and for the bits to get to the computer they are supposed to go to, there have to be agreed-upon ways of interpreting things. This agreement for how to interpret the binary data is what we call a network protocol. There are many different protocols that have been developed and there are different ones for different levels of communication. For moving information across a network the Java libraries provide support for Transmission Control Protocol (TCP) and User Datagram Protocol (UDP)/indexUDP.
Both of these protocols break the information you send up into packets. Each packet contains a certain amount of your data as well as protocol data with information such as where that data should go. Most network communication uses TCP, and we will follow along with that. The reason is that TCP is "safe". You can think of TCP as being something like certified mail. When a TCP packet is sent out, it goes through the network until it reaches its destination. The receiver sends back a verification that it got the packet. If something is lost, TCP will try to resend it. If it fails too many times, the program sending the data will be notified with an error message. In Scala, that notification will come in the form of an exception.
UDP is more like standard mail and lacks the safety mechanisms of TCP. You put your information in a UDP packet and send it out and just hope it arrives. If you are on a good network, most of the packets will. However, UDP will not actually tell you if they do or do not. It is your responsibility as a program to write the code in such a way that packets can be dropped and the program can deal with it. The advantage of UDP being "unsafe" is that it can be much faster. The system does not ever sit around waiting for verification that data got across, it just sends things out. This makes it the preferred protocol for things like games where the network speed can significantly impact user experience. It also places an extra development cost on game companies because effort does have to go into making the programs deal with dropped packets.
23.2 Sockets
Communication between machines is done through sockets. The program on one machine, often called the "server", will wait for connections from the outside. programs running on other computers, called "clients", then make a connection to the one that is waiting. In order to support multiple different types of connections, each computer has many "ports" that sockets can connect to. The server specifies which port it will listen to and clients should connect to the appropriate port for the server they want to talk to.
23.2.1 TCP Sockets
The libraries for using sockets can be found in java.io.net. For TCP connections, the program on the server side creates a ServerSocket and gives it a port number to use. A call to accept on the ServerSocket will block until a connection is made. The accept method returns an instance of Socket. If you wanted to accept a single connection and do something with it, the code might look like this.
import java.net._
val ss = new ServerSocket(8000)
val serverSock = ss.accept()
// Stuff to communicate across serverSock
The counterpart to this code on the client side just uses the Socket class to make a connection to a remote computer. You pass in the machine to connect it and a port number like this.
val clientSock = new Socket("localhost",8000)
// Stuff to communicate across clientSock
The port numbers on the client and server need to agree for them to connect. In this example, the client would be run on the same machine as the server. The name "localhost" is used to represent the local machine. You could also provide a remote machine by name or IP address.
Details of Port Numbers
Port numbers are 16-bit unsigned values so they can range from 0 to 65535. The first 1024 (from 0 to 1023) of these can only be used by programs run with administrator privileges. Most of these are assigned to well-known system level programs. For example, ssh uses port 22 by default while the SMTP mail service uses 25.
The ports from 1024 to 49151 are registered ports that have assigned uses based on applications to the IANA. On most systems these are open for users, though you can not use a port that is already in use by some other application. The code in this chapter uses port 8000. Technically, this port has been registered for the Intel®Remote Desktop Management Interface (iRDMI). However, unless you happen to be running that on your system, it should work just fine for your programs.
The ports from 49152 to 65535 can not be registered and are used for custom applications or temporary purposes. You should feel free to have your application use a port in that range to make sure that you do not conflict with anything on whatever system the application might be run on.
23.2.2 UDP Sockets
With UDP, the role of client and server are less obvious. There is a single DatagramSocket class that is used for both sending and receiving data. It does this through a DatagramPacket. The two simplest ways to build a DatagramPacket are the following.
new DatagramPacket(buf:Array[Byte], len:Int) // Receiving packet
new DatagramPacket(buf:Array[Byte], len:Int, address:InetAddress, port:Int) //
Sending packet
In the first case you are building a packet to receive data. The data goes into the specified array and the specified number of bytes are supposed to be read. The length of the array does not have to match len, but for simple usage it probably should.
The second one takes additional arguments that tell where the data should be sent. The InetAddress type is also in java.net. There are several different methods in InetAddress that can be used to get an instance of the type. The two you are most likely to use are the following.
getByAddress(addr:Array[Byte]):InetAddress
getByName(host:String):InetAddress
You are probably most familiar with using names to represent computers and will likely use the second option.
The DatagramSocket has methods called send and receive that each take a DatagramPacket and do the appropriate action with them. The receive method will block until a message comes in on the proper port. The real challenge of working with UDP is that you have to pack whatever data you want to sent into the arrays of bytes in the packets yourself. For this reason, we will not be making much use of UDP in this book. The following example is as far as we will go.
import java.net._
import scala.collection.mutable
object DatagramDoubles {
def packDouble(d:Double,v:mutable.IndexedSeq[Byte]) {
var dlong = java.lang.Double.doubleToLongBits(d)
for(i <- v.indices) {
v(i) = dlong.toByte
dlong >>= 8
}
}
def unpackDouble(v:mutable.IndexedSeq[Byte]):Double = {
val dlong = v.foldRight(0L)((b,dl) => (dl << 8) | (b & 0xff))
java.lang.Double.longBitsToDouble(dlong)
}
def packArray(ds:Array[Double]):Array[Byte] = {
val ret = new Array[Byte](8∗ds.length)
for(i <- ds.indices) packDouble(ds(i),ret.view(8∗i,8∗(i+1)))
ret
}
def main(args:Array[String]) {
if(args.length>1) {
val socket = new DatagramSocket()
val data = packArray(args.map(_.toDouble))
val packet = new
DatagramPacket(data,data.length,InetAddress.getByName("localhost"),8000)
socket.send(packet)
} else if(args.length==1) {
val socket = new DatagramSocket(8000)
val num = args(0).toInt
val data = new Array[Byte](8∗num)
val packet = new DatagramPacket(data,data.length)
socket.receive(packet)
for(i <- 0 until 8∗num by 8) println(unpackDouble(data.view(i,i+8)))
} else println("Specify one int for number to read or multiple doubles to
send.")
}
}
This code has the ability to send an Array of Doubles using UDP. Note that in order to pack the Doubles into an Array of bytes we use some calls in the Java library such as doubleToLongBits as well as bitwise operations like >>, <<, |, and &.
To run this code you first start the receiving end, as the receive method will block. If we want to send three numbers you could do that with scala DatagramPoint 3. This will just sit there until we run the sender with a call like this, scala DatagramPoint 2.3 7.8 1.8775. After this call the other instance will print out the three values on different lines.
Clearly this is code that you would only go through the effort to write if you really need the speed of UDP. Instead of hand packing the data you can also use the java.io.ByteArrayInputStream wrapped in either a java.io.DataInputStream or a java.io.ObjectInputStream. If you use this approach, you can get the data out with a java.io.ByteArrayOutputStream wrapped in the appropriate data or object output stream. This approach is not all that much simpler.
23.2.3 Streams from Sockets
For UDP we saw that data has to be packed into the DatagramPackets to be sent to other machines and then unpacked when they arrive. We did not discuss how data is sent using the plain Socket class for TCP. To do this, we use streams. The Socket class has the following methods.
getInputStream() : InputStream
getOutputStream() : OutputStream
These methods do pretty much exactly what you would expect them to given their names. If you call getInputStream on a socket, it will return an implementation of InputStream that connects to the socket so that when data is read from it, data sent through the socket from the other machine will be read. You can wrap these streams in the same manner you would have wrapped streams attached to files. This is part of the flexibility of the stream library. You can write code that uses an InputStream or an OutputStream and it can work regardless of the type of stream that is passed to it. So the same code can be used to work with sockets or files.
To see how this works, we will create a simple chat room with a server and the ability to include multiple clients. To see what we really want, we should do some analysis. Figure 23.1 shows a use-case diagram for what we want to do. There are two types of users of the system, one will start of the chat room as a server on a particular computer. Other users will be clients of the server and will connect into the room and have options for chatting and leaving. When a person connects they have to give a handle they will go by so that others will know who has chatted certain messages and so that private messages can be sent. For this to work, only a single user at any given time can have a particular handle.
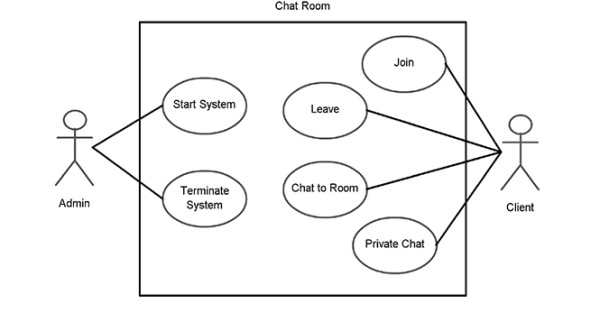
This figure shows the different use-cases for the socket/stream-based chat program that we want to write.
We will start with the client code because it is simpler. It only needs to make a socket to the server, get the user’s handle, ask the user for chat lines that are sent to the server, and display chat text coming from the server. Here is code that does that with a console interface.
package scalabook.chat
import java.net._
import java.io._
import actors.Actor.actor
import annotation.tailrec
/∗∗
∗ This application runs a server for a chat room that demonstrates the use of
∗ socket based networking.
∗/
object ChatClient {
def main(args : Array[String]) {
if(args.isEmpty) {
println("Usage: scala ChatClient host [port]")
} else {
val port = if(args.length>1) args(1).toInt else 8000
val sock = new Socket(args(0),port)
val dis = new DataInputStream(new BufferedInputStream(sock.getInputStream()))
val dos = new DataOutputStream(new
BufferedOutputStream(sock.getOutputStream()))
println("What is your handle for the chat room?")
val name = readLine()
dos.writeUTF(name)
dos.flush()
val response = dis.readUTF()
if(response!=":quit") {
actor {incoming(dis)}
println("Welcome! Begin chatting.")
outgoing(dos)
} else {
println("The server has rejected you.")
}
sock.close()
}
sys.exit(0)
}
@tailrec private def incoming(dis:DataInputStream) {
val line = dis.readUTF()
println(line)
incoming(dis)
}
@tailrec private def outgoing(dos:DataOutputStream) {
print("> ")
val input = readLine().trim
dos.writeUTF(input)
dos.flush()
if(input!=":quit") outgoing(dos)
}
}
Typing in ":quit" as a chat line will terminate the chat. Note that the incoming messages are handled in a separate thread. This thread is spawned using the actor shortcut. The reason for doing this is that both incoming and outgoing message handling contain blocking methods in the form of readUTF and readLine. To handle both in a single thread we would have to write more elaborate code that only reads when there are things to be read to prevent blocking.
The incoming and outgoing methods include something new that we have not seen before, an annotation called @tailrec. This annotation tells the Scala compiler that a particular recursive method must be optimized for tail recursion. If it can not, the compiler should generate an error. What does this mean? Tail recursion is a term used to describe a recursive function that contains only one recursive call and does not do significant work after the call returns. These types of recursive functions can often be transformed into while loops. In this way you can get the efficiency of a while loop while getting the programming benefits of recursion. The @tailrec annotation will force an error if the Scala compiler can not convert the function to a loop. This is important, because you might recall that recursive calls consume memory on the stack, and if you recurse too deeply, you run out of memory and the program crashes from a stack overflow.
The code for the server is a bit more complex because it has more work to do. It needs to have a ServerSocket that is accepting new connections, code for each socket that takes in chat messages, and code that lets the person who runs the server enter a command to stop it. Like the client, some of these things involve blocking calls so multithreading can be helpful. Here is one way of writing the code.
package scalabook.chat
import java.net._
import java.io._
import actors.Actor._
import annotation.tailrec
import collection.mutable
/∗∗
∗ This application runs a server for a chat room that demonstrates the use of
∗ socket based networking.
∗/
object ChatServer {
def main(args : Array[String]) {
val port = if(args.isEmpty) 8000 else args(0).toInt
actor {startServer(port)}
checkQuit()
sys.exit(0)
}
private case class User(name:String, sock:Socket, dis:DataInputStream,
dos:DataOutputStream)
private val users = new mutable.HashMap[String,User] with
mutable.SynchronizedMap[String,User] {}
private def startServer(port:Int) {
val ss = new ServerSocket(port)
while(true) {
val sock = ss.accept()
actor {addUser(sock)}
}
}
private def addUser(sock:Socket) {
val dis = new DataInputStream(new BufferedInputStream(sock.getInputStream()))
val dos = new DataOutputStream(new BufferedOutputStream(sock.getOutputStream()))
val name = dis.readUTF()
if(users.contains(name)) {
dos.writeUTF(":quit")
dos.flush()
sock.close()
} else {
dos.writeUTF(":accept")
dos.flush()
val user = User(name,sock,dis,dos)
users += name -> user
doChat(user)
}
}
@tailrec private def doChat(user:User) {
val input = user.dis.readUTF().trim
if(input!=":quit") {
val index = input.indexOf("<-")
if(index>0) {
val oname = input.take(index).trim
if(users.contains(oname)) {
users(oname).dos.writeUTF(user.name+" -> "+input.drop(index+2).trim)
users(oname).dos.flush()
} else {
user.dos.writeUTF(oname+" is not a valid handle.")
user.dos.flush()
}
} else {
val output = user.name+" : "+input
for((name,ouser) <- users; if name!=user.name) {
ouser.dos.writeUTF(output)
ouser.dos.flush()
}
}
doChat(user)
} else {
users.remove(user.name)
}
}
@tailrec private def checkQuit() {
if(readLine() != ":quit") checkQuit()
}
}
The main method gets a port number, then starts the server in a separate thread. The main thread waits for input from the user.
The function that creates the ServerSocket goes into an infinite loop where it accepts connections and calls addUser in new threads created with actor. This means that each client could be in a separate thread. In reality, the actor library handles threads and we can not be certain of how many threads it will create to do the processing.
The addUser method gets streams from the socket and wraps them in data streams. It then reads a string which should be the name/handle of that client. Note that the server defined a case class called User and keeps a mutable map associating names with users. This mutable map is synchronized so that it does not run into problems with the multiple threads involved. This map allows us to easily insure that there are never two users with the same handle. It also makes it easier to do private messages. The name that is read in is checked against the map. If the map already has that as a key, it tells the client to terminate before closing the socket. Otherwise, it tells the client that it was accepted, adds a new User to the map, and moves on to the doChat method.
The doChat method is another tail recursive method. It reads from the input stream of that user and checks to see if they have disconnected. If they have not, it either sends out a private message to the correct user or runs through all users sending everyone a message. If they quit, that user name is removed from the map and there is no recursive call. You will also see that private messages are handled in this method. It looks for <- in the text and assumes that what is before that is a user handle and what is after it is the message to send.
There are several places in both the client and the server where you see output streams getting flushed. In fact, there is a flush after every write. The reason is that most of the writes will be small and the whole thing will sit in the buffer if we do not flush it.
Enter these files and check that they work. If you use "localhost" as the machine name you can have conversations with yourself on a single computer. After playing with this for a while you might notice some areas in which it is lacking. First, it is not very pretty. It is plain text in the console. Chat messages that come in will print in the middle of what you are typing in a way that can make it not only a bit ugly, but can also make it hard to use as you can not keep track of what you are writing.
There are some other problems that are more than cosmetic. Currently anything is allowed for a handle. That will not cause a problem as long as your users are not trying to break the system. However, there are names that could lead to less than ideal behavior. Strings that are only whitespace or that include whitespace at the beginning or end will prevent private messages from being sent. More checking should be put into the server when it receives a name to reject anything that would cause a problem.
The other problem you might have noticed is that if a client disconnects without entering ":quit" there is an exception in the server. Networking code throws even more exceptions than code using files. This code never includes a try/catch, but they could be useful around every call to readUTF or writeUTF. The ones that will cause exceptions if a client disconnects improperly are the first line in doChat and the writeUTF calls for sending messages. The cure for this is having a try/catch that will detect when a link fails. At that point it should stop the doChat for that user and remove it from the users map. Doing this is left as an exercise.
Network Security
The topics of security and information assurance in computing are extremely broad in scope and of critical importance in our modern, computer-driven world. Programs that deal with confidential information need to take efforts to protect that information so that outside entities can not get to it. Programs that run critical systems need to take precautions to make sure that they can not be taken down by individuals without the authorization to do so.
The chat program we just wrote failed on all accounts in regards to security. Adding the proper error handling would be a major step in the direction to make sure that only the person running the server can take it down. However, every message coming in to and out of the server is sent pretty much as plain text that could be easily read at any number of points between the client and the server if sent across a network. Granted, this was not intended to be a highly secure system. It does nothing to even verify who is connecting to it. This does not mean that it would never be used to discuss things that people might want to keep private. Someone might feel that if they set up the server on a machine just temporarily, then no one they do not invite would have a chance to come in and snoop on what is being said. The problem with this assumption is that another party could be watching communication without even knowing about the server.
The standard way to circumvent someone from listening to network communications is to encrypt messages. The person could still see the message going by, but because it is encrypted they can not read it. The simplest way to do this with socket communication in Scala is to use a javax.net.ssl.SSLServerSocket on the server and connect with javax.net.ssl.SSLSockets. These make sockets that encrypt all communications using the Secure Socket Layer (SSL) protocol. This is the same protocol used by ssh and scp.
23.3 URLs
As was mentioned at the beginning of the chapter, you have likely been using networked programs for years. Most notable of these would be your web browser. Web browsers were originally written as little more than a program to pull information down from servers and display that information on your screen. Many web applications now have some 2-way communication, but there is still a lot on the web that can be accessed by simply pulling down information.
When you use a web browser to access information you have to tell it where you want to pull the information from and what information you want to pull down. This is done with a Uniform Resource Locator or URL. Most of the URLs you enter into a browser begin with "http". This tells the browser that it is supposed to communicate with the server using the Hypertext Transport Protocol (HTTP). This is a standard for requesting information across sockets using fairly simple text commands. By default, HTTP servers sit on port 80 though other port numbers can be specified as part of the URL. You could pull down information from an HTTP server by opening a socket and sending the appropriate commands. However, because HTTP is so ubiquitous, there is a java.net.URL class that will help to do this for you.
There are a number of ways to build a URL where you can specify different parts of the URL, but the simplest to describe just takes a String with the same text that you would enter into a browser giving a complete specification of what information you want. For example, you could use the following line of code to get a URL for the main page of Scala.
import java.net._
val scalaURL = new URL("http://www.scala-lang.org/")
The URL class has a method called openStream that will return an InputStream that can be used to read the contents of the URL. We could use this in code like the following to read the complete contents of that URL and convert it to a String.
import java.io._
import collection.mutable
val urlis = new BufferedInputStream(scalaURL.openStream())
val buffer = mutable.Buffer[Byte]()
var res = urlis.read()
while(res>=0) {
buffer += res.toByte
res = urlis.read()
}
val contents = new String(buffer.toArray)
This code opens the stream and wraps it in a BufferedInputStream to improve performance. It then creates a Buffer[Byte] to hold the values that are read, then enters a loop where bytes are read one at a time and added to the buffer. This process ends when the value read is less than zero, indicating that the end of the stream has been reached. After the end has been reached, the buffer is converted to an array and a new String is build from that array.
The use of a while loop here is called for because we do not know how much data we are loading in advance and other approaches would require that. Instead of a while loop this could easily be converted to use a recursive function as well. Just make sure to specify @tailrec so that you know what you write will not overflow the stack. Knowing the length of the content would allow this alternate version, which is significantly simpler. The challenge is knowing what goes in place of the question marks.
import java.io._
val urlis = new BufferedInputStream(scalaURL.openStream())
val buffer = new Array[Byte](???) // Needs the size of the contents in bytes.
urlis.read(buffer)
val contents = new String(buffer)
It is tempting to call available on the stream. Unfortunately, this is not a good solution. That method returns the number of bytes that can be read before blocking. That number is often different from the total size. If the stream was just opened it will be small. Waiting for the full contents to become available is not an appropriate solution.
One way to do this that will work from some content is using a java.net.URLConnection. The URL class as a method called openConnection:URLConnection that can return one of these objects. The URLConnection has a getContentLength:Int method that will tell you the size of the contents of that URL. There is also a getContentLengthLong:Long method that can give you the size for content that exceeds the maximum size of an Int. A call to getInputStream:IntputStream on the URLConnection will provide an input stream that you can read from.
import java.io._
val connection = scalaURL.openConnection()
val urlis = new BufferedInputStream(connection.getInputStream())
val buffer = new Array[Byte](connection.getContentLength)
urlis.read(buffer)
val contents = new String(buffer)
Unfortunately, the getContentLength method does not work with all types of content. If the length is not available, a value of -1 is returned which will cause this code to crash. For this reason, the while loop is probably the most robust solution.
If the URL pointed to something other than a text file, the data that was read would have to be handled in a different way. For example, it might point to an image. The URLConnection has a method called getContentType:String that can help you determine what type of data the URL references. You would then have to write code to load in the data and process it appropriately. There is also a method called getContent:AnyRef that is part of both URL and URLConnection. This method can return various things depending on the type of the contents. For example, getContent will return an image object if that is what the URL refers to. The fact that it returns AnyRef means that you should do a match on the value and handle it appropriately depending on what it is. The code might look something like this.
url.getContent() match {
case img:java.awt.Image =>
// Code for handling an image.
case is:InputStream =>
// This is what you get for text so you need code to read it.
case _ =>
// Some other type.
}
23.4 Remote Method Invocation (RMI)
In the next section we will be adding networking to the project in a way that will let users collaborate on a drawing while working on different programs. In order for this to work, they need to be able to share a drawing, chat with one another, and modify elements of that shared drawing. We could also consider adding other features to the sharing such as a sketch pad where they can doodle ideas. Now picture the code to implement these features using sockets.
The challenge that such an implementation will face is that there are many different types of messages being sent between the two users and those different messages can have an impact on very different parts of the code on either end. The code to handle this type of situation using sockets gets very messy. It might be tempting to use a different port for each type of message and keep many different sockets open, but such a solution is sloppy and does not scale. The operating system puts limits on the number of resources a single application can use. Instead, you have to send additional information with each message that identifies what type of message it is, and what objects it should be directed toward.
Dealing with that extra bookkeeping is challenging and time consuming to code. It is also difficult to debug. For these reasons, and the fact that this is something that happens in many applications, the Java libraries provide a simplified alternative called Remote Method Invocation (RMI). As the name implies, RMI lets you make method calls on objects that are located on other machines. It automatically handles the bookkeeping so that information is sent to the right place and the correct code is invoked on the opposite side. The downsides of RMI are that it does have a bit of a learning/setup curve, it only works between languages running on the Java Virtual Machine (JVM) , and it runs slower than well-done specialized code for the same task. The rest of this section will talk about the setup and help you climb the learning curve. Our application is running on the JVM so that is not a problem for us. Our application is not highly dependent on performance either so the costs involved will not be significant and will be more than make up for with the convenience that RMI provides.
There are a number of steps that are required to get an application to use RMI. Here they are listed out.
- Set up abstract types that specify the methods that can be called remotely. This is done by making traits for any types that you want to have remote access to. These traits need to inherit from java.rmi.Remote and they should only include methods that are abstract. So the only things in the trait should be declarations using def that do not specify any code to run.2 Each method needs to say it can throw a java.rmi.RemoteException. More on that below.
- Write a class that extends java.rmi.server.UnicastRemoteObject with the trait you just created. You have to implement all the methods from the trait. Provide others as needed to make a complete implementation for your program.3
- Create a server application that binds the server object to an RMI registry. You do this by calling bind or rebind on java.rmi.Naming. Those methods take two arguments. The first is the name the registry will know the object by and the second is the object to bind. The bind method will throw an exception if that name is already in use. The rebind method will unbind the old object and bind this new one in its place.
- Create a client application that uses the lookup method of java.rmi.Naming to get hold of the server object. The lookup method takes a single argument that is a URL for the server and object to look up. The protocol for the URL should be "rmi" and the name should be separated from the server by a slash. An example would be "rmi://computer.college.edu/ServerObjectName". The name used here must match what the server used when it was bound to the registry.
- Lastly you need to run rmiregistry then start up the server and clients. The rmiregistry program is part of the Java Development Kit (JDK) installation. For a Java program, the registry needs to have access to the compiled ".class" files for the application. This can be accomplished either by setting a CLASSPATH environment variable or by running rmiregistry in the based directory that the program compiles to.4 For a Scala program, odds are good that it will also need to be able to find certain Scala jar files. These are in the lib file of the Scala install directory. More details on this below in the example.
This might seem like a daunting list, but it really is only five steps and once you have done that it becomes much easier to extend your networked application. We will go back through the steps shortly as part of an example.
Before the example, there is one other detail of RMI that needs to be covered, the passing of arguments. Back in sections 7.8-7.9 we talked about how arguments are passed in Scala. The normal style is to pass a reference to the object with support for pass-by-name sematics as well. With RMI there are two different ways to pass things: pass-by-value and pass-by-reference. Which happens depends on the type of the object being passed. Pass-by-value implies that the object is copied and the other machine gets its own copy that is independent of the first one. This happens for Serializable data and includes the standard types you are used to working with in Scala. Objects with a type that implements Remote are passed as a remote reference. Instead of getting a copy of the object, the remote machine gets an object that implements the remote interface and which has the ability to communicate calls across the network. Methods called on these objects go back to the original value. The fact that there is network communication involved means that they are much slower than calls on local objects.
If you try to pass a value that is not serializable or remote, you will get an exception. The reason for this should be fairly clear to you, RMI is utilizing object streams to perform communication. Only objects that can be serialized will go through those. So the discussion of how to make objects serializable in 22.4.3 is relevant when using RMI as well.
To help you see how this all goes together, we will write another chat application that uses RMI instead of making direct use of sockets. We will run through the steps from above and point out what code is written for each one. Before we can write it though, we need to figure out what we are writing. This chat application is going to be a bit different from the last one. In particular, it will have a GUI for the client. The GUI will include not only standard chat elements, but a list of everyone logged onto the server. The idea is that users can send private messages by selecting one or more users from the list when they do their chats. Only the selected users will get their messages.
Starting with step 1 from the RMI steps, we lay out the types we want to have remote access to and put in the methods that we need to be able to call remotely. We start with the server.
package scalabook.chat
import java.rmi._
trait RMIServer extends Remote {
@throws(classOf[RemoteException]) def connect(client:RMIClient):String
@throws(classOf[RemoteException]) def disconnect(client:RMIClient):Unit
@throws(classOf[RemoteException]) def getClients:Seq[RMIClient]
@throws(classOf[RemoteException]) def publicMessage(client:RMIClient,
text:String):Unit
}
The fundamental structure is that we have a trait that extends java.rmi.Remote. Inside of that trait there are four methods that we want to be able to call on a server remotely. These allow the client to connect, disconnect, and get a list of the current clients. There is also a method called publicMessage that should be called whenever a client sends out a message publicly. This allows the server to keep a brief history so that someone new logging in can see what has been discussed recently.
This code uses a new annotation that we have not seen before, @throws. This annotation allows us to specifically state exceptions that can be thrown by methods. It takes a single argument for the class of exception that might be thrown. This is not something that we have to do very often in Scala. The equivalent code is much more common in Java and in this case it is required for Scala because we need our code to work smoothly with the Java RMI libraries.
A second trait is set up for the methods that we want to be able to call remotely on the client. It looks like the following.
package scalabook.chat
import java.rmi._
trait RMIClient extends Remote {
@throws(classOf[RemoteException]) def name:String
@throws(classOf[RemoteException]) def message(sender:RMIClient, text:String):Unit
@throws(classOf[RemoteException]) def clientUpdate(clients:Seq[RMIClient]):Unit
}
There are only three methods on the client. These get the name of the client, deliver a message to this client, and tell the client to update its list of clients logged into the server.
Looking at these two interfaces you might feel like there is something missing, methods on the server for sending out public or private chats. In the last chat, when one person wrote a chat message, that was sent to the server as just a String, and the server figured out what to do with it then sent it to the various chat participants. This uses the standard client-server network application structure where all communication goes through the server. This worked well for sockets and made our life easier. However, it is not very efficient as the server becomes a significant bottleneck. What is more, if you really wanted your messages to be private, you lack some security because they all have to go through the server for processing. Basically, the server sees everything and does a lot of work sending out all the messages.
RMI makes it easy for us to deviate from the client-server structure and use more of a peer-to-peer approach. The clients won’t just have a remote reference to the server, they will have remote references to all the other clients. This means that each client can call the message method on the other clients it wants messages to go to. This reduces pressure on the server and makes it less of a bottleneck. If we did not want to keep a history of what was being said on the server, chat traffic would not be sent to the server at all.
This next piece of code includes steps 2 and 3 for the server. Step 2 is in the class RMIServerImpl while step 3 is in the companion object.
package scalabook.chat
import java.rmi._
import java.rmi.server.UnicastRemoteObject
import collection.mutable
class RMIServerImpl extends UnicastRemoteObject with RMIServer {
private val clients = mutable.Buffer[RMIClient]()
 private var history = mutable.ListBuffer("Server Started
")
@throws(classOf[RemoteException]) def connect(client:RMIClient):String = {
clients += client
sendUpdate
 history.mkString("
")+"
"
}
@throws(classOf[RemoteException]) def disconnect(client:RMIClient) {
clients -= client
sendUpdate
}
@throws(classOf[RemoteException]) def getClients:Seq[RMIClient] = clients
@throws(classOf[RemoteException]) def publicMessage(client:RMIClient,text:String)
{
history += client.name+" : "+text
if(history.length>10) history.remove(0)
}
private def sendUpdate {
val deadClients = clients.filter(c =>
try {
c.name
false
} catch {
case ex:RemoteException => true
}
)
clients --= deadClients
clients.foreach(_.clientUpdate(clients))
}
}
object RemoteServerImpl {
def main(args:Array[String]) {
val server = new RMIServerImpl
Naming.rebind("ChatServer",server)
}
}
The class defines two fields for storing the clients and history, then implements the four methods from the interface with rather short methods. You can see that the connect method returns the history. Both connect and disconnect make use of the one private method that is also included, sendUpdate. This method sends out a message to all the clients letting them know that the client list has been modified. This method is a bit longer because it first runs through all the clients and calls their name method. That value is not used for anything, but it serves as a check that the client is still there. This is part of a filter operation that is checking for dead clients. The clients that can not be reached are removed from the list before that list is sent out to all the active clients.
The main method for running the server is remarkably simple. It makes an instance of RemoteServerImpl then uses rebind to bind it to the rmiregistry.
This next piece of code shows steps 2 and 4 for the client. This code is a bit longer because it includes support for the GUI. Even that does not make it all that long.
package scalabook.chat
import java.rmi._
import java.rmi.server.UnicastRemoteObject
import collection.mutable
import swing._
class RMIClientImpl(myName:String,server:RMIServer) extends UnicastRemoteObject
with RMIClient {
private val chatText = new TextArea(server.connect(this))
chatText.editable = false
private var clients = server.getClients
private val userList = new ListView(clients.map(_.name))
private val chatField = new TextField("") {
listenTo(this)
reactions += {
case e:event.EditDone => if(text.trim.nonEmpty) {
val recipients = if(userList.selection.items.isEmpty) {
server.publicMessage(RMIClientImpl.this,text)
clients
} else {
userList.selection.indices.map(clients).toSeq
}
recipients.foreach(r => try {
r.message(RMIClientImpl.this,text)
} catch {
case ex:RemoteException => chatText.append("Couldn’t send to one
recipient.")
})
text = ""
}
}
}
private val frame = new MainFrame {
title = "Chat"
contents = new BorderPanel {
import BorderPanel.Position._
val scrollList = new ScrollPane(userList)
scrollList.preferredSize = new Dimension(200,500)
layout += scrollList -> West
layout += new BorderPanel {
val scrollChat = new ScrollPane(chatText)
scrollChat.preferredSize = new Dimension(500,200)
layout += scrollChat -> Center
layout += chatField -> South
} -> Center
}
listenTo(this)
reactions += {
case e:event.WindowClosing => server.disconnect(RMIClientImpl.this)
case _ =>
}
}
frame.visible = true
@throws(classOf[RemoteException]) def name:String = myName
@throws(classOf[RemoteException]) def message(sender:RMIClient,text:String) {
 chatText.append(sender.name+" : "+text+"
")
}
@throws(classOf[RemoteException]) def clientUpdate(cls:Seq[RMIClient]){
clients = cls
if(userList!=null) userList.listData = cls.map(c =>
try {
c.name
} catch {
case ex:RemoteException => "Error"
})
}
}
object RMIClientImpl {
def main(args:Array[String]) {
val mName = Dialog.showInput(null, "What server do you want to connect to?",
"Server Name", Dialog.Message.Question, null, Nil, "")
mName match {
case Some(machineName) =>
Naming.lookup("rmi://"+machineName+"/ChatServer") match {
case server:RMIServer =>
val name = Dialog.showInput(null, "What name do you want to go by?",
"User Name", Dialog.Message.Question, null, Nil, "")
if(name.nonEmpty) new RMIClientImpl(name.get, server)
case _ => println("That machine does not have a registered server.")
}
case None =>
}
}
}
The GUI includes a TextArea to display chat text, a TextField to enter chat text into, and a ListView to show the names of the clients so that private messages can be sent. The text field has event-handling code to send out messages when the user stops editing the field. This is where the peer-to-peer aspect of the code comes into play as each client can directly call message on the other clients.
Those elements are set in a frame using nested BorderPanels. Both the list and the main area are embedded in ScrollPanes that have their preferred size set so that the GUI will look reasonable. The frame also includes event code so that when the window is closed, this client will disconnect from the server. The GUI as a whole looks like figure 23.2.

The implementations of the remote methods are quite short for the client as well. Only the updating of the client list has any length and that is due to the fact that the call to name is a remote call that needs some error handling so that the code does not die on the first client that can not be reached.
That is all the code we need. All that remains is step 5 where we start of the rmiregistry and run the server and clients. The use of Scala does add one complication to that first part because rmiregistry is a Java program, not a Scala program and by default it will know about the Java libraries, but not the Scala ones. For this reason, we need to tell it where to find the Scala libraries.
When you install Scala there are a number of JAR files that are put in a directory called lib. JAR stands for Java archive and is a standard way of packaging files for Java. Not all programs will need all of these files, but the one called "scala-library.jar" will be needed by the majority of Scala programs, including this one. On a Linux or Mac, if you are in the root directory for the compiled .class files, you could do the following: CLASSPATH=$(SCALA HOME)/lib/scala-library.jar:. rmiregistry. If SCALA HOME has not been set up on your system just replace that with the path to your Scala install. Once that is running start up the server on that same machine and then start clients on that machine or other machines that can reach it. Each client will ask you what machine you want to connect to and what name you want to be known by. If the client is on the same machine as the server, you can use "localhost" as the machine name.
There is one aspect of this application that could be seen as a weakness. Calls to the client name method are made more often than they probably should be. The fact that name is a method in a remote trait means that every call to this will incur network overhead. In this case, "frequent" really just means when chats go through or when client lists are updated. Given that those things are driven by human interactions this likely is not a problem. Frequently updating names likely make it harder to "spoof" the system and act like someone else. In general, you do need to be cognizant of when you are making remote calls because they do have a significant overhead. There might be times when you pass things by value to allow a client to do fast processing then pass a modified copy back just to avoid the overhead of many remote calls.
To really understand the benefits of RMI, consider what it takes to add features. Perhaps you want to make a menu option for things like sharing images or having a shared sketchpad. Using socketing, those additions would make the code significantly more complex. With RMI, you would just add one or two methods into the RMIClient trait and the RMIClientImpl class. You implement those methods and put in code to call them and you are done. Setting up the RMI is a bit more hassle, but once in place, you can add new features to the RMI-based application just about as easily as you would a non-networked application.
23.5 Collaborative Drawing (Project Integration)
Now it is time to put things together into the drawing program. We will do this in two ways. To demonstrate socketing, we will add a simple feature that allows a copy of a drawing to be sent from one user to another. This will be simple to implement because we already have code that sends a drawing to a stream that writes to a file. The other aspect of networking that we want to add is more significant and we will use RMI. This will be a collaboration panel where multiple users can post drawings for others to pull down, chat with one another, and even draw basic sketches.
We will add a second menu with the title "Collaborate" onto the menu bar for the frame in DrawingMain. This menu will have four options. The first two will work with the basic sending of drawings over the network. The second two will work with the more sophisticated RMI-based collaboration scheme. We’ll start with just the first two and add the following code into the DrawingMain class after the creation of the "File" menu.
contents += new Menu("Collaborate") {
contents += new MenuItem("Start Server") {
action = Action("Start Server"){
startServer
enabled = false
}
}
contents += new MenuItem(Action("Send Drawing")(sendDrawing))
}
The first option is intended to set up a ServerSocket on the current machine that will sit there until the program is stopped and accept connections from other machines that want to share drawings. The second option allows us to send the drawing in the tab that is currently selected to another machine. For this code to compile, we need to implement the startServer and sendDrawing methods.
These two methods are fairly simple and they can be put directly in DrawingMain because we have already made it so that the Drawing type can be serialized. If this had not been done for saving through streams earlier, we would have to add that functionality now. A possible implementation of the startServer method is shown here.
private def startServer {
actors.Actor.actor {
val ss = new ServerSocket(8080)
while(true) {
val sock = ss.accept
val ois = new ObjectInputStream(new
BufferedInputStream(sock.getInputStream()))
val sender = ois.readUTF()
val title = ois.readUTF()
ois.readObject() match {
case drawing:Drawing =>
val response = Dialog.showConfirmation(tabbedPane,"Accept "+title+" from
"+sender+"?","Accept Drawing?")
if(response==Dialog.Result.Yes) {
addDrawing(title,drawing)
}
case _ =>
}
ois.close()
sock.close()
}
}
}
This makes a new ServerSocket and then enters into an infinite loop of accepting connections. This code needs to go into a separate thread because the loop will never exit. Recall from chapter 21 that all events in a GUI are handled in the same thread. If you do not put the server code in a separate thread, the GUI will become completely unresponsive because this method never ends.
That infinite loop accepts connections, opens the stream with wrapping to read objects, then it reads two strings and an object. The strings tell us who the sender is and the title of the drawing. The last read is for the drawing itself. A match statement is used to make sure the object that is read really is a Drawing. If it is, the user is asked if they want to accept that drawing from that sender. If they answer yes, it is added as a new tab using a call to the following method.
def addDrawing(title:String,drawing:Drawing) {
openDrawings += drawing
tabbedPane.pages += new TabbedPane.Page(title,drawing.propertiesPanel)
}
Once that is all done, the stream and the socket are closed.
The other side of this communication is sending a drawing to a different machine. This method is invoked when we select the "Collaborate → Send Drawing" menu option.
private def sendDrawing {
val host = Dialog.showInput(null, "What machine do you want to send to?",
"Machine Name", Dialog.Message.Question, null, Nil, "")
if(host.nonEmpty) {
val sock = new Socket(host.get,8080)
val oos = new ObjectOutputStream(new
BufferedOutputStream(sock.getOutputStream()))
val name = Dialog.showInput(null, "Who do you want to say is sending?",
"Name", Dialog.Message.Question, null, Nil, "")
if(name.nonEmpty) {
val title = Dialog.showInput(null, "What is the title of this drawing?",
"Title", Dialog.Message.Question, null, Nil, "")
if(title.nonEmpty) {
oos.writeUTF(name.get)
oos.writeUTF(title.get)
oos.writeObject(openDrawings(tabbedPane.selection.index))
oos.close()
sock.close()
}
}
}
}
This method asks for the machine we want to send to, then opens a socket to that machine and wraps the OutputStream of the socket for sending objects. Once those are open, it asks for the name of the sender and the title of the drawing. Those are sent through the socket, followed by the drawing in the currently selected tab. Once that is sent, everything is closed.
Neither of these methods includes proper error checking. That helps to significantly reduce the length of the code, but it is something that production network code really can not ignore as networking is a task with the ability to produce many types of exceptions.
This basic socketing approach is technically sufficient to let us share drawing, but if you use it for a while you will notice that it really does not feel very collaborative. There is not any real interaction between the different users. Putting in real interaction requires that there are many types of different messages sent between the machines. This is the type of thing that leans towards the strengths of RMI.
The ideal feature to add would be a true collaboration on a drawing where two or more users could view and edit a single drawing at the same time. This path was considered for this chapter, but eventually dismissed because the required code was too involved. It is made more challenging due to the fact that we are already using standard serialization for saving drawings and RMI features interact with serialization. In addition, users on both sides of the network connection need to interact with elements through a GUI. It happens that GUI elements are serializable, but the event handling is a bit more complex to do properly. In the end it was decided to go with this simpler form of collaboration that demonstrates real-time interactions without including many other details that would obscure the educational objectives.
The use of RMI means that we need to follow the basic steps of RMI. That begins with determining what remote interfaces we want to have and what methods should go into them. Our application here is still simple enough that we can make due with one server type and one client type. In this case, the server type will be fairly simple. Both the remote trait and the implementation are shown here.
package scalabook.drawing
import java.rmi._
import server.UnicastRemoteObject
import collection.mutable
trait CollaborationServer extends Remote {
@throws(classOf[RemoteException]) def joinCollaboration(col:Collaborator) :
(Array[Collaborator], Array[(String,Drawing)])
@throws(classOf[RemoteException]) def addDrawing(title:String, drawing:Drawing) :
Unit
}
class CollaborationServerImpl extends UnicastRemoteObject with CollaborationServer
{
private val collaborators = mutable.Buffer[Collaborator]()
private val drawings = mutable.Buffer[(String,Drawing)]()
@throws(classOf[RemoteException]) def joinCollaboration(col:Collaborator) :
(Array[Collaborator], Array[(String,Drawing)]) = {
collaborators += col
(collaborators.toArray,drawings.toArray)
}
@throws(classOf[RemoteException]) def addDrawing(title:String, drawing:Drawing) {
drawings += title -> drawing
for(c <- collaborators) {
try {
c.addDrawing(title,drawing)
} catch {
case ex:RemoteException =>
}
}
}
}
The trait has only two methods, one for joining and one for sharing a drawing. The implementation includes those two methods, which are both fairly short, along with two data members for storing who is currently participating in the collaboration and the drawings that have been shared, along with their titles. The joinCollaboration method returns all of the collaborators as well as the drawings that have been shared. It is interesting to point out that these things are passed differently. The drawings and their titles are all serializable but not remote, so they are passed by value and the new collaborator gets a copy of them. On the other hand, the collaborators are remote so the array that goes across will be filled with remote references that allow the new user to communicate with everyone else.
It is worth noting that we have used a slightly different approach to arranging files for these types. Instead of having only a single class or trait in the file, this file has both the remote trait and the implementing class.5 This was done because the two are intimately related and it cuts down on additional imports of things like java.rmi. The downside of doing this is that someone looking for CollaborationServerImpl might take a long time to find it as there is no file with that name. This is very much a style issue and something that different instructors and employers might request different rules for.
The majority of the code for implementing the collaboration feature goes into the client code. This includes a remote interface for the Collaborator as well as an implementation. Here again, the two are put into a single file. This time the file is longer because the implementation is longer. If both the trait and the implementation were long we would certainly split them into two files to avoid long files. However, moving the trait out does not significantly reduce the length of this file. The code gives us the ability to produce a window that looks like figure 23.3.

This is a screen shot of the collaboration window. On the left is a column showing shared drawings. On the bottom is a chat area. The main portion is a shared sketch region where different collaborators can draw using some simple types.
package scalabook.drawing
import java.rmi._
import server.UnicastRemoteObject
import java.awt.image.BufferedImage
import java.awt.{Color,Font}
import java.awt.geom._
import swing._
import event._
import collection.mutable
trait Collaborator extends Remote {
@throws(classOf[RemoteException]) def name:String
@throws(classOf[RemoteException]) def post(text:String):Unit
@throws(classOf[RemoteException]) def requestSketch:Array[Byte]
@throws(classOf[RemoteException]) def updateSketch(who:Collaborator,
img:Array[Byte]):Unit
@throws(classOf[RemoteException]) def addDrawing(title:String,
drawing:Drawing):Unit
}
/∗∗
∗ This implementation will run on the clients and bring up a window that will show
∗ thumb nails of the shared drawings, a simple sketch pad, and chat window.
∗ /
class CollaboratorImpl(server:CollaborationServer) extends UnicastRemoteObject
with Collaborator {
private[drawing] val sketch = {
val img = new BufferedImage(CollaboratorImpl.sketchSize,
CollaboratorImpl.sketchSize, BufferedImage.TYPE_INT_ARGB)
for(i <- 0 until img.getWidth; j <- 0 until img.getHeight)
img.setRGB(i,j,0)
img
}
private[drawing] val (sketches,drawings) = {
val (cols,draws) = server.joinCollaboration(this)
mutable.Map(cols.map(c => {
try {
Some(c -> ImageHandling.imageFromBytes(c.requestSketch))
} catch {
case ex:RemoteException => None
}
}).filter(!_.isEmpty).map(_.get):_∗) -> mutable.Buffer(draws:_∗)
}
private val nameField = new TextField("Name")
private val chatField = new TextField
private val chatArea = new TextArea
chatArea.editable = false
object SharedPanel extends Panel {
preferredSize = new Dimension(150,200)
val bigFont = new Font(Font.SERIF,Font.PLAIN,75)
override def paint(g:Graphics2D) {
g.setPaint(Color.white)
g.fillRect(0,0,size.width,size.height)
g.scale(0.15,0.15)
g.setPaint(Color.black)
for(i <- drawings.indices) {
drawings(i)._2.renderTo(g)
g.setPaint(Color.black)
g.setFont(bigFont)
g.drawString(drawings(i)._1,0,100/0.15f)
g.translate(0,200/0.15)
}
}
def setSize() {
preferredSize = new Dimension(150,200∗drawings.size)
}
listenTo(mouse.clicks)
reactions += {
case mc:MouseClicked =>
if(mc.clicks==2 && mc.point.y<drawings.size∗200) {
val index = mc.point.y/200
DrawingMain.addDrawing(drawings(index)._1,drawings(index)._2)
}
}
}
val sketchPanel = new SketchPanel(this)
sketchUpdated()
import BorderPanel.Position._
val collabSplit = new SplitPane(Orientation.Horizontal,
sketchPanel,
new BorderPanel {
layout += chatField -> North
layout += chatArea -> Center
}
)
private val frame = new Frame {
contents = new BorderPanel {
layout += new BorderPanel {
layout += new Label("Name") -> West
layout += nameField -> Center
} -> North
layout += new ScrollPane(SharedPanel) -> West
layout += collabSplit -> Center
}
listenTo(chatField)
reactions += {
case ed:EditDone =>
if(chatField.text.trim.nonEmpty) {
foreachCollaborator(_.post(name+" : "+chatField.text))
chatField.text = ""
}
}
size = new Dimension(800,600)
}
def showFrame {
frame.visible = true
collabSplit.dividerLocation = 0.7
}
private def forCollaborators[A](f:Collaborator=>A):Seq[A] = {
(for(c <- sketches.keys) yield try {
Some(f(c))
} catch {
case ex:RemoteException => None
}).toSeq.filter(!_.isEmpty).map(_.get)
}
private def foreachCollaborator(f:Collaborator=>Unit) {
for(c <- sketches.keys) try {
f(c)
} catch {
case ex:RemoteException =>
}
}
@throws(classOf[RemoteException]) def name:String = nameField.text
@throws(classOf[RemoteException]) def post(text:String) {
 chatArea.append(text+"
")
}
@throws(classOf[RemoteException]) def requestSketch:Array[Byte] = {
ImageHandling.imageAsBytes(sketch)
}
@throws(classOf[RemoteException]) def
updateSketch(who:Collaborator,img:Array[Byte]) {
sketches(who)=ImageHandling.imageFromBytes(img)
sketchPanel.sketchSlider.max = sketches.size-1
sketchPanel.repaint()
}
private[drawing] def sketchUpdated() {
val bytes = ImageHandling.imageAsBytes(sketch)
foreachCollaborator(c => {
c.updateSketch(this,bytes)
})
}
@throws(classOf[RemoteException]) def addDrawing(title:String,drawing:Drawing) {
drawings += title->drawing
SharedPanel.setSize()
SharedPanel.repaint()
}
}
object CollaboratorImpl {
val sketchSize = 1000
}
The class starts with the creation of a sketch image that is filled in with transparent color. After that, is code that joins the collaboration, then uses the return from that to get the sketches of all the other collaborators as well as all shared drawings. This is followed by code to set up the GUI in a frame and two helper methods that make it easier to perform actions on the collaborators without worrying about exceptions. The implementation class ends with definitions of the five remote methods that were put into the trait. A companion object includes a constant that can be used to size the images used in the sketches.
The CollaboratorImpl depends on code in two other files. The fact that BufferedImage is not serializable presents a problem for sending sketches between the collaborators. If you look in the remote interface, sketches are passed around using the type Array[Byte]. To convert from BufferedImage to Array[Byte] and back, we have an object called ImageHandling, which has two methods for performing these conversions.
package scalabook.drawing
import javax.imageio.ImageIO
import java.awt.image.BufferedImage
import java.io._
object ImageHandling {
def imageAsBytes(img:BufferedImage):Array[Byte] = {
val baos = new ByteArrayOutputStream()
ImageIO.write(img,"png",baos)
baos.toByteArray()
}
def imageFromBytes(bytes:Array[Byte]):BufferedImage = {
val bais = new ByteArrayInputStream(bytes)
ImageIO.read(bais)
}
}
There are quite a few different ways that you could convert a BufferedImage into something that is serializable. One way would be to simply make a big Array[Array[Int]] and store Red, Green, Blue (RGB) values of pixels in that. This approach will work, but is very inefficient on the networking side because that sends a completely uncompressed version of the image. This class uses javax.imageio.ImageIO to compress the image using PNG format. A java.io.ByteArrayOutputStream is used to get ImageIO.write to put the data into an array that we can send without having to write to, and read from disk. A ByteArrayInputStream is used on the other side with ImageIO.read to get back to an image. The PNG format is fairly efficient compression which is non-lossy so it works well for our purposes.
The CollaboratorImpl also depends on a type called SketchPanel. This is a class that holds the GUI component for the sketch. This is a large enough piece of code that it was worth pulling it completely out. Here is what it looks like.
package scalabook.drawing
import swing._
import event._
import java.awt.{Color,Graphics2D}
import java.awt.geom._
import java.awt.image.BufferedImage
class SketchPanel(collab:CollaboratorImpl) extends BorderPanel {
class NamedSketch(val name:String,val col:Collaborator,val img:BufferedImage) {
override def toString = name
}
val sketchSlider= new Slider
sketchSlider.min = 0
sketchSlider.max = collab.sketches.size-1
var curColor = Color.black
def drawCurrent {
val g=collab.sketch.createGraphics()
g.setPaint(curColor)
curDrawer.draw(g)
collab.sketchUpdated()
}
trait Drawer {
var mouseDown = false
def pressed(x:Int,y:Int)
def released(x:Int,y:Int)
def dragged(x:Int,y:Int)
def draw(g:Graphics2D)
}
object FreeDrawer extends Drawer {
var path:GeneralPath = new GeneralPath
def pressed(x:Int,y:Int) {
mouseDown=true
path=new GeneralPath
path.moveTo(x,y)
}
def released(x:Int,y:Int) {
path.lineTo(x,y)
drawCurrent
mouseDown=false
}
def dragged(x:Int,y:Int) {path.lineTo(x,y)}
def draw(g:Graphics2D) {if(mouseDown) g.draw(path)}
}
trait PositionDrawer extends Drawer {
var (sx,sy,ex,ey) = (0,0,0,0)
def pressed(x:Int,y:Int) {
mouseDown=true
sx=x
sy=y
ex=x
ey=y
}
def released(x:Int,y:Int) {
ex=x
ey=y
drawCurrent
mouseDown=false
}
def dragged(x:Int,y:Int) {
ex=x
ey=y
}
}
object LineDrawer extends PositionDrawer {
def draw(g:Graphics2D) {if(mouseDown) g.draw(new Line2D.Double(sx,sy,ex,ey))
}
}
object RectangleDrawer extends PositionDrawer {
def draw(g:Graphics2D) {if(mouseDown) g.fill(new Rectangle2D.Double(sx min
ex, sy min ey, (ex-sx).abs, (ey-sy).abs))}
}
object EllipseDrawer extends PositionDrawer {
def draw(g:Graphics2D) {if(mouseDown) g.fill(new Ellipse2D.Double(sx min ex,
sy min ey, (ex-sx).abs, (ey-sy).abs))}
}
var curDrawer:Drawer = FreeDrawer
val buttons = new GridPanel(6,1) {
val b = Array(
new ToggleButton {
selected = true
action = Action("Free")(curDrawer = FreeDrawer)
},
new ToggleButton {action = Action("Line")(curDrawer = LineDrawer)},
new ToggleButton {action = Action("Rectangle")(curDrawer =
RectangleDrawer)},
new ToggleButton {action = Action("Ellipse")(curDrawer = EllipseDrawer)}
)
val group = new ButtonGroup(b:_∗)
b.foreach(contents += _)
contents += Button("Clear") {
for(i <- 0 until collab.sketch.getWidth; j <- 0 until
collab.sketch.getHeight)
collab.sketch.setRGB(i,j,0)
collab.sketchUpdated()
}
contents += Button("Color") {
val c = javax.swing.JColorChooser.showDialog(peer,"Select Color",curColor)
if(c!=null) curColor = c
}
}
val sketchDraw = new Panel {
override def paint(g:Graphics2D) {
g.setPaint(Color.white)
g.fillRect(0,0,size.width,size.height)
val sketchSeq = collab.sketches.toSeq
for(index <- 0 until collab.sketches.size) {
val (c,i) = sketchSeq((index+sketchSlider.value)%sketchSeq.size)
g.drawImage(i,0,0,null)
}
g.setPaint(curColor)
curDrawer.draw(g)
}
}
import BorderPanel.Position._
layout += sketchDraw -> Center
layout += buttons -> East
layout += sketchSlider -> North
listenTo(sketchDraw.mouse.clicks,sketchDraw.mouse.moves,sketchSlider)
reactions += {
case mp:MousePressed =>
curDrawer.pressed(mp.point.x,mp.point.y)
sketchDraw.repaint()
case mp:MouseDragged =>
curDrawer.dragged(mp.point.x,mp.point.y)
sketchDraw.repaint()
case mp:MouseReleased =>
curDrawer.released(mp.point.x,mp.point.y)
sketchDraw.repaint()
case vc:ValueChanged =>
sketchDraw.repaint()
}
}
The class gets passed the CollaboratorImpl because it needs to have access to the sketch and some other parts of that object. Much of this class is focused on dealing with the user drawing to his/her sketch. There is a group of ToggleButtons that allow the user to select how they are drawing as well as other buttons to clear the sketch and select a color. The ToggleButtons are added to a ButtonGroup so that only one can be selected at a time.
The State Pattern is used to make it so that mouse input is interpreted properly for each different type of thing that the user can draw [6]. The way this works is that we have a trait called Drawer that has four abstract methods in it. These methods deal with the mouse being pressed, released, and dragged as well as how to draw what would be drawn if the mouse were released. Each style of drawing is represented by an object that extends this interface. A mutable variable named curDrawer stores a reference to one of these objects, the one associated with the currently selected drawing mode. Events are passed through to that object, and are placed where the proper shape needs to be drawn to screen of an image.
You might be tempted to write code like this by keeping an integer value telling you what style you are drawing in and then having multiple if/else conditions to take the right action in different situations. While that approach can work, it is less flexible and more bug prone. The real advantage of the abstraction shown here is how easy it is to add new drawing modes. You simply add a new button to the GUI and a new Drawer object for handling that style and it works. This is an example of using abstraction to make code more flexible.
The last thing we need is to add this functionality to the GUI. First we add the following two lines to DrawingMain so that it can keep track of a server and a client.
private var server:CollaborationServer = null
private var client:CollaboratorImpl = null
After that, the following code can be added to the "Collaborate" menu below the two options for simple sharing.
contents += new Separator
val joinItem = new MenuItem("Join") {
action = Action("Join") {
text = "View"
if(server==null) {
val host = Dialog.showInput(null, "What server host do you want to
use?", "Server Name", Dialog.Message.Question, null, Nil, "")
if(host.nonEmpty && host.get.trim.nonEmpty) {
try {
Naming.lookup("rmi://"+host.get+"/Collaborate") match {
case svr:CollaborationServer =>
server = svr
client = new CollaboratorImpl(server)
case _ => Dialog.showMessage(tabbedPane,"The wrong type of
object was found on that server.")
}
} catch {
case ex:NotBoundException =>
server = new CollaborationServerImpl()
Naming.bind("Collaborate",server)
client = new CollaboratorImpl(server)
}
}
}
if(client!=null) client.showFrame
}
}
contents += joinItem
contents += new MenuItem(Action("Share"){
val title = Dialog.showInput(null, "What do you want to call this
drawing?", "Drawing Title", Dialog.Message.Question, null, Nil, "")
if(title.nonEmpty) {
server.addDrawing(title.get, openDrawings(tabbedPane.selection.index))
}
})
This gives a "Join" option that asks for a host, then uses RMI to try to look up a server on that host. If one is found, it connects to it. Otherwise one is created and bound to that host. The share option simply asks for a title for the drawing and then sends the currently selected drawing to the server.
This section contains a fair bit of code that really requires some exploration. It is highly recommended that you enter this all in and play with it to see how it works. It is worth noting that while the RMI code might not look like it involves threads, RMI calls do come across on a separate thread so some applications will have to take that into account.
23.6 End of Chapter Material
23.6.1 Summary of Concepts
- Networking has become an essential aspect of computers. When computers talk to one another over a network they have to go about it in an agreed-upon manner known as a protocol.
- The most commonly used networking protocol in the Transmission Control Protocol, TCP. A TCP connection guarantees transmission or throws an exception so that the program knows it has failed. This makes it slower, but safe.
- Applications needing higher speed that are willing to live with the occasional loss of a packet typically use the User Datagram Protocol, UDP. This protocol throws out packets of information and does not care if they get where they are going. As a result, some will be lost. The program will have to have mechanisms in place for dealing with packets that do not get through.
- Computers communicate through sockets. There are different socket types in the java.net package.
- For TCP connections you want to create a ServerSocket on one machine that will accept connections on a particular port. Other machines can create Sockets that go to the port on the machine with the ServerSocket.
- The Socket class has the ability to give you an InputStream or an OutputStream. These can be used just like any other streams to send or receive information.
- A machine that wants to receive connections over UDP can open a DatagramSocket. The information has to be packed up by a client in a DatagramPacket.
- The java.net.URL class provides a simple way to read data information from web servers.
- Java includes an approach to network communication called Remote Method Invocation, RMI. Using RMI, you can make method calls to objects that reside on other machines using the standard syntax of a method call. There are a few steps you have to take to get an application set up with RMI.
23.6.2 Exercises
- Set up a server socket and have it accept one connection. Have it open both the input and output streams and run through a loop where it parrots back to output what was written in input with minor modifications of your choosing. If the input is "quit" have it close the socket and terminate. Run this on a machine, then use telnet to connect to that port and see what happens.
- Write a simple chat server that works using telnet as the client.
- Fix the error handling in the first chat program example in the chapter.
- Clean up the allowed names code in the first chat program example in the chapter.
- Take the chat we have and add some extra commands. For example, :who should display everyone in the room. Other options might include private interactions other than normal chat.
- Make a chat using sockets that has a GUI client with a list of all people in the chat room that is kept updated at all times.
- Write a text-based chat client and server with RMI as the mode of communicating between the two sides.
- Write a GUI-based chat client and server with RMI as the mode of communication.
- Using the serialization concepts from the last chapter, add functionality to the GUI-based chats that you have written to send other types of information as serialized objects.
23.6.3 Projects
For this chapter, the obvious addition to the projects is to put in networking. For those projects that are based on networking, it is easy to see how this will happen. For the other projects we are going to force it in a bit, but only in ways that are potentially useful to you.
-
If you are working on a MUD, it is customary for players to be able to access the game through telnet. If you want to take that approach, then you simply add a ServerSocket to your map game and set it up so that many people can connect and give commands. You can also choose to create a more advanced viewer, but keep in mind that this is supposed to be text based.
To do this, you will have a separate thread handling the ServerSocket with calls to accept. The new connections, once the user is logged in, will need to be handed off to the main game thread. It is suggested that you use one of the types in java.util.concurrent for doing this. The main game code need not change too much for this addition. Instead of reading from readLine, you will be pulling from the InputStream of the users Socket. You can also support multiple players so that on each iteration, the program checks for input from all users and executes them in order. Keeping the main processing sequential is one way to prevent race conditions.
-
If you are writing the webspider it is finally time to add real functionality. Use the URL class and give your program the ability to download pages. You could add a very simple search for "href=" so that you can find links to other pages. Use the ability of the URL class to build relative URLs to make this easier. Have your program pull down a few hundred pages and collect the data that you want from them. If you had the code setup as described in the previous chapter, this should be as simple as making the threads that are acquiring data pull from a URL instead of from files.
If you do not already have a graphical display of information, you should add that in. That way you can display to the user what pages have been downloaded then let them look at the data you have collected in some manner. Remember that you need to have a Set or Map to make sure that you do not visit the same page multiple times.
-
For the multiplayer graphical game you have to make it so that two or more instances of the game can be run on separate computers that talk to one another. Exactly how you do this depends on the style of game that you are creating. If your game allows many users to play in a networked fashion, you should probably use a client-server model where there is a separate application running as the server and then various clients connect.
In the client-server model, much of the game logic will likely be processed on the server. The clients become graphical displays and the medium for user interactions. The commands given to the clients are likely sent to the server with little interpretation.
If your game is only a two-player networked game, you might skip having a server and instead have a single application where the user can set their instance up as something of a local server for a second instance to connect to. In this situation, the game logic will happen primarily on that "main" instance and the second client is primarily just sending and displaying information.
One thing that you will probably realize fairly quickly when you work on this is that distributed parallel applications, those running on multiple machines across a network, can have their own types of race conditions as the different clients might not always be seeing the same world.
-
A game that is not supposed to involve networking is probably the most difficult project to tie networking into. One reason that you might want to include networking is to be able to keep track of things going on in the game outside of the normal display or provide other types of basic interaction. This is largely useful for debugging.
Large and complex software often needs to have the ability to do "logging." This is where different steps in the code write out what they are doing to a file or something similar. When things go wrong, you can consult the log files to see what happened. Instead of logging to a file, you can make your game log to the network. Have your game create a ServerSocket that accepts connections. All logging should go to all the connections. If there are no connections, the logging is basically skipped.
While logging to the network lacks some of the advantages of logging to a file, like an easy way to go back over things, it provides the flexibility that you can use commands written to the network connection. These commands could be to query information for use in debugging, or they could be like a superuser mode to set up situations that would be hard to create when you are testing your program.
-
The math workbook program could involve networking in at least two different ways. One would be that addition of collaborative features, like those added to the drawing program in this chapter, so that users can send a complete or partial worksheet from one computer to another.
It is also possible to add logging features, like those described in project 4. The logging features for a math worksheet are most likely going to be for debugging purposes to inspect what is happening in the background.
You can decide whether you want to implement one or both of these options into your code. Pick what interests you most and fits with your objectives for the project.
-
For the Photoshop® project you could add networking in the form of collaboration, logging, and/or using a URL to pull down images from the web. The collaboration could be much like what was shown in the chapter, though it should be altered to fit the flow of the program you are developing. Logging would be most useful for debugging as described in project 4. Both of those options are fairly significant, and you only need to pick one.
The addition of loading images from URLs across the web is very straightforward and really is something that should be in this type of application. Whichever of the other two networking options you choose, you should probably add this possibility on top of it.
-
The simulation workbench provides a very different feature to add networking to the application. The fact that simulations can be highly processor intensive means that there can be benefits to breaking the work-load not only across threads, but also across multiple machines. This form of distributed computing requires networking.
You should make a second application for a helper node that you can run on other computers. That helper application will make a network connection to the main application and wait to be given work. The simplest way to divide the work is to have separate simulations on each machine with information passed back occasionally for the purposes of displaying data to the user and perhaps saving. If the number of particles in a simulation is really large, it can make sense to distribute that one simulation across multiple machines. This is a more challenging problem as the different machines have to communicate the state of the particles they are controlling for force calculations.
It is left to the student to decide how involved you wish to get with distributing your simulations.
1It is quite possible that some of the work you have done has happened on a networked file system. In that case you have been using a network connection, even if you did not realize it.
2Java has a construct called an interface that is purely abstract. That is what RMI actually requires. Scala traits with no data that have only abstract methods get compiled to Java interfaces.
3There are other servers you can use instead of UnicastRemoteObject. That one is specified because it is the most straightforward.
4If you are using Eclipse, there is a bin directory in the project that is the base directory for the compiled files.
5This is something that you can do in Scala, but not in other languages, like Java. In Java you can only have one public type per file and it must have the same name as the file.