
The raw audio you record with Cubase is contained in a series of audio events. Each event is actually a digital waveform that represents the analog waveform of the original instrument or vocal. To trained eyes, that waveform maps out everything you need to know about the recorded sound—pitch, amplitude, and duration.
To edit these audio events, Cubase provides two primary audio editing environments (the Sample and Audio Part Editors) and a number of audio asset management windows (the Pool and the MediaBay, SoundFrame, and Loop Browsers). You can also, of course, perform some editing directly from the Project window.
All that said, this chapter focuses on the Sample Editor, which lets you edit recorded or imported audio, create regions and slices, and add special tempo markers to time-stretch audio events in real time. This type of audio warping makes it possible to match the tempo of an audio event, such as a loop, to the project tempo without affecting its pitch; it also automatically adjusts the tempo of the audio event whenever the project tempo is changed, making audio events almost as flexible as MIDI events when it comes to altering project tempos.
Here’s a summary of what you will learn in this chapter:
How to edit the boundaries of objects (events or regions) in the Sample Editor
How to cut, copy, or paste audio inside an event
How to insert or remove silence inside an event
How to delete individual notes
How to create and edit regions inside the Sample Editor
How to edit a snap point’s position
When you want to directly edit the audio waveforms you’ve recorded or imported, you use Cubase’s Sample Editor. The Sample Editor edits the contents of one audio event at a time in a nondestructive environment. You can create regions within an event, add effects, or edit an event by using offline processes and effects.
To open the Sample Editor for an audio event, as shown in Figure 19.1, simply doubleclick that event. You can have more than one Sample Editor window open at the same time, to edit multiple audio events.

The main area of the Sample Editor consists of the Waveform Display. The Editor window also displays a number of bars similar to the other editors—a toolbar, which includes various audio-specific tools, the Overview line that provides a waveform overview of the entire event, the Info line, the ruler for the horizontal time scale, and the vertical Level Scale that depicts amplitude. The following list describes the key areas of the Sample Editor window.
The Info line (status) area displays information about the sample being edited.
The Overview line presents a thumbnail display that can be used to zoom and navigate within the audio event. The currently displayed area in the Overview area is displayed inside a box that can be used to resize or move the portion of this audio event or clip that is shown below in this editor’s Waveform Display.
The Sample Editor Inspector contains all the tools and functions you need to work within the Sample Editor. As with the Track Inspector, the Sample Editor Inspector consists of multiple tabs: Definition (for adjusting the audio grid and musical mode); AudioWarp (for quantizing the audio, applying a swing setting, and manually dragging beats to specific time positions); VariAudio (for editing single notes and changing pitch and timing); Hitpoints (for marking and editing specific points in an event, typically for the “hits” in a drum track); Range (for working with ranges and selections); and Process (for applying processes and plug-ins). Click any tab to expand it.
The Level Scale represents amplitude, which can be switched between decibel and percentage formats.
The Waveform Display area, which you can then edit.
The selected portion inside the Waveform Display area.
The snap point of the object (event or region).
Region handles that identify the start and end of a region inside an audio event.
The Time Zoom slider.
The Amplitude Zoom slider.
The Regions pane, which includes a list of named regions within the event and buttons to create and edit regions.
Figure 19.2 displays the first few tools found in the Sample Editor’s toolbar. The first button lets you configure the contents of the Sample Editor window, while the next two buttons toggle the solo editor and acoustic pitch feedback.

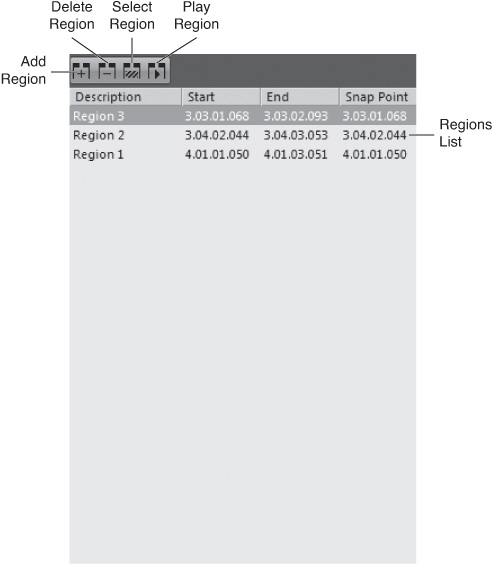
Next is the Show Audio Event button, which toggles on or off the start and end points of the audio event being edited. Next to that is the Show Regions button, which toggles on or off the Regions pane, shown in Figure 19.3. This area displays information on regions currently associated with an audio clip or event, as well as allows you to create, remove, rename, select, edit, or preview regions; it also displays region handles, if there are any. This Regions List (on the bottom part of the pane) enables you to create a region from a selection in the Waveform Display area, remove an existing region, select the highlighted region in the Waveform Display area, and play the highlighted region. Unless you have recorded audio in Cycle mode with the Create Regions option enabled, events do not normally contain any regions when they are recorded or imported. It is through editing options or preference settings that regions are created, or, as you’ll see later in this chapter, through the buttons above the Regions List.
Next is the Auto-Scroll button, which turns on or off automatic scrolling through the event; click the arrow next to the Auto-Scroll button to suspend Auto-Scroll when editing. This is followed by the Audition and Audition Loop buttons, which have the same properties as in the Pool window. The Audition Volume arrow next to the Audition Loop tool displays a fader that enables you to control the preview level when you are playing an event inside the Sample Editor. (This preview level does not affect the level of the event in the Project window.)
Figure 19.4 shows the next group of buttons in the toolbar. These buttons perform distinct editing operations, such as selecting a range, zooming in or out, editing the waveform, performing audio playback, scrubbing, and time warping. We’ll discuss these tools later, when we examine the operations available in this window.

Figure 19.5 starts with two “snap” buttons, Snap to Zero Crossing and Snap On/Off. Clicking “on” the Snap On/Off button enables you to find exact positions when editing. Clicking “on” the Snap to Zero Crossing button forces any selection you make to move to the nearest zero crossing. Enabling this function is a useful way of being sure that regions you create or process will not begin or end at a position within the audio not corresponding to zero percent amplitude (silence). This helps in preventing clicks, pops, and other audio glitches from occurring due to sudden jumps in audio amplitudes at the beginning or end of a region.

Next to the Snap buttons is a button that toggles on/off Cubase’s Musical mode, which matches playback to the selected bars and beats. The balance of the toolbar contains controls related to Musical mode: Bars, Beats, Tempo, Time Signature, and Warping Algorithm. We’ll discuss these later in this chapter.
Below the toolbar is the Overview line that provides a thumbnail view of the current event loaded in the Sample Editor. You can have only one event loaded in this editor at a time, so this overview displays only one event or several regions defined within this event.
The visual representation of the audio sample appears in the Waveform Display area. Cubase can display mono, stereo, and surround formats with up to six channels. The waveforms are displayed around a zero axis at the center of each waveform, which is also indicated in the vertical Level Scale along the left side of the Waveform Display. You can customize the elements displayed in this area by right-clicking (PC)/Control-clicking (Mac) in the Sample Editor, selecting the Elements option at the bottom of the context menu, and selecting or deselecting elements found in this submenu. You can change the Level Scale from decibel (dB) to percentage display by clicking the down arrow at the top of the Level Scale.
If you want to edit, cut, copy, and paste entire events, you can do so from Cubase’s main Project window; we discuss this in Chapter 28, “Arranging in the Project Window.” To cut, copy, and paste audio data within an audio event, however, you use the editing functions in the Sample Editor.
One of the most common editing functions is to trim the beginning or ending of a clip. This is typically done when you start recording before a musician starts playing; you can trim the non-playing part of the event.
You can also cut and paste any section of an event elsewhere within the same event. These basic editing functions are similar to those in any other type of application, just applied to the audio waveform in the Sample Editor window.
For our purposes, cutting and pasting audio can be summed up in four steps:
You also can insert silence within an existing audio clip. This is useful when you want to add pauses between specific audio content.
Know, however, that inserting silence doesn’t erase any of the existing event; when you insert an area of silence, it moves the rest of the audio clip (the bit to the right of the inserted silence) farther to the right. For example, if you insert a second of silence, it just makes the event one second longer.
Want to delete a bad note? You can do it from the Sample Editor—although you don’t want to use the Delete function found in the Edit menu. That’s because when you use the Delete function, you delete not only that part of the waveform you selected, but also that part of the timeline. That is, cutting a note makes the measure (and thus the entire song) shorter by the length of that note.
You also don’t want to use the Insert Silence function, found in the Edit > Range menu. Inserting silence in this manner doesn’t actually erase any of the existing event; it literally inserts a new range without any recorded audio, moving the rest of the audio clip (the bit to the right of the inserted silence) farther to the right. For example, if you insert a second of silence, it just makes the event one second longer.
Instead, you want to select the note you want to erase, and then use Cubase’s Silence audio process. This effectively mutes the selected region of the audio event, removing the undesired note.
Erase an individual note
Select the Range Selection tool in the toolbar.
Click and drag the cursor across the area you want to delete; make sure you select the entire duration of the note, as shown in Figure 19.6.
Select Audio > Process > Silence.

The audio is now removed from the selected region.
You also can use the Sample Editor to define loop properties needed for Musical mode samples. Once Musical mode is enabled on a sample, its tempo becomes locked to the project’s tempo setting. Cubase automatically time-stretches the loop to reflect any tempo changes that occur in real time. This type of feature is now commonly used in many loop-based composition tools, and using it in Cubase is pretty straightforward.
I will further discuss how to use Musical mode in this fashion to quantize audio, tighten up the timing of a rhythmic part using AudioWarp tabs, and match an audio file’s fluctuating tempo with the project’s fixed tempo in Chapter 20, “Using Audio Processing Options.” Turn there for more information.
Regions enable you to define portions within an audio event that you can reuse several times in a project. For example, you could create regions from a 16-bar groove played by a drummer, naming each region appropriately: intro, beat, break, fill, and ending. You can then drag the regions from the Regions List in the Sample Editor into the Project window, just as you do when dragging objects from the Pool into the Project window.
For more precise range selection, use the controls in the Range tab of the Sample Editor Inspector, shown in Figure 19.7. You can enter precise start and end times, or pull down the Select menu to select specific areas. Pull down the Zoom menu to select zoom levels.

Because audio events or regions don’t necessarily begin at a specific quantize value, you can change the location of the sensitive area or “hook” within them that will used for snapping them to the increments of the current quantize grid. This is called the snap point, and here in the Sample Editor it is displayed as a dotted vertical line, with an S in a box at the center of this line, as shown in Figure 19.8.

By default, the snap point is located at the very beginning of an event. This is not necessarily where the first beat is, however. You can therefore drag the snap point anywhere within the event, to the first beat or another important point in the event.
As you drag the event within a track in the Project window or a lane in the Sample Editor, the object snaps to the grid based on the location of this snap point, rather than the actual start position of the event that contains it. By default, snap points are placed at the event start point of audio events and regions.