
Without content, there is no project—and recording audio is the most common way to create content for your recording project, which means connecting a microphone or electric instrument to your computer (or audio input device) and getting ready to record.
It used to be the musician’s job to get the notes right, and it was up to the recordist or sound engineer to get the performance recorded properly. In today’s computer-based production environment, chances are you’ll be doing both jobs, playing your instrument with one hand and triggering the recording device with the other. Cubase is there to make your job look easy and to make you feel confident about getting the most out of a recording session.
Here’s a summary of what you will learn in this chapter:
How to set up Cubase to record digital audio
How to record a basic audio track
How to configure the click track (metronome)
How to set the tempo and time signature for a project
Before you begin your first audio recording, make sure your audio connections are configured properly. Your project settings should also be completed at this point, especially the sample rate. Check the Project Setup dialog box (the default key command is Shift+S) if you haven’t done so already; all audio files in a project have to be recorded (or imported) at the same sampling rate.
For any project, the recording process consists of two parts: setting the input levels and making the recording. You set the input levels before the recording begins; this lets you make the recording with a minimum amount of knob twiddling.
Record a single track of audio in Cubase
Select Project > Add Track > Audio to add a new audio track to your project.
When the Add Audio Track dialog box appears, pull down the Configuration list and select Mono (if it’s a mono instrument or microphone) or Stereo (if it’s a stereo instrument, like some electronic keyboards). If you want to use a preset template for this track, click the Browse button and browse for the preset you want. Click the Add Track button to create the new track.
The new track now appears in the Track List; make sure this track is selected.
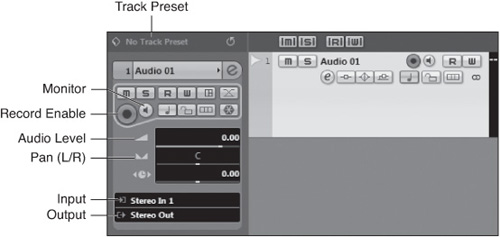
In the selected track’s Inspector, click the Input Routing field and select the input you want to record, as shown in Figure 8.1.
Click the Record Enable button for the selected track.
If the Monitor button is disabled, activate it to monitor the input level of the audio signal.
You now need to set the input level for this recording. Start by playing or singing as you would during the actual recording, at the same planned volume levels.
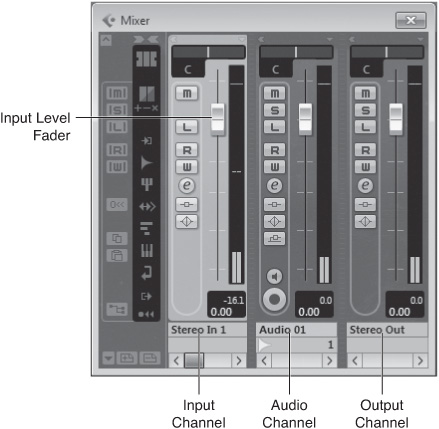
Next, adjust the level fader in the Mixer’s input channel for the selected track, as shown in Figure 8.2. Do not use the fader in the audio channel itself, as it doesn’t affect the input level; it only affects the output (monitored) level. Make sure you monitor the level using the input meter in the Mixer; get the levels as high as possible without going into the red.
In the Transport panel, select the appropriate recording mode. When recording audio, Normal is usually the appropriate choice.
To start and stop a recording at a specific point in time, position the left and right locators appropriately and enable the Punch-In and Punch-Out buttons on the Transport panel.
Place the project cursor at the position where you want your recording to begin.
When everything is ready, click the Record button and begin recording the audio.
Click the Stop button or press the spacebar to manually stop the recording if you haven’t enabled the Punch-Out button.
Obviously, you’ll want to repeat this process for each additional track you include in your project.
When you want to hold a steady tempo throughout your recording, all the musicians need to play to what is called a click track. Now, this might sound formidable (and, in fact, might scare some inexperienced musicians), but it’s nothing more than an electronic metronome. Setting the click track is an important part of any recording project.
Playing to a click track helps musicians play at the right tempo, without speeding up or slowing down throughout the piece. It’s especially important if you’re recording multiple tracks at different times; the click track enables each musician to play to the same beat, even though they may not be playing together.
In addition, the click track makes post-recording editing much easier. After you’ve recorded all the tracks and want to edit your project, you use Cubase’s bars and beat markings the project provides as reference points to cut, move, copy, or resize events along the timeline. When your musicians play to a click track while recording, you can precisely edit the resulting recording.
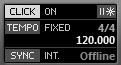
To help you keep the beat while you are recording, you can activate the Click button on the Transport panel, as shown in Figure 8.3. The Click button enables or disables the metronome click. To generate the metronome click, you can use a MIDI device, your audio hardware output, or both. When the metronome click is enabled, the word “click” is lit, and the field next to the button displays the word “on.”
Configure the metronome settings
Ctrl-click (PC) /
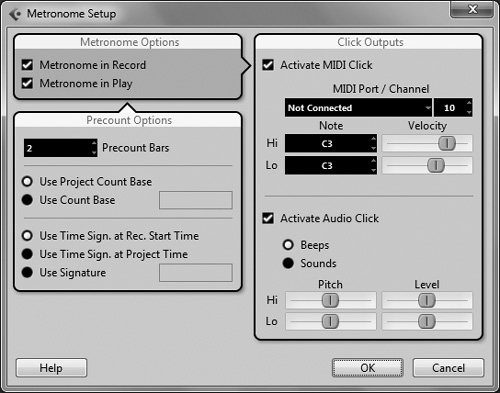
 -click (Mac) the Click button on the Transport panel, or select Transport > Metronome Setup. The Metronome Setup dialog box will appear, as shown in Figure 8.4.
Check the Activate MIDI Click and/or the Activate Audio Click check boxes, depending on which type of click you want to hear. The MIDI click plays through a MIDI device or plug-in, whereas the audio click plays through an audio output.
If you’ve selected the Activate MIDI Click check box, make sure to select a MIDI port connected to a device that will play the MIDI click and an appropriate MIDI channel.
You can change the MIDI note value of the high and low notes. High notes are played on the first beat of a bar, whereas low notes are played on the other beats. Finally, you can adjust the MIDI velocity of these notes in the same area.
For the audio click, if you want to hear beep sounds automatically generated by Cubase, select Beeps. If you prefer to hear a click sound played from an audio file, select the Sounds option; load different click sounds for both Hi and Lo clicks by clicking inside the field. Use the corresponding level controls to adjust the volume for each sound.
If you only want to hear the click sound while in record mode, select the Metronome in Record option. If you also want to hear the click sound during playback, select the Metronome in Play option.
If you want your metronome clicks on a different value than your time signature setting, such as every eighth note rather than every quarter note in a 4/4 bar, check the Use Count Base option (not Use Project Count Base). This displays a count box to the right of this option; use the up and down arrows in this box to adjust the beat subdivision for your metronome’s click.
In the Precount Bars field, enter the appropriate number of bars you want Cubase to click through before it actually starts playing or recording. For example, if you want a two-bar lead in, enter 2 in the Precount Bars field. (This will have no influence on the metronome if the Precount button is disabled in the Transport panel.)
The Use Signature option affects the time signature of the metronome during the precount. This technique is convenient to hear a different time signature from the project’s tempo track time signature. For example, if your project switches from a 4/4 to 3/4 time at the exact point you’re punching in a new recording, you may want the count-in metronome to be in 3/4 as well. On the other hand, if you don’t want to use the signature values associated with the tempo track of a project, enter a custom signature here. For example, it can sometimes be more natural to use a 4/4 count-in, even though the figure you’re about to play is in 7/8.
When you have completed setting these options, click OK.
The tempo of a project is counted in beats per minute (BPM) and determines the speed of the project. The project’s current tempo and time signature are displayed to the right of the Tempo button in the Transport panel.
When the Tempo button is enabled, the tempo track controls the tempo of the project. To open the Tempo Track window, Ctrl-click (PC)/![]() click (Mac) the Tempo button. When the tempo track is enabled, the project’s tempo follows tempo changes in the tempo track. When the Tempo button is not active, the project tempo remains fixed at the tempo value entered in the Transport panel. (Learn more about the tempo track in Chapter 30, “Working with Tempo.”)
click (Mac) the Tempo button. When the tempo track is enabled, the project’s tempo follows tempo changes in the tempo track. When the Tempo button is not active, the project tempo remains fixed at the tempo value entered in the Transport panel. (Learn more about the tempo track in Chapter 30, “Working with Tempo.”)
While a tempo track is useful when a song changes tempo mid-stream, most songs consist of a single tempo throughout. To that end, you can use Cubase to set the tempo and time signature for a project.