Before we get into the specifics of custom programming in Microsoft Dynamics CRM workflow, let’s briefly review creating and running workflow rules through the Web interface.
First, we will create a workflow rule that automatically creates and schedules a follow-up phone call for a newly created account. Microsoft Dynamics CRM will run this workflow rule whenever you create a new account. We will also design the workflow rule to dynamically populate values in the phone call activity using values from the newly created account.
Creating a native workflow in Microsoft Dynamics CRM
Open Microsoft Dynamics CRM in your Web browser.
Navigate to the Workflows view by clicking Go To in the top menu and then selecting Workflows within Settings.
You will see a list of workflows you own (or an empty list if this is the first time you have visited this area).
Click New on the Workflow toolbar.
Type New Account Telephone Workflow in the Workflow name field and click OK. You will be presented with the Microsoft Dynamics CRM native workflow designer.
We want the workflow to run whenever an account is created and only for those accounts that you own, so leave all the properties in the top half of the screen at their default values.
Click Add Step at the bottom of the workflow designer, and then select Create Record.
Type Create a Follow Up Phone Call as the description and then select Phone Call as the record type to create.
Click Set Properties to open the Create Phone Call dialog box.
Next we will specify dynamic values for the phone call record so that it includes information from the account record. To do this, set focus in the Sender field, and then select Owner from the second drop-down list under Look For in the Form Assistant. (You use the first drop-down list to select the entity you want a value from; you use the second drop-down list to select the attribute from that entity.)
Click Add in the Form Assistant to add the selected attribute to the list of values that appears near the bottom of the Form Assistant. The Form Assistant enables you to assign form fields to properties of the current workflow, its steps, or the primary entity. When you specify multiple dynamic values to the list at the bottom of the Form Assistant, the first one that has a non-null value will be assigned to the target field. In addition, you can use the Default Value field at the bottom of the Form Assistant to specify a value that should be used if all of the dynamic values are null.
Click OK to populate the Sender field with the dynamic values.
Repeat steps 9 through 11 to set the Recipient field. In this case we want to specify the Account as the recipient of the phone call. To specify an entity instead of an attribute for a dynamic value, select the entity name from the second drop-down list. So for this example, choose the Account option in the second picklist.
Type Welcome call for new account: in the Subject field and keep the focus at the end of the text.
Once again, repeat steps 9 through 11 to append the Account Name attribute from the Account entity to the end of the Subject field.
Click Add and then click OK.
Set focus in the Due field and select 3 from the Days drop-down list in the Form Assistant. Select After from the Operator drop-down list and then select the Created On attribute from the Account entity.
Click Add and then click OK.
Click Save And Close on the top menu bar.
Click Publish on the menu bar of the workflow screen, and then click OK in the Workflow Publish Confirmation dialog box to publish the workflow.


While this is a fairly simple workflow rule, it demonstrates some of the powerful workflow capabilities natively available within Microsoft Dynamics CRM. We specified how to trigger the workflow rule, defined the scope of the workflow rule (which records it should run against), created the steps to take when the workflow runs, and dynamically assigned values to the newly created phone call record.
Now that we’ve configured and published the workflow, you can test the rule by simply creating an account and confirming that it creates the appropriate phone call activity.
Creating an account and verifying the workflow results
On the Microsoft Dynamics CRM top menu, click New Record and then select Account.
Type a name in the Account Name field.
Click Save on the top menu bar.
After the page reloads, click Activities in the left navigation pane. Depending on how quickly you clicked, you might not see a phone call activity yet. Since workflow runs asynchronously, it might not have completed processing the workflow rule yet.
If no phone call activity appears, wait a few seconds and click the Activities grid’s refresh icon until the new phone call activity appears.
Open the phone call activity and verify that Microsoft Dynamics CRM correctly populated the Sender, Recipient, Subject, and Due fields with the dynamic data values we configured in the workflow rule.
Close the phone call window.
On the account form, click Workflows in the left navigation pane and verify that you see the New Account Telephone Workflow successfully completed.


Now that we have executed a workflow rule successfully, let’s take a step back and examine workflow definitions in a little more detail. One of the first things we did when creating the phone call workflow was specify a name and select which entity to associate it with. The associated entity is passed in to the executing workflow instance and is also used to determine when the workflow is executed. Specifying the workflow trigger is the next key part of a workflow definition. Microsoft Dynamics CRM can trigger workflow using one of three primary techniques: automatically in response to system events, manually, or as child workflows.
You will often want workflows to execute automatically in response to a system event. The workflow dialog allows you to define automatic workflows by selecting events to automatically trigger the workflow. Table 6-1 shows the system events that can be used to trigger an automatic workflow.
Table 6-1. Automatic Workflow Trigger Events
Description | |
|---|---|
Record is created | The workflow executes whenever an instance of the associated entity is created. |
Record status changes | The workflow executes whenever an associated entity’s state changes (typically moving from Active to Inactive). |
Record is assigned | The workflow executes whenever an instance of the associated entity is assigned to a new user. |
Record attributes change | The workflow executes whenever an instance of the associated entity is modified. When this trigger is included, you can further specify which attributes must be modified for the workflow to execute. |
Record is deleted | The workflow executes whenever an instance of the associated entity is deleted. |
In addition to specifying the events for an automatic workflow, you can define a scope for the automatic triggers. Scope is used to limit which records automatically trigger the workflow. Table 6-2 lists the scope values and their meanings.
Table 6-2. Automatic Workflow Scope Values
Scope Name | Description |
|---|---|
User | The associated entity will trigger the workflow only if that entity’s owner is the same as the workflow’s owner. |
Business Unit | The associated entity will trigger the workflow only if that entity’s owner is in the same business unit as the workflow’s owner. |
Parent: Child Business Units | The associated entity will trigger the workflow only if that entity’s owner is in the same business unit as the workflow’s owner or a child of that business unit. |
Organization | The associated entity will trigger the workflow regardless of who owns it. |
You can specify that a workflow run on demand in the workflow dialog to create a manual workflow. Manual workflows can be started by the user whenever they want to execute them. For instance, you could create a workflow that will e-mail a contact using a specific e-mail template. After the workflow is published, you can simply select the contact you want to e-mail from the contact grid, click the Run Workflow button from the toolbar, and then select your workflow from the window that opens.
Child workflows are executed by a Start Child Workflow step in another workflow. A workflow can also start a child instance of itself this way.
The next part of a workflow definition is also the most important. For a workflow to actually do anything, you must include one or more steps in its definition. Microsoft Dynamics CRM exposes several steps natively and also allows you to develop your own custom steps that you can include in the native workflow designer. We will discuss custom steps later in this chapter. Table 6-3 lists the native steps.
Table 6-3. Natively Supported Workflow Steps
Step Name | Description |
|---|---|
Stage | A stage is simply used to group other steps together to keep more complicated workflow definitions organized and maintainable. |
Check condition | Check condition acts like an if statement in C# or other programming languages. If the configured condition evaluates to true, the child steps are executed. |
Conditional branch | Conditional branch steps can only follow a check condition step and provide behavior similar to an else if statement in programming languages. They provide an alternate condition and child steps that can be checked and executed if the preceding check condition step evaluates to false. |
Default action | Default action steps must either follow a check condition step or a conditional branch step and are similar to an else statement found in programming languages. If none of the preceding conditions is found to be true, the child steps of the default action step are executed. |
Wait condition | Wait condition steps are similar to check condition steps, but they suspend the workflow until the condition evaluates to true. |
Parallel wait branch | Parallel wait branch steps must follow a wait condition step and are used to provide an alternate condition to wait for. Whichever condition evaluates to true first determines which child steps are executed. |
Create record | Create record steps are used to create a new instance of an entity. |
Update record | Update record steps are used to update existing entities. The entity being updated must be the main associated entity or one of the entities related to it. |
Assign record | Assign record steps are used to assign an entity to a new owner. Only the main associated entity or one of the entities related to it can be reassigned. |
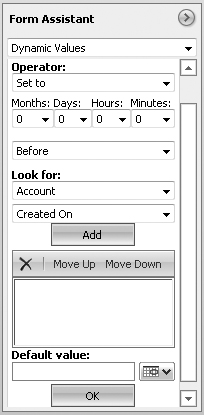
Send e-mail | The send e-mail step is used to send an e-mail message. The e-mail can be custom and completely defined in the step properties, or it can be based on an e-mail template. |
Start child workflow | Start child workflow steps are used to create instances of a workflow. The child workflow must include "Available to run as a child workflow" in its definition. |
Change status | The change status step allows you to change the status of an entity. The entity being updated must be the main associated entity or one of its related entities. |
Stop workflow | The stop workflow step allows you to stop the currently executing workflow with a status of either Succeeded or Canceled. |
One of the most important workflow features that you will use (probably in every single rule that you create) is dynamic values. As you saw in the earlier example, you can use dynamic values in your workflow rules to populate your conditions, actions, and so on with data specific to the workflow entity or its related entities.
When you’re designing your workflow rule, you access dynamic values in workflow from the Form Assistant. You will notice that Microsoft Dynamics CRM automatically changes the dynamic values choices based on the field your cursor focuses on. To insert a dynamic value in workflow, select a field on the form where you want the dynamic value to appear, use the Form Assistant to select the value, and then click OK.
Tip
Because the dynamic values Form Assistant automatically updates the options depending on your context, we must admit it can cause a little confusion when you initially start working with workflow rules. However, you can rest assured that you will quickly become comfortable using dynamic values in workflow rules.
In addition to including dynamic values in the form, you can also use dynamic values to update data fields even if the attribute does not appear on the entity form. To access and dynamically update a data field that does not appear on the form, click the Additional Fields tab.
In the Form Assistant pane, you can see the following aspects of dynamic values:
Operator
Look for options
Dynamic Values box
Default value
Microsoft Dynamics CRM automatically updates the operator values based on the form field with the current focus. So, if you select a numeric field on the form, Microsoft Dynamics CRM shows you operator options specific to numeric fields; when you select a date field, Microsoft Dynamics CRM shows you options specific to date fields. Table 6-4 shows the operator options and when you can apply them.
Table 6-4. Operator Options
Operator | Description |
|---|---|
Set to | The default operator. Simply assigns the dynamic value to the field. For DateTime fields, additional time options are displayed. |
Increment by | Can be used to increase the current value by the selected dynamic value. Available only for numeric fields for the Update Record action. |
Decrement by | Can be used to reduce the current value by the selected dynamic value. Available only for numeric fields for the Update Record action. |
Multiply by | Used to multiply the current value by the selected dynamic value. Available only for numeric fields for the Update Record action. |
Clear | Removes the current value from the field. Available only with the Update Record action. |
Important
The Set to operator is the only option displayed unless you are using the Update Record step.
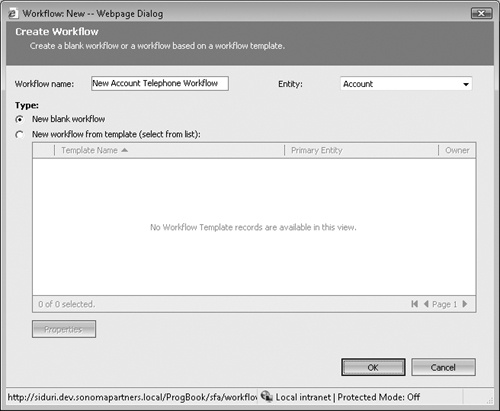
As mentioned, when you select a date field, Microsoft Dynamics CRM displays different operator options, as shown in Figure 6-1. By using the date-specific options, you can define the dynamic value for dates to be a certain amount of time before or after a custom date field.
Microsoft Dynamics CRM splits the Look for options into entity and attribute lists. The entity list displays the current primary entity, all related entities, a workflow option, and any custom assembly steps configured in the workflow rule (Figure 6-2). Workflow automatically updates the attribute list based on the selected entity, and it only displays attributes of the data type available for the field currently in focus. For example, if your cursor is in a date field, you can’t select a non-date field attribute with dynamic values. Microsoft Dynamics CRM even allows you to populate dynamics values using custom attributes and custom entities that you create.
If you select the Workflow option in the Look for picklist as shown in Figure 6-2, the user interface displays these special attribute choices (depending on the field with focus):
Activity Count. The current number of activities associated with the primary entity excluding any created by the workflow rule.
Activity Count Including Workflow. The current number of activities associated with the primary entity plus any activities specifically created by the workflow rule.
Execution Time. The amount of time elapsed on the current workflow step. The execution time value resets each time a step is taken.
If you configure a wait condition and select the Workflow option, Microsoft Dynamics CRM gives you a fourth option, Timeout. If you select Timeout, you can also access a special Duration dynamic value in addition to the typical Before and After values (Figure 6-3). By using the Duration option, you can specify an amount of time that the workflow rule should wait before it proceeds to the next step.

The Dynamic Values box stores values as you select them in the picklists and click the Add button. Most of the time, you will have only one value; however, the design allows for multiple values if one of them is null. A common use for this technique is choosing a customer value for an Opportunity or Case. Because the customer of an Opportunity can either be an Account or a Contact, you may want to configure dynamic values to accommodate either scenario (Figure 6-4). In this example, Microsoft Dynamics CRM will try to populate the top value in the box (Account Name) as the dynamic value. If no account name value exists because the customer of the Opportunity is a Contact, Microsoft Dynamics CRM will try to populate the dynamic value with the next value in the box. If that value doesn’t exist either, workflow will populate the dynamic value using the default value that you specify.

If your dynamic value doesn’t return any data from the database, you can use the default value to ensure that the value contains some data. You should strongly consider specifying a default value unless you are certain the data field chosen will always have a value. Default values do not apply to workflow wait conditions.
By now you have probably noticed that the out-of-the-box workflow functionality in Microsoft Dynamics CRM is quite powerful. Next we’ll look at how Microsoft Dynamics CRM implements this functionality and then move on to how you can extend it.