As a global product, Microsoft Dynamics CRM supports the needs of companies that have users located in multiple countries throughout the world. Microsoft Dynamics CRM offers both multi-currency and multilingual functionality so that users can view and work with records using the language and currency of their choice.
Out of the box, Microsoft Dynamics CRM 4.0 includes more than 20 different language packs that you can download and install in your system. Once you install and activate multiple language packs in your Microsoft Dynamics CRM deployment, each user can specify which language he or she prefers to see in the user interface.
For multiple currency support, Microsoft Dynamics CRM allows you to set up and record conversion rates between the system’s base currency and other currencies. Just like multilingual support, users can configure their default currency. However, in addition they can also specify a currency on a record-by-record basis. For example, a user could create one opportunity using U.S. dollars and then create a different opportunity using euros.
As a developer, you should understand how to incorporate the multilingual and multi-currency functionality in your custom code. As you would expect, of course you can interact and manipulate the multilingual and multi-currency functionality using the Microsoft Dynamics CRM API. In this chapter, we will discuss extending Microsoft Dynamics CRM by creating custom code that works with multiple languages and currencies. The CrmService and MetadataService classes provided in the Microsoft Dynamics CRM SDK both provide messages and methods to assist you in localizing your applications. We will also discuss the usage of resource files in your custom code.
As you learned, you can download, install, and enable one or more language packs for your Microsoft Dynamics CRM system. These language packs include translations for all of the user interface components that ship with the system. However, your system will most likely include custom attributes, custom views, and other areas that won’t be included in the Microsoft-supplied language packs. Conveniently, the customization section of Microsoft Dynamics CRM allows you to export and import language labels for translation of your custom elements. However, you should also consider how multilingual deployments will impact your custom IFrames, dialog boxes, ISV pages, and so on. In this section, we will discuss using the CrmService to update translations and a few ways to make your custom code multilingual-capable and also easy to update with more languages in the future.
The Microsoft Dynamics CRM SDK contains messages that allow developers to work with the installed language packs. Table 11-1 lists all of these messages along with a description of each.
Table 11-1. CrmService Messages for Multiple Language Packs
Name | Description |
|---|---|
ExportCompressedTranslationsXml | Exports translations for all the installed language packs to an XML file and compresses it into a .zip file |
ExportTranslationsXml | Exports translations for all the installed languages packs to an XML file |
ImportTranslationsXmlWithProgress | Asynchronously imports translations for the installed language packs and allows you to retrieve data about the import job’s progress |
RetrieveAvailableLanguages | Retrieves a list of enabled languages, including the base language. |
RetrieveDeprovisionedLanguages | Retrieves a list of disabled language packs |
RetrieveInstalledLanguagePacks | Retrieves an integer array of the installed language pack Locale ID (LCID) values |
RetrieveLocLabels | Retrieves the available labels for a specified attribute |
RetrieveProvisionedLanguages | Retrieves a list of provisioned language packs |
SetLocLabels | Sets the labels for a specified attribute |
Now that we know what multilingual messages Microsoft Dynamics CRM offers, let’s discuss how to programmatically export and import translations using the CrmService.
The ExportCompressedTranslationsXml and ExportTranslationsXml messages basically do the same thing, except that the ExportCompressedTranslationsXml message will compress the exported XML file in a .zip archive file. Using this message is a programmatic way to accomplish the same functionality as a user clicking the Export Labels For Translation link on the Settings Customization screen in the Microsoft Dynamics CRM UI. The exported file will contain translations for drop-down lists and other text UI elements. You can then alter the XML file with any new translations or change existing text. The ImportTranslationsXmlWithProgress message can then be used to take the exported and updated translation XML file and import the changes into Microsoft Dynamics CRM.
To help illustrate how to work with these messages, we will create a simple console application for demonstration purposes.
Creating the Translation Import/Export Console project
Open the ProgrammingWithDynamicsCrm4 solution in Microsoft Visual Studio 2008.
Right-click the solution name in Solution Explorer, select Add, and then click New Project.
In the New Project dialog box, select the Visual C# project type targeting the Microsoft .NET Framework 3.0 and then select the Console Application template.
Type ProgrammingWithDynamicsCrm4.TranslationUtil in the Name box and click OK.
Right-click the TranslationImportExport Project in Solution Explorer and click Add Reference.
On the Browse tab of the Add Reference dialog box, navigate to the Microsoft.Crm.Sdk. dll and Microsoft.Crm.Sdk.TypeProxy.dll assemblies and click OK.
We need to add two more references. Right-click the TranslationImportExport project in Solution Explorer and click Add Reference.
On the .NET tab of the Add Reference dialog box, select System.Web.Services and System.Configuration. Click OK.
Now that we’ve created our project, we can add the code. Example 11-1 contains the full source code for our application.
Example 11-1. ProgrammingWithDynamicsCrm4.TranslationUtil source code
using System;
using System.Collections.Generic;
using System.Text;
using Microsoft.Crm.Sdk;
using Microsoft.Crm.SdkTypeProxy;
using System.IO;
using System.Xml;
using System.Web.Services.Protocols;
using Microsoft.Crm.Sdk.Query;
using System.Configuration;
using System.Net;

namespace ProgrammingWithDynamicsCrm4.TranslationUtil
{
    class Program
    {
    static void Main(string[] args)
    {
        if (args.Length != 4)
        {
            string exeName =
                         Path.GetFileName(Environment.GetCommandLineArgs()[0]);
            Console.WriteLine("Usage: {0} <import/export> <file path>
                                            <crmServerUrl> <organizationName>",
                                exeName);
            Environment.Exit(1);
        }

        try
        {
            string commandType = args[0];
            string filePath = args[1];
            string crmServerUrl = args[2];
            string orgName = args[3];

            switch (commandType)
            {
                case "export":
                    {
                        ExportTranslations(filePath, crmServerUrl, orgName);
                    }
                    break;
                case "import":
                    {
                        ImportTranslations(filePath, crmServerUrl, orgName);
                    }
                    break;
                default:
                    {
                        Console.WriteLine(
                    String.Format( "{0}: unhandled command type", commandType));
                    }
                    break;
            }
        }
        catch (SoapException e)
        {
            Console.WriteLine(e.Detail.InnerText);
        }
        catch (Exception e)
        {
            Console.WriteLine(e.Message);
        }
    }

    private static void ExportTranslations(string exportFilePath,
                                           string crmServerUrl,
                                           string orgName)
    {
        Console.WriteLine("Initializing CrmService...");

            CrmService service = CreateCrmService(crmServerUrl, orgName);

            Console.WriteLine("Complete");

            ExportCompressedTranslationsXmlRequest request =
                                     new ExportCompressedTranslationsXmlRequest();

            request.EmbeddedFileName = "translations.xml";

            Console.WriteLine("Exporting Translations...");

            ExportCompressedTranslationsXmlResponse response =
                 (ExportCompressedTranslationsXmlResponse)service.Execute(request);

            byte[] compressedXML = response.ExportCompressedXml;

            using (FileStream fs = new FileStream(
               String.Format(@"{0}Translations.zip", exportFilePath.TrimEnd('')),
                                FileMode.Create))
            {
                fs.Write(compressedXML, 0, compressedXML.Length);
                fs.Close();
            }

            Console.WriteLine("The Translation Export Completed Successfully!");
        }

        private static void ImportTranslations(string importFilePath,
                                                string crmServerUrl,
                                                string orgName)
        {
            Console.WriteLine("Initializing CrmService...");

            CrmService service = CreateCrmService(crmServerUrl, orgName);

            Console.WriteLine("Complete");

            XmlDocument translationXmlDoc = new XmlDocument();
            translationXmlDoc.Load(importFilePath);

            String translationXML = translationXmlDoc.OuterXml;

            ImportTranslationsXmlWithProgressRequest request =
                                     new ImportTranslationsXmlWithProgressRequest();

            Guid tmpJobId = Guid.NewGuid();

            request.ImportJobId = tmpJobId;
            request.ImportXml = translationXML;

            Console.Write("Importing Translations...");

            service.ExecuteAsync(request);

            importjob job = new importjob();

            XmlDocument doc = new XmlDocument();

            String progress = String.Empty;

            bool incrementProgress = false;

            while (progress != "Succeeded")
            {
                System.Threading.Thread.Sleep(1000);

                try
                {
                    ColumnSet jobColumns = new ColumnSet();
                    jobColumns.AddColumn("data");

                    job =
 (importjob)service.Retrieve(EntityName.importjob.ToString(), tmpJobId, jobColumns);

                    doc.LoadXml(job.data);

                    progress = doc.GetElementsByTagName("status").Item(0).InnerText;

                    incrementProgress = true;

                }
                catch { }

                if (incrementProgress)
                {
                    Console.Write("...");
                    incrementProgress = false;
                }
            }

            Console.WriteLine();
            Console.WriteLine("The Translation Import Completed Successfully!");
        }

        private static CrmService CreateCrmService(string crmServer,
                                                    string organizationName)
        {
            UriBuilder crmServerUri = new UriBuilder(crmServer);
            crmServerUri.Path = "/MSCRMServices/2007/CrmService.asmx";

            string userName = ConfigurationManager.AppSettings["crmUserName"];
            string password = ConfigurationManager.AppSettings["crmPassword"];
            string domain = ConfigurationManager.AppSettings["crmDomain"];

            CrmService crmService = new CrmService();
            if (String.IsNullOrEmpty(userName))
            {
                crmService.UseDefaultCredentials = true;
            }
            else
            {
            crmService.Credentials = new NetworkCredential(userName,
                                                           password,
                                                           domain);
            }

            crmService.Url = crmServerUri.ToString();
            crmService.CrmAuthenticationTokenValue = new CrmAuthenticationToken();
            crmService.CrmAuthenticationTokenValue.AuthenticationType =
                                                            AuthenticationType.AD;
            crmService.CrmAuthenticationTokenValue.OrganizationName =
                                                                     organizationName;

            return crmService;
        }
    }
}
You will run this application from the command line and you can specify whether to import or export translations using the command-line arguments. Table 11-2 lists and describes the four command-line arguments. The command-line usage to import or export the translations is:
Table 11-2. ProgrammingWithDynamicsCrm4.Translationutil Command-Line Arguments
Name | Description |
|---|---|
Command Type | Determines whether to import or export translations. Possible values are import and export. |
File Path | For exports this argument determines where the exported file will be saved. For imports this argument specifies where the updated translation XML file is located. |
Microsoft Dynamics CRM server URL | Specifies the URL of the Microsoft Dynamics CRM server. |
Organization Name | Specifies the name of the organization to export or import the translations from. |
ProgrammingWithDynamicsCrm4.TranslationUtil.exe <commandType> <filePath> <serverUrl>
    <orgName>
The Main method of our application contains a switch statement that determines whether to call the ExportTranslations method or the ImportTranslations method. If the incorrect number of arguments are given at the command line, we display a message to the user with the proper usage instructions. Now let’s take a look at the source code behind the export and import functionality. The first method we will discuss is a helper method used to create an instance of CrmService.
The CreateCrmService method. The CreateCrmService method creates an instance of the CrmService class using Active Directory authentication. By default it will use the credentials of the user running the application. However, if you want to export or import the translations under a different user account, you can add an app.config file to the project and add keys for the credentials you would like to make the calls under. The keys are added to the AppSettings node of the config file. Table 11-3 lists the keys along with a description of each.
Table 11-3. App.config AppSettings
Name | Description |
|---|---|
crmUserName | User name of the Microsoft Dynamics CRM system user |
crmPassword | Password of the Microsoft Dynamics CRM system user |
crmDomain | Domain of the Microsoft Dynamics CRM system user |
The ExportTranslations method. First we create an instance of CrmService using our CreateCrmService method. Next we create an instance of the ExportCompressedTranslationsXmlRequest. Note that you specify the name of the XML file by setting the EmbeddedFileName property on the ExportCompressedTranslationsXmlRequest object, and you also specify a path to save the .zip file in the constructor of the FileStream object. In our application the name of our file is set to translations.xml and it will be saved to the path specified in the command line arguments as a .zip file named "Translations.zip".
Note
You need to install and provision at least one language besides the base language before running the application.
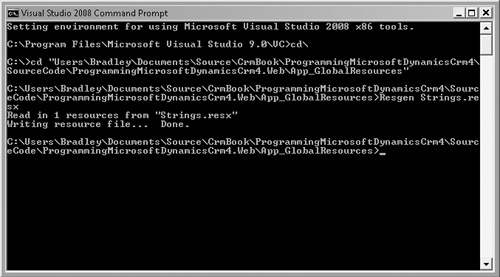
Now, compile the application and run it. Use "export" for the type in the command-line arguments. The resulting output should look like Figure 11-1.

The resulting XML file is actually a Microsoft Office Excel XML document that you can open and edit in Excel (Figure 11-2). In this figure, columns B, C, and D display the translated text for three different languages:

1033 English – United States
1036 French – France
3082 Spanish - Spain (Modern Sort)
To update the translation, simply type the new text in the appropriate cell.
Tip
Although it’s possible to determine the language by examining the text, you can also look up the language by cross-referencing the locale IDs (1033, 1036, 3082, and so on) with the published Microsoft list. For a list of locale ID values assigned by Microsoft, you can reference the Web page http://www.microsoft.com/globaldev/reference/lcid-all.mspx.
Once you update your translations, you can import the final values back into Microsoft Dynamics CRM using the next message we will discuss, ImportXmlTranslationsWithProgress.
The ImportTranslations method. The ImportTranslationsXmlWithProgress message takes the exported and updated translation XML file and imports the changes into Microsoft Dynamics CRM. This method begins in the same way our export method did: by creating an instance of CrmService. Next we read our translations XML file specified in the file path command-line argument into an XMLDocument object. Once we have our XML, we can create the ImportTranslationsXmlWithProgressRequest object. Notice that we create a new Guid and use it to set the value of the request object’s ImportJobId property:
ImportTranslationsXmlWithProgressRequest request =
                                           new ImportTranslationsXmlWithProgressRequest();

Guid tmpJobId = Guid.NewGuid();

request.ImportJobId = tmpJobId;
request.ImportXml = translationXML;
Creating the new Guid value is an important step because we will use this Guid to track the progress of our import job. Notice that we use the ExecuteAsync method this time instead of the normal Execute method on the CrmService. This kicks off an asynchronous job for our import. The while loop toward the end of the method is used to track the progress of our job. We use the Retrieve method of the CrmService to retrieve an instance of the Import Job entity. The try-catch block is in place because our job may not exist at the time we first make the retrieve call. If the catch block is hit, we simply continue the loop. Once the job exists in Microsoft Dynamics CRM, the loop continues until the job’s status reads "Succeeded". During the loop, we continue to write out "..." to the user as a means of letting the user know that the import is still processing. Once everything is finished, we write out another message to the user. If you run our application again, this time using "import" as the first command-line argument, your output should look like Figure 11-3.

Now that you understand how to programmatically export and import multilingual translations, let’s examine using multilingual functionality in a custom Web page embedded in a Microsoft Dynamics CRM IFrame.
As you learned in Chapter 8, the Metadata Service gives you the ability to retrieve information from entities and attributes such as attribute labels for the base language and all of the installed language packs. In this section, we will create an IFrame on the Contact entity that displays information from the Contact’s selected parent customer record. We will code this custom IFrame Web page to automatically display the label text using the preferred language selected by the user. Therefore, different users viewing this custom IFrame see different label languages if they’ve selected two different preferred languages. To see the final output, you can skip ahead to view Figure 11-4.

Tip
Microsoft Dynamics CRM users can set their preferred language for the UI and Help documentation on the Language tab of the Set Personal Options screen.
Now we will add a new Web Form to the ProgrammingMicrosoftDynamicsCrm4.Web project.
Adding the ContactParentCustomerInfo.aspx page
Open the ProgrammingWithDynamicsCrm4 solution in Visual Studio 2008.
If you have not created the ProgrammingMicrosoftDynamicsCrm4.Web project in a previous chapter, right-click the solution name, select Add, and then click New Web Site. Change the name of the Web site to ProgrammingMicrosoftDynamicsCrm4. Web and click OK. Add references to the Microsoft Dynamics CRM SDK assemblies: Microsoft.Crm.Sdk.dll and Microsoft.Crm.SdkProxy.dll.
If a folder named IFrames does not already exist, create one under the new Web site. Right-click the IFrames folder and then click Add New Item.
Select the Web Form template and type ContactPrimaryCustomerInfo.aspx in the Name field.
Click Add.
We start by setting up our form. Example 11-2 contains the source code for the ContactParent CustomerInfo.aspx page.
Example 11-2. ContactParentCustomerInfo.aspx source code
<%@ Page Language="C#"
         AutoEventWireup="true"
         CodeFile="ContactParentCustomerInfo.aspx.cs"
         Inherits="IFrames_ContactParentCustomerInfo" %>

<!DOCTYPE html PUBLIC "-//W3C//DTD XHTML 1.0 Transitional//EN"
                         "http://www.w3.org/TR/xhtml1/DTD/xhtml1-transitional.dtd">

<html xmlns="http://www.w3.org/1999/xhtml">
<head runat="server">
    <title>Untitled Page</title>
</head>
<body style="font-size: 11px;
             font-family: Tahoma;
             margin: 0px;
             border: 0px;
             background-color: #eaf3ff;">
    <form id="form1" runat="server">
    <div id="warning"
         visible="false"
         style="background-color: #FFFFAE;height: 26px;border: 1px solid
                                           #C5C5C5;font-size: 11px;" runat="server">
        The record must be saved before you can view the customer information.
    </div>
    <div id="main" runat="server">
        <table cellspacing="1"
               cellpadding="0"
               border="0"
               style="width: 100%;table-layout: fixed;">
            <colgroup>
                <col style="width: 111px;" />
                <col />
                <col style="width: 115px; padding-left: 23px;" />
                <col />
            </colgroup>
            <tr>
                <td>
                    <asp:Label ID="street1Label" runat="server" />
                </td>
                <td>
                    <asp:Label ID="street1" runat="server" />
                </td>
                <td>
                    <asp:Label ID="stateLabel" runat="server" />
                </td>
                <td>
                    <asp:Label ID="state" runat="server" />
                </td>
            </tr>
            <tr>
                <td>
                    <asp:Label ID="street2Label" runat="server" />
                </td>
                 <td>
                    <asp:Label ID="street2" runat="server" />
                </td>
                <td>
                    <asp:Label ID="zipLabel" runat="server" />
                </td>
                <td>
                    <asp:Label ID="zip" runat="server" />
                </td>
            </tr>
            <tr>
                <td>
                    <asp:Label ID="cityLabel" runat="server" />
                </td>
                <td>
                    <asp:Label ID="city" runat="server" />
                </td>
                <td>
                    <asp:Label ID="countryLabel" runat="server" />
                </td>
                <td>
                    <asp:Label ID="country" runat="server" />
                </td>
            </tr>
        </table>
    </div>
    </form>
</body>
</html>
You can see that we divided our page into two div tags. The first div contains a warning message. Notice that this message is hard-coded in English. We will discuss updating this warning for multiple languages using a resource file in the next section. The second div contains our form elements. Because this will be a read-only display, each field we want to show has two ASP.NET Label controls associated with it. The first Label control is populated with the attribute’s Display Name translated into the user’s preferred language, and the second Label control contains the attribute’s data. Our form also contains some styles to make it blend in with the native Contact entity form, but we won’t go into detail about that now because it is discussed in more detail in Chapter 13, Now that our form is set, let’s discuss the code to populate it. Example 11-3 contains the source code for our IFrame’s code behind.
Example 11-3. ContactParentCusomterInfo.aspx.cs
using System;
using System.Collections;
using System.Configuration;
using System.Data;
using System.Web;
using System.Web.Security;
using System.Web.UI;
using System.Web.UI.HtmlControls;
using System.Web.UI.WebControls;
using System.Web.UI.WebControls.WebParts;
using Microsoft.Crm.Sdk;
using Microsoft.Crm.SdkTypeProxy;
using Microsoft.Crm.Sdk.Query;
using Microsoft.Crm.SdkTypeProxy.Metadata;
using Microsoft.Crm.Sdk.Metadata;
using ProgrammingWithDynamicsCrm4.Utilities;

public partial class IFrames_ContactParentCustomerInfo : System.Web.UI.Page
{
    protected void Page_Load(object sender, EventArgs e)
    {
        string contactId = Request.QueryString["id"];
        string orgName = Request.QueryString["orgname"];

        if (!string.IsNullOrEmpty(contactId))
        {
            CrmService crmService =
       CrmServiceUtility.GetCrmService(CrmServiceUtility.GetServerURLFromRegistry(),
                                        orgName);

            MetadataService metadataService =
  CrmServiceUtility.GetMetadataService(CrmServiceUtility.GetServerURLFromRegistry(),
                                        orgName);

            ColumnSet contactColumns = new ColumnSet();
            contactColumns.AddColumn("parentcustomerid");

            contact crmContact =
                        (contact)crmService.Retrieve(EntityName.contact.ToString(),
                                                      new Guid(contactId),
                                                      contactColumns);

            if (crmContact.parentcustomerid != null)
            {
                string customerEntityName = crmContact.parentcustomerid.type;

                // set up labels using metadata
                AttributeMetadata addressLine1Metadata =
                      MetadataUtility.RetrieveAttributeMetadata(metadataService,
                                                                customerEntityName,
                                                                "address1_line1");
                this.street1Label.Text =
                                addressLine1Metadata.DisplayName.UserLocLabel.Label;

                AttributeMetadata addressLine2Metadata =
                          MetadataUtility.RetrieveAttributeMetadata(metadataService,
                                                                 customerEntityName,
                                                                  "address1_line2");
                this.street2Label.Text =
                                addressLine2Metadata.DisplayName.UserLocLabel.Label;

                AttributeMetadata cityMetadata =
                          MetadataUtility.RetrieveAttributeMetadata(metadataService,
                                                                 customerEntityName,
                                                                 "address1_city");
                this.cityLabel.Text =
                                        cityMetadata.DisplayName.UserLocLabel.Label;

                AttributeMetadata stateMetadata =
                          MetadataUtility.RetrieveAttributeMetadata(metadataService,
                                                                 customerEntityName,
                                                        "address1_stateorprovince");
                this.stateLabel.Text =
                                       stateMetadata.DisplayName.UserLocLabel.Label;

                AttributeMetadata zipMetadata =
                          MetadataUtility.RetrieveAttributeMetadata(metadataService,
                                                                 customerEntityName,
                                                             "address1_postalcode");

                this.zipLabel.Text = zipMetadata.DisplayName.UserLocLabel.Label;

                AttributeMetadata countryMetadata =
                          MetadataUtility.RetrieveAttributeMetadata(metadataService,
                                                                 customerEntityName,
                                                                "address1_country");

                this.countryLabel.Text =
                                     countryMetadata.DisplayName.UserLocLabel.Label;

                // populate the form
                TargetRetrieveDynamic targetRetrieve =
                                                       new TargetRetrieveDynamic();

                targetRetrieve.EntityName = crmContact.parentcustomerid.type;
                    targetRetrieve.EntityId = crmContact.parentcustomerid.Value;

                ColumnSet customerColumns = new ColumnSet();
                    customerColumns.AddColumns("address1_line1",
                                               "address1_line2",
                                               "address1_city",
                                               "address1_stateorprovince",
                                               "address1_postalcode",
                                               "address1_country");

                RetrieveRequest retrieve = new RetrieveRequest();
                retrieve.Target = targetRetrieve;
                retrieve.ColumnSet = customerColumns;
                retrieve.ReturnDynamicEntities = true;

                RetrieveResponse retrieved =
                                    (RetrieveResponse)crmService.Execute(retrieve);

                DynamicEntity entity = (DynamicEntity)retrieved.BusinessEntity;
                if (entity.Properties.Contains("address1_line1"))
                    this.street1.Text =
                                    entity.Properties["address1_line1"].ToString();
                if (entity.Properties.Contains("address1_line2"))
                    this.street2.Text =
                                    entity.Properties["address1_line2"].ToString();
                if (entity.Properties.Contains("address1_city"))
                    this.city.Text =
                                     entity.Properties["address1_city"].ToString();
                if (entity.Properties.Contains("address1_stateorprovince"))
                    this.state.Text =
                           entity.Properties["address1_stateorprovince"].ToString();
                if (entity.Properties.Contains("address1_postalcode"))
                    this.zip.Text =
                                entity.Properties["address1_postalcode"].ToString();
                if (entity.Properties.Contains("address1_country"))
                    this.country.Text =
                                   entity.Properties["address1_country"].ToString();
           }
       }
       else
       {
           this.warning.Visible = true;
           this.main.Visible = false;
       }
    }
}
The first thing we do in the Page_Load method is check to see whether an ID was passed to us in the query string. If not, we can then turn on our message div to tell the user that the record must be saved before she can view the information. If an ID was passed to our IFrame, we can then retrieve the information we need from the Contact record’s parent customer.
Note
The MetadataUtility class used in this example is discussed in detail in Chapter 15. This utility is used to retrieve and cache Microsoft Dynamics CRM metadata.
If the Contact record has a parent customer selected, we can then retrieve each attribute’s metadata. Because the customer can be either an Account or a Contact, we create the customerEntityName variable and set it to the parentcustomerid attribute’s type. This will store the logical name of the customer entity, so we can use it to retrieve the correct metadata. To populate our field labels, we use the AttributeMetadata class’s DisplayName property. The DisplayName property is of the type CrmLabel. As we learned in Chapter 8, the CrmLabel class has a LocLabels property that contains a collection of all available translations for this label. For example, if English is your base language and you have the Spanish and French language packs installed and enabled in your Microsoft Dynamics CRM environment, the LocLabels collection would contain three items, one for each enabled language. Each item in the LocLabels collection contains a LanguageCode property, so it would be possible for us to retrieve the user’s preferred language’s language code and then loop through the collection and pull out the appropriate label. Luckily, achieving this result is much simpler. The CrmLabel object also has a UserLocLabel property that contains the label already translated into the user’s preferred language. This ensures that our label always shows the correct translation.
AttributeMetadata addressLine1Metadata =
                          MetadataUtility.RetrieveAttributeMetadata(metadataService,
                                                                 customerEntityName,
                                                                  "address1_line1");

this.street1Label.Text = addressLine1Metadata.DisplayName.UserLocLabel.Label;
After our field labels have been populated, we can retrieve the data we need from Microsoft Dynamics CRM and populate the fields. Because our customer can be an Account or a Contact, we can use TargetRetrieveDynamic as the Target property on our RetrieveRequest message. Once our DynamicEntity has been retrieved, we can use its Properties collection to populate our fields.
Now that we have finished development of our page, we can deploy it to the Microsoft Dynamics CRM server and test it. We will start by adding our IFrame to the Contact entity.
Adding the IFrame to the Contact form
Open Microsoft Dynamics CRM in a Web browser and navigate to the Contact entity’s form customization screen.
Click Add A Section on the Common Tasks menu.
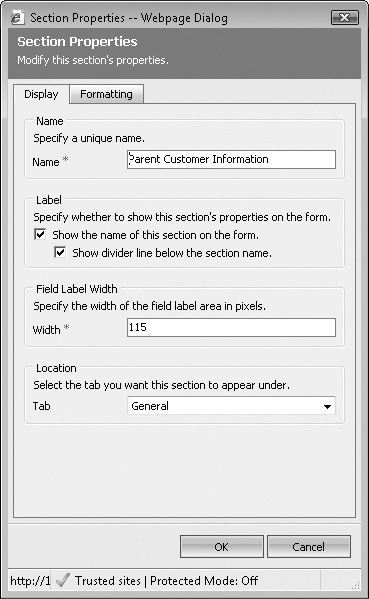
Type Parent Customer Information in the Name box.
Select both the Show The Name Of This Section On The Form and Show Divider Line Below The Section Name check boxes and verify that the Tab is set to General. Click OK.
Select our new section and then click Add An IFrame on the Common Tasks menu.
Type contactparentcusomterinfo in the Name box.
Type /ISV/ProgrammingWithDynamicsCRM4/ContactParentCustomerInfo.aspx in the URL box.
Select the Pass Record Object-Type Code And Unique Identifier As Parameters check box.
Clear the Restrict Cross-Frame Scripting check box.
Verify that the Tab is set to General and the Section is set to Parent Customer Information.
In the Formatting tab’s Row Layout section, select the Automatically Expand To Use Available Space check box.
In the Formatting tab’s Border section, clear the Display Border check box. This will make our IFrame integrate seamlessly into the form. Click OK.
Save the form and publish your customizations.

Now that our IFrame has been added to the Contact form, we will deploy our Web files to the server.
Deploying the Web files
Note
If you have created a folder named ProgrammingWithDynamicsCrm4 under the ISV folder in a previous chapter, you can skip step 1 and move on to step 2.
Create a new folder named ProgrammingWithDynamicsCrm4 under the ISV folder in the directory with your Microsoft Dynamics CRM Web files.
Copy the ContactParentCustomerInfo.aspx and ContactParentCustomerInfo.aspx.cs files into the ProgrammingWithDynamicsCrm4 folder on the server.
Warning
Because this example uses the MetadataUtility class defined in Chapter 15, it requires the ProgrammingWithDynamicsCrm4.Utilities assembly to be copied into the Microsoft Dynamics CRM bin folder. You can obtain the ProgrammingWithDynamicsCrm4. Utilities assembly by opening the ProgrammingWithDynamicsCrm4 solution in Visual Studio and compiling the ProgrammingWithDynamicsCrm4.Utilities project.
Now we can test our IFrame. Navigate to the Contact grid in Microsoft Dynamics CRM and open an existing Contact record that has the parent customer field populated. Our IFrame at the bottom of the General tab shows the parent customer’s information with the labels translated into the language currently set on your user record (Figure 11-4).
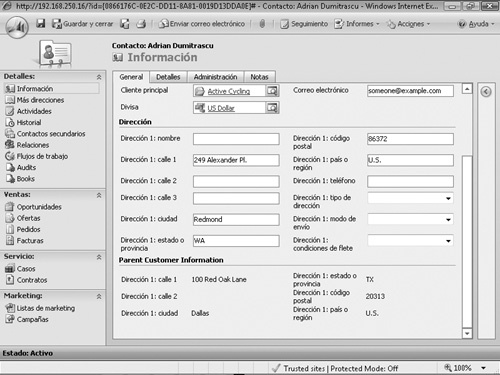
To test in a different language, go to the Tools menu on the main Microsoft Dynamics CRM toolbar and select Options. On the Languages tab of the Set Personal Options dialog box change your User Interface Language preference to Spanish and click OK. Now go back to the Contact record you just viewed and refresh the browser. The entity form and IFrame should now be displayed in your newly selected language (Figure 11-5).
In the example we just completed, we were able to use the Microsoft Dynamics CRM language packs to display the field labels because our IFrame displayed a field from the native account entity. Therefore, we did not need to provide a custom translation.
However, what about scenarios where we want to display multilingual text to the user but that text isn’t stored in the Microsoft Dynamics CRM metadata? One way to handle this case is to use resource files. A resource file is just a file that contains nonexecutable text that we can use in our code. Resource files make localizing our text easy because they are external files and we can add as many new translated resource files as we need without having to update any code. To illustrate the use of resource files, we will update the previous example to display the warning message to the user in his or her preferred language.
In the IFrame we created in the previous section, we hard-coded an English warning message to the user if a new Contact record had not been saved yet. In this section we will learn how to use a resource file to localize this warning message so that users with Spanish as their language will see the warning in the localized language. To accomplish this we will add two resource files, one for English and one for Spanish translations.
Adding the resource files
Open the ProgrammingWithDynamicsCrm4 solution in Visual Studio 2008.
Right-click the ProgrammingMicrosoftDynamicsCrm4.Web project, select Add ASP.NET folder, and then click App_GlobalResources.
Right-click the App_GlobalResources folder and select Add New Item.
Select the Resource File template and type Strings.resx in the Name field. Click Add.
In our new resource file, type IFrames_ContactParentCustomerInfo_Warning as the name of the first string resource.
Type The record must be saved before you can view the customer information. in the Value field.
To add a resource file for the Spanish translation, repeat steps 3 through 5 replacing the resource file name with Strings.es-ES.resx.
In the Spanish resource file, type El expediente debe ser ahorrado antes de que usted pueda ver la información del cliente. in the Value field.
Save the two .resx files.
Now we will use a .NET utility named Resource File Generator (Resgen.exe). This tool converts a .resx file into a binary .resource file. The syntax for using the Resource File Generator looks like this:
Resgen <resource file name>
Important
Always follow the correct naming convention when creating resource files. This allows your code to easily locate the resources at run time. The proper naming convention is: <resource file name>.<culture>.resources.
Tip
You can find a list of valid culture strings at the following link: http://msdn.microsoft.com/en-us/library/system.globalization.cultureinfo.aspx.
Converting the .resx files to .resource files
Open the Visual Studio 2008 Command Prompt and navigate to the folder containing your .resx files.
Type in the following command: Resgen Strings.resx. This creates a file named Strings. resources in the App_GlobalResources folder.
Now we need to run a command to create a .resource file for our Spanish translation. Run the following command: Resgen Strings.es-ES.resx.
Create a new folder in the Web site’s folder hierarchy under the IFrames folder and name it Resources. Copy the two .resources files we just generated from the App_GlobalResources folder into our newly created Resources folder.
Now we need to update our IFrame’s code-behind file to use the new resource files. Example 11-4 contains the updated source code.
Example 11-4. ContactParentCustomerInfo.aspx.cs updated source code for resources
using System;
using System.Collections;
using System.Configuration;
using System.Data;
using System.Web;
using System.Web.Security;
using System.Web.UI;
using System.Web.UI.HtmlControls;
using System.Web.UI.WebControls;
using System.Web.UI.WebControls.WebParts;
using Microsoft.Crm.Sdk;
using Microsoft.Crm.SdkTypeProxy;
using Microsoft.Crm.Sdk.Query;
using Microsoft.Crm.SdkTypeProxy.Metadata;
using Microsoft.Crm.Sdk.Metadata;
using ProgrammingWithDynamicsCrm4.Utilities;
using System.Resources;
using System.Reflection;
using System.Globalization;
using System.Xml;
using System.Threading;

public partial class IFrames_ContactParentCustomerInfo : System.Web.UI.Page
{
    protected void Page_Load(object sender, EventArgs e)
    {
        string contactId = Request.QueryString["id"];
        string orgName = Request.QueryString["orgname"];

        CrmService crmService =
       CrmServiceUtility.GetCrmService(CrmServiceUtility.GetServerURLFromRegistry(),
                                       orgName);

        if (!string.IsNullOrEmpty(contactId))
        {

            MetadataService metadataService =
  CrmServiceUtility.GetMetadataService(CrmServiceUtility.GetServerURLFromRegistry(),
                                       orgName);

            ColumnSet contactColumns = new ColumnSet();
            contactColumns.AddColumn("parentcustomerid");

            contact crmContact =
                         (contact)crmService.Retrieve(EntityName.contact.ToString(),
                                                       new Guid(contactId),
                                                       contactColumns);

            if (crmContact.parentcustomerid != null)
            {
                string customerEntityName = crmContact.parentcustomerid.type;

                // set up labels using metadata
                AttributeMetadata addressLine1Metadata =
                          MetadataUtility.RetrieveAttributeMetadata(metadataService,
                                                                 customerEntityName,
                                                                 "address1_line1");
                this.street1Label.Text =
                               addressLine1Metadata.DisplayName.UserLocLabel.Label;

                AttributeMetadata addressLine2Metadata =
                          MetadataUtility.RetrieveAttributeMetadata(metadataService,
                                                                 customerEntityName,
                                                                  "address1_line2");
                this.street2Label.Text =
                                addressLine2Metadata.DisplayName.UserLocLabel.Label;
                     AttributeMetadata cityMetadata =
                          MetadataUtility.RetrieveAttributeMetadata(metadataService,
                                                                 customerEntityName,
                                                                   "address1_city");

               this.cityLabel.Text = cityMetadata.DisplayName.UserLocLabel.Label;

               AttributeMetadata stateMetadata =
                         MetadataUtility.RetrieveAttributeMetadata(metadataService,
                                                                customerEntityName,
                                                       "address1_stateorprovince");

                this.stateLabel.Text = stateMetadata.DisplayName.UserLocLabel.Label;

                AttributeMetadata zipMetadata =
                          MetadataUtility.RetrieveAttributeMetadata(metadataService,
                                                                 customerEntityName,
                                                             "address1_postalcode");

                this.zipLabel.Text = zipMetadata.DisplayName.UserLocLabel.Label;

                AttributeMetadata countryMetadata =
                          MetadataUtility.RetrieveAttributeMetadata(metadataService,
                                                                 customerEntityName,
                                                                "address1_country");

                this.countryLabel.Text =
                                     countryMetadata.DisplayName.UserLocLabel.Label;

                // populate the form
                TargetRetrieveDynamic targetRetrieve = new TargetRetrieveDynamic();
                targetRetrieve.EntityName = crmContact.parentcustomerid.type;
                targetRetrieve.EntityId = crmContact.parentcustomerid.Value;

                ColumnSet customerColumns = new ColumnSet();
                customerColumns.AddColumns("address1_line1",
                                           "address1_line2",
                                           "address1_city",
                                           "address1_stateorprovince",
                                           "address1_postalcode",
                                           "address1_country");

                RetrieveRequest retrieve = new RetrieveRequest();
                retrieve.Target = targetRetrieve;
                retrieve.ColumnSet = customerColumns;
                retrieve.ReturnDynamicEntities = true;

                RetrieveResponse retrieved =
                                    (RetrieveResponse)crmService.Execute(retrieve);

                DynamicEntity entity = (DynamicEntity)retrieved.BusinessEntity;

                if (entity.Properties.Contains("address1_line1"))
                    this.street1.Text =
                                     entity.Properties["address1_line1"].ToString();

                if (entity.Properties.Contains("address1_line2"))
                    this.street2.Text =
                                     entity.Properties["address1_line2"].ToString();
                if (entity.Properties.Contains("address1_city"))
                    this.city.Text = entity.Properties["address1_city"].ToString();
                if (entity.Properties.Contains("address1_stateorprovince"))
                    this.state.Text =
                           entity.Properties["address1_stateorprovince"].ToString();
                if (entity.Properties.Contains("address1_postalcode"))
                    this.zip.Text =
                                entity.Properties["address1_postalcode"].ToString();
                if (entity.Properties.Contains("address1_country"))
                    this.country.Text =
                                   entity.Properties["address1_country"].ToString();
             }
         }
         else
         {
             ResourceManager resManager =
                           ResourceManager.CreateFileBasedResourceManager("Strings",
                                                        Server.MapPath("Resources"),
                                                                               null);

             WhoAmIRequest whoAmIRequest = new WhoAmIRequest();
             WhoAmIResponse whoAmIResponse =
                                  (WhoAmIResponse)crmService.Execute(whoAmIRequest);

             Guid userId = whoAmIResponse.UserId;

             string fetchXml = String.Format(@"<fetch mapping='logical'>
                                             <entity name='usersettings'>
                                                 <attribute name='uilanguageid' />
                                                 <filter type='and'>
                     <condition attribute='systemuserid' operator='eq' value='{0}' />
                                                 </filter>
                                             </entity>
                                            </fetch>", userId.ToString());

             string fetchResults = crmService.Fetch(fetchXml);

             XmlDocument fetchDoc = new XmlDocument();
             fetchDoc.LoadXml(fetchResults);

             XmlNode resultNode =
                                fetchDoc.DocumentElement.SelectSingleNode("result");
             string languageCode =
                              resultNode.SelectSingleNode("uilanguageid").InnerText;

             CultureInfo cultureInfo = new CultureInfo(int.Parse(languageCode));

             string warningMessage =
      resManager.GetString("IFrames_ContactParentCustomerInfo_Warning", cultureInfo);

             this.warning.InnerHtml = warningMessage;

             this.warning.Visible = true;
             this.main.Visible = false;
         }
    }
}
Warning
This example only works for on-premise because it doesn’t use the CrmImpersonator class and uses a WhoAmIRequest to find the current user’s ID.
The main changes to our code-behind file are in the else of our condition that checks whether the Contact record’s ID was passed to the IFrame in the query string. The first thing we do is create a new ResourceManager. This object allows us to pull the string values from the .resources files we created earlier.
ResourceManager resManager =
                          ResourceManager.CreateFileBasedResourceManager("Strings",
                                                       Server.MapPath("Resources"),
                                                                              null);
We will copy our .resources files to the Microsoft Dynamics CRM server when we deploy our changes, so we will use a file-based resource manager. The first argument passed into the CreateFileBasedResourceManager method is the base name of our resource files. In our case this is "Strings", because we have two files: "Strings.resources" and "Strings.es-ES.resources". The second argument is the path to our .resources files. We will copy them into a folder named Resources in the next section.
Now that our ResourceManager is set up, we need to figure out the user’s preferred language. To do this we use the WhoAmI message to find the current user’s ID and some FetchXML to query the User Settings entity and find the language code. After we retrieve the language code we can create a new CultureInfo object and use it in the ResourceManager object’s GetString method. The first argument is the name of the resource we want to return, and the second argument is our CultureInfo object.
resManager.GetString("IFrames_ContactParentCustomerInfo_Warning", cultureInfo);This method either returns the English or Spanish translation, depending on which language code was set on the CultureInfo object. If a language code other than English or Spanish was used, the GetString method returns the default language because it could not find a resource for the specified language. In our case, this is English.
Now we can test our updates on the Microsoft Dynamics CRM server.
Deploying the Web and Resource files
Copy the ContactParentCustomerInfo.aspx and ContactParentCustomerInfo.aspx.cs files from the IFrame folder to the ProgrammingMicrosoftDynamicsCrm4 folder on the Microsoft Dynamics CRM server.
Copy the Resources folder containing our two .resources files into the Programming-MicrosoftDynamicsCrm4 folder.
Because we are testing the warning message when a record has not been created, open Microsoft Dynamics CRM in a Web browser and navigate to the Contacts grid. Click the New button. The resulting window should display our IFrame with the warning message in your current language (Figure 11-6).

Now change your language preference to Spanish in the Microsoft Dynamics CRM UI just like we did when testing the IFrame the first time. Once again, click the New button on the Contacts grid. The warning message should now be translated (Figure 11-7).

Note
You might notice that the name of our Parent Customer Information section has not been translated. To add translations for IFrame section names, you must export the translations from Microsoft Dynamics CRM, open the XML file in Excel, and update the appropriate text on the Localized Labels sheet. After you do this, you can import your updated translations and publish your entity to see your changes.