
If you have developed custom IFrame or Web pages for your Microsoft Dynamics CRM system, you most likely want them to function for your users when they go offline with the Microsoft Dynamics CRM for Outlook with offline Access. By planning ahead of time for offline usage, you can easily create custom Web pages and IFrames that will work both offline and online. However, some scenarios might exist where your custom Web pages cannot function offline because the Internet connection is absent:
When it requires access to an external Web Service
When it displays content from an external Web site
When it retrieves or updates data from an external database
Of course, these scenarios are not caused by a Microsoft Dynamics CRM constraint. Instead, they are simply a limitation because no connectivity to these external systems exists. In cases where you know your IFrame cannot function offline, it is best to display a message explaining this to the user, or have your IFrame detect whether the user is offline and redirect the user to an offline friendly page.
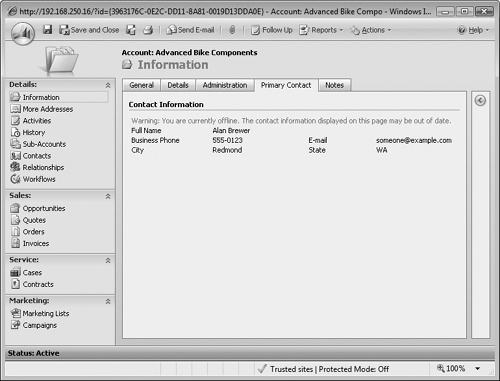
In this section we will develop an IFrame page that functions both online and offline. We will add the IFrame to the native Account entity’s form and display contact information from the Account’s selected primary contact. If the user views the page while in offline mode, we alert the user to let her know the information she is viewing may not be up to date. If you want to peek ahead to see what the finished output looks like, please refer to Figure 10-3.
Adding the AccountPrimaryContactInfo.aspx page
Open the ProgrammingWithDynamicsCrm4 solution with Microsoft Visual Studio 2008.
If you have not created the ProgrammingMicrosoftDynamicsCrm4.Web project in a previous chapter, right-click the solution name, add a new Web Site project named ProgrammingMicrosoftDynamicsCrm4.Web and add references to these Microsoft Dynamics CRM SDK assemblies: Microsoft.Crm.Sdk.dll and Microsoft.Crm.SdkProxy.dll.
Right-click the ProgrammingWithDynamicsCrm4.Web project and select Add New Item.
Select the Web Form template and type AccountPrimaryContactInfo in the Name box.
Click Add.
The preceding steps add two new files to the Web project: AccountPrimaryContactInfo.aspx and AccountPrimaryContactInfo.aspx.cs. Example 10-1 shows the source code for our user interface page.
Example 10-1. AccountPrimaryContactInfo.aspx source code
<%@ Page Language="C#" AutoEventWireup="true"
CodeFile="AccountPrimaryContactInfo.aspx.cs"
Inherits="IFrames_AccountPrimaryContactInfo" %>
<!DOCTYPE html PUBLIC "-//W3C//DTD XHTML 1.0 Transitional//EN"
"http://www.w3.org/TR/xhtml1/DTD/xhtml1-transitional.dtd">
<html xmlns="http://www.w3.org/1999/xhtml">
<head runat="server">
<title>Untitled Page</title>
<script type="text/javascript">
function window.onload()
{
if ( !parent.IsOnline() )
{
    document.getElementById("message").innerHTML = "Warning: You are currently offline.
The contact information displayed on this page may be out of date.";
}
}
</script>
</head>
<body style="font-size: 11px;
font-family: Tahoma;
margin: 0px;
border: 0px;
background-color: #eaf3ff;">
<form id="form1" runat="server">
<table cellpadding="1"
cellspacing="0"
style="width: 100%; height: 100%; table-layout: fixed;"
border="0">
<colgroup>
<col style="width: 111;" />
<col />
<col style="width: 115; padding-left: 23px;" />
<col />
</colgroup>
<tr>
<td colspan="4">
<div id="message" style="color: Red" />
</td>
</tr>
<tr>
<td>
Full Name
</td>
<td>
<asp:Label ID="fullname" runat="server" />
</td>
<td>
</td>
<td>
</td>
</tr>
<tr>
<td>
Business Phone
</td>
<td>
<asp:Label ID="phone" runat="server" />
</td>
<td>
E-mail
</td>
<td>
<asp:Label ID="email" runat="server" />
</td>
</tr>
<tr>
<td>
City
</td>
<td>
<asp:Label ID="city" runat="server" />
</td>
<td>
State
</td>
<td>
<asp:Label ID="state" runat="server" />
</td>
</tr>
</table>
</form>
</body>
</html>The display is a simple HTML table laid out similarly to the four-column layout used on the Microsoft Dynamics CRM entity forms. You will also notice that styles were added to the page to help blend it into the Account entity form. The end user will most likely not even realize that he is looking at custom IFrame page. You can find the styles used in the Microsoft Dynamics UI Style Guide included in the Microsoft Dynamics CRM SDK.
The code in the JavaScript block at the top of the aspx page is used to alert the user when the IFrame is being displayed in offline mode. The code calls the IsOnline method of the entity form:
if ( !parent.IsOnline() )
{
document.getElementById("message").innerHTML = "Warning: You are currently offline.
The contact information displayed on this page may be out of date.";
}The code to actually retrieve our Contact data is located in the code-behind file. Example 10-2 shows the source code for this file.
Example 10-2. AccountPrimaryContactInfo.aspx.cs source code
using System;
using System.Collections;
using System.Configuration;
using System.Data;
using System.Web;
using System.Web.Security;
using System.Web.UI;
using System.Web.UI.HtmlControls;
using System.Web.UI.WebControls;
using System.Web.UI.WebControls.WebParts;
using Microsoft.Crm.Sdk;
using Microsoft.Win32;
using Microsoft.Crm.Sdk.Query;
using Microsoft.Crm.SdkTypeProxy;

public partial class IFrames_AccountPrimaryContactInfo : System.Web.UI.Page
{
    protected void Page_Load(object sender, EventArgs e)
    {
        string id = Request.QueryString["id"];

        if (string.IsNullOrEmpty(id))
            throw new Exception("The required query string parameter "id" was not
                                 found.");

        CrmService crmService = GetCrmService();

        // First retrieve the primary contact for the account
        ColumnSet accountCols = new ColumnSet();
        accountCols.AddColumn("primarycontactid");

        account crmAccount = (account)crmService.Retrieve("account",
                                                           new Guid(id),
                                                           accountCols);

        if (crmAccount.primarycontactid != null)
        {
            Guid primaryContactId = crmAccount.primarycontactid.Value;
            ColumnSet contactCols = new ColumnSet();
            contactCols.AddColumns("fullname",
                                   "telephone1",
                                   "emailaddress1",
                                   "address1_city",
                                   "address1_stateorprovince");

            contact crmContact = (contact)crmService.Retrieve("contact",
                                                               primaryContactId,
                                                               contactCols);

            this.fullname.Text = crmContact.fullname;
            this.phone.Text = crmContact.telephone1;
            this.city.Text = crmContact.address1_city;
            this.state.Text = crmContact.address1_stateorprovince;
            this.email.Text = crmContact.emailaddress1;
    }
}


private CrmService GetCrmService()
{
    CrmAuthenticationToken token = new CrmAuthenticationToken();
    string crmUrl;
    string orgName = String.Empty;
    bool online = true;

    if (Request.Url.Host.ToString() == "127.0.0.1")
    {
        online = false;
    }

    if (online)
    {
        RegistryKey regkey =
           Registry.LocalMachine.OpenSubKey("SOFTWARE\Microsoft\MSCRM");
        string serverUrl = regkey.GetValue("ServerUrl").ToString();
        crmUrl = serverUrl + "/2007/crmservice.asmx";

        if (Request.QueryString["orgname"] != null)
        {
            orgName = Request.QueryString["orgname"];
        }
    }
    else
    {
        RegistryKey regkey =
           Registry.CurrentUser.OpenSubKey("Software\Microsoft\MSCRMClient");
        orgName = regkey.GetValue("ClientAuthOrganizationName").ToString();
        string portNumber = regkey.GetValue("CassiniPort").ToString();

        string baseUrl = "http://localhost:"
                         + portNumber
                         + "/mscrmservices/2007/";
            crmUrl = baseUrl + "crmservice.asmx";
        }

        token.OrganizationName = orgName;
        token.AuthenticationType = 0;

        CrmService service = new CrmService();
        service.Credentials = System.Net.CredentialCache.DefaultCredentials;
        service.CrmAuthenticationTokenValue = token;
        service.Url = crmUrl;

        return service;
   }
}
Because this page needs to function both online and offline, we need to accommodate the different locations of the Microsoft Dynamics CRM SDK services. We used the GetCrmService method in Example 10-2 to accomplish this. As we discussed earlier in the section "Communicating with the Microsoft Dynamics CRM SDK API Offline," if the page is being run offline, the values needed by the CrmService, such as port number and organization name, are pulled from the client computer’s registry.
After the CrmService has been created, the rest of the functionality is pretty straightforward. First we attempt to retrieve the primary contact Guid from the Account. If a value is returned, we then retrieve the necessary fields from that Contact record and populate our Label controls.
Now that we have completed our IFrame development, we need to update the Account form and deploy our Web files to the Microsoft Dynamics CRM server and client computer.
The first thing we need to do is add our IFrame to the Account entity’s form. To accomplish this, we add a new tab named Primary Contact that contains an IFrame pointed at our aspx page.
Adding the IFrame to the Account Form
Open Microsoft Dynamics CRM in a Web browser and navigate to the Account entity’s form customizations screen.
Click Add A Tab in the Common Tasks menu.
Type Primary Contact into the Name field and click OK.
An IFrame must be housed in a section, so click Add A Section from the Common Tasks menu.
Type Contact Information into the Name field.
Select both the Show The Name Of This Section On The Form and the Show Divider Line Below The Section Name check boxes and verify that the tab is set to our new Primary Contact tab. Click OK.
Select our new section and click Add An IFrame in the Common Tasks menu.
Enter accountprimarycontactinfo in the Name field.
Later we will deploy our Web files under the ISV folder of Microsoft Dynamics CRM, so type /ISV/ProgrammingWithDynamicsCRM4/AccountPrimaryContactinfo.aspx in the URL field.
Select the Pass Record Object-Type Code And Unique Identifier As Parameters check box.
Clear the Restrict Cross-Frame Scripting check box.
Verify that Tab is set to Primary Contact and Section is set to Contact Information.
In the Formatting tab’s Row Layout section, select the Automatically Expand To Use Available Space check box.
In the Formatting tab’s Border section, clear the Display Border check box. This makes our IFrame integrate seamlessly into the form. Click OK.


After these changes are published, they are synced with the offline customizations in Microsoft Dynamics CRM for Outlook with offline Access the next time the user goes offline.
For our IFrame to function while the user is online, we need to deploy our files to the CRM Web server. You can find a more detailed look at deployment in Chapter 9.
Deploying the Web files
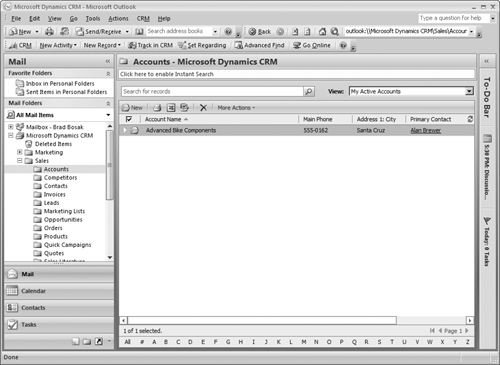
Now we will test our new IFrame when working offline. Open your instance of Microsoft Outlook that has Microsoft Dynamics CRM for Outlook with Offline Access installed and configured. Click the Go Offline button. When the synchronization process completes and the Go Offline button has been replaced with a Go Online button, navigate to the Accounts grid (Figure 10-2).
Open an Account record that has the Primary Contact field populated, or open an Account, populate the Primary Contact field, and click Save. Click the Primary Contact tab we added. You should see the Primary Contact information along with our warning message (Figure 10-3).
Close the Account window and click the Go Online button. When the synchronization process is complete and you no longer see the Go Online button, reopen the same Account record and click the Primary Contact tab. You can now see the Primary Contact Information, but the warning message is gone because you are viewing the actual online form (Figure 10-4).
