Microsoft Dynamics CRM permits you to add custom buttons by using the ISV.Config file. Typically these buttons reference a Web page, but Microsoft Dynamics CRM also allows for script to execute directly from the button.
Using script directly from the ISV.Config buttons offers the following advantages:
You can execute simple logic without having to deploy a custom Web page, which proves very effective with Microsoft Dynamics CRM Online.
You can provide additional script logic prior to launching a custom Web page.
Deployment is simplified because the code is installed as part of the Microsoft Dynamics CRM import customizations process.
However, use caution with this approach, because you are embedding your script logic within an XML attribute tag. As such, you need to conform to XML standards (escaping special characters, using tick marks instead of quotation marks, and so on), and your scriptwill be more difficult to read and debug.
To better understand a real-world example of scripting from the ISV.Config button,consider the following scenario. You need to create a button on the Case entity that creates a child Case record, duplicates some key properties of a Case record for a Microsoft Dynamics CRM Online deployment, and then links that child case back to the original case. Because the scenario requires you to deploy to Microsoft Dynamics CRM Online, you should keep thebusiness logic contained within the button.
You can address this business scenario by performing the following steps:
Configure a hierarchical relationship with the case entity by using the Web-based configuration tools
Add a button (with custom script in the ISV.Config) to the case record
Let’s start by creating a new relationship from the Case entity. This new relationship allows you to link two different cases to each other in a hierarchical relationship.
Create the child case relationship
Open Microsoft Dynamics CRM in a Web browser, and then click Settings from the Application Area.
Click Customizations, and then click Customize Entities.
Double-click the Case entity.
After the form loads, click 1:N Relationships.
Click the New 1-to-Many Relationship button to open the Relationship Form.
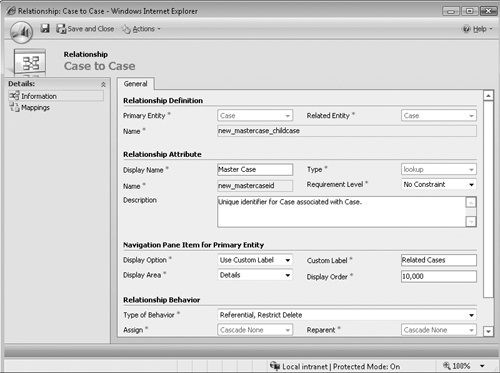
Create the 1:N relationship from case to case, as shown here:
Click Save and Close on the Relationship: New Web form.
On the Case entity form, click Forms and Views, and then double-click Form.
Add the new Master Case lookup attribute to the Case form.
Save and close the form.
On the Case entity form, click Actions and then select Publish. Then click Save and Close for the entity.
Now that you have added the relationship and attribute to the form, you need to add your custom button and logic to Microsoft Dynamics CRM.
Add the New Child Case button
In the Settings area, click Customization, and then click Export Customizations.
Select the ISV.Config record, and then click Export Selected Customizations.
Save the zip file to your computer.
Unzip the downloaded file, and then open the resulting file in your favorite XML editor.
Add the following XML within the <Entities> node. Be sure to check that an existing incident entity node doesn’t already exist.
<Entity name="incident"> <ToolBar ValidForCreate="0" ValidForUpdate="1"> <Button Icon="/_imgs/ico_16_112.gif" JavaScript=" var url = '/cs/cases/edit.aspx?'; var params = [ 'customerid=',crmForm.all.customerid.DataValue[0].id, '&customeridname=',crmForm.all.customerid.DataValue[0].name, '&customeridtype=',crmForm.all.customerid.DataValue[0].typename, '&new_mastercaseid=',crmForm.ObjectId, '&new_mastercaseidname=',crmForm.all.title.DataValue, '&subjectid=',crmForm.all.subjectid.DataValue[0].id, '&subjectidname=',crmForm.all.subjectid.DataValue[0].name, '&casetypecode=',crmForm.all.casetypecode.DataValue, '&caseorigincode=',crmForm.all.caseorigincode.DataValue, '&customersatisfactioncode=',crmForm.all.customersatisfactioncode.DataValue ].join(''), openStdWin(url+params);"> <Titles> <Title LCID="1033" Text="New Child Case" /> </Titles> <ToolTips> <ToolTip LCID="1033" Text="Create new child Case record." /> </ToolTips> </Button> </ToolBar> </Entity>Import your updated ISV.Config file.
Publish the ISV.Config.
Tip
To make development easier, consider developing your code independently of the ISV.Config file by using a stubbed page with the same form/data. This allows you to more quickly troubleshoot your script logic without the overhead of importing the ISV.Config file repeatedly.
Figure 7-5 shows the new button that you just added to the toolbar of the Case form. You can also see the new Master Case field that you added to the Case form.

The script in this example takes advantage of the ability of Microsoft Dynamics CRM to provide default values using the query string. The next section explores this query string technique in more detail. Keep in mind the following points with this sample code:
You need to use single quotation marks instead of double quotation marks.
You need to escape the ampersand (&) with &.
The master case ID will be the ObjectId of the current Case record. You also need to set the name for the lookup value. The lookup name is always the primary attribute of theentity, which is Case’s title in this example.
Customer lookup attributes are a special case of the lookup and require the type attribute to define whether the record is an account or a contact. Be sure to pass the entity name instead of the type code for the type value.
The JavaScript attribute allows for line breaks within your code. Although this increases the overall size of the file, it definitely allows for more readable code.
Any errors with this approach will be suppressed and the button will not function.
The code does not contain any error handling. If the lookup values for customer and subject do not contain any values, the page will not open. You can add additional checking for null lookup values if you want.
The code reuses the CRM openStdWin method. If you prefer, you can use JavaScript’s window.open method and pass it the proper parameters to ensure that your code can be properly upgraded. However, you will need to be sure to escape your query stringparameters yourself.
Note
Both the Microsoft Dynamics CRM SDK and Working with Microsoft Dynamics CRM 4.0 discuss the ISV.Config file and functionality in depth.
Default Values using the Query String
Microsoft Dynamics CRM provides a useful but little-known feature to programmatically pre-populate default values on a form when you create a new record. This technique works on most entities, including custom entities. Conceptually it works very simply. If you pass in additional, specially named query string parameters, the Microsoft Dynamics CRM form takes those parameters and provides default values for the form.
Note
The Microsoft Dynamics CRM SDK contains additional information regarding this approach, as well as the URLs for the entity forms.
Keep in mind the following considerations when using the query string to provide default form values:
Activity forms do not support default values from the query string.
When providing default values for lookup and picklist values, you need to specify the additional values to properly construct those attributes:
Lookups include a name and ID. The ID will always be the attribute name, and the name will always be in the format attributename- name. (For instance, the Subject attribute on a Case form is subjectid.) Therefore, you need to pass the GUID to subjectid and the subject nameas subjectidname.
Customer lookups require an extra attribute to define whether the record is an account or a contact. The name of the parameter will be attributename type. Be sure to pass the entity name as the value, instead of the type code.
For picklists, you only need to pass the integer data value.
Boolean values can either be 0/1 or true/false. Consider always using 0/1, which takes up fewer characters in the query string.
In Internet Explorer, query strings have a maximum length of 2,083 characters. Be aware of this limitation when you need to include a long list of defaultattributes.
Be cautious of passing textarea attributes in the query string, becausethe data stored in these values can contain carriage returns and new linecharacters.
Passing an invalid parameter generates a hard error.
You must pass valid static values for each attribute (for example, no script orvariables).