The size and position of the placeholders on a slide are dictated by the slide's design. Every slide you create with a particular design has the same placeholders in the same locations, and the text you type in them has the same format.
When you want additional text to appear on the slide, such as annotations or minor points that do not belong in a bulleted list, you can create a text box by using the Text Box button in the Text group on the Insert tab. You can create a text box in two ways:
You can click the Text Box button, click the slide where you want the text to appear, and then type. The text box grows to fit what you type on a single line, even expanding beyond the border of the slide if necessary.
You can click the Text Box button, drag a box where you want the text to appear on the slide, and then type. When the text reaches the right boundary of the box, the height of the box expands by one line so that the text can wrap. As you continue typing, the width of the box stays the same, but the height grows as necessary to accommodate all the text.
When you click in a text box, an insertion point appears, and the box is surrounded by a dashed border. You can then edit the text—for example, you can add, delete, or correct words and punctuation. Clicking the dashed border changes it to a solid border. You can then manipulate the text box as a unit—for example, you can size, move, or copy it as a whole.

You can drag the handles around the border of the box to change its size and shape. By default, PowerPoint adjusts the box to fit the text within it. If you want to create a text box of a specific size or shape, you can right-click the box's border, click Format Shape, click Text Box in the Format Shape dialog box, and then change the settings. In this dialog box, you can also specify whether PowerPoint should shrink the text to fit the box if it won't all fit at the default size (18 points), and whether the text should wrap within the box.
Tip
If you want to change the size, shape, or behavior of a placeholder on an individual slide, you can use the same techniques as those you use with text boxes. If you want to make changes to the same placeholder on every slide, you should make the adjustments on the presentation's master slide."
Sometimes you will want the text in a text box to be oriented differently than the rest of the text on the slide. When a text box is selected, a green rotating handle is attached to its upper-middle handle. You can drag this handle to change the angle of the text.
Tip
You can also change the direction of text on the Text Box page of the Format Shape dialog box. In the Text Direction list, click one of the Rotate options. Or you can click Stacked to keep the individual characters horizontal but make them run from top to bottom in the box instead of from left to right.
When a text box is surrounded by a solid border, you can move or copy the text box anywhere on the slide. Dragging its border is the most efficient way to move a text box within a single slide, and you can copy it just as easily by holding down the Ctrl key while you drag it.
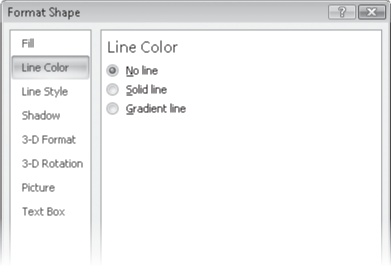
To deselect the text box, you click a blank area of the slide. The border then disappears. If you want a text box to have a border when it is not selected, you can display the Format Shape dialog box, and on the Line Color page, select either Solid Line or Gradient Line. You can then fine-tune the border's color or gradient to achieve the effect you want.
In this exercise, you will select and deselect a placeholder to see the effect on its border. You will create one text box whose height stays constant while its width increases and another whose width stays constant while its height increases. You will manipulate these text boxes by rotating and moving one of them and sizing the other. You will also make a text box border a solid line that is visible when the text box is not selected.
Note
USE the TextBoxes presentation. This practice file is located in the DocumentsMicrosoft Press2007OfficeSBSPptWorking folder.
OPEN the TextBoxes presentation.
Move to Slide 2, and then on the slide, click the slide title.
The placeholder is selected for editing, as indicated by the blinking insertion point and the dashed border.
Point to the border of the placeholder, and when the pointer changes to a four-headed arrow, click the mouse button once.
The placeholder is selected as a unit, as indicated by the solid border. Although you won't usually want to change the size or location of a text placeholder, while the placeholder has a solid border, you can size and move it just like any other text box. Your changes will affect only the placeholder on the current slide, not corresponding placeholders on other slides.
To deselect the placeholder, click outside it in a blank area of the slide.
Move to Slide 5, and then click the bulleted list placeholder.
 On the Insert tab, in the Text group, click the Text Box button, and then point immediately below the lower-left handle of the placeholder for the bulleted list.
The pointer changes shape to an upside-down T.
Click the slide to create a text box.
A small, empty text box appears with a blinking insertion point inside it.
Type Contrast with Adversary on Slide 6.
The width of the text box increases to accommodate the text as you type it.
To rotate the text so that it reads vertically instead of horizontally, drag the green rotating handle that is attached to the upper-middle handle 90 degrees clockwise.
Point to the border of the box (not to a handle), and then drag the box to the right edge of the slide.
Right-click the border of the box, and then click Format Shape.
Click Solid line, click the Color arrow, and in the top row of the Theme Colors palette, click the orange box (Orange, Accent 6). Then click Close.
Click a blank area of the slide to deselect the text box, and then move to Slide 2.
On the Insert tab, in the Text group, click the Text Box button, point to the center of the area below the bulleted list, and drag approximately 2 inches to the right and ½ inch down.
No matter what height you make the box, it snaps to a standard height when you release the mouse button.
Type Need to decide whether to offer the series to one author or to multiple writers.
The width of the box does not change, but the box's height increases to accommodate the complete entry.
Click the border of the text box to select it as a unit, point to the solid border, and drag the box to the lower-left corner of the slide, so that its left border aligns with the text of the bullet points.
Point to the handle in the lower-right corner of the box, and drag up and to the right until the box is two lines high and the same width as the bullet points.
Click a blank area of the slide to deselect the text box.