
Forwarding parameters via a URL
Automating Application Object production
Getting values from a form
Dreamweaver Technique: Building a Search Page
Making form elements dynamic
Administering data sources with Web applications
Dreamweaver Technique: Creating the Results Page
Displaying variables
Authenticating site visitors
In a Web site composed of static HTML pages, each page generally stands on its own and is developed individually. In a dynamic Web site, however, applications often require multiple pages to be effective. A prime example is the master-detail Web application where a search box on one page leads to a master list of results on a second page, each of which, in turn, is linked to a third dynamically generated detail page. To execute the application, variables and other information must be passed from one page to the next. The dynamic Web site developer has a variety of tools capable of handling this task, including forms and session variables. All these methods for creating multiple-page Web applications are available in Dreamweaver and are covered in this chapter. I also show you a one-step procedure for developing a master-detail Web application.
Additionally, this chapter covers the use of form elements, such as text fields, checkboxes, and drop-down lists for dynamic data display. Form elements are extremely useful to the Web-application developer because they let the developer update objects on-the-fly. By making a choice in one drop-down list, the developer can determine which options are available in another list. This chapter also describes how to put your new knowledge of form elements to work in creating a search field. Finally, you'll learn how to protect your site by authenticating your site visitors and permitting only authorized ones in.
In a static Web site, links are used to navigate from one page to another. In a dynamic site, links can have an additional function: passing parameters to an application server so that it can determine the dynamic content on the linked page. The added parameters are known as a query string and follow the standard URL after a question mark, like this:
dvd_details.asp?movie=Serenity
Every parameter is composed of a name/value pair separated by an equals sign. If more than one parameter is sent, each pair is separated by an ampersand, as in the following example:
dvd_details.asp?movie=Serenity&genre=scifi
Unlike in HTML or other languages, quotation marks are not used to set off the values. Quotation marks and other non-alphanumeric characters including spaces, single quotes, and tildes must be translated into encoded characters so that the server interprets them correctly. Spaces, for instance, are rendered as a %20, as shown here:
dvd_details.asp?movie=Serenity&genre=scifi&director=Joss%20Whedon
Dreamweaver provides all the tools necessary for constructing query strings within its point-and-click interface. However, if you understand the required syntax, you can quickly test your page using the URL field found on the Live Data toolbar.
With a master-detail Web application, typically only a single parameter is used. The parameter uniquely identifies the record selected on the master page and is appended to the link for the detail page. For example, suppose the detail page is details.php, the identifying variable is called tripID, and the specific item is Conquering K2. The full link, with the query string, reads:
details.php?tripID=Conquering%20K2
Note
Master pages are one of two types: Either the master list is defined by the designer or by search criteria submitted by the user. The examples in this section are designer-based and rely on a specific recordset being declared. Details on how to create a search field are covered later in this chapter in the Dreamweaver Technique "Building a Search Page" section.
To create the proper code within Dreamweaver, apply a Go To Detail Page server behavior to the linking text, image, or dynamic data. Master pages also include a Repeat Region server behavior; the Go To Detail Page server behavior is attached to the text or graphic within the region, as shown in Figure 23-1.

Figure 23-1. The Go To Detail Page server behavior within the Repeat Region connects the master page to the proper detail page.
To attach a Go To Detail Page server behavior, follow these steps:
Select the page element—text, graphic, or dynamic data—to use as the link to the detail page.
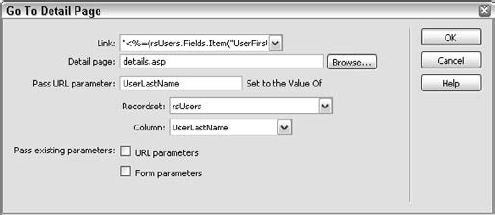
From the Server Behaviors panel, click Add (+) and select Go To Detail Page from the drop-down list. The Go To Detail Page dialog box, shown in Figure 23-2, is displayed. (This option is not available for ColdFusion or PHP.)
Make sure that the page element selected is represented in the Link field. If no selection is made, Dreamweaver creates a new Detail text link.
Enter the path to the detail page in the Detail Page field or click Browse to locate the file in the Select File dialog box.
Tip
It's a good idea to prototype all the pages in your application before you begin adding content, especially server-side code. Existing pages are easy to link to through a Select File dialog box, and doing so reduces the chance of typographical errors.
In the Pass URL Parameter field, enter the variable name to be sent. You can use a name of your own choosing or the name of the field in the database. Whichever name you decide upon, make a note of it somewhere because you need to reference it when the detail page itself is constructed.
From the Recordset list, select the recordset that contains the URL parameter.
From the Column list, choose the field to which the URL parameter's value is related.
Unless you have pre-existing URL or form parameters to send to the detail page, leave the Pass Existing Parameters options unchecked.
Warning
Make sure that you leave the Pass Existing Parameters options unselected, especially if you are linking back to your master page from the detail page. Otherwise, the parameters begin to accumulate, and your linking URL will look like this nonfunctioning example:
detailpage.php?id=23&id=36
When you're finished, click OK.
Now that the link is passing parameters successfully, it's time to make sure that the detail page is set up to receive them properly.
Dreamweaver provides two routes for your detail page to use the parameter passed to it by the master page: a filtered recordset or a Dreamweaver server behavior. In general, the first method is less processor-intensive and thus the better choice of the two. The filtered recordset technique returns a recordset of one record—the one used in the detail. If you use the server behavior technique, the entire recordset from the master page is made available, and only the specific record is displayed. You should use the entire recordset method if you want to do recordset paging from one record to the next
Note
To learn more about recordset paging, see Chapter 21.
Regardless of which technique you use, the detail page should include whatever dynamic data is appropriate. This, of course, requires a recordset. If you're using the server behavior technique, the recordset is generally left unfiltered; in many situations, you can copy the recordset used in the master page and paste it in the detail page using the context-sensitive menus on the Bindings panel. After the recordset is pasted onto the page, you can modify it to include additional fields by double-clicking the recordset entry in the Bindings panel.
You can create the filtered recordset in either the simple Recordset or the advanced Recordset dialog box. To use the simple Recordset dialog, follow these steps:
Note
See Chapter 19 for more on the simple and advanced Recordset dialog boxes.
From the Bindings panel, click the Add (+) button and choose Recordset from the list.
After you've chosen the name, connection, and table, select the fields required by your details page from the Columns list.
From the first Filter list, select the field that coincides with the value passed by the URL parameter, as shown in Figure 23-3. This field should contain unique values that can be used to identify each record.
From the second Filter list, select the equals operator (=).
From the third Filter list, ASP, .NET, PHP, and ColdFusion users should choose the URL Parameter from the list; JSP users should select the URL/Form Variable.
In the fourth Filter field, enter the variable name passed by the master page in the Go To Detail Page server behavior. Avoid names with spaces or other special characters; these names must be URL-encoded and may be difficult to manage.
Click OK when you're finished.

You can preview the results of your detail page in Live Data view, but be sure to set up the Live Data settings option first. Choose View
Tip
After entering Live Data view, you can test a variety of different records without reopening the Live Data Settings dialog. In the URL Parameter field found on the Live Data toolbar, change the URL parameter's current value and press Enter (Return). If you enter a value not found in the data source, Dreamweaver displays an error indicating that it cannot display the page.
To test your master-detail application, save both pages and then preview the master page in the browser. When you select the link to the detail page, you should see your chosen record.
Sometimes you need to define a more complex recordset than is possible in the simple Recordset dialog box. You can effectively add the same filter-by-URL-parameter argument for such recordsets in the advanced Recordset dialog box by altering the SQL statement. Filtering in a SQL statement is handled by the WHERE clause.
To create a detail page filter, you declare a variable and add a WHERE clause referencing that variable. The runtime value portion of the variable is different for each server model. Assume that you want to declare a variable called theBrand, and the field is named Brand. In the Variables section of the Advanced Recordset dialog box, click the Add (+) button and then enter the following values, according to your server model:
Server Model | Name | Default Value | Runtime Value |
|---|---|---|---|
ASP and .NET |
|
|
|
ColdFusion |
|
|
|
JSP |
|
|
|
PHP |
|
|
|
In this example, the WHERE clause would read:
WHERE Brand = 'theBrand'
If you have already created a URL-parameter filtered recordset in the simple Recordset dialog box and then switch to the Advanced mode, you will notice that Dreamweaver uses the variable name MMColParam. You can continue to use this variable name or change it to something more meaningful if you prefer.
As noted earlier, the other method for connecting a master page with a detail page involves using a Dreamweaver server behavior. The Move To Specific Record server behavior is applied on the detail page itself and may be attached at any time. Unlike the filtered recordset approach, which uses a single record in the recordset, Move To Specific Record requires a recordset that includes all the possible records and their data. This gives you the capability to move through the recordset using the Recordset Paging server behaviors. The record specified by the URL parameter, as interpreted by the server behavior, is extracted from the overall recordset and its data displayed. To use the Move To Specific Record server behavior to create a detail page, follow these steps:
Establish a recordset that contains all the possible records that could be requested by the master page.
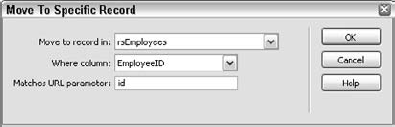
From the Server Behaviors panel, choose Move To Specific Record from the Move To Record submenu. The Move To Specific Record dialog box is displayed, as shown in Figure 23-4.
Select the desired recordset from the list labeled Move To Record In.
Choose the field referenced in the URL parameter from the Where Column field.
Enter the variable in the URL parameter in the Matches URL Parameter field.
Click OK when you're finished.
Warning
Although Dreamweaver provides this method for creating a detail page—and I've covered it here for the sake of completeness—it's really not the recommended method. Because this technique relies on the use of a full recordset, it is far more resource-intensive than the filtered recordset method. However, this method is required if you are going to use Recordset Paging.
Although Dreamweaver has made crafting master detail Web applications by hand extremely accessible, it can be a tedious series of steps, especially if you have to produce a number of applications for a site. To ease the monotony—and enhance your production efforts—Dreamweaver includes the Master-Detail Page Set application object that, after a single dialog box is completed, creates all the elements for a linked master-detail Web application.
The master page elements are inserted in the current document, which must contain a recordset. The inserted elements and code, shown in Figure 23-5, are as follows:
A two-row table with a column for each field
A header row comprised of all the field names selected in the dialog
Dynamic text for all selected fields, placed into the second row
A Repeat Region server behavior surrounding the second row
A Go To Detail Page server behavior linking to the newly created detail page
A recordset navigation bar with text links and appropriate Show Region server behaviors in place
A recordset status bar showing the current record count

Figure 23-5. The Master-Detail Page Set application object adds all the designated fields and the required server behaviors to the current page.
The detail page is created when the Master-Detail Page Set Object is executed. As shown in Figure 23-6, the detail page is blank except for a two-column table, which contains a row for each field. The first column displays all the field names in the designated order, and the second column holds Dynamic Text elements, one for each of the fields.
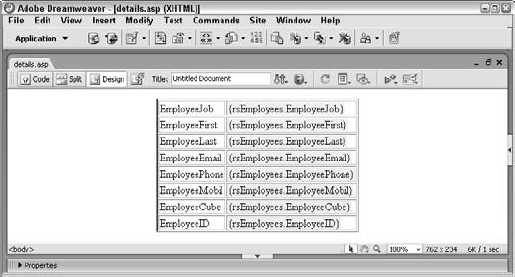
Figure 23-6. Only the fields, data, and necessary server behaviors are included in the newly created detail page.
To create a Web application using the Master-Detail Page Set application object, follow these steps:
Be sure that the current page, which will become the master page, includes the desired recordset and has been saved. The recordset must contain all the fields you want to display on the detail page, as well as the fields for the master page.
Tip
When creating master-detail pages, I generally create my initial recordset and choose all records. After I've created my page set, I trim down the recordset on the master page by selecting only those fields necessary for the master page.
Place your cursor where you'd like the table, Recordset Navigation Bar, and Recordset Navigation Status element to appear.
Choose Insert

Select the recordset you'd like to use from the Recordset list.
In the Master Page Fields area, choose any fields you do not want to appear on the master and click the Remove (–) button.
Dreamweaver, by default, includes all the available fields in a selected recordset. If you'd like to include any fields that are not in the current recordset, you must click Cancel and modify the recordset.
If you change your mind after you remove a field from the list of fields to be inserted into the master page, click the Add (+) button and reinsert the field.
Alter the positioning of the fields in the master page table by selecting the field and using the up and down arrows above the Master Page Fields area. The master page table is horizontal with the topmost fields in the Master Page Fields area appearing on the left and the bottommost fields on the right. Clicking the up arrow moves a field to the left; clicking the down arrow moves it to the right.
Choose a field from the Link To Detail From list that serves as a link to the detail page. Only the fields remaining in the Master Page Fields area are available in the Link To Detail From list.
From the Pass Unique Key list, select the field that identifies each record for use in the URL parameter. The field in the Link To Detail From list and the one in the Pass Unique Key list do not have to be the same. You can, for example, use an employee's last name as the link and the employee ID number—not displayed in the master page fields—as the unique key. The Pass Unique Key list includes all the fields in the chosen recordset whether or not they are displayed onscreen.
Select the number of records you'd like displayed in the Repeat Region. Choose All to display every record in the recordset. Now that you have defined the master page portion of your application, define the elements for the detail page.
Enter the path to the detail page in the Detail Page Name field or click Browse to locate the file, if it exists.
Note
The master and detail pages must be in the same folder for the Master-Detail Page Set application object to function properly.
From the Detail Page Fields area, select any fields that you do not want to display on the detail page and click the Remove (–) button. Again, by default, Dreamweaver displays all the available fields in the recordset, and you must delete those you don't want to show.
To change the order in which the fields are inserted into the detail page table, select the field and use the up or down buttons above the Detail Page Fields area.
Click OK when you're done.

Note
After the application object has finished inserting master page elements and creating the detail page, be sure to save the master page. Dreamweaver saves the detail page automatically, but it does not save the master page as part of the creation process.
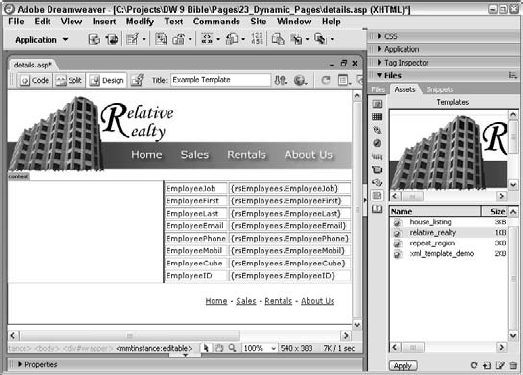
The Master-Detail Page Set application object—especially the detail page—works well with Dreamweaver templates. After the master and detail pages are created, you can apply any Dreamweaver template to integrate the results into your site. To prepare the template, just make sure that at least one editable region exists for all the visual elements inserted into the master and detail pages. I say that the Server-Object–generated detail page is especially well suited to template use because the created page contains only the table and its dynamic elements. After applying such a template, as shown in Figure 23-8, you may still need to tweak the design by altering the table properties.
Note
To find out more about Dreamweaver templates, see Chapter 28.
Next to clicking on links, a user's prime interaction with a Web page is through the form. Forms are used in almost every Web application in one form (minor pun intended) or another. A Web page that is gathering information from a user always contains a form that uses a variety of elements, such as text fields, checkboxes, radio buttons, and drop-down lists. Although forms are important to Web applications, not every page containing a form needs to be executed by an application server. You can, however, pass information from a form to a dynamic page.
In the earlier discussions of master-detail Web applications, the master page was always generated by the developer's recordset selection without any user input. This section examines how you can develop user-driven master pages in Dreamweaver. Here are the four key elements:
A static HTML page containing a form. (Although it's possible to use a dynamic page, none of what this page accomplishes requires server-side code.)
One or more uniquely named form elements. (The naming of the form element is vital to getting the correct value into the application.)
A link from the static page to the dynamic page inserted as a relative or an absolute URL in the
actionparameter of the form.A filter on the recordset of the dynamic page that reads the value passed from the form.
The recordset filter, if it relates to a single form element, can be set in the simple Recordset dialog box. More sophisticated filters, which depend on values received from multiple form elements, must be created in the advanced Recordset dialog box. To set up a form to send user selections to a master page or other Web application, follow these steps:
Create a static HTML page (File
Add the desired input form elements into the form by selecting them from the Insert
Be sure to name each form element appropriately and uniquely. You need to recall this name when you're building your application page.
Tip
It's best to adopt a naming strategy that you can use over and over again. My preference is to name each form element with two parts: context and type. The first part of the name describes its context or how it is used on the page; the second part indicates what kind of form element is used. For example, a text field that holds the last name of a visitor is called
lastnameText;whereas a drop-down list that lists office locations islocationsList.After a while, your naming convention becomes second nature to you, and you can easily remember what each form element has been named.Select the
<form>tag on the Tag Selector and, in the Action field of the Property inspector, enter the path to the dynamic page containing the application. Alternatively, you can click the folder icon to locate the file.Also in the Property inspector, set the
Methodproperty of the form toPost. When you're passing variables and values via the URL query-string technique, described previously in the section "Using the URL to Pass Parameters," use theGetmethod. To pass the values of the form without exposing them in the URL, usePost.Note
When you're deciding whether to use
POSTorGETto pass your parameters, also decide whether you want to be able to pass those variables easily to other pages.GETis the easier method to use when passing variables. If you're only going to use them for this single page, usePOSTto keep the query string clean.Save your page.
Now you're ready to implement the receiving portion of your form-value passing application. To do so, follow these steps:
Create a new dynamic page for your master page application.
Insert a recordset by clicking the Add (+) button on the Bindings panel and selecting Recordset from the list.
In the simple Recordset dialog box, choose your recordset name, connection, table, and columns.
In the Filter area, from the first Filter list, select the field that matches the value passed by the form element. For example, if you are filtering a recordset based on the location specified in a form's drop-down list, choose the field—called location, perhaps—that contains the specified value.
From the second Filter list, select the equals operator (=).
From the third Filter list, ASP and ColdFusion users choose Form Variable from the list; JSP users select URL/Form Variable.
In the fourth Filter field, enter the name of the form element. In this example, the form element is named
locationList.Click OK when you're finished.
Apply the Master-Detail Page Application object to create the master page.
Test your application by saving the master page and previewing the initial page with the form. You can also use View
For more complex recordsets, you have to write the SQL statement in Dreamweaver's advanced Recordset dialog box. The same technique described earlier in the "Filtering a detail page recordset in Advanced mode" section applies here. Declare a variable that uses one of the following runtime values:
Server Model | Name | Default Value | Runtime Value |
|---|---|---|---|
ASP and .NET |
|
|
|
ColdFusion |
|
|
|
JSP |
|
|
|
PHP |
|
|
|
The WHERE clause of the SQL sets the fieldname to the variable, as in this example:
WHERE dbadata.Location = theLocation
Multiple form variables can also be set up in the advanced Recordset dialog box. Assume that you want your master page to display a list of employees in a particular department at a specific office. The form might include a drop-down list that displays a number of departments as well as a radio button group for the different offices. If theDept is the variable for the department form list value and theLocation is the variable for the office radio button value, the SQL statement looks like this:
SELECT * FROM Employees WHERE Department = theDeptAND Location = theLocation
Master-detail Web applications aren't the only applications that can benefit from information entered on a form. Other applications sometimes offer a link to a related page—such as a special note pertinent only to a user-specified selection. To implement such pages, the application page needs the same form information passed to the master page. Dreamweaver includes a Go To Related Page server behavior that delivers the form values to the linked page; the behavior can also pass URL values by themselves or in conjunction with values from forms.
Like other server behaviors in the Go To category, Go To Related Page can be applied to text, images, or dynamic page elements. In a master page with a Repeat Region, you can attach Go To Related Page to an element within the repeating region and have it be available for every entry. To attach a Go To Related Page server behavior, follow these steps:
On a page that has had form or URL values passed to it, select the page element—text, image, or dynamic data—to use as the trigger for your behavior.
From the Server Behaviors panel, click the Add (+) button and select Go To Related Page from the list. The Go To Related Page server behavior dialog box appears, as shown in Figure 23-9.
In the dialog box, verify that the text or code for the selected element displayed in the Link field is correct.
Enter the path to the target page in the Related Page field or click Browse to locate an existing dynamic page.
If you want to carry over values received from a query string, select the URL Parameters option.
If you want to pass values received from a form, select the Form Parameters option.
Click OK when you're finished.

The Go To Related Page server behavior can also be used to carry results of a form within a series of pages. In other words, if the first Go To Related Page server behavior passed the form or URL values from the master page to the first related page, you can include another Go To Related Page server behavior linked to a second related page.
Warning
You cannot use the Go To Related Page server behavior to link to a dynamic page that uses the Move To Specific Record server behavior. The Move To Specific Record server behavior overwrites the form or URL values passed by the Go To Related Page server behavior with its own. Instead of a Move To Specific Record server behavior on the target page, create a recordset filtered from the passed form/URL values.
Building a Search Page
A dynamic application that searches a database uses two pages: one to specify the search parameters and another to display the results page. In this Technique, you create the search page.
From the Techniques - Dynamic site (established in Chapter 19), expand the 22_Dynamic_Pages folder and open the
search_startfile for your server model.Place your cursor below the opening paragraph of placeholder text.
From the Forms category of the Insert bar, click Form.
In the Property inspector, click the Action field's Browse for File folder icon and select the
results_startfile for your server model in the current folder.Make sure your cursor is inside the form and, from the Insert bar's Common category, choose Table.
In the Table dialog box, specify these settings:
Setting
Value
Rows
2
Columns
2
Width
300 pixels
Border thickness
0 pixels
When you're done, click OK.
In the top row's first cell, enter the text Keywords.
Select the
<td>tag from the Tag Selector and, then, from the Property inspector's Class list, choose formLabel.Place your cursor in the second cell of the top row, and, from the Forms category of the Insert bar, choose Text Field.
With the text field still selected, enter searchField in the Property inspector's Name field.
Place your cursor in the second row, directly beneath the text field and, from the Insert bar, choose Button to add it to the page.
With the button selected, enter the term Search in the Property inspector's Value field.

Save your page.
In the next technique, you build the results page to accompany this search page.
Forms and form elements play a much larger role in Web applications than just filtering recordsets. Forms are also necessary for inserting new records in a data source as well as for updating existing records. Dreamweaver lets you convert standard form elements into dynamic ones so that they can reflect and modify a record's data.
Although the general conversion from a static to a dynamic form element is handled in the same fashion for all elements—by applying a Dynamic Form Elements server behavior to an existing form element—almost every element has different dialog boxes with varying parameters.
Text fields are extremely flexible and essential for inputting freeform text into data sources. To create a dynamic text field, follow these steps:
Insert a text field into a form on a page with a recordset or other data source. It's a good idea to name the text field and form at this point. Although you can always change the names later, I find that naming the elements early avoids problems later.
Select the text field.
From the Server Behaviors panel, choose Dynamic Form Elements
In the Dynamic Text Field dialog box that appears (see Figure 23-10), verify that the correct form element is chosen in the Text Field list. If necessary, choose a different text field.
Click the Set Value To lightning bolt icon to display the available data sources.
Choose a field from the Dynamic Data dialog box.
If you want, you can apply a server format to the data by choosing an entry in the Format list.
Click OK to close the Dynamic Data dialog box and, after reviewing your choices, click OK again to close the Dynamic Text Field dialog box.

The dynamic data is inserted into what is called the initial value of the form field. You can see the data of the current recordset by selecting View
Tip
If Cascading Style Sheets (CSS) is an option on your Web application, it's often far better to create a custom class for the text field to control the width. Not only is the measurement standard more precise in CSS than in standard HTML, but it can be updated for all applicable text fields in one operation rather than in a tag-by-tag fashion.
After you become familiar with Dreamweaver's workings, you can use the Bindings panel to skip most of the previous steps. To use the Bindings panel, follow these steps:
Insert a text field into a form on a page with a recordset or other data source.
Select the text field.
Open the Bindings panel and select the dynamic data to bind to your text field.
Click Bind at the bottom of the Bindings panel.
When you attach a checkbox to dynamic data, the checked and unchecked state reflects the true or false state of a Yes/No (also known as a Boolean) type of database field. Not only is this visual method easily understood at a glance, but checkboxes are extremely easy to update. To convert a static checkbox to a dynamic one, follow these steps:
Select a checkbox in a form on a page with a recordset.
From the Server Behaviors panel, choose Dynamic Form Elements
Tip
Click the Dynamic button in the Property inspector to go straight to this dialog box.
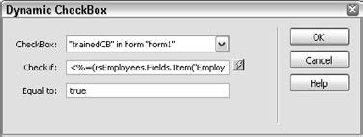
Verify that your selected checkbox is correctly named in the CheckBox list.
Click the Check If lightning bolt icon to display the available data sources.
Choose a field from the Dynamic Data dialog box.
If desired, you can apply a server format to the data by choosing an entry in the Format list. Click OK when you're finished to close the Dynamic Data dialog box.
Enter the value expected for a selected checkbox in the Equal To field. This value is data-source dependent. For many data sources,
1is used to represent true; for others, a−1is used. When working with Yes/No fields from Access databases, enter True; be sure to capitalize the letter T; lowercase true does not work properly.Click OK when you're finished.
Tip
Although checkboxes are most typically used to show the state of Yes/No data fields, they can also be tied to text data fields and selected if the field is equal to a given value. When applying the Dynamic CheckBox server behavior, choose the text field and enter the exact text string in the Equal To field.
Radio buttons provide a good way to represent a field that has a limited number of options. Suppose your data source includes a Comment Type field, which offers three possible choices: Positive (Pos), Negative (Neg), and Other (Other). To illustrate which type of comment a user submits, your Web application might display a series of three radio buttons, one for each type. If the radio buttons are dynamically tied to the Comment Type field, they show the correct type for each comment. Like checkboxes, radio buttons are very easy to modify—one click and you're done. To link radio buttons to dynamic data, follow these steps:
Select a group of radio buttons on a dynamic page with an available data source.
From the Server Behaviors panel, choose Dynamic Form Elements
Verify that your selected form element is displayed in the Radio Button Group list.
In the Radio Button Values area, choose the first entry shown and, if necessary, change the Value field to reflect the expected data.
Repeat step 4 for every radio button in the group.
Click the Select Value Equal To lightning-bolt icon to display the available data sources.
Choose a field from the Dynamic Data dialog box. Be sure to select a data source field with values parallel to those entered in the radio button group.
If desired, you can apply a server format to the data by choosing an entry in the Format list. Click OK when you're done to close the Dynamic Data dialog box.
Click OK when you're finished to close the Dynamic Radio Buttons dialog box.

Typographical errors are the bane of data entry. Regardless of how careful users are, whenever they must enter an exact phrase of any length, typos are inevitable. If the set of desired responses from a user is limited, the list/menu form element provides a good alternative to a text field. An e-commerce site, for instance, might use a list/menu form element (also called a drop-down list or select list) to enable the user to navigate from one product line to another. With Dreamweaver, the drop-down list may be filled (populated) with dynamic data, so that the navigation tool can keep track of the products entered in the data source.
A drop-down list is composed of two parts: the label and the value. The label is what the user sees when he selects the list; the value is what the user submits by selecting a particular list choice. In many situations, both the label and the value may be the same; in these cases, you can use the same data source field for both. Otherwise, you need data source fields available—this is how the product navigation example works. One data source field contains an entry for every product line (the label), and another field contains a URL to that product line's page on the Web site (the value). To link a drop-down list to dynamic data, follow these steps:
Insert a list/menu form element on a dynamic page with a recordset.
If you have more than one list/menu on the page, select the one you want to convert.
From the Server Behaviors panel, choose Dynamic Form Elements
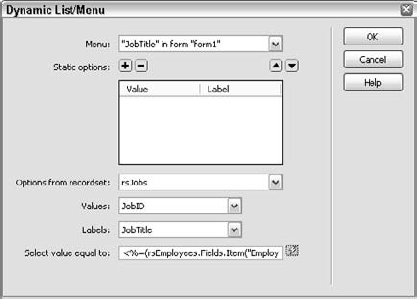
In the Static Options box, add any nondynamic items to the top of the list menu. This could be something as simple as a label for the list menu or as complicated as a full URL with query strings for search pages.
Choose the recordset you want to work with from the Options From Recordset list.
Verify that the desired drop-down list is displayed in the Menu list.
Choose the field from your data source containing the items you want submitted by the user from the Values list.
Choose the field from your data source containing the items you want displayed to the user from the Labels list.
To preselect an item, enter its value in the Select Value Equal To field, or use the lightning bolt icon to choose a value from the established data sources.
Click OK when you're finished.
You should also notice the new Dynamic button on the Property inspector. Click the button to open the corresponding dialog box. This is another quick way to get to the options without going through the Server Behaviors panel.
Data source connectivity is a two-way street. Not only can data be extracted and displayed over the Web, but Web applications can also manage records found in data sources. With the power to add, modify, and remove data comes a terrific opportunity. From a Web application builder's perspective, I find that almost half of my client work is concerned with data source management.
Like the common master-detail application, Dreamweaver offers both a manual and an automatic method of performing the most common management tasks. There are Application objects for inserting and for updating records. Both methods are detailed in the following sections.
To insert records into a data source, you need the following:
An active page
A form placed on the page
One form element per data source field
A Submit button
An Insert Record server behavior
No recordset or other data source is necessary, nor are there are any special requirements for the form itself—you don't even have to specify an action or a method. The Insert Record server behavior handles most of the coding chores.
Form elements are typically arranged in a table with labels for each field, as shown in Figure 23-14. Naturally, you can format the table however you like; I generally prefer a two-column table with the labels in the first column, right-aligned, and the form elements in the second column, left-aligned. It's best to name the form elements so that you can identify them easily and ensure that each element is unique. A reset button is optional—but recommended if the form has many fields.

Tip
You can save a step in the Insert Record server behavior setup by naming your form elements the same as their relevant data source fields. Dreamweaver automatically assigns the form elements to any data fields with matching names. Unfortunately, this process could expose the field names in your database and give hackers more information about your database than you'd like them to know.
After you've constructed your table inside the form and placed the form elements, follow these steps to add the Insert Record server behavior:
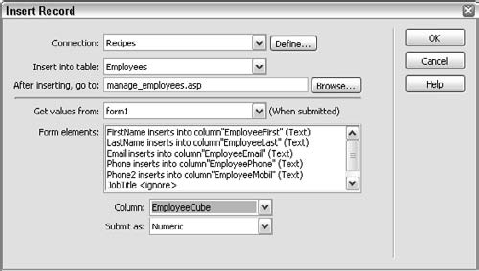
From the Server Behaviors panel, choose Insert Record. The Insert Record dialog box appears.
From the Insert Record dialog box, choose a connection from the Connection drop-down list. If you need to establish a new connection, click Define.
Select the data table you want to use from the Insert Into Table list.
Enter the path to the destination page in the After Inserting, Go To field, or click the Browse button to locate the file. It's important to select a confirmation or other page for users to go to after the form is submitted. If you don't, there is no feedback to the user, and no change is apparent.
Select the name of the form to be used from the Get Values From list. If there is only one form on the page, the form is preselected.
Do the following for each object listed in the Form Elements area:
From the Column list, select the data source field into which you want to insert the value of the form object.
From the Submit As list, choose the data source type for the data. The options are Text; Numeric; Date; Date MS Access; Checkbox Y, N; Checkbox 1,0; Check −1,0; and Checkbox MS Access.
Click OK when you're finished.
With the Record Insertion Form application object, you create a new page and apply the object. Dreamweaver creates the HTML table, includes the form elements and their labels, makes the connection to the data source, and adds the appropriate server-side code. Moreover, this application object is flexible enough to include seven different form element types—Text Field, Text Area, Menu, Hidden Field, CheckBox, Radio Group, and Password Field—as well as Text.
The Menu and Radio Group options are interesting because they enable you to enter the labels and values either manually or dynamically. To take advantage of Dreamweaver's capability to generate dynamic menus and radio buttons, you must have a recordset or other data source on the page. To insert the Record Insertion Form application object, follow these steps:
Place your cursor where you'd like the form to appear and choose Insert
From the Record Insertion Form dialog box, choose a connection from the Connection drop-down list. If you need to establish a new connection, click Define.
Select the data table from the Insert Into Table list.
Enter the path to the destination page in the After Inserting, Go To field or click the Browse button to locate the file. At this point, Dreamweaver has added an entry in the Form Fields area for every field in the data source.
Delete any unwanted fields by selecting their entries in the Form Fields area and clicking the Remove (–) button. It's best to remove any fields that use auto-incrementing numbers. Such fields are commonly used to generate unique identification numbers for each record and are automatically incremented when a new record is added.
Select the first entry in the Form Fields area.
If desired, modify the text in the Label field to a more descriptive term than the name of the data source column automatically supplied by Dreamweaver.
Choose the form element type from the Display As list. By default, Dreamweaver uses Text Field. If you choose either Menu or Radio Group, click the Properties button that appears to further define the form element. With text fields, text areas, and text you can set an initial value in the Default Value field. For checkboxes, select whether the element should be Checked or Unchecked.
Choose the data format from the Submit As list.
Click OK when you're done.
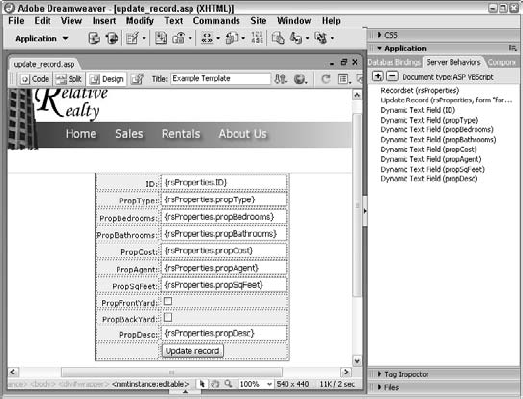
In the day-to-day operations of most Web sites, you update records more often than you insert new records. The process in Dreamweaver for creating an update records page is similar to the one for the insert records application with one important difference—you must have a recordset defined. Detail pages are good candidates to transform into update applications. They already have the features necessary for an update application; namely, they have a recordset or other method for specifying a single record, and they are often generated from master-type pages. The major difference is that an update records application also requires specific server-side code—which is supplied in Dreamweaver by the Update Record server behavior.
As with the insert record application, you can choose to either create all the components of an update record page yourself or use the application object to build them for you. To prepare the page for adding the Update Record server behavior, make sure you include a form element for every data field you want to update as well as a Submit button. Neither the action nor method attributes of the form need to be set—the Update Record server behavior handles that chore. To insert an Update Record server behavior, follow these steps:
From the Server Behaviors panel, choose Update Record. The Update Record dialog box appears, as shown in Figure 23-16.
From the Update Record dialog box, choose a connection from the Connection drop-down list. If you need to establish a new connection, click Define.
Select the data table from the Table to Update list.
Choose the data source on which to base your update from the Select Record From list.
Select the key field from the Unique Key Column list. Dreamweaver attempts to detect whether the field is a number type and, if so, it selects the Numeric option.
Enter the path to the destination page in the After Updating, Go To field; or click the Browse button to locate the file.
Select the name of the form to be used from the Get Values From list. If there is only one form on the page, the form is preselected.
For each object listed in the Form Elements area
From the Column list, select the data source field into which you can insert the value of the form object.
Choose the data source type for the data from the Submit As list. The options are Text; Numeric; Date; Date MS Access; Checkbox Y, N; Checkbox 1,0; Check −1,0; and Checkbox MS Access.
Click OK when you're done.

If you'd prefer Dreamweaver to set up the form elements for you, use the Record Update Form application object. Before you can insert this application object, you must define a recordset or other data source from which to extract the data. The advantage of using Dreamweaver is sheer speed. Instead of manually creating the form, let Dreamweaver do the grunt work for you. To create an update record application using the application object, follow these steps:
Place your cursor where you'd like the form to appear, and choose Insert
From the Insert Record Update Form dialog box, choose a connection from the Connection drop-down list. To establish a new connection, click Define.
Select the data table to modify from the Table To Update list.
Choose the data source on which to base your update from the Select Record From list.
Select the key field from the Unique Key Column list. Dreamweaver attempts to detect whether the field is a number type and, if so, selects the Numeric option.
Enter the path to the destination page in the After Updating, Go To field; or click the Browse button to locate the file. At this point, Dreamweaver has added an entry in the Form Fields area for every field in the data source.
Delete any unwanted field by selecting its entry in the Form Fields area and clicking the Remove (–) button.
Select the first entry in the Form Fields area.
If desired, modify the text in the Label field to a more descriptive term than the name of the data source column automatically supplied by Dreamweaver.
Choose the desired form element type from the Display As list. By default, Dreamweaver uses Text Field. If you choose either Menu or Radio Group, click the Properties button that appears to further define the form element. With text fields, text areas, and text you can set an initial value in the Default Value field. For checkboxes, select whether the element should be Checked or Unchecked.
Tip
For fields that you want to display, but that you don't want users to alter—such as a unique key field—choose Text.
Choose the data format from the Submit As list.
Click OK when you're finished.
When these steps are completed, Dreamweaver inserts a borderless two-column table with the requested form elements and labels, similar to the one shown in Figure 23-17. As with other application objects, you can easily apply a template and include the generated elements in an editable region.
Eliminating outdated or otherwise unneeded records is a key task in properly maintaining a data source. The Delete Record server behavior greatly simplifies the chore. All that the Delete Record server behavior requires is a recordset and a form with a Submit button.
Tip
Although it's not mandatory, it's good practice to provide enough detail—displayed in a read-only format—so that the user can be sure he is removing the correct record. A confirmation message on the Submit button (with something akin to "Are you sure you want to do this?") is nice also.
To attach a Delete Record server behavior to a form, follow these steps:
Make sure that a form exists on a dynamic page that includes at least one recordset.
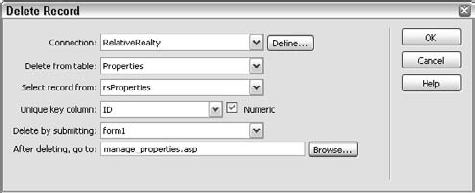
From the Server Behaviors panel, choose Delete Record. The Delete Record dialog box is displayed, as shown in Figure 23-18.
From the Delete Record dialog box, choose the Connection from the drop-down list. If you need to establish a new connection, click Define.
Select the data table to delete from the Delete From Table list.
Choose the data source on which to base the deletion from the Select Record From list.
Select the key field from the Unique Key Column list. Dreamweaver attempts to detect whether the field is a number type and, if so, selects the Numeric option.
Enter the path to the destination page in the After Deleting, Go To field; or click the Browse button to locate the file.
Choose the form that contains the delete Submit button.
The Delete Record server behavior is executed when the user clicks the Submit button in the form. It's a good idea to confirm the deletion with your user on the destination page.
Warning
There's a known problem with JSP pages that use Dreamweaver's Delete Record server behavior when they run on Apache's Jakarta Tomcat application server. The problem arises from the use of a redirect page. As a workaround, place all dynamic data on the deleted page within a Show Region If Recordset is Not Empty server behavior. By doing so, you'll allow Jakarta to link properly to the redirect page without generating an error.
Variables are essential to any programming; and various variables are available depending on the server model. Although all setting of variables in Dreamweaver must be done by hand or using a custom server behavior, Dreamweaver provides a method for reading or displaying almost every kind of variable.
All variables are made available through the Add list of the Bindings panel. After a variable has been added as a data source, it can be dragged and dropped anywhere on the page or included via the Insert button. Which variables are available depends upon the server model. The vast majority of dialog boxes for variables are single entry fields, requesting the name of the specific variable, like the one shown in Figure 23-19.

Both application and session variables are used throughout Web applications. An application variable is one that continues to exist as long as the application is active; in this situation, the application is the Web site itself. Application variables are available to all users of a site. A hit counter often uses an application variable to track the number of visitors to a site.
Although all users can see the results of a calculation involving application variables, session variables are user-specific. A session starts when a user first visits a site and ends shortly after the user leaves. Session variables are often used for user authentication and to maintain information about users as they travel through the site; shopping carts often employ session variables. Both application and session variables are available in ASP, PHP, and ColdFusion; in JSP only session variables can be inserted through the Bindings panel; .NET doesn't allow any declared variables.
Each of the server models, with the exception of .NET, has a range of variables available aside from application and server variables. All are accessible through the Add (+) button of the Bindings panel and all, except for ASP Request variables, use a one-field dialog box for the name of the variable. In the case of the ASP Request variables, all five types of variables are available through a drop-down list on the Request Variable dialog box. After you've chosen your variable, enter its name in the Name field. Table 23-1 provides a breakdown of the available variables for each of the Dreamweaver server models.
Table 23-1. Variables for Dreamweaver Server Models
Server Model | Variables |
|---|---|
ASP | Request, Cookie, QueryString, Form, ServerVariables, ClientCertificate, Session, Application |
ColdFusion | Form, URL, Session, Client, Application, Cookie, CGI, Server Variable, Local Variable |
JSP | Request Variables, Session Variable |
PHP | Form, URL, Session, Cookie, Server, Environmental |
Creating the Results Page
To complete the search application begun in the previous Technique, you need to create a results page. Unlike the search page, the results page contains server-side code easily inserted through Dreamweaver.
From the 22_Dynamic_Pages folder in the Techniques - Dynamic site, open the
results_startfile for your server model.To save time, a table to hold your search results has already been added to the page. The first task is to add a recordset to the page.
From the Bindings panel, click Add (+) and select Recordset (Query) from the list.
In the Recordset dialog box's Simple mode, enter rsResults in the Name field.
From the Connection list, choose RelativeRealty.
From the Table list, select Properties.
To return the proper results for the search, you need to limit the recordset to records in which the database's description field contains the keyword searched for. You'll recall that text field in the search page was named searchField.
Set the Filter options like this:
propDesc
contains
Form Variable
searchField

Leave the Sort list at its default setting and click OK.
With the recordset defined, you're ready to begin binding data to the page.
In the Bindings panel, expand the Recordset (rsResults) entry.
Place the proper dynamic data in position:
Drag propType to the cell under the Type label.
Drag propDesc to the cell under the Description label.
Drag propBedrooms to the cell under the Bedrooms label.
Drag propBathrooms to the cell under the Bathrooms label.
Drag propAgent to the cell under the Agent label.
Select any of the dynamic elements just added to the page like rsResults.propType and, from the Tag Selector, choose the
<tr>tag.From the Server Behaviors panel, click Add (+) and select Repeat Region from the list.
In the Repeat Region server behavior, make sure that rsResults is the chosen recordset and set the option Show All Records; click OK when you're ready.
Save your page.
In the Files panel, select both the pages of the search application—
search_startandresults_start—for your server model and choose Put to publish the files to the Testing server.
To test your search application, preview the previously built search_start page in a browser. Enter a keyword, such as "kitchen," in the text field and click Search; the results page will display any matching entries.

Fundamentally, you have two types of customers: new customers and returning customers. The goal of almost every enterprise is to turn the former into the latter. To that end, e-commerce sites try to make the customer experience as pleasant as possible. What makes for an enjoyable customer visit? Volumes have been written on that subject, so I'll concentrate here on one facet: the customer's account.
Early on in the history of Web stores, it wasn't uncommon to require returning customers to re-enter all their pertinent billing and shipping information. The e-commerce sites had no way of tracking all that data. Now, the vast majority of online stores—particularly the successful ones—offer a way for customers to open an account to store their basic information. Just as important, customers can easily identify themselves on their return, thus accessing their account information and enabling it to be applied to a new order. You may also want to restrict certain areas of your site to registered users or those who have paid for a subscription. Various levels of sophistication are possible here, but the most fundamental requirements are a way to identify returning customers and a way to add new ones.
The most common way to identify returning customers is to allow them to log in. A login page can be as simple as a three-element form: two text fields—one for the username and one for the password—and a Submit button. The form connects to a data source containing a list of users and their passwords, among other information, and verifies that the submitted username corresponds with the submitted password. Dreamweaver accomplishes this task with the appropriately named Log In User server behavior.
The Log In User server behavior redirects authorized users to one page and unauthorized users to another. In addition, it creates a session variable containing the username. This session variable can then be employed on other pages as required.
To apply the Log In User server behavior, make sure your page has, at a minimum, a form with text fields for the username and password, and a Submit button. You're now ready to follow these steps:
From the Server Behaviors panel, click the Add (+) button and choose User Authentication
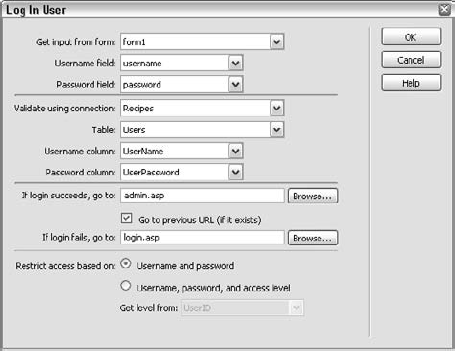
If there is more than one form on the page, select the form containing the username and password fields from the Get Input From Form list.
Select the form element used to gather the username from the Username Field list.
Select the form element used to gather the password from the Password Field list.
Choose a connection to the data source containing the table of registered users from the Validate Using Connection list.
Select the table of registered users from the Table list.
Choose the field containing the username from the Username Column list.
Choose the field containing the password from the Password Column list.
Enter the path to the page for the authorized user in the If Log In Succeeds, Go To field.
If you want the user to proceed to the previously selected link, rather than the page entered in step 9, select the Go To Previous URL option.
Enter the path to the page for the unauthorized user in the If Log In Fails, Go To field.
If access levels should be evaluated as part of the authentication, choose the following:
Restrict Access Based On Username, Password, and Access Level
The data source field containing the access-level data from the Get Level From list.
Click OK when you're finished.
Now that you've got your users added and logging in, you need to protect those pages that require authorized access. These could be their user profile information or perhaps information they've paid a subscription to access. Dreamweaver provides two different types of access restriction. The first method just determines if a user is logged in or not. The second includes restriction based on access levels defined in your database.
To restrict access based on whether a user has logged in or not, follow these steps:
Open a dynamic page to which to restrict access.
In the Server Behaviors panel, click the Add (+) button and select User Authentication
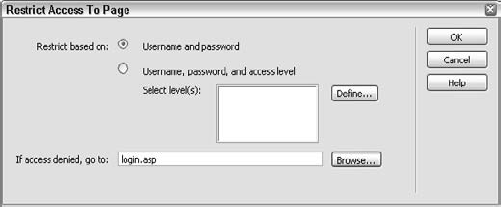
Choose the Username and Password radio button to restrict access to those users already logged in.
In the If Access Denied, Go To box, browse to the URL you want to send users to if they're not authorized to view the page. This page should have a sentence or two telling users why they're at this page, as well as a form for them to log in.
To restrict pages based on access level, add a login page as shown in Figure 23-21. This is handy if you want to have one login for both your administrators and your regular customers. One access level may be able to change user details, whereas another can only view those details. In step 12 of creating the login form in the previous section, choose the Restrict Access Based On Username, Password, and Access Level option. Next, choose the field from your table that contains the access levels, as shown in Figure 23-22.
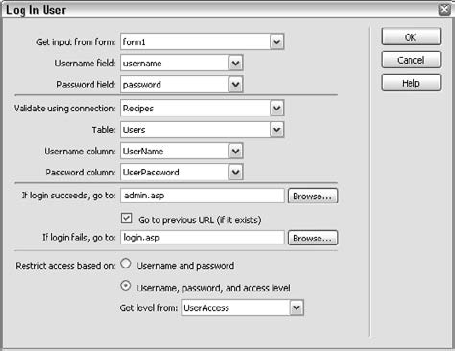
Figure 23-22. Use the Get Level From list menu in the Log In User dialog to restrict access to a page to a specific group of users. This gives you more granular control over your site.
To restrict access based on access levels, follow these steps:
Open a dynamic page to which you want access restricted.
In the Server Behaviors panel, click the Add (+) button and select User Authentication
Choose the Username, Password, and Access Level radio button.
Choose one or more groups from the Select Level(s) area.
To add new groups to the Select Level(s) list:
Click Define to open the Define Access Levels dialog.
Enter the name for the access level in the Name field. The name must match a value stored in your data source in whichever column is designated for the group access levels.
To add additional levels, click the Add (+) button and enter another name.
To delete any levels, choose the level in the list area and click the Remove (–) button.
Click OK to close the Define Access Levels dialog box.
Enter the path to the file to which you redirect unauthorized users in the If Access Denied, Go To field. Alternatively, click the Browse button to locate the file.
Click OK when you're finished.

It's always a good idea to give your customer an easy way to log out of your site—a way that also destroys all the session variables associated with his login and ensures that his coworkers can't jump on his computer (right after he leaves for some coffee) and gain access to information they shouldn't have. Logging out a user in Dreamweaver is just a matter of one simple server behavior.
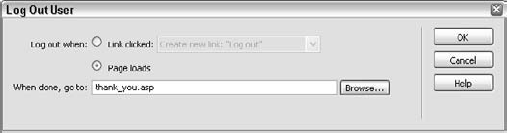
To use the Log Out User server behavior, follow these steps:
To apply the server behavior to a specific link on the page, select that link.
From the Server Behaviors panel, click the Add (+) button and choose User Authentication
To trigger the server behavior with a link, choose the Log Out When Link Clicked option and make sure your selected link is chosen in the list. If no link was preselected, Dreamweaver offers to apply the server behavior to a new link, Log Out.
To automatically log out users when the current page is viewed, select the Log Out When Page Loads option.
If you're using a link as a trigger, enter the path to the destination page in the When Done, Go To field. Alternatively, click the Browse button to locate the file.
Warning
Do not use the When Done, Go To option if you are automatically logging out a user when the page loads. If you do, the user never sees the current page.
Click OK when you're finished.
An application that adds new customers is essentially the same as an insert record application, with one additional function. If you've ever tried to get a username on America Online that even remotely resembles your own name, chances are you've encountered the function I'm talking about—just ask bobsmith01234x. For a username to be useful, it must be unique; therefore, the Web application must check a submitted username for uniqueness. Dreamweaver's Check New Username server behavior does just this.
Before you can apply the Check New Username server behavior, however, you must create a page with the proper form elements for all the data necessary. Moreover, you need a Dreamweaver Insert Record server behavior (refer to Figure 23-15 earlier in this chapter). As the name implies, the Insert Record server behavior creates a new record and adds it to the specified data source.
The one difference between a standard Insert Record server behavior and the one used in this circumstance is that you leave the destination page field (After Inserting, Go To) blank. Leaving this field empty enables the Check New Username server behavior to control the redirection.
The Check New Username server behavior verifies that the requested username is not already in the data source and redirects the user if it is. To add a Check New Username server behavior to your page, follow these steps:
From the Server Behaviors panel, click the Add (+) button and choose User Authentication
Select the form element that contains the requested username from the Username list. If a form element is called
username, Dreamweaver automatically selects that entry.Enter the path to the file you want a user to see if her requested name is already stored in the data source in the If Already Exists, Go To field, or click Browse to locate the file.
Click OK when you're finished.
Although numerous Web applications use only a single dynamic page, crafting multipage applications gives you more opportunity to build a robust user experience for your visitors. It's key for every Web developer to master the various methods for passing information from one page to another. When building your first multiple-page Web applications, keep these points in mind:
Dreamweaver can send and receive parameters from one page to another by appending them in an encoded fashion to the linked URL. The additional text is known as a query string.
You can send values from a form either by way of the query string or, in a hidden manner, in a separate object seen only by the server. The first technique uses the
Getmethod and the second technique usesPost.Dreamweaver includes several application objects that reduce the building of common dynamic components—or even whole applications—to one step. Application objects can be combined with Dreamweaver templates for rapid application development.
To craft applications that update records in a data source, you must know how to tie the various form elements to dynamic data. In Dreamweaver, the basic procedure is to include a standard form element and then choose the appropriate server behavior from the Dynamic Elements submenu of the Server Behaviors panel.
Many Web applications are not concerned with publicly viewed sites on the Web, but rather with administratively oriented pages designed to manage data sources remotely. Dreamweaver includes a full complement of tools for inserting new records, updating existing ones, and deleting data that is no longer required.
After you've declared a variable in Dreamweaver, it is available for display through the Bindings panel. Each server model has its own set of variables.
Dreamweaver enables you to create a user authentication system quickly to protect valuable customer information or paid subscription sites. You can even set different access levels for administrators and regular customers.
In the next chapter, you learn how to integrate graphics created in Fireworks into your Dreamweaver application.