
IN THIS CHAPTER
Examining the fundamentals of HTML frames and framesets
Creating frames in a new document, visually and with frame objects
Selecting, saving, and closing framesets
Dreamweaver Technique: Establishing a Frameset
Altering frame and frameset properties
Opening links in specific frames
Targeting multiple frames with a single click
Dreamweaver Technique: Setting Frame Targets
Inserting frameless content
Understanding iframes
The first time I fully appreciated the power of frames, I was visiting a site that displayed examples of what the Webmaster considered "bad" Web pages. The site was essentially a jump-station with a series of links. The author used a frameset with three frames: one that ran all the way across the top of the page, displaying a logo and other basic information; one narrow panel on the left with a scrolling set of links to the sites themselves; and the main viewing area, which took up two-thirds of the center screen. Selecting any of the links caused the site to appear in the main viewing frame.
I was astounded when I finally realized that each frame was truly an independent Web page and that you didn't have to use only Web pages on your own site—you could link to any page on the Internet. That was when I also realized the amount of work involved in establishing a frame Web site: Every page displayed on that site used multiple HTML pages.
Be aware that the use of frames is controversial. Designers opposed to their use give a number of reasons. One argument is that dealing with frames often confuses users, especially as they navigate through a site. Another reason cited by designers is that search engines have difficulty indexing a frame-based site. Nonetheless, frames are valid HTML, and Dreamweaver does support their use.
Warning
Although the technology enables you to include any page on the Web within your own frameset, Internet etiquette and, in some cases, copyright law dictate that you obtain permission to display another site's pages within your own site and that you clearly credit work that is not your own.
Dreamweaver takes the head-pounding complexity out of coding and managing frames with a point-and-click interface. You get easy access to the commands for modifying the properties of the overall frame structure, as well as each individual frame. This chapter gives you an overview of frames, as well as all the specifics you need for inserting and modifying frames and framesets. Special attention is given to defining the unique look of frames through borders, scroll bars, and margins.
It's best to think of frames in two major parts: the frameset and the frames. The frameset is the HTML document that defines the framing structure—the number of individual frames that make up a page, their initial size, and the attributes shared among all the frames. A frameset is never displayed by itself. Frames, on the other hand, are complete HTML documents that can be viewed and edited separately or together in the organization described by the frameset.
A frameset takes the place of the <body> tags that contain the content of a Web page in an HTML document. Here's what the HTML for a basic frameset looks like:
<frameset rows="50%,50%">
  <frame src="top.html">
  <frame src="bottom.html">
</frameset>
Notice that the content of a <frameset> tag consists entirely of <frame> tags, each one referring to a different Web page. The only other element that can be used inside of a <frameset> tag is another <frameset> tag.
In Dreamweaver's Code view, you can directly add a <frameset>...</frameset> tag pair by clicking the Frameset button on the Frames menu of the Insert bar's HTML category. Add a <frame> tag in Code view by clicking the Frame button on the Insert bar. Of course, Dreamweaver gives you other ways to create framesets in Design view; see the "Creating a Frameset and Frames" section later in this chapter for more information.
Framesets, much like tables, are made up of columns and rows. The columns and rows attributes (cols and rows) are lists of comma-separated values. The number of values indicates the number of either columns or rows, and the values themselves establish the size of the columns or rows. Thus, a <frameset> tag that looks like this
<frameset cols="67,355,68">
denotes three columns of widths 67, 355, and 68, respectively. And this frameset tag
<frameset cols="270,232" rows="384,400">
declares that two columns exist with the specified widths (270 and 232), and two rows exist with the specified heights (384 and 400).
Column widths and row heights can be set as absolute measurements in pixels or expressed as a percentage of the entire screen. HTML frames also support an attribute that assigns the size relative to the other columns or rows. In other words, the relative attribute (designated with an asterisk) assigns the balance of the remaining available screen space to a column or row. For example, the following frameset
<frameset cols="80,*">
sets up two frames, one 80 pixels wide and the other as large as the browser window allows. This ensures that the first column is always a constant size—making it perfect for a set of navigational buttons—whereas the second is as wide as possible.
The relative attribute can also be used proportionally. When preceded by an integer, as in n*, this attribute specifies that the frame is allocated n times the space it would have received otherwise. Therefore, frameset code like this
<frameset rows="4*,*">
ensures that one row is proportionately four times the size of the other.
Dreamweaver offers you two strategies for creating a frameset. You can explicitly create a frameset file and add content to each of the frames, or you can start with existing content and create a frameset around it. You can achieve the same results using either method. Within Dreamweaver, you can create a frameset in any of the following ways:
Create a new, empty frameset using the File

Start with an existing document and use drag-and-drop to draw frames around the document.
Start with an existing document and apply one of several common frameset layouts to it, using menu commands or the Insert bar.
Note
The Insert bar contains two Frames menus—each with different options. The Frames menu found in the Layout category is intended to be used in Design view, and the one in the HTML category is meant to be used in Code view.
Most of the framesets employed on the Web today use two or three frames, albeit in different configurations. For example, a common setup is to have one narrow frame spanning the top of the page to hold a banner and some site navigation; below it is a left frame to hold a table of contents or additional navigation, and a large right frame to hold the content of the site (see Figure 16-1).
Dreamweaver gives you quick access to a full array of the most common setups when you create a frameset document from scratch using the File

To explicitly create a new frameset file, follow these steps:
Choose File
In the New Document dialog box, choose the Page From Sample category.
From the Sample Folder list, choose Frameset. A list of possible framesets appears, as shown in Figure 16-2.
Select the desired entry from the Framesets list. A description and abstract preview of that frameset display.
Click Create to create the frameset and display it in the Document window.

After you've created a new frameset, you can enter text, images, and other content in each of the frames, as you would for any other HTML document. Alternatively, you can change individual frames to contain previously created documents by clicking in a frame and choosing the File
Note
For almost all the frame objects, Dreamweaver creates one or more frames with a set size. Although, by default, the set width or height is 80 pixels, you can easily resize the frame by dragging the frame border. The only framesets that do not have at least one set frame are the Split Horizontal and Split Vertical framesets (for these, the two frames are divided equally). Dreamweaver also sets the Scroll option to No for frames with absolute sizes.
If you're a hand-coder, Dreamweaver provides a couple of tools to hasten frameset development. When you are in Code view, the Frames menu (found on the HTML category of the Insert bar) becomes active. Select the Frameset object from this menu to insert a set of <frameset> tags. Likewise, choosing the Frame object inserts the <frame></frame> tag pair. Code hints are available for all the frame-related attributes.
The other entries in the HTML Frames menu, Floating Frame and No Frames, are covered later in this chapter in the "Investigating Iframes" and "Handling Frameless Browsers" sections, respectively.
Another way of creating a frameset is to start with an existing document and use the mouse to drag and drop the frame borders into position. When you do this, Dreamweaver creates all the new files necessary for your frameset. To create a frameset visually, using the mouse, follow these steps:
If necessary, switch to Design view by clicking the Show Design View button on the Document toolbar or by choosing View
Turn on the frame borders in Design view by choosing View
Position the cursor over any of the frame borders. If your pointer is over any side of a frame border, it changes into a two-headed arrow; it changes into a four-headed arrow (or a drag-hand on the Mac) when it's over a corner.
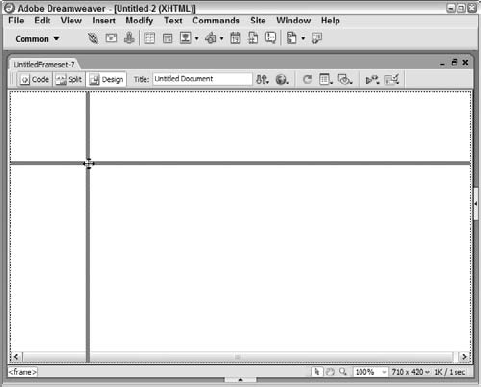
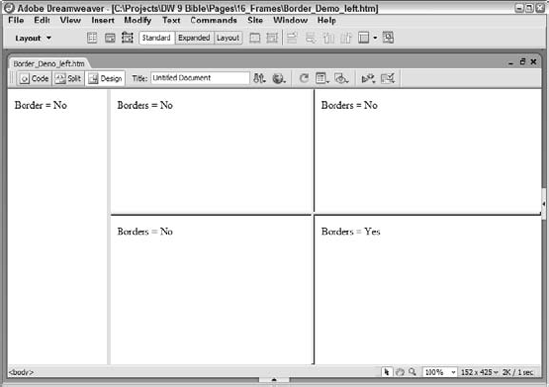
Drag the frame border into the middle of the Document window. Figure 16-3 shows a four-frame frameset.
Dreamweaver initially assigns a temporary filename and an absolute pixel value to your HTML frameset code. Both can be modified later if you want.
Note
With the other methods of frameset creation, you can initially create a frameset with only two or three frames. Although you can further split these into additional frames, the fastest way to create a frameset with four frames is by Alt+dragging (Option+dragging) the corner of the frame border.
When the frameset is selected, Dreamweaver displays a black, dotted line along all the frame borders and within every frame. You can easily reposition any frameset border by clicking and dragging it. If you just want to move the border, make sure you don't press the Alt (Option) key while dragging the border because that action creates additional frames.
Note
Another method of creating a frameset by splitting the page into frames uses the menus. Open a document that you want to appear in one of the frames. Then choose Modify
Dragging out your frameset in Dreamweaver is a clear-cut method of setting up the various frames. However, despite the ease of this procedure, it can still be a bit of a chore to create even simple framesets by clicking and dragging. To hasten the development workflow, Dreamweaver uses frame objects, which can build a frameset with a single click.
As previously mentioned, most Web sites using frames follow a simple, general pattern. Dreamweaver includes frame objects for the most common frameset configurations. The frame objects are available through the Frames menu found in the Layout category of the Insert bar shown in Figure 16-4. Choose one of the basic designs, and you're ready to tweak the frame sizes and begin filling in the content. This method gives you a great combination: ease of use with design flexibility.

Figure 16-4. The Frames menu of the Insert bar holds the most commonly used frameset configurations.
The frame objects are roughly organized from simplest framesets to most complex. On the Insert bar, notice that each of the icons shows a sample frameset with one blue section. The placement of the color is significant. The blue indicates in which frame the current page will appear when the frameset is constructed. For example, if you begin to construct your main content page, and then decide to turn it into a frameset with separate navigation strip frames to the left and above it, you choose the Top and Nested Left Frame button. Figure 16-5 provides a before-and-after example, first with the preframe content and then with the same content after a Top and Left Bottom Frame object has been applied.
The framesets available from the Frames menu of the Insert bar are as follows:
Left: Inserts a blank frame to the left of the current page.
Right: Inserts a blank frame to the right of the current page.
Top: Inserts a blank frame above the current page.
Bottom: Inserts a blank frame below the current page.
Bottom and Nested Left: Makes a nested frameset with three frames; the bottom frame spans the width of the other frames. The current page is placed in the upper-right frame.
Bottom and Nested Right: Makes a nested frameset with three frames, with the bottom frame spanning the other frames. The current page appears in the upper-left frame.
Left and Nested Bottom: Opens a nested frameset with three frames. The left frame spans the other frames, and Dreamweaver places the current page in the upper-right frame.
Right and Nested Bottom: Makes a nested frameset with three frames, with the right frame spanning the other frames. The current page is placed in the upper-left frame.
Top and Bottom: Inserts a three-frame frameset, with all frames spanning the width of the entire window. Dreamweaver places the current page in the center frame.
Left and Nested Top: Creates a nested frameset with three frames, with the left frame spanning the height of the other frames. Dreamweaver puts the current page in the lower-right frame.
Right and Nested Top: Inserts a nested frameset with three frames, with the right frame spanning the height of the other frames. The current page is placed in the lower-left frame.
Top and Nested Left: Creates a nested frameset with three frames, with the upper frame spanning the width of the other frames. The current page is put in the lower-right frame.
Top and Nested Right: Inserts a nested frameset with three frames, with the top frame spanning the other frames. Dreamweaver inserts the current page in the lower-left frame.
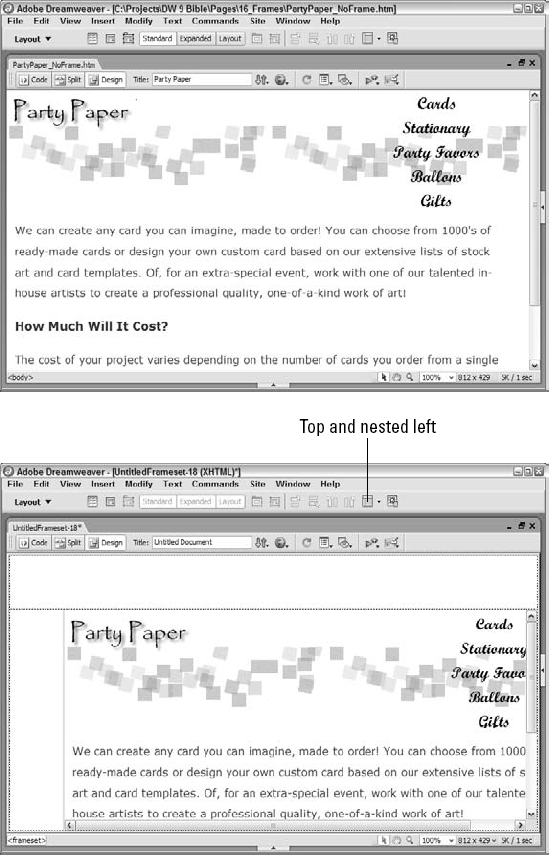
Figure 16-5. Top: Before. Bottom: After. Existing content is incorporated into a new frameset when a frame object is chosen.
Using the frame object can be, quite literally, a one-click operation. Just select the desired frameset from the Frames menu of the Insert bar, and Dreamweaver automatically turns on Frame Borders, if necessary, and creates and names the required frames. For all frame objects, the existing page is moved to a frame in which the scrolling option is set at Default, and the size is relative to the rest of the frameset. In other words, the existing page can be scrolled, and it expands to fill the content.
Note
Because Dreamweaver automatically puts the existing document into an expandable frame with scroll bars, it's most efficient to apply a frame object to an existing page only if that page is intended to be the primary content frame. Otherwise, it's better to select the frame object while a blank page is open and then use the File
Regardless of how you create your initial frameset, you're not limited to your initial frame choices. In addition to being able to move frame borders visually, you can also set the size through the Frameset Property inspector, as described in the next section. Furthermore, you can continue to split either the entire frame or each column or row as needed—using either menu commands or the mouse. When you divide a column or row into one or more frames, you are actually nesting one frameset inside another.
Note
After you've created the basic frame structure, you can choose View
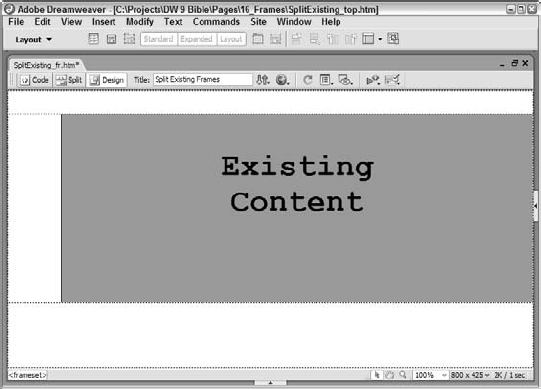
To split an existing frame using the menus, position the cursor in the frame you want to alter and choose Modify
You can clearly see the nested nature of the code in the following HTML fragment describing the frameset in Figure 16-6:
<frameset rows="80,*">
  <frame src="ExistingTop.htm" name="topFrame">
  <frameset rows="*" cols="130,614">
    <frame src="UntitledFrame-12">
    <frame src="ExistingLower.htm" name="mainFrame">
  </frameset>
</frameset>When you use the menus to split a frame, only the currently selected frame is split. To create additional columns or rows that span the entire Web page, use the mouse method instead. Select the specific frameset to which you want to add rows or columns and then Alt+drag (Option+drag) any of the frame's borders that span the entire page, such as one of the outer borders. Figure 16-7 shows a new row added along the bottom of the previous frame structure.

After you've initially created your frameset in Dreamweaver, you need to learn some basics before modifying the frameset or individual frames. For example, it's very easy to select framesets or individual frames if you know how. In addition, before changing your framesets, you must save your changes and close the frameset files.
To change or view the properties of a frameset or a specific frame, you first select the frameset or frame. You can choose either the frameset itself or one of the frames within it from Design view or from the Frames panel.
The Frames panel shows an accurate representation of all the frames in your Web page. Open the Frames panel by selecting Window
To select a frameset, click an outside border of the frameset in the Frames panel. You can also select a frameset by clicking any border of the frameset in Design view. If you can't see the frame borders, choose View
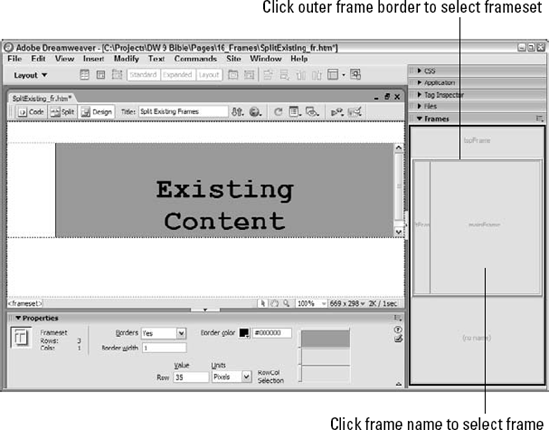
To select a specific frame, click inside the represented image of the frame in the Frames panel. You can resize the Frames panel to get a better sense of the page layout, especially for complex pages. You can also select a frame by pressing Alt (Option+Shift) and clicking in the desired frame in the Document window.
Note
When you are working with multiple framesets, use the Tag Selector together with the Frames panel to identify the correct nested frameset. Selecting a frameset in the Tag Selector causes it to be identified in the Frames panel with a heavy black border.
After a frame is selected, you can move from one frame to another within the same frameset by pressing Alt (Command) and then using the right and left arrow keys. You can move from a nested frameset to its parent frame by using the keyboard shortcut Alt+up arrow (Command+up arrow). Likewise, you can move from a parent frameset to its child frame by pressing Alt+down arrow (Command+down arrow).
Remember that when you're working with frames, you're working with multiple HTML files. You must be careful to save not only all the individual frames that make up your Web page, but also the frameset itself.
Dreamweaver makes it easy to save framesets and included frames by providing several special commands. To save a frameset, select the frameset as previously described and choose File
You can save a single frame by clicking in the frame and then choosing File
Although you can save each frame separately in the frameset, it can be a chore unless you choose File
There's no real trick to closing a Dreamweaver frameset: Just choose File
Establishing a Frameset
This Technique uses one of the many ways in Dreamweaver to create a frameset from scratch and brings in existing content for each of the frames.
Within the Dreamweaver Technique site, choose File
When the New Document dialog box opens, select the Page From Sample category.
From the Sample Folder list, choose Framesets.
Select the Fixed Top, Fixed Bottom entry from the Framesets list; click OK when you're done.

Dreamweaver creates the new frameset; each of the frames has been automatically named for you.
In the Title field of the Document toolbar, type Relative Realty and press Enter (Return). It's best to name the frameset when it's first created because the frameset is currently selected; novices often make the mistake of applying a title to one of the frame pages rather than the frameset.
Choose File
Alt+click (Option+click) in the top frame.
From the Property inspector, drag the Src target icon to the Files panel and point to header_fr.htm in the 16_Frames folder.
Tip
I find it helpful to add an _fr suffix to all my individual frame files to identify them as part of a frameset.
Click the frame border between the top and middle frames to select the frameset.
In the Property inspector, make sure the top frame is selected in the representation and enter 115 pixels for the Row value.
Alt+click (Option+click) in the middle frame and, in the Property inspector, drag the Src point-to-file icon to the Files panel and point to home_fr.htm. Depending on your screen resolution and size of your Dreamweaver window, you may see scroll bars appear.
Alt+click (Option+click) in the middle frame and, in the Property inspector, drag the Src point-to-file icon to the Files panel and point to footer_fr.htm.
Leave the default Row values for middle and bottom frames and choose File
If you investigate the individual frame pages, you'll see that they all connect to a different CSS file than other pages in the Dreamweaver Techniques site. For the main_fr.css file, the outside border attributes have been removed to work better within the frameset.
The Frameset Property inspector manages elements, such as the borders, that are common to all the frames within a frameset. It also offers more precise sizing control over individual rows and columns than you can achieve visually by dragging the borders. If the Property inspector is not already open, choose Window
Note
When a browser visits a Web page that uses frames, it displays the title found in the frameset HTML document for the entire frame. The easiest way to set that title is to select the frameset and enter the name directly in the Title field of the Document toolbar, if visible. You can also set the title by selecting the frameset and choosing Modify
With HTML, when you want to specify the size of a frame, you work with the row or column in which the frame resides. Dreamweaver gives you two ways to alter a frame's size: by dragging the border or, for more precision, by specifying a value in the Property inspector.
As shown in Figure 16-9, Dreamweaver's Frameset Property inspector contains a Row/Column selector to display the structure of the selected frameset. For each frameset, click the tab along the top or left side of the Row/Column selector to choose the column or row you want to modify.
Note
The Row/Column selector shows only the rows and columns for one frameset at a time. Therefore, if your design uses nested framesets, you won't see an exact duplicate of your entire Web page in the Row/Column selector.
Whether you need to modify just a row, a column, or both a row and a column depends on the location of the frame:
If the frame spans the width of an entire page, like the top or bottom row shown in Figure 16-7, select the corresponding tab on the left side of the Row/Column selector.
If the frame spans the height of an entire page, select the equivalent tab along the top of the Row/Column selector.
If the frame does not span either the entire height or width (refer to the middle row in Figure 16-7), select both its column and its row and modify the size of each in turn.

Figure 16-9. In the Frameset Property inspector, you use the Row/Column selector tabs to choose which frame you are going to resize.
After you have selected the row or column, you can specify its size in several ways:
To specify the size in pixels, enter a number in the Frameset Property inspector's Value text box and select Pixels as the Units option.
To specify the size as a percentage of the screen, enter a number from 1 to 100 in the Value text box and select Percent as the Units option.
To specify a size relative to the other columns or rows, first select Relative as the Units option. Now you have two choices:
To set the size to occupy the remainder of the screen, delete any number that may be entered in the Value text box; optionally, you can enter 1.
To scale the frame relative to the other rows or columns, type the scale factor in the Value text box. For example, if you want the frame to be twice the size of another relative frame, put a 2 in the Value text box.
Note
The Relative size operator is generally used to indicate that you want the current frame to take up the balance of the frameset column or row. This operator makes it easy to specify a size without having to calculate pixel widths and ensures that the frame has the largest possible size.
By default, Dreamweaver sets up your framesets so that all the frames have borders that are invisible when viewed in a browser. You can, however, set borders to be visible, alter the border color, and change the border width. All the border controls are handled through the Frameset Property inspector.
Note
Dreamweaver also provides border controls for individual frames. Just as table cell settings override options set for the entire table, the individual frame options override those determined for the entire frameset, as described in the section "Working with the Frame Property Inspector," later in this chapter. Use the frameset border controls when you want to make a global change to the borders, such as turning them all off.
If you are working with nested framesets, select the outermost frameset before you begin making any modifications to the borders. You can tell that you've selected the outermost frameset by looking at the Dreamweaver Tag Selector; it shows only one <frameset> in bold. If you select an inner nested frameset, you see more than one <frameset> in the Tag Selector.
When a frameset is first created, Dreamweaver sets borders to be invisible in all browsers. You can expressly turn the frameset borders on or off through the Property inspector.
Unfortunately, different browsers control frame borders differently. Some browsers base the presence of borders on the value in the Borders drop-down list, whereas others use the Border Width text box. To enable borders for all browsers, enter a non-zero number in the Border Width text box; and in the Borders drop-down list of options, choose Yes.
The opposite is also true; if you want borders to be invisible for all browsers, set the Borders drop-down list to No, and specify 0 for the Border Width. If you turn off the borders for your frameset, you can still work in Dreamweaver with View
To change the frameset border color, select the Border Color text box and enter either a color name or a hexadecimal color value. You can also select the color box and choose a new border color from the color picker. If you click the small painter's palette in the upper-right corner of the color picker, the Color dialog box opens, just as with other color pickers in Dreamweaver.
Note
If you have nested framesets on your Web page, make sure that you've selected the correct frameset before you make any modifications through the Property inspector.
What makes the whole concept of a Web page frameset work so well is the flexibility of each frame:
You can design your page so that some frames are fixed in size and others are expandable.
You can attach scroll bars to some frames and not others.
Any frame can have its own background image, and yet all frames can appear as one seamless picture.
Borders can be enabled—and colored—for one set of frames but left off for another set.
Dreamweaver uses a Frame Property inspector to specify most of a frame's attributes. Others are handled through devices already familiar to you, such as the Page Properties dialog box.
Each frame is its own HTML document and, as such, each frame can have independent page properties. To alter the page properties of a frame, position the cursor in the frame and choose Modify
From the Page Properties dialog box, you can assign a title, although it is not visible to the user unless the frame is viewed as a separate page. If you plan to use the individual frames as separate pages in your <noframes> content (see "Handling Frameless Browsers" at the end of this chapter), it's good practice to title every page. You can also assign a background and the various link colors to the nonframe content by selecting the desired color box or entering a color name into the appropriate text box in the Appearance category of the Page Properties dialog box.
Note
The Page Properties dialog box respects the Dreamweaver preference for CSS or HTML when working in frames, just as it does with a standard page. For more details on setting the Page Properties, see the section "Establishing Page Properties" in Chapter 6.
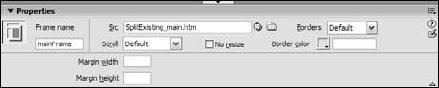
Using the Frame Property inspector, you can assign names to each of your frames, specify what document should display within each frame, add or remove scroll bars, specify whether the user can resize the frame, and more. To view the Property inspector for a frame, first select the frame by using the Frames panel or by holding down the Alt (Option+Shift) key as you click within the frame.
Naming each frame is essential to getting the most power from a frame-structured Web page. The frame's name is used to make the content inserted from a hyperlink appear in that particular frame. For more information about targeting a link, see the section "Targeting Frame Content," later in this chapter.
Frame names must follow specific guidelines, as explained in the following steps:
Select the frame you want to name. You can use either the Frames panel or Alt+click (Option+Shift+click) inside the frame.
If necessary, open the Property inspector by choosing Window
In the Frame Property inspector, shown in Figure 16-10, add the frame's name in the text box under the Frame Name label. Frame names have the following restrictions:
You must use one word, with no spaces.
You may not use special characters such as quotation marks, question marks, and hyphens. You may use the underscore character.
You may not use certain reserved frame names:
_blank, _parent, _self, and_top.
You don't have to build all Web pages in frames from scratch. You can load an existing Web page into any frame. If you've selected a frame and the Frame Property inspector is open, just type the link directly into the Src text box or click the folder icon to browse for your file. Alternatively, you can position your cursor in a frame (without selecting the frame) and choose File
You can generally set most border options adequately in the Frameset Property inspector, yet you can override some of the options, such as color, for each individual frame. These possibilities have practical limitations, however.
From the Frame Property inspector for a selected frame, you can make the borders visible by choosing Yes in the Borders drop-down list, or make them invisible by choosing No. Leaving the Borders option at Default gives control to the frameset settings. You can also change a frame's border color by choosing the Border Color swatch in a selected frame's Property inspector.
Note
Different browser versions on different operating systems treat the border settings for individual frames differently. To complicate the situation, sometimes the settings on the overall frameset control how the individual frame border settings act. For example, if the frameset border is set to Default, and the individual frame Border is set to No, the border still appears in Internet Explorer 6.0 running on Windows—but as flat, rather than three-dimensional. If you elect to set the border property for an individual frame, be sure to test on as many browsers and platforms as possible.
Additional limitations come into play when you try to implement one of your border modifications. Because frames share common borders, it is difficult to isolate an individual frame and have the change affect only the selected frame. As an example, Figure 16-11 shows a frameset in which the borders are set to No for all frames except the one on the lower right. Notice how the left border of the lower-right frame extends to the top, including the left border of the upper-right frame. You have two possible workarounds for this problem. First, you can design your frames so that their borders do not touch, as in a multirow frameset. Second, you can create a background image for a frame that includes a border design.
One of the features that has given frames the wide use they enjoy is the capability to enable or disable scroll bars for each frame. Scroll bars are used when the browser window is too small to display all the information in the Web page frame. The browser window's size is completely controlled by the user, so the Web designer must apply the various scroll bar options on a frame-by-frame basis, depending on the look desired and the frame's content.
Four options are available from the Scroll drop-down list on the Frame Property inspector:
Default: Leaves the use of scroll bars up to the browser.
Yes: Forces scroll bars to appear regardless of the amount of content.
No: Disables scroll bars.
Auto: Turns scroll bars on if the content of the frame extends horizontally or vertically beyond what the browser window can display.
The page shown in Figure 16-12 uses automatic scroll bars in the lower-right frame; you can see one on the far right.

Unless otherwise specified, frames are resizable by the user; that is, a visitor to your Web site can widen, narrow, lengthen, or shorten a frame by dragging the border to a new position. You can disable this resizing capability, however, on a frame-by-frame basis. In the Frame Property inspector, select the No Resize option to turn off the resizing feature.
Note
Although it might be tempting to select No Resize for every frame, it's best to enable resizing to allow users to expand the frame if necessary except in frames that require a set size to maintain their functionality (frames containing navigational controls, for example).
When you first create a frameset using the Frames menu on the Insert bar, or by selecting an item in the Framesets category when you choose File
Just as you can pad table cells with additional space to separate text and graphics, you can offset content in frames. Dreamweaver enables you to control the left/right margins and the top/bottom margins independently. If no margin values are specified, about 6 pixels of space are between the content and the left or right frame borders, and about 15 pixels of space are between the content and the top or bottom frame borders.
To alter the left and right margins, change the value in the Frame Property inspector's Margin Width text box; to change the top and bottom margins, enter a new value in the Margin Height text box. (If you don't see the Margin Width and Margin Height text boxes, select the expander arrow in the lower-right corner of the Property inspector.)
You can update a frame's content in any way you see fit. Sometimes, it's necessary to keep an eye on how altering a single frame's content affects the entire frameset. Other times, it is easier—and faster—to work on each frame individually and later load them into the frameset to see the final result.
With Dreamweaver's multiple-document structure, you can have it both ways. Work on the individual frame files in one or more Document windows and the frameset in yet another. If you use File
Note
To preview changes made to a Web page using frames, you must first save the changed files.
As you're building your Web page frameset, you inevitably try a frame design that does not work. How do you delete a frame once you've created it? Click the frame border and drag it into the border of the enclosing (or parent) frame. When no parent frame is present, drag the frame border to the edge of the page. If the frame being deleted contains any unsaved content, Dreamweaver asks if you'd like to save the file before closing it.
Note
Because the enclosing frameset and each individual frame are all discrete HTML pages, each keeps track of its own edits and other changes. Therefore, each has its own undo memory. If you are in a particular frame and try to undo a frameset alteration, such as adding a new frame to the set, it won't work. To reverse an edit to the frameset, you have to select the frameset and choose Edit
One of the major uses of frames is for navigational control. One frame acts as the navigation center, offering links to various Web pages in a site. When the user selects one of the links, the Web page appears in another frame on the page; and that frame, if necessary, can scroll independently of the navigation frame. This technique keeps the navigation links always visible and accessible.
When you assign a link to appear in a particular frame of your Web page, you are said to be assigning a target for the link. You can target specific frames in your Web page, and you can target structural parts of a frameset. In Dreamweaver, targets for typical text or image links are assigned through the Text and Image Property inspectors. You also encounter frame target options elsewhere in the Dreamweaver interface, such as when you create a navigation bar (see Chapter 9) or when you use behaviors that create links, such as the jump menu behavior (see Chapter 12).
In the section "Naming Your Frames," you learned that certain names are reserved. The following four special names are reserved by HTML for the parts of a frameset that are used in targeting: _blank, _parent, _self, and _top. With them, you can cause content from a link to overwrite the current frame or to appear in an entirely new browser window.
To target a link to a section of your frameset, follow these steps:
Select the text or image you want to use as your link.
In the Text (or Image) Property inspector, enter the URL and/or named anchor in the Link text box. Alternatively, you can click the folder icon to browse for the file.
Select the Target text box. (You may need to expand the Property inspector to see the Target text box.)
Select one of the following reserved target names from the drop-down list of Target options (see Figure 16-13) or type an entry into the text box:
_blank—Opens the link into a new browser window and keeps the current window available._parent—Opens the link into the parent frameset of the current frame, if any._self—Opens the link into the current frame, replacing its contents (the default)._top—Opens the link into the outermost frameset of the current Web page, replacing all frames.

The generic nature of these reserved target names enables you to use them repeatedly on different Web pages, without having to code a particular reference each time.
Note
A phenomenon known as recursive frames can be dangerous to your site setup. For example, say you have a frameset named index_frame.html. If you include a link to index_frame.html in any frame on your current page and leave the target empty or set the target as _self, when the user selects that link, the entire frameset loads into the current frame—including another link to index_frame.html. Browsers can handle about three or four iterations of this recursion before they crash. To avoid the problem, set your frameset target to _top.
Recall the importance of naming each frame in your frameset. After you have entered a name in the Name text box of the Frame Property inspector, Dreamweaver dynamically updates the Target list to include that name. This feature enables you to target specific frames in your frameset in the same manner that you target the reserved names noted previously.
Although you can always type the frame name directly in the Target text box, the drop-down list comes in handy for this task. Not only can you avoid keeping track of the various frame names in your Web page, but you prevent typing errors as well. Targets are case-sensitive, and names must match exactly or the browser won't be able to find the target.
Sooner or later, most Web designers using frames need to update more than one frame with a single click. The problem is, you can't group two or more URLs together in an anchor tag. Here is an easy-to-implement solution, thanks to Dreamweaver's behaviors.
Note
If you're not familiar with Dreamweaver's JavaScript behaviors, you might want to look at Chapter 12 before continuing.
To update more than one frame target from a single link, follow these steps:
Select your link text or image in the frame.
If you selected text for your link, type javascript:; in the Link field of the Text Property inspector.
The behavior cannot be attached directly to the text; instead, it must be associated with an anchor or an image. Typing
javascript:;in the Link field creates the necessary anchor tag.Tip
If one of the multiple links targets the frame that contains the hotspot, instead of typing
javascript:; in the Link field, you can enter the path to the file that will load in that frame.Open the Behaviors panel by choosing Window
Click the Add (+) button at the top of the Behaviors panel, and in the drop-down menu, choose Show Events For
Click the Add (+) button again to display the list of available behaviors and choose Go To URL.
Dreamweaver displays the Go To URL dialog box (see Figure 16-14) and scans your document for all named frames. Select a target frame from the list of windows or frames.
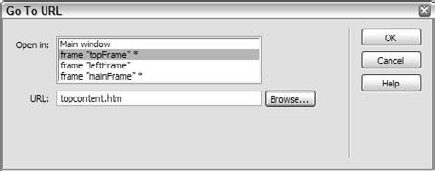
Figure 16-14. You can cause two or more frames, marked by the trailing asterisk, to update from a single link by using Dreamweaver's Go To URL behavior.
Warning
You won't be able to use this behavior until you name your frames as detailed in the section "Naming Your Frames," earlier in this chapter.
Enter a URL or click the Browse button to select one. Dreamweaver places an asterisk after the targeted frame to indicate that a URL has been selected for it. You can see this in Figure 16-14.
Repeat steps 6 and 7 for any additional frames you want to target.
Click OK when you're finished.
If
onClickis not already listed in the Events column of the Behaviors panel, click the arrow button next to the event and choose(onClick)from the event list.
Now, whenever you click your one link, the browser opens the URLs in the targeted frames in the order specified.
Setting Frame Targets
In this Technique, you set the text navigation links to work properly with the frameset. Three links open pages within the frameset and a fourth opens a page outside the frameset.
Re-open the frameset previously saved, frames_start.htm.
In the bottom frame, select the text Home.
From the Property inspector, drag the Link point-to-file icon to the home_fr.htm file.
Select mainFrame from the Target list.
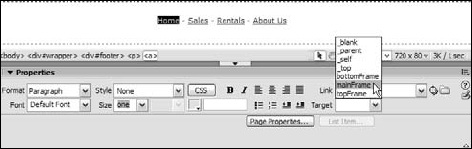
Dreamweaver automatically adds the names of frames in the current frameset to the Target list.
Repeat steps 2–4, with the text Sales and the file sales_fr.htm.
Repeat steps 2–4 again, with the text Rentals and the file rentals_fr.htm. Make sure that you set the Target list to mainFrame for both the previous links.
Select the final text phrase, About Us, and drag the Link point-to-file icon to the about.htm file. Because about.htm is a standard HTML file and not part of the frameset, you'll choose a different target.
From the Target list, choose _top.
Save your page and press F12 (Option+F12) to preview the frameset.
When you try the navigation links, you notice that the first three links open their pages within the frameset as expected whereas the fourth link, about.htm, replaces the frameset with a single page. If you click the Home link at the bottom of this page, the frameset re-opens.
Not all of today's browsers support frames. Netscape began supporting frames in Navigator version 2.0; Microsoft didn't start until IE version 3.0—and a few of the earlier versions for both browsers are still in use, particularly among AOL users. Some less-prevalent browsers also do not support frames. HTML has a built-in mechanism for working with browsers that are not frame-enabled: the <noframes>...</noframes> tag pair.
A more vital reason to use the <noframes> tag than supporting older browsers is that most of the search-engine indexing systems (called spiders) don't work with frames. If your frameset is index.html and you want the spider to find the rest of your site, the <noframes> content must include descriptive text as well as navigational links to other pages in your site. Many Webmasters also include links to current versions of Communicator or Internet Explorer to encourage their nonframe-capable visitors to upgrade.
When you begin to construct any frameset, Dreamweaver automatically inserts a <noframes> area just below the closing </frameset> tag. If a browser is not frames-capable, it ignores the frameset and frame information and renders what is found in the <noframes> section.
Note
If you are manually coding a frameset, in Code view, you can insert the <noframes>...</noframes> tag pair by clicking the No Frames button in the Frames menu of the HTML category of the Insert bar.
What should you put into the <noframes> section? To ensure the widest possible audience, Webmasters typically insert links to a nonframe version of the site. The links can be as obvious or as discreet as you care to make them and, if used, are placed on the site's home page.
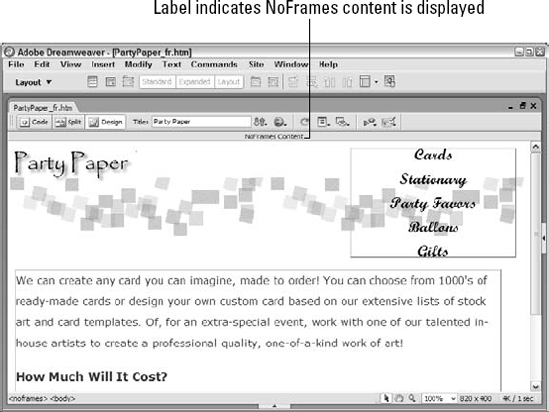
Dreamweaver includes a facility for easily adding and modifying the <noframes> content. Choose Modify
Keep the following pointers in mind when working in the NoFrames Content window:
The page properties of the
<noframes>content are the same as the page properties of the frameset. You can select the frameset and then choose ModifyDreamweaver disables the File
The
<noframes>section is located in the frameset page, which is the primary page examined by search engine spiders. It's a good idea to enter<meta>tag information detailing the site in the frameset page. While you're in the NoFrames Content window, you can insert the<meta>tags using the Head category of the Insert bar.
The <iframe> tag (short for inline frames) is an HTML 4.0 specification worth noting. An Iframe is used to include one HTML document inside another—without building a frameset. What makes iframes visually arresting and extremely useful is their capability to display scroll bars automatically, as shown in Figure 16-16. Iframes are supported by Internet Explorer 4 and later, Firefox, Netscape 6 and later, and Safari.
The <iframe> tag uses the src attribute to specify which HTML file is to be included. Any content—text, images, or whatever—found between the opening and closing <iframe> tags is displayed only if the browser does not support iframes. In other words, it's the no-iframe content. Here's an iframe code example:
<iframe src="/includes/salespromo.htm" name="promoFrame"
style="position:absolute; width:200px; height:300px; top:139px;
left:530px">Iframes are not supported by this browser.</iframe>
If you're familiar with Cascading Style Sheet AP elements, you may notice that the style attribute is identical in iframes. This has an interesting effect in Dreamweaver: iframe code with the style attribute set to position:absolute is displayed like an AP element, as shown in Figure 16-17. This makes positioning and resizing the iframe straightforward. To see the actual iframe content, preview the page in a compatible browser.
Note
Iframes are depicted in Design view as a solid rectangle, even if absolute positioning is not used. Although you can't see the content at design-time in Dreamweaver without previewing the page in a browser, the iframe dimensions are rendered correctly to preserve the layout.
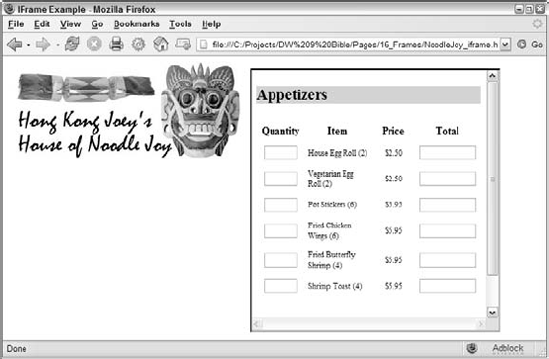
Figure 16-16. The iframe—also known as an inline frame—is a cutting-edge technique for including one HTML page within another.
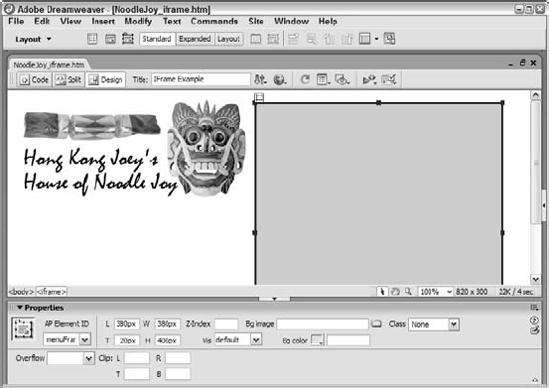
Figure 16-17. When you view an absolutely positioned iframe tag in Dreamweaver, it appears like an AP element, complete with resizing handles.
Warning
Specifying position:absolute in the style attribute enables you to exactly position a floating frame on the page. However, if you specify position:absolute and your other content is not contained within AP elements, your floating frame may overlap the other content on your page. For this reason, it is best to use floating frames in combination with a CSS-based layout.
You can also specify a style of position:relative. In this case, browsers display the floating frame on the page relative to the other page content, even if that content is not contained within AP elements. Note, however, that Design view does not always correctly display floating frames that are positioned relatively, and sometimes the floating frame overlaps existing content, making it difficult to edit. Again, it is best to lay out your content using CSS positioning and specify position:absolute for your <iframe> if you are using floating frames.
In Dreamweaver, iframes are referred to as floating frames. Dreamweaver facilitates the inclusion of iframes in your documents with the Floating Frame button in the Frames menu of the HTML category of the Insert bar.
Note
Two Frames menus are available in Dreamweaver: one in the Layout category and one in the HTML category. Be sure you switch to the HTML category before attempting to insert an iframe (floating frame).
To insert a floating frame in your document, follow these steps:
If you are working in Design view, switch to Code view by choosing View
Position the cursor after the
<body>tag in your document.Insert the
<iframe>tag by clicking the Floating Frame button on the Frames menu of the Insert bar (HTML category).Note
You cannot access the floating frame command while you are in Design view. If you are in Code and Design view, the cursor must be in the Code window for the command to be available.
Specify the attributes for the
<iframe>tag. To do this, right-click (Ctrl+click) the tag and choose Edit Tag <iframe> from the drop-down list.The Tag Editor for iframes opens. In this dialog box, specify at least the following:
Source: This is the file that will be displayed within the floating frame.
Scrolling: This attribute specifies whether scroll bars will appear in the frame.
Style: In the Style Sheet/Accessibility category, type position:absolute in the Style box. If you want to add other style options, separate them with semicolons.
Alternate Content: Select the Alternate Content category and then specify the text that will be displayed in browsers that don't support floating frames.
In Design view, you can size and position the floating frame as you would any AP element.
Note
Refer to Chapter 11 for more information about positioning and sizing AP elements.
Frames are a significant tool for Web designers. With frames and framesets, you can divide a single Web page into multiple, independent areas. Dreamweaver gives Web designers quick and easy access to frame design through its drag-and-drop interface. When you're working with frames and framesets, keep these points in mind:
A framed Web page consists of a separate HTML document for each frame and one additional file that describes the frame structure, called the frameset.
A frameset comprises columns and rows, which can be sized absolutely in pixels as a percentage of the browser window or relative to the other columns or rows.
Dreamweaver enables you to reposition frame borders by dragging them to a new location. You can also add new frames by Alt+clicking (Option+clicking) as you drag any existing frame border.
Framesets can be nested to create more complex column and row arrangements. Selecting the frame border displays the Frameset Property inspector.
Select any individual frame through the Frames panel or by Alt+clicking (Option+Shift+clicking) within any frame. After you select the frame, you can display the Frame Property inspector.
Make your links appear in a specific frame by assigning targets to the links. Dreamweaver supports both structured and named targets. You can update two or more frames with one link by using the Dreamweaver Go To URL behavior.
You should include information and/or links for browsers that are not frame-capable through Dreamweaver's Edit NoFrames Content feature.
Floating frames, as defined in HTML 4.0, can be implemented in Dreamweaver by initially hand-editing the
<iframe>tag in Code view. After inserting the tag, the floating frame can be sized and positioned in Design view.
In the next chapter, you learn how to develop timelines, which enable AP elements and their contents to move around the Web page.