
Cascading Style Sheets basics
Using external style sheets
Applying style sheet attributes
Dreamweaver Technique: Applying External Style Sheet Styles
Defining and inserting styles
Dreamweaver Technique: Crafting a Print Style Sheet
Understanding style properties
Specifying design time style sheets
All publications, whether on paper or the Web, need a balance of style and content to be effective. Style without content is all flash with no real information. Content with no style is flat and uninteresting, thus losing the substance. Traditionally, HTML has tied style to content wherever possible, preferring logical tags such as <strong> to indicate emphasis to physical tags such as <b> for bold. But although this emphasis on the logical worked for many single documents, its imprecision made achieving style consistency across a broad range of Web pages unrealistic, if not impossible.
The Cascading Style Sheets specification has changed this situation—and much more. As support for Cascading Style Sheets (CSS) grows, more Web designers can alter font faces, type size, spacing, and many other page elements with a single command—and have the effect ripple not only throughout the page, but also throughout a Web site. Moreover, an enhancement of CSS, initially called CSS-P (for positioning), is the foundation for what has become commonly known as AP elements.
Dreamweaver was one of the first Web-authoring tools to make the application of Cascading Style Sheets user-friendly—and in this latest version, Dreamweaver has integrated CSS throughout the program. Through Dreamweaver's intuitive interface, the Web designer can access more than 70 different CSS settings, affecting everything from type specs to multimedia-like transitions. Dreamweaver enables you to work the way you want: Create your complete style sheet first and then link it when you're ready, or make up your styles one-by-one as you build your Web page. Dreamweaver's advanced CSS rendering helps you create the design you visualize every step of the way; best of all, Dreamweaver renders CSS according to the W3C specifications, today's standard for Web designers.
In this chapter, you find out how CSS works and why you need it. As you work through a Dreamweaver Technique to remove underlines from links, you also walk through a typical style sheet session. With that experience under your belt, you're ready for the later sections with detailed information on the current CSS commands—and how to apply those commands to your Web page and site. Also, the section on defining styles helps you understand what's what in the Style Definition dialog box. You learn how you can create external style sheets to establish—and maintain—the look and feel of an entire Web site with a single document. Finally, you see how Dreamweaver's special CSS features, including design time style sheets, make the CSS promise a reality.
The Cascading Style Sheets system significantly increases the design capabilities for a Web site. If you are a designer used to working with desktop publishing tools, you may recognize many familiar features in CSS, including the following:
Commands for specifying and applying font characteristics
Traditional layout measurement systems and terminology
Pinpoint precision for page layout
Cascading Style Sheets are able to apply many features with a simple syntax that is easy to understand. If you're familiar with the concept of using styles in a word processing program, you'll have no trouble grasping style sheets.
Here's how the process works: CSS instructions are given in rules; a style sheet is a collection of these rules. A rule is a statement made up of an HTML or custom style, called a selector, and its defined properties and values. For example, a CSS rule that makes the contents of all <h1> tags (the selector) red (#FF0000 in hexadecimal, the value) in color (the property) looks like the following:
h1 {
   color: #FF0000;
}
A CSS property and its associated value are collectively referred to as a declaration.
In the following sections, you see the various characteristics of CSS—grouping, inheritance, and cascading—working together to give style sheets their flexibility and power.
A Web designer often needs to change several style properties at once. CSS enables you to group declarations by separating them with semicolons. For example:
h1 {
  color:#FF0000;
  font-family:Arial,Helvetica,sans-serif;
  font-size:18pt;
}
The Dreamweaver interface provides a wide range of options for styles. If you look at the code, you find that Dreamweaver groups your selections exactly as shown in the preceding example. You can group selectors as well as declarations. Separate grouped selectors with commas rather than semicolons. For example:
h1, h2, p, em {
  color:green;
  text-align:left;
}CSS rules can also be applied to more than one tag through inheritance. The HTML tags enclosed within the CSS selector can inherit most, but not all, CSS declarations. Suppose you set all <p> tags to the color red. Any tags included within a <p>...</p> tag pair then inherit that property and are also colored red.
Inheritance is also at work within HTML tags that involve a parent-child relationship, such as a list. Whether numbered (ordered, <ol>) or bulleted (unordered, <ul>), a list comprises any number of list items, designated by <li> tags. Each list item is considered a child of the parent tag, <ol> or <ul>. Look at the following example:
ol {
  color:#FF0000;
}
ul {
  color:#0000FF;
}
Using the preceding example, all ordered list items appear in red (#FF0000); all unordered list items appear in blue (#0000FF). One major benefit to this parent-child relationship is that you can change the font for an entire page with one CSS rule. The following statement accomplishes this change:
body {
  font-family: Verdana, Arial, Helvetica, sans-serif;
}
The change is possible in the previous example because the <body> tag is considered the parent of every HTML element on a page.
Tip
There's one exception to the preceding rule: tables. Netscape browsers (through version 4.75) treat tables differently than the rest of the HTML <body> when it comes to style sheets. To change the font of a table, you specify something like the following:
td {
  font-family: Verdana, Arial, Helvetica, sans-serif;
}
Because every cell in a table uses the <td> tag, this style sheet declaration affects the entire table. Thankfully, the number of users still running Netscape 4.x has dwindled to the point where many Web developers don't worry about it much.
The term cascading describes the capability of a local style to override a general style. Think of a stream flowing down a mountain; each ledge encountered by the stream has the potential to change its direction. The last ledge determines the final direction of the stream. In the same manner, one CSS rule applying generally to a block of text can be overridden by another rule applied to a more specific part of the same text.
For example, you've defined, using style sheets, all normal paragraphs—<p> tags—as a particular font in a standard color, but you mark one section of the text using a little-used tag such as <samp>. If you make a CSS rule altering both the font and color of the <samp> tag, the section takes on the characteristics of that rule.
The cascading aspect of style sheets also works on a larger scale. One of the key features of CSS is the capability to define external style sheets that can be linked to individual Web pages, acting on their overall look and feel. Indeed, you can use the cascading behavior to fine-tune the overall Web-site style based on a particular page or range of pages. Your company may, for instance, define an external style sheet for the entire company intranet; each division could then build upon that overall model for its individual Web pages. For example, suppose that the company style sheet dictates that all <h2> headings are in Arial and black. One department could output its Web pages with <h2> tags in Arial, but colored red rather than black, whereas another department could make them blue.
Tip
Dreamweaver has a great learning tool built in to help you understand inheritance and cascading: the Relevant CSS tab of the Tag inspector. Select any tag and you can see what CSS rules are being applied to the selection; rules that are applied, but not taking effect because of inheritance or cascading properties are marked with a red strikethrough. This feature is explained in greater detail later in this chapter.
Redefining existing HTML tags is a step in the right direction toward consistent design, but the real power of CSS comes into play when you define custom selectors. One type of custom selector is called a class; class selector names always begin with a period. Here's a simple example: To style all copyright notices at the bottom of all pages of a Web site to display in 8-point Helvetica all caps, you could define a tag like this:
.cnote {
  font-family:Helvetica, sans-serif;
  font-size:8pt;
  font-transform:uppercase
}
If you define this style in an external style sheet and apply it to all 999 pages of your Web site, you have to alter only one line of code (instead of all 999 pages) when the edict comes down from management to make all the copyright notices a touch larger. After a new class has been defined, you can apply it to any range of text, from one word to an entire page.
Classes are typically applied to more than one element on a page. You could, for example, have more than one paragraph styled as a copyright notice in various parts of the page. A custom tag intended to be applied to a single element, such as a <div> tag that contains the footer content, is called an ID selector. An ID selector is identified by its beginning pound sign—technically called an octothrope—for example, #footer. If you want the footer content to really stand out, you could style it with white type against a black background with a red border. The CSS rule looks like this:
#footer {
   color: #FFFFFF;
   background: #000000;
   border: thin solid #FF0000;
}
An ID selector is applied to a tag through the self-named id attribute, minus the pound sign. Thus, the <div> tag that holds the footer content is coded like this:
<div>Footer content goes here</div>
Designers use a combination of class and ID selectors—as well as other types of selectors—when laying out the page. It's considered a best practice to avoid using class selectors when the CSS rule is intended to be applied only once on the page; in those situations, an ID selector is the better choice.
The specificity of a CSS rule determines which rule takes effect when two or more rules conflict. For example, let's say you have one rule that sets the color of an <h1> tag to dark gray, like this:
h1 { color: #333333; }and another rule that sets the color of a class called .alert to bright red:
.alert { color: #FF0000; }What would happen when the browser encounters code like this:
<h1 class="alert">Attention all shoppers!</h1>
As you might suspect, the .alert rule would be applied and the <h1> tag would appear red. The reason this is true is because the .alert selector is more specific than the <h1> tag selector. The W3C CSS specification (no relation) provides a different weight for each kind of selector.
A rule's specificity is noted with four comma-separated values. For example, the specificity for the <h1> rule is
0,0,0,1
because there is one tag element in the selector. Whereas the specificity for the .alert rule is
0,0,1,0
because there is one class element in the selector. Any positive value in the second-to-last column outweighs any value in the last column.
The formula for creating specificity is as follows:
Total inline styles, total ID selectors, total class and pseudo-class selectors, total tag elements
Inline styles are the most specific—and the most rarely used these days—so they trump any other type of selector. If two rules have the same specificity and are applied to the same selection, the rule that comes later in the style sheet—because it is physically closer to the code—wins.
CSS applies style formatting to your page in one of three ways:
Via an external, linked style sheet
Via an embedded styles
Via inline style rules
An external style sheet is a file containing the CSS rules; it links one or more Web pages. One benefit of linking to an external style sheet is that you can customize and change the appearance of a Web site quickly and easily from one file.
Two different methods exist for working with an external style sheet: the link method and the import method. Dreamweaver initially defaults to the link method, but you can also choose import if you prefer.
For the link method, a line of code is added outside of the <style> tags, as follows:
<link href="mainstyle.css" rel="style sheet" type="text/css">
The import method writes code within the style tags, as follows:
<style type="text/css">
<!--
@import url("newstyles.css");-->
</style>
Comparing the link and the import methods, the link method is better supported among browsers, including Netscape 4.x. Because of Netscape 4.x's lack of standards support in CSS and other issues, however, the link method isn't necessarily your best choice.
Tip
You can take advantage of Netscape 4.x's lack of support for the import method to offset its rather quirky support of CSS in general. Create two style sheets: one to handle Netscape 4.x issues and one for newer browsers, such as Internet Explorer 4.x and up and Netscape 6. Use the link technique to bring in the NS4.x-based style sheet and import for the second style sheet. By writing the code in the following sequence, the second style sheet overrides the same selector rules in the first style sheet and is ignored by Netscape 4.x:
<link href="mainstyleNS.css" rel="style sheet";
type="text/css">
<style type="text/css">
<!--
@import url("mainstyles.css");-->
</style>
Embedded styles are those typically written into the actual file at the top of a Web page within a <style>...</style> tag pair. Placing style sheets within the header tags has become a convention that many designers use, although you can also apply a style sheet anywhere on a page.
The <style> tag for a Cascading Style Sheet identifies the type attribute as text/css. A sample embedded style listing looks like the following:
<style type="text/css">
<!--
p {
  font-family: "Arial, Helvetica, sans-serif";
  color: #000000;
}
.cnote {
  font: 8pt "Arial, Helvetica, sans-serif";
  text-transform: uppercase;
}
h1 {
  font: bold 18pt Arial, Helvetica, sans-serif;
  color: #FF0000;
}-->
</style>
The HTML comment tags <!-- and --> prevent older browsers that can't read style sheets from displaying the CSS rules.
The final method of applying a style inserts it within HTML tags using the style attribute—a technique known as inline styles. This method is the most local of all the techniques; that is, it is closest to the tag it is affecting and, therefore, has ultimate control—because of the cascading nature of style sheets as previously discussed.
Warning
As my mother used to say, "Just because you can do something, doesn't mean you should." Generally, inline styles are not used because they exert such a high level of control, and modifying the style must be done on an item-by-item basis, which defeats much of the purpose of CSS.
When you create an AP element within Dreamweaver, you notice that the positioning attribute is a Cascading Style Sheet inline within a <div> tag like the following:
<div id="apDiv1" style="position:absolute; visibility:inherit; left:314px;
top:62px; width:194px; height:128px; z-index:1">
</div>
For all its apparent complexity, the Cascading Style Sheets system becomes straightforward in Dreamweaver. Often, you won't have to write a single line of code. But even if you don't have to write code, you should understand the CSS fundamentals of grouping, inheritance, and cascading.
Note
Dreamweaver gives anyone working with CSS layouts a big boost with the newly introduced starter pages available through the Layout category of the New Document dialog box. With a full array of layout variations, you can quickly get a solid head start without touching a single CSS rule. Naturally, you're free—and encouraged—to customize the styles. For more details about creating a new page based on the CSS layouts, see Chapter 5, "Setting Up Sites and Servers."
The CSS Styles panel is Dreamweaver's central point for establishing, modifying, and learning about Cascading Style Sheets. It is, by far, the most complex and sophisticated of any of Dreamweaver's panels and requires a bit of explanation to help you to understand how best to use it. You can open the CSS Styles panel by choosing Window
The CSS Styles panel can be viewed in two separate ways: All mode and Current mode. In brief, All mode displays the embedded and external CSS styles contained in the current page; it does not display inline styles. Current mode shows every style rule affecting the current selection on the page, regardless of whether the source is defined in an inline, embedded, or external style rule.
Personally, I tend to work in All mode during the initial development of a page and then switch to Current when I need to drill-down into a particular style. Both modes allow for rapid modification of any defined CSS properties and the equally speedy setting of new attributes.
Enter All mode by selecting All at the top of the CSS Styles panel. Once selected, you'll note that the panel is divided into two parts, the All Rules pane and the Properties pane. The All Rules pane shows every embedded and external style rule associated with the current page. Select any rule to see its properties and values in the Properties pane (see Figure 7-1).
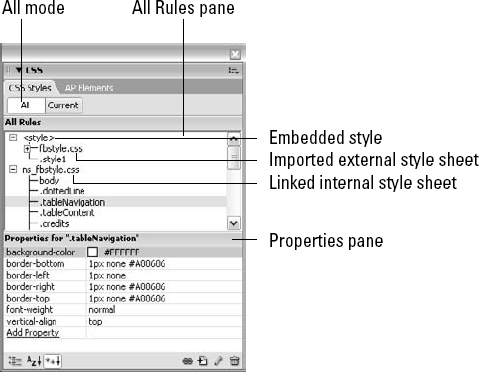
Figure 7-1. Use All mode to see the full list of embedded and external style rules for the current page.
Dreamweaver's All mode enables you to tell, at a glance, where a custom style is from—whether it's from a linked external style sheet or included in the current document. The CSS Styles panel displays the containing tag <style> if the styles are embedded or imported; expand the <style> entry to determine if it contains styles or an imported sheet or both. You may recall that the code for importing a style sheet is placed within a <style> tag. Linked style sheets are shown with just the filename, as you can see in Figure 7-1.
Note
The style rules are presented in the order they appear in the embedded style tag or external style sheet. To adjust the order of the rules, drag the style rule you want to move to its new location.
Select any rule in the All Rules pane to see its properties and values in the Properties pane. By default, only the currently set properties are displayed. There are two other ways to display the properties, Category view and List view. You can choose the way you'd like to see the properties by selecting from one of the buttons on the bottom left of the Properties pane:
Category View: Separates the CSS properties and values into the same nine categories found in the CSS Rule Definition dialog: Font, Background, Block, Border, Box, List, Positioning, Extensions and Tables, Content and Quotes. This view is useful when you want to add one or more new properties in a specific category.
List View: Shows an alphabetical listing of the properties with the applied ones listed first. Use this view when you know the name of a property but don't want to enter it by hand.
Show Only Set Properties: Displays only the currently set properties as well as an option to add a new one. Once you've gained familiarity with CSS properties, you'll find this view the most efficient because it both isolates your current properties and provides a direct route to defining new ones.
For any property displayed, you can modify the current value directly. Details are provided in a later section in this chapter, "Editing and Managing Style Sheets."
As the name implies, Current mode focuses on the current selection (see Figure 7-2); click Current to enter into this mode. Current mode has three separate panes rather than the two of All mode—you can change the height of any by dragging the separating border up or down within the CSS Styles panel.
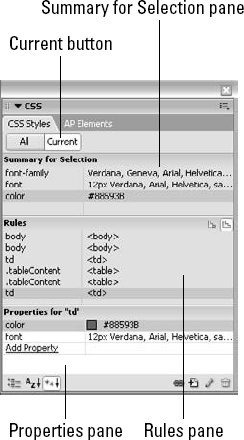
Figure 7-2. Get detailed information and control over the current selection by entering Current mode.
Choose any entry in the Tag Selector or select any section of the page and the CSS Styles panel under Current mode displays all the properties applicable to that selection, regardless of their origin, in the top section known as the Summary for Selection pane. The next area on the panel is the Rules pane, which either shows information about the property currently selected in the Summary for Selection pane or all the rules affecting the current selection; two buttons on the Rules pane title bar allow you to switch between views. The final area in Current mode—the Properties pane—works the same way as it does in All mode.
The Summary for Selection pane lists both properties and values; each entry is listed in order of specificity, the property with lowest specificity appearing first. Furthermore, if there are two conflicting properties only the one with the highest specificity is shown. While subtle, these applications of specificity are a valuable debugging and teaching tool.
For instance, let's say you're trying to change the line-height of a particular paragraph where the property is declared in two different rules: p and .openingParagraph. If you try to change the line-height for the p rule, you won't see a difference, in either Dreamweaver or your browser. A glance at the Summary for Selection pane while the paragraph in question is selected will show just the property for the .openingParagraph rule.
How do you tell which rule a displayed property is from? Dreamweaver offers a number of methods. Hover your cursor over any property in the Summary for Selection pane and the property's location—both rule and document—appear in a tooltip. The Rules pane provides another alternative. Click any property in the Summary for Selection pane and, if the Rules pane is in the About view, you'll see a brief sentence describing the property's location. When in Rules view, the Rules pane shows a cascade of all of the—you guessed it—rules affecting the current selection; the one containing the property selected in the Summary for Selection pane is highlighted as shown in Figure 7-3. You switch between the About view and the Rules view by clicking the Show Information about Selected Property button and the Show Cascade of Rules for Selected Tag button, respectively, located on the right of the Rules pane title bar.
Tip
Move your cursor over any property in the Rules pane while in Rules view to see the tooltip that notes both the property's location and specificity.
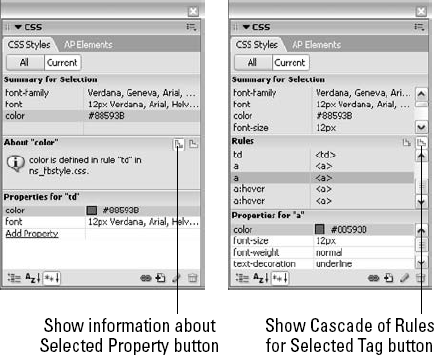
Figure 7-3. Find out where a property is defined through the About view and see the cascade of rules in the Rules view.
The final pane, Properties, is almost exactly the same in the Current mode as it is in All mode. Again, the Show Only Set Properties option is the default and you can, if desired, switch to either Category or List view by using the buttons at the bottom of the CSS Styles panel.
The Properties pane in Current mode differs from the same pane in All mode in one respect. Both applied and irrelevant properties are displayed. The irrelevant properties are noted with a strikethrough. If you place your cursor over the property, Dreamweaver displays a tooltip explaining why the property is not relevant. The two most common reasons a property is marked as irrelevant are because it is overridden by another rule or not inherited.
Dreamweaver uses three primary tools to implement Cascading Style Sheets: the CSS Styles panel, the Edit Style Sheet dialog box, and the Style Definition dialog box. You use the CSS Styles panel to view all the styles available or those that are being applied to the currently selected HTML tag; the CSS Styles panel also provides a direct link to modifying any property or for adding properties to any rule. The Edit Style Sheet dialog is useful for managing groups of styles and style sheets, whereas the Style Definition dialog defines the CSS rules themselves. With these three interfaces, you can accomplish the following:
Link or import all your styles from an external style sheet
Create new selectors and specify their rules
Apply styles to selected text or to a particular tag surrounding that text
Modify any styles you create
Warning
The fourth-generation browsers (and above) support many of the attributes from the first draft of the Cascading Style Sheets standard. Unfortunately, neither Netscape Navigator 4.0 nor Microsoft Internet Explorer 4.0 fully supports CSS Level 1. Of the earlier browsers, only Internet Explorer 3.0 supports a limited set of the CSS Level 1 features: font attributes, indents, and color. However, this support is rendered differently in Internet Explorer 3.0 and 4.0. Netscape Navigator 3.0 does not support any of the features of CSS Level 1. On the brighter side, Netscape Navigator 6.2 shows an almost complete compliance of CSS 1 and quite a lot of CSS 2, the current version of Internet Explorer (6.0) is almost as complete, and the current version of Safari, while only at 2.2, supports all of CSS 1, almost all of CSS 2, and even boasts some CSS 3 support.
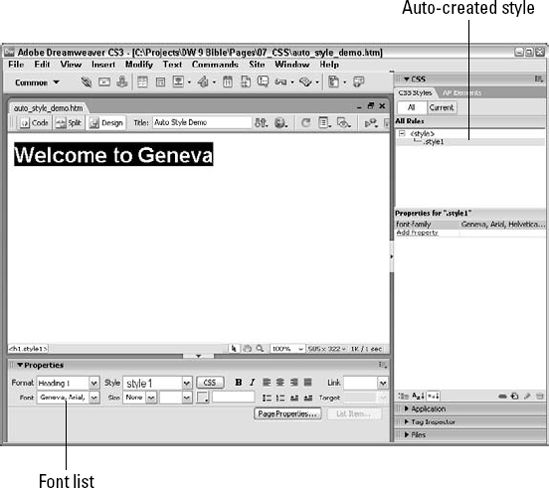
The world of CSS can be overwhelming to the novice designer: How do you even begin to master this complex set of rules and concepts? Dreamweaver offers many routes to explore CSS, but perhaps the easiest entry is through the Property inspector. Set a font face, font size, or color on any bit of text and Dreamweaver applies your formatting as a new style, automatically created and stored internally. The new style is then added to the list of available styles, right in the Property inspector.
Not only does Dreamweaver automatically create styles, it does so in an intelligent fashion that prevents duplicate styles. If you choose the same color, font face, or size as an existing style—whether it's an automatically generated style or not—Dreamweaver uses the existing style and, if necessary, deletes the temporary style. Any style created can be modified to add other characteristics or renamed to fit within your naming scheme.
Walk through the following steps to see how Dreamweaver automatically builds styles:
Select the text you want to style, either by highlighting it or choosing the tag from the Tag Selector. If you select a portion of text rather than the entire tag, the style is applied to a
<span>tag surrounding your selection; otherwise, the style is applied to the containing element, like a<p>or heading tag.From the Property inspector, select a new typeface for the text by choosing Geneva, Arial, Helvetica, sans serif from the Font list. Dreamweaver creates a new CSS class called
styleN, whereNis an incrementing number starting with 1; if this is the first automatically generated style on the page, the style is calledstyle1. The style is applied to the tag containing the text and listed both in the CSS Styles panel and the Property inspector Styles list as shown in Figure 7-4.From the Property inspector, choose a color for your text, like blue, from the color picker. Dreamweaver adds this new property to the existing style.
Place your cursor in another unstyled paragraph or heading.
Choose the same typeface as before from the Font list. Dreamweaver creates a new style,
style2, to apply this new format. Now there are two autogenerated styles:style1andstyle2.Select the same color as previously applied. To avoid creating two styles with the exact same properties, Dreamweaver applies
style1to the text and deletesstyle2. Now, whenever you want text in this typeface and font, just apply the style rather than change the formatting through the Property inspector.
Note
As mentioned earlier, Dreamweaver looks at font, size, and color for its autogenerated styles. In the example, I purposely left size out of the mix to demonstrate that you don't need all three values set to create a style or style match. Any additional formatting set through the Property inspector, such as alignment, is applied with tag attributes (for example, align), rather than added to the CSS style.
If certain conditions are met, Dreamweaver may modify the existing style rather than create a new one. These conditions are
A style named styleN—the Dreamweaver naming convention for automatically created styles—is currently applied.
The style is embedded and not in an external style sheet.
The style is applied only once—to the current selection.
Again, the modifications only apply to the font face, size, and color attributes.
Although the automatically created styles are a good jumping-off place, regard them only as the beginning of your study of CSS. The styles created should be renamed to make them more meaningful; it's far easier to remember how the .headline class should be used than .style1. Renaming is an option initiated through the CSS Styles panel and carried out interactively with Dreamweaver's Find and Replace dialog.
You should also, where possible, maintain your styles in external style sheets rather than embedding them. You can easily export the autocreated styles by selecting them in the CSS Styles panel and choosing Options
Tip
All autogenerated styles are embedded into the page, except in one circumstance. If you format text in a Dreamweaver template (where all but specified areas of the document are locked) without an unlocked region in the <head> area, Dreamweaver places the style in-line.
In addition to automatically creating CSS styles, Dreamweaver also enables you to apply any defined style directly through the Property inspector. The immediate availability of CSS styles is a major boon to productivity and is extremely helpful for designers working in a site fully committed to using Cascading Style Sheets.
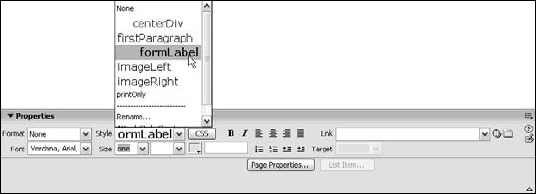
To apply a class style from the Property inspector, select a page element and then make your choice from the Style drop-down list as shown in Figure 7-5; to make it simpler for you, a style is previewed in the Style list. If the tag allows an ID to be assigned, all available ID selectors are listed in a similar list. However, unlike class selectors, after an ID selector has been assigned to a tag, Dreamweaver no longer displays it in the ID list.
Now that CSS-enabled browsers dominate, more Web designers are encountering clients with existing external style sheets. To apply the site's design specifications to a new page, all the designer need do is connect the current page to the CSS document. Dreamweaver provides a streamlined method for doing just that.
The Attach Style Sheet button, found on the CSS Styles panel, is a straightforward solution for linking external style sheets to the current document. When Attach Style Sheet is selected, the Attach External Style Sheet dialog box, shown in Figure 7-6, appears. Here, you can choose between the two previously discussed methods for attaching an external style sheet: link or import. You'll also have the option to target your style sheet for a specific media type.

Figure 7-6. Use the Link method for style sheets readable by older browsers (like Netscape 4.x) and the Import for more current browsers.
If you're not sure which style sheet is the appropriate one, you can check it out before applying. Just select the existing style sheet and click Preview. Dreamweaver applies the selected style sheet to the current page. If you choose another style sheet or click Cancel, the sheet is removed.
After you've made your choice, click Browse to locate a previously existing style sheet. When selected, a standard Select File dialog box appears with the *.css filter set. Simply locate the style sheet and select it: Dreamweaver inserts the necessary code into the <head> of your document. If any HTML tags—such as <p> or any of the heading tags—on your page are defined in the style sheet, you see an immediate change in your document.
Tip
If you don't have an external style sheet and want to create one, just enter the path and filename in the text field, making sure to use the .css extension. Dreamweaver notes that the file cannot be found and asks if you want to proceed. Click OK, and, when you create your first style, Dreamweaver also creates the CSS file with the requested filename.
The final option on the Attach External Style Sheet dialog box, the Media list, is discussed in the next section.
One of the most important facets of the Cascading Style Sheet specification is the ability to style a page for a specific media type. A media type is a means of communication, such as computer screen, printer, or TTY device. The W3C identifies eight different media types: aural, braille, handheld, print, projection, screen, TTY, and TV. If no media type is declared, the style sheet is applied to all devices that render the page. If one is declared, a media attribute is added to the code, like this (addition bolded for emphasis):
<link href="Techniques/styles/main.css" rel="style sheet"
type="text/css" media="screen" />
The bulk of today's designers do not apply a media type at all. However, an increasing number have started to create different style sheets: one to be viewed on the computer screen and another to be printed. Dreamweaver makes this easy by including a media list on the Attach External Style Sheet dialog box. The list includes the eight media types recognized by the W3C as well as another one from the specification, all. It's considered a best practice to add a media attribute to your page and recommended to use all to cover every media type, screen for computer screen and print for printer.
Dreamweaver's Style Rendering toolbar complements the development of separate style sheets. After you've defined a style sheet for a specific media type, such as print, you can use the Style Rendering toolbar to select the desired media type and Dreamweaver will render your page as if it were that medium. To display the Style Rendering toolbar (see Figure 7-7), choose View
Another option on the Style Rendering toolbar is to disable all CSS rendering altogether. Select the Toggle Rendering Of CSS Displays option on the far right of the toolbar to view the page without CSS; select again to enable CSS rendering. This feature is extremely helpful for both debugging CSS pages and viewing the order in which screen readers will present the page.
As noted, any HTML tags redefined as CSS styles in an attached style sheet are automatically applied to your document. However, any custom CSS style must be applied on a case-by-case basis. Most Web designers use a combination of HTML and custom CSS styles. Only custom CSS styles appear in the CSS Styles panel in Apply Styles mode.
In Dreamweaver, you can apply a style in four main ways: from the Property inspector, the menus, the Tag Selector, or the CSS Styles panel.
To apply an existing custom style using the Property inspector, follow these steps:
To apply the style to a section of the page enclosed by an HTML tag, select the tag from the Tag Selector; if you're applying the style to text, you can also just place your cursor in the text without selecting the containing tag.
To apply the style to a section that is not enclosed by a single HTML tag, use your mouse to highlight that section in the Document window.
Select the custom style from the Styles list in the Property inspector for class styles or from the ID list for ID selectors, if available. Dreamweaver applies the custom style either by setting the
classoridattribute of the selected tag to the custom style. If you select only text and not an enclosing tag, Dreamweaver wraps a<span>tag around the selection.
The second approach is to use the menus to apply a style to your pages. Follow these steps:
Highlight the text to which you're applying the style, either by using the Tag Selector or by using the mouse.
Choose Text

The third approach is to use the Tag Selector exclusively. Right-click (Control+click) the selected tag name in the Tag Selector and choose the style from either the Class or ID submenus.
Finally, you can use the CSS Styles panel itself to apply a style:
Select the tag or text to which you want to apply your style.
In the CSS Styles panel, right-click (Control+click) the style and choose Apply from the context menu.
Note
Dreamweaver supports multiple classes for rendering purposes, but there is no method except hand-coding to apply more than one class to a tag.
Changing from one applied custom style to another is extremely straightforward in Dreamweaver. Just place your cursor anywhere within the styled text and select a different custom style from the Styles list on the Property inspector. Dreamweaver changes the old style to the new instantly. You get the same results if you switch styles from the Tag Selector or use the menus.
But what if you want to apply a new style to a text range within an existing <span> tag? Dreamweaver, by design, avoids nested <span> tags. Here's how it works. Suppose that you're working with the following code:
<span class="bodyCopy">Developing strategies to survive requires
industry insight and forward thinking in this competitive
marketplace.</span>
If you apply a custom style called hype to the phrases industry insight and forward thinking by first selecting those phrases and then choosing hype from the Styles list, the code looks like this:
<span class="bodyCopy">Developing strategies to survive requires
</span><span class="hype">industry insight</span>
<span class="bodyCopy"> and </span><span class="hype">forward
thinking</span><span class="bodyCopy"> in this competitive
marketplace.</span>
Dreamweaver wraps each phrase in a distinct <span> tag so that nesting is entirely avoided. This behavior enables the style of each phrase to be altered more easily.
Warning
Although the use of the <span> tag is unavoidable under some circumstances, you should be careful not to overuse it. It's far better to apply a logical tag that makes sense in the context, such as <em> (emphasis) or <cite>, and then create a CSS style that formats those tags for the look you want.
Getting rid of an applied style is just as easy as changing it. Now, just position your cursor anywhere in the stylized text and select None from the Styles list. Dreamweaver also removes the no-longer–needed class attribute for all but the <span> tag. If you remove the class from a selection marked by <span> tags, Dreamweaver deletes the surrounding <span> tags.
Note
Be sure your cursor is positioned within styled text and not selecting any. Selecting None from the Styles list on the Property inspector when just text—not tags—is highlighted forces Dreamweaver to remove the style from the tag and apply it to <span> tags on either side of the now unstyled text.
Styles can also be removed through the Tag Selector—just right-click (Control+click) any styled tag on the Tag Selector and choose Set Class
Applying External Style Sheet Styles
In this Technique, you attach an existing style sheet to a page and assign styles to various page elements.
In the Technique site, expand the 07_css folder and open
css_start.htm.If necessary, press Shift+F11 to expose the CSS Styles panel.
At the bottom of the CSS Styles panel, click Attach Style Sheet.
When the Attach External Style Sheet dialog box opens, click the Browse button.
In the Select Style Sheet dialog, browse to the styles folder in the root of the site and select
primary.css.From the Media list of the Attach External Style Sheet dialog box, choose All; click OK when you're ready.

You'll notice that certain parts of the page, like the headings and paragraphs, are automatically styled because the style sheet includes rules for those tags. Now, let's apply some styles to specific page elements.
Place your cursor in the first heading, Coming attractions.
From the Tag Selector, choose the
<div>tag to the left of the<h1>tag.In the Property inspector, select middle from the Div ID list.
The #middle style adds an outside border and increases the padding. Now, add a class to differentiate the first paragraph under each heading.
Place your cursor in the first paragraph beneath the initial heading.
Right-click the
<p>tag in the Tag Selector and choose Set ClassRepeat the preceding steps 1 and 2 for each of the remaining paragraphs under the different headings.
Finally, apply classes to the images to help the page flow.
Select the first image on the page.
From the Property inspector's Class list, choose.
imageLeft.Repeat the preceding steps 1 and 2 for the remaining images, alternating between the .
imageLeftand .imageRightclasses.When you're done, save your page.
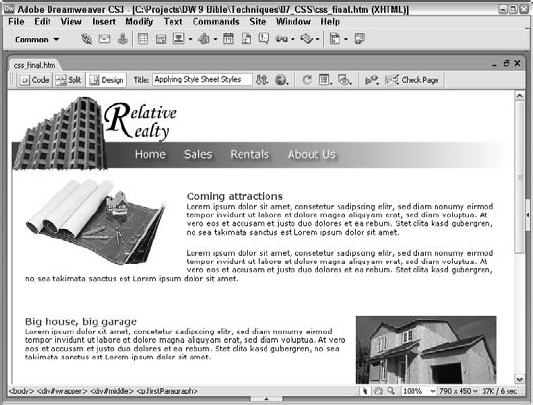
The two image-related styles align the image differently and add additional padding to complete the effect.
Clicking the New CSS Rule button in the CSS Styles panel brings up a dialog box (see Figure 7-8) where you specify the type of style you're defining. You can opt to create the new styles in an external style sheet, the default, or in the current document. After you've chosen the type of style, select the Define In This Document Only option to create an embedded style. Any style sheets already linked to—or imported into—the current document appear in the drop-down list along with the New Style Sheet File option. If you choose Define In (New Style Sheet File), a standard file dialog box opens for you to name your new CSS file and select its path.
Note
Dreamweaver attempts to help you choose your selector based on your current selection by including the cascade of selectors in the Selectors field with the Advanced option chosen. For example, if your cursor is in an <em> tag within a paragraph with a class of .firstParagraph, which is within a div named middle, which, in turn is inside another div named wrapper, the Selector field will be prepopulated with:
#wrapper #middle .firstParagraph em
If you want to take advantage of this very specific selector, leave the field as is and click OK. If, on the other hand, you want to broaden the selector a bit, remove the outer selectors that appear first in the field. You're also free to clear the entire field and start over.

Figure 7-8. The first step in defining a new style is to select a style type and enter a name for the style, if it's a custom one.
The following sections explain the three style types—Class, Tag, and Advanced—in depth.
Making a custom style is the most flexible way to define a style on a page. The first step in creating a custom style is to give it a name; this name is used in the class attribute. The name for your class must start with a period and must be alphanumeric without punctuation or special characters. If you do not begin the name of your custom style with a period, Dreamweaver inserts one for you. Here are some typical names you can use:
.master
.pagetitle
.bodytext
Warning
Although you can give your classes names such as body, title, or any other HTML tag, this approach is not a good idea. Dreamweaver warns you of the conflict if you try this method. You should also be aware that class names are case-sensitive.
The second radio button in the New CSS Rule dialog box is Tag. This type of style provides an excellent tool for making quick, global changes to existing Web pages. Essentially, the Tag style enables you to modify the features of your existing HTML tags. When you select this option, the drop-down list displays more than 90 HTML tags in alphabetical order. Select a tag from the drop-down list and click OK. As you become more familiar with HTML, you're free to simply enter the tag into the Tag field.
Because of its flexibility, you may find that you use the Advanced option frequently. If you're not defining a class or setting up a tag style, the general rule is to use Advanced. Enter the selector directly in the Advanced field; Dreamweaver allows almost any type of input, whether it recognizes the selector type or not. In addition to ID and descendant selectors (covered later in this chapter), you can also group selectors when applying a single style to multiple tags and/or classes. If, for example, you want to create a style for the <body>, <td>, and <th> tags, you enter the tag names in the Advanced field (without their delimiters) in a comma-separated list like this:
body,td,th
The Advanced option is also useful for defining pseudo-classes and pseudo-elements. A pseudo-class represents dynamic states of a tag that may change under user action or over time. Several standard pseudo-classes associated with the <a> tag are used to style hypertext links. When you choose Advanced, the drop-down list box contains four customization options, which can all be categorized as pseudo-classes:
a:link—Customizes the style of a link that has not been visited recentlya:visited—Customizes the style of a link to a page that has been recently visiteda:hover—Customizes the style of a link while the user's mouse is over itNote
The
a:hoverpseudo-class is a CSS Level 2 specification and is not supported by Netscape 4.x. Furthermore,a:activelinks are always colored red, regardless of the CSS specifications.a:active—Customizes the style of a link when it is selected by the user
Warning
Dreamweaver does not preview pseudo-class styles (except for a:link), although they can be previewed through a supported browser.
A pseudo-element, on the other hand, gives you control over contextually defined page elements: For example, p:first-letter styles the first letter in every paragraph tag, enabling a drop-cap design. Because of their specific nature, Dreamweaver does not display any pseudo-elements in the Advanced list. You can, however, enter your own—Dreamweaver 8 does a fine job of rendering both the :first-letter and :first-line pseudo-elements.
Note
Dreamweaver does not render the lesser-used pseudo-elements :before and :after in the Design view. Preview your page in a compatible browser—such as Netscape 6.x or higher or Opera 5.x or higher—to see these in action.
Dreamweaver also enables you to enter some of the more advanced additions to the CSS selector palette through the Advanced field.
One such selector is the descendant selector. Descendant selectors are contextual selectors because they specify one tag within another. A descendant selector, for example, permits you to give paragraphs within a table a different style than paragraphs outside a table. Similarly, text nested within two blockquotes (giving the appearance of being indented two levels) can be given a different color, font, and so on than text in a single blockquote.
For example, to style text within nested blockquotes, enter the following in the Advanced field of the New Style dialog box:
blockquote blockquote
In essence, you are creating a custom style for a set of HTML tags used in your document. This type of CSS selector acts like an HTML tag that has a CSS style applied to it; that is, all page elements fitting the criteria are automatically styled. You can also combine custom styles with redefined HTML styles in a descendant selector.
Other advanced selectors that you can enter in the Advanced field include:
ID: An
idselector is identified by a pound sign (like#footer) that can be assigned to any page element using the sameidattribute (for example,<div>).Child: Selects an element that is a direct child of another element. For example, in a
divtag with nesteddivelements,div > pselects the paragraphs in the outermostdivtag only.Adjacent-sibling: Selects an element that immediately follows another. For example, in an unordered list with two list items,
li + liselects the second list item, but not the first.Universal: Selects any element. This selector may be used to skip one or more generations of tags. Use
body * pto select paragraphs contained withindivelements that are children of thebodytag, for example.Attribute: Selects tags with specified attributes. You can select tags if they either contain the attribute (
p[align]) or if they contain an attribute set to a specific value (p[align="left"]).
Best of all, these selectors are rendered correctly in Dreamweaver's Design view. As of this writing, only the most CSS-compliant browsers (such as Firefox, Internet Explorer 7, Netscape 6.2 and higher or Safari) properly render these selectors; but CSS support is gaining ground in each new browser release.
Note
Dreamweaver warns you if you enter what it considers an invalid selector type; however, you are given the option to use the selector if you choose.
Style sheets, like most elements of a Web page, are almost never set in stone. Designers need to be able to modify style rules—whether they're embedded or from an external style sheet—at a moment's notice. Through the CSS Styles panel's Edit Styles mode, Dreamweaver provides near-immediate access.
As discussed earlier, the CSS Styles panel in All mode displays all the styles attached to the current page, whether embedded or external. Presented in a collapsible outline (see Figure 7-9), Dreamweaver shows the styles in the order in which they are defined in the code. The style list is more than just a pretty display—it's a direct pipeline to editing each style. You can select any style and click the Edit Style button, and Dreamweaver displays the CSS Rule Definition dialog box with the current style's settings.

Figure 7-9. Both embedded and external styles are shown in the Edit Styles mode of the CSS Styles panel.
If you'd prefer to work directly with the CSS code, double-click the style. Dreamweaver goes to the style selected in the editing option of your choice, as defined in the CSS Styles category of the Preferences. You can choose between using the Edit CSS dialog box, the Properties pane, or Code view.
Applying CSS Hacks
As any designer beginning to work with CSS knows, not all browsers are created equally. In fact, browsers vary wildly in their CSS support. To achieve cross-browser compatibility with CSS, designers have resorted to using what are referred to as CSS hacks. A CSS hack is the use of CSS code in an unintended fashion to make CSS elements unavailable to certain browsers. In other words, a CSS hack acts as a filter. Dreamweaver includes two of the most common hacks that allow you to hide CSS from two of the most problematic browsers: Netscape 4.x and Internet Explorer 5 for Mac. Both hacks are only available from within Code view through the context menu; commands for applying and removing each hack are included.
To hide a CSS rule from Netscape 4.x, use the Ciao hack. In Code view, select the CSS code you want to make sure that Netscape 4.x does not attempt to render and right-click (Control-click). From the context menu that appears, choose Selection
/*/*/
/* */
The first line starts hiding code from Netscape 4.x and the second line stops the hiding.
You can hide CSS rules from Internet Explorer 5 for Mac in a similar fashion with the Backslash-comment hack. To hide particular rules, select them and then right-click (Control-click) to bring up the context menu. Choose Selection
/*Start hiding from IE Mac */
/*Stop hiding from IE Mac */
To remove either of these hacks select the entire code block, including the opening and closing hack lines, and choose Selection
If you'd prefer to work directly with the CSS code, double-click the style. Dreamweaver goes to the style selected in the editing option of your choice, as defined in the CSS Styles category of the Preferences. You can choose between using the Edit CSS dialog box, the Properties pane, or Code view.
Tip
Modifying or deleting a style in an external style sheet causes that style sheet to open. Dreamweaver does this so that the modification or deletion can be undone. You can force the style sheet not to open by unchecking the Open CSS Files When Modified option in the CSS Styles category of the Preferences; but, if you do, changes to the style sheet cannot be undone.
If you have an external CSS editor such as TopStyle or Style Master defined—and the Use External Editor option selected—double-clicking a style opens the style sheet in that editor. Access the Use External Editor option by right-clicking (Control-clicking) in the CSS Styles panel or by selecting the CSS Styles panel Options menu.
To delete a style, select the style and click the Delete CSS Rule button.
Note
If you're looking for a single reference on CSS hacks, check out CSS Hacks and Filters written by this book's author and published by Wiley. For more details, visit www.idest.com/csshacks/.
Although the CSS Rule Definition dialog is helpful when establishing CSS rules, it's not the most direct route for modifying them. Dreamweaver supplies a much quicker facility for viewing and changing existing styles: the Properties pane of the CSS Styles panel (see Figure 7-10).
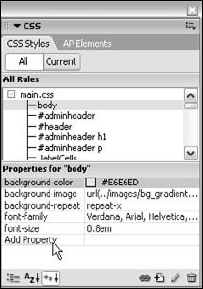
Figure 7-10. Insert a new property directly into a rule through the Properties pane's Add Property link.
To change the value of a property, click into the corresponding field on the right of the CSS Properties tab. Color-based properties, like background-color, include a standard Dreamweaver color picker to simplify your selection; properties requiring a URL offer both Point-to-File and Browse-for-File icons. Those properties that use specific keywords, like display, provide a list of acceptable values. In all cases, the value can also be entered by hand. This is especially useful when working with properties that accept compound values, like border, for which entering the values in proper order (style, color, width) is valid. Hover over a property value to see a code hint. After you've inserted your new value, press Enter (Return) or click anywhere to confirm the change; Dreamweaver immediately renders the results.
To add a new property to an existing rule in the Properties pane, follow these steps:
In the Properties pane, click Add New Property.
Enter the property in the blank field that appears. Alternatively, you can choose a property from the drop-down list.
Press Tab or Enter (Return) to move to the second column.
Enter the value for the new property.
To remove a property from the Properties pane, select it and press Delete.
Tip
Rather than type out the whole property, you can enter just the first few letters and press Alt+down arrow (Option+down arrow). Dreamweaver goes right to the first matching property. Press Enter (Return) after you've found your match to move to the second column to enter the desired value(s).
You can add new properties through the CSS Styles panel in either All or Current modes. All mode works best when you're editing CSS from a top-down perspective. If you'd prefer a bottom-up approach, switch to Current mode and select the tag containing the existing style rather than the style itself.
The development of the CSS rules for a site is an evolutionary process. The designer may start by embedding CSS layout rules in the basic page and, when the design is locked down, elect to move the rules to an external sheet. Or, before publishing the final style sheets, the designer may prefer to clean them up, grouping similar styles together for added clarity. Dreamweaver offers a number of key tools to help designers manipulate their CSS rules however they choose.
Note
Prior to Dreamweaver CS3, the only way to effectively move CSS rules within a style sheet or from one style sheet to another was good old cut and paste. Now, managing your CSS rules is both intuitive and fast. You can, for example, simply drag and drop a CSS rule from one location in your style sheet to another—right in the CSS Styles panel. Highlight any rule while in All mode and drag it to its new location. Rules can easily be moved to any embedded or attached style sheet; any unopened style sheet affected is opened and marked as modified. You can move a single rule at a time or select any number of them to drag to a new location.
CSS rules can also be moved to an unattached or new style sheet. Right-click on any selected rules and choose Move CSS Rules to begin the process. When the Move To External Style Sheet dialog box, shown in Figure 7-11, opens, you have the option to choose an existing style sheet or store the selected rules in a new one. If you decide to use a new style sheet, a Save Style Sheet As dialog box appears when you click OK.
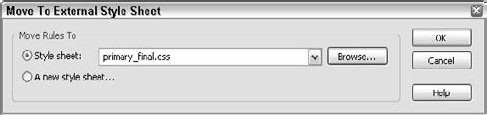
Figure 7-11. Move any style rules selected in the CSS Styles panel to a current external style sheet or a brand-new one.
Tip
The Move CSS Rules feature is also available in the Coding toolbar along with another powerful, albeit more specialized, CSS management command: Convert Inline CSS to Rule. As the name implies, the Convert Inline CSS to Rule feature moves style attributes within a tag like this:
<div id="legalDisclaimer" style="font-size: smaller;">
to a separate rule, like this:
#legalDisclaimer { font-size: smaller; }The Convert Inline CSS to Rule command is terrific for cleaning up legacy pages where the use of inline styles in absolutely positioned <div> tags was the rule rather than the exception.
The contextual menu in the CSS Styles panels offers a number of other management tools in addition to the Move CSS Rules command. Beyond the traditional cut/copy/paste options is the Go to Code feature. As you might suspect, Go to Code goes directly to the CSS code defining the selected rule, whether the rule is in the current page or an external style sheet. Go to Code lets you dive right into the heart of your CSS, quickly and easily.
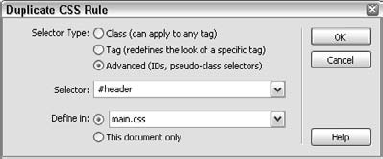
The Duplicate command is another CSS rule management power tool and one that I personally use all the time. Often I find that a rule I need to create has similar properties to an existing rule—and it's much faster to duplicate the rule than re-create it. When you choose to duplicate a selected rule, a dialog box with all the options of the New CSS Rule dialog appears (Figure 7-12). This featureset allows you to copy the properties of any rule and, if you choose, change the selector to anything you desire. You could, for example, duplicate a rule with an ID selector and save your new rule as a class. You can even save the duplicated rule in a different style sheet or the current page. Once you select the name of your duplicated rule as well as selector, the style is added to the specified location; however, unlike when creating a new style, the CSS Rule Definition dialog box does not appear.
Anyone working with CSS for any amount of time has experienced the frustration of seeing their Dreamweaver perfect page break in one or more browsers. Real-world browser testing is a tried-and-true technique, but a tedious and time-consuming one with no clear solutions. Dreamweaver offers a real alternative: Check Browser Compatibility.
Note
With the Check Browser Compatibility feature, your page is quickly reviewed for 16 different, common browser rendering issues. Better yet, the command offers full relief for the identified problems, both in an immediate form through the Results panel and also in a more full-featured fashion via the Web. Debugging your CSS styled pages just got a whole lot easier.
To begin the CSS debugging process, choose File
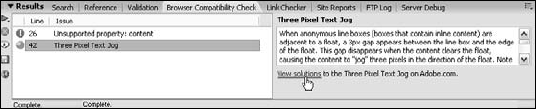
Figure 7-13. Run Check Browser Compatibility for any page to identify CSS rendering issues in any of the supported browsers.
Note
You can find a detailed discussion of the Check Browser Compatibility feature, including which CSS bugs are detected and establishing command settings, in Chapter 30, "Maximizing Browser Targeting."
Crafting a Print Style Sheet
In this Technique, you attach a print style sheet to a page and change the styles so that the document is more printer-friendly.
In the Technique site, expand the 07_css folder and open
print_start.htm.From the CSS Styles panel, click Attach Style Sheet.
When the Attach External Style Sheet dialog box opens, click the Browse button.
In the Select Style Sheet dialog, browse to the styles folder in the root of the site and select
print.css.From the Media list of the Attach External Style Sheet dialog box, choose Print; click OK when you're ready.
To see the changes you'll make take effect, you'll need to switch to print style rendering.
Choose View
From the Style Rendering toolbar, click Render Print Media Type, or choose View
In the CSS Styles panel, make sure you're in All mode; if not, click All.
For your first change to the print style sheet, hide those page elements that are not relevant in print: the header and footer.
In the CSS Styles panel, expand the
print.cssentry and select the#header style.Click Edit Style at the bottom of the CSS Styles panel.
When the CSS Rule Definition dialog box opens, switch to the Block category and, from the Display list, choose None.
Repeat steps 1–3, selecting the
#footerstyle from the CSS Styles panel instead.
Now, you need to adjust certain styles so they are more suitable for print.
In the CSS Styles panel, select the
#wrapperstyle.From the Propertis pane, click in the value column next to the width property and enter auto; press Enter (Return) when you're done.
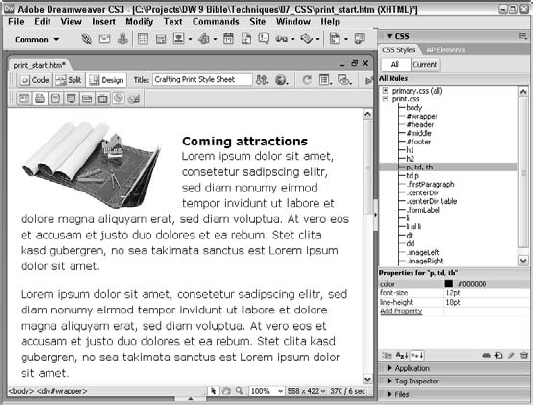
In the CSS Styles panel, select the h1 style.
From the Properties pane, click in the color swatch next to the color property and select black (#000000) from the pop-up color picker.
Select the value next to the font-size property and enter 14pt; press Enter (Return) to confirm your choice.
Repeat steps 3–5, selecting the p, td, th style and changing the font-size property to 12pt.
With the
p, td, thstyle still selected, click Add Property and enter line-height; press Enter (Return) and then enter 18pt.
The final step is to add a heading that appears only in the print version of the page. To accomplish this, you'll need to hide the content in the screen-oriented style sheet.
Place your cursor on the first image on the page and switch to Code view.
Press left-arrow to move the cursor in front of the
<img>tag and enter the following code<h1>Relative Realty</h1>;return to Design view when you're done.Place your cursor in the new
<h1>tag and, from the Property inspector's Style list, chooseprintOnly.In the Style Rendering toolbar, choose Switch to Render Screen Media Type, or choose View
You'll notice that the heading—redundant in screen mode—is also visible here. You can change that by adding a style.
In the CSS Styles panel, select the
primary.css entryand click New CSS Rule.In the New CSS Rule dialog box, switch the Selector Type set to Class and change the Name field to .printOnly; click OK when you're ready.
Switch to the Block category and, from the Display list, choose None; click OK to confirm the change and close the dialog box.
Select File
You can easily see the differences by switching between the Screen and Print icons on the Style Rendering toolbar.
After you've selected a type and name for a new style or chosen to edit an existing style, the CSS Rule Definition dialog box opens. A Category list from which you select a style category (just as you select a category of preferences in Dreamweaver's Preferences dialog box) is located on the left side of this dialog box.
Dreamweaver offers you eight categories of CSS styles to help you define your style sheet:
Type
Border
Background
List
Block
Positioning
Box
Extensions
You can define styles from one or all categories. The following sections describe each style category and its available settings.
Note
Although CSS rendering has been vastly improved in Dreamweaver CS3, not all possible CSS attributes are viewable in the Design view.
The Type category specifies the appearance and layout of the typeface for the page in the browser window. The Type category, shown in Figure 7-14, is one of the most widely used and supported categories—it can be rendered in Internet Explorer 3.0 and above and Navigator 4.0 and above.

Table 7-1 explains the settings available in this category.
Table 7-1. CSS Type Attributes
Type Setting | Description |
|---|---|
| Specifies the font or a collection of fonts, known as a font family. You can edit the font list by selecting Edit Font List from the drop-down list. (This sequence opens the Edit Font List dialog box, as described in Chapter 8.) |
| Selects a size for the selected font. If you enter a value, you can then select the measurement system in the adjacent text box (the default is pixels). The relative sizes, such as small, medium, and large, are set relative to the parent element. Values can be selected from the drop-down list or entered by hand. |
| Specifies a normal, oblique, or italic attribute for the font. An oblique font may have been generated in the browser by electronically slanting a normal font. |
| Sets the line height of the line (known as leading in traditional layout). Typically, line height is a point or two more than the font size, although you can set the line height to be the same as or smaller than the font size for an overlapping effect. |
| Changes the decoration for text. Options include underline, overline, line-through, blink, and none. The blink decoration is displayed only in Netscape 4.x and earlier browsers. |
| Sets the boldness of the text. You can use the relative settings (light, bold, bolder, and boldest) or apply a numeric value. Normal is around 400; bold is 700. |
| Switches between normal and small caps. Small caps is a font style that displays text as uppercase, but the capital letters are a slightly larger size. |
| Forces a browser to render the text as uppercase, lowercase, or capitalized. |
| Sets a color for the selected font. Enter a color name or select the color swatch to choose a browser-safe color from the color picker. |
Since Netscape Navigator 2.0, Web designers have been able to use background images and color. Thanks to CSS Background attributes, designers can now use background images and color with increased control. Whereas traditional HTML background images are restricted to a single image for the entire browser window, CSS backgrounds can be specified for a single paragraph or any other CSS selector. (To set a background for the entire page, apply the style to the <body> tag.) Moreover, instead of an image automatically tiling to fill the browser window, CSS backgrounds can be made to tile horizontally, vertically, or not at all (see Figure 7-15). You can even position the image relative to the selected element.
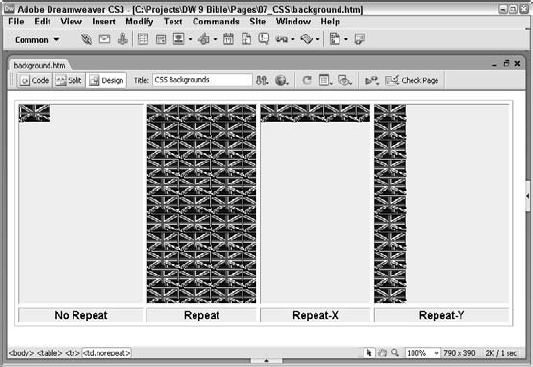
Figure 7-15. You can achieve a number of different tiling effects by using the Repeat attribute of the CSS Background category.
The latest versions of browsers support the CSS Background attributes shown in Figure 7-16 and described in Table 7-2.
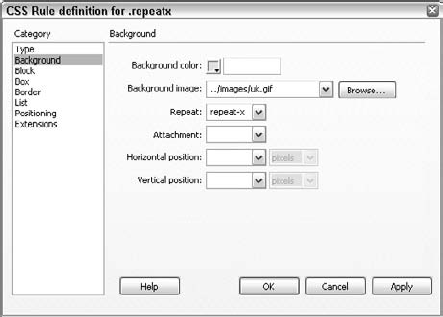
Figure 7-16. The CSS Background options give you a much wider range of control over background images and color.
Table 7-2. CSS Background Attributes
Description | |
|---|---|
| Sets the background color for a particular style. Note that this setting enables you to set background colors for individual paragraphs or other elements. |
| Specifies a background image. |
| Determines the tiling options for a graphic: |
no repeat displays the image in the upper-left corner of the applied style. | |
repeat tiles the background image horizontally and vertically across the applied style. | |
repeat-x tiles the background image horizontally across the applied style. | |
repeat-y tiles the background image vertically down the applied style. | |
| Determines whether the background image remains fixed in its original position or scrolls with the page. This setting is useful for positioned elements. If you use the overflow attribute, you often want the background image to scroll in order to maintain layout control. |
| Controls the positioning of the background image in relation to the style sheet elements (text or graphics) along the horizontal axis. |
| Controls the positioning of the background image in relation to the style sheet elements (text or graphics) along the vertical axis. |
One of the most common formatting effects in traditional publishing, long absent from Web publishing, is justified text—text that appears as a solid block. Justified text is possible with the Text Align attribute, one of the seven options available in the CSS Block category, as shown in Figure 7-17. Indented paragraphs are also a possibility.

Dreamweaver includes an option for setting the Display attribute. As the name implies, the Display attribute determines how an element should be presented. Display accepts a wide range of values—18 in all—but only a few are currently supported by even the latest browsers. That said, the supported values—block, inline and, curiously enough, none—are very important indeed. Setting a Display attribute to None effectively hides the element to which the CSS attribute is applied; setting the same attribute to Block or Inline reveals the element. Many collapsible/expandable lists depend on the Display attribute to achieve their effects.
Table 7-3 lists the CSS Block options.
Table 7-3. CSS Block Attributes
Block Setting | Description |
|---|---|
| Defines the spacing between words. You can increase or decrease the spacing with positive and negative values, set in ems by default. (In CSS, one em is equal to the height of a given font.) If you have a 12 pt. font, to increase the spacing between words to 24 pts., set the Word Spacing value to 2 ems. |
| Defines the spacing between the letters of a word. You can increase or decrease the spacing with positive and negative values, set in ems by default. |
| Sets the vertical alignment of the style. Choose from baseline, sub, super, top, text-top, middle, bottom, or text-bottom, or add your own value. |
| Sets text alignment (left, right, center, and justified). |
| Indents the first line of text on a style by the amount specified. |
| Controls display of spaces and tabs. The normal option causes all whitespace to collapse. The Pre option behaves similarly to the |
| Determines how a tag is represented. Possible values include none, inline, block, list-item, run-in, compact, marker, table, inline-table, table-row-group, table-header-group, table-footer-group, table-row, table-column-group, table-column, table-cell, and table-caption. |
The Box attribute defines the placement and settings for elements (primarily images) on a page. Many of the controls (shown in Figure 7-18) emulate spacing behavior similar to that found in <table> attributes. If you are already comfortable using HTML tables with cell padding, border colors, and width/height controls, you'll quickly learn how to use these Box features, which are described in Table 7-4.
Tip
To have the same padding or margins all around a box area, check the Same For All option. This option allows you to set one value—Top—to use for all four sides.
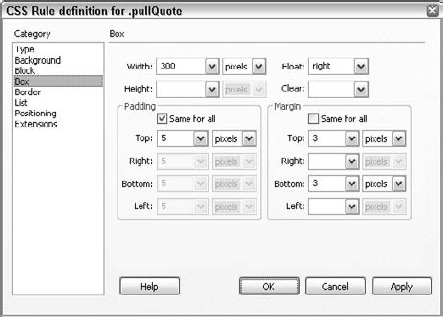
Table 7-4. CSS Box Attributes
Box Setting | Description |
|---|---|
| Sets the width of the element. |
| Defines the height of the element. |
| Places the element at the left or right page margin. Any text that encounters the element wraps around it. |
| Sets the side on which AP elements cannot be displayed next to the element. If an AP element is encountered, the element with the |
| Defines the amount of space between the borders of the element and other elements in the page. |
| Sets the amount of space between the element and the border or margin, if no border is specified. You can control the padding for the left, right, top, and bottom independently. |
With Cascading Style Sheets, you can specify many parameters for borders surrounding text, images, and other elements such as Java applets. In addition to specifying separate colors for any of the four box sides, you can also choose the width of each side's border, as shown in the CSS Border category (see Figure 7-19). You can use eight different types of border lines, including solid, dashed, inset, and ridge. As with the Padding and Margin attributes in the Box category, Dreamweaver includes a Same For All option under the Style, Width, and Color attributes to save you the work of having to enter the same value for all four sides. Table 7-5 lists the Border options.
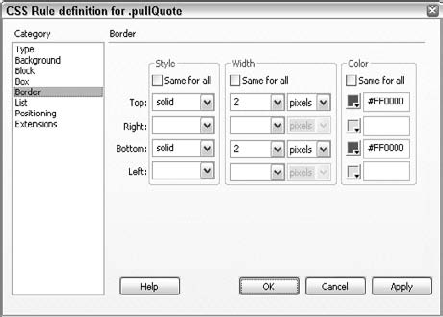
Table 7-5. CSS Border Attributes
Border Setting | Description |
|---|---|
| Sets the style of the border. You can use any of the following border styles: dotted, dashed, solid, double, groove, ridge, inset, and outset. |
| Determines the width of the border on each side. Choose thin, medium, thick, or enter a number to set a width. |
| Sets the color of the border on each side. |
Tip
CSS Border attributes are especially useful for highlighting paragraphs of text with a surrounding box. Use the Box category's Padding attributes to inset the text from the border.
CSS gives you greater control over bulleted points. With Cascading Style Sheets, you can now display a specific bulleted point based on a graphic image, or you can choose from the standard built-in bullets, including disc, circle, and square. The CSS List category also enables you to specify the type of ordered list, including decimal, Roman numerals, or A-B-C order. Figure 7-20 shows and Table 7-6 describes the settings for lists.
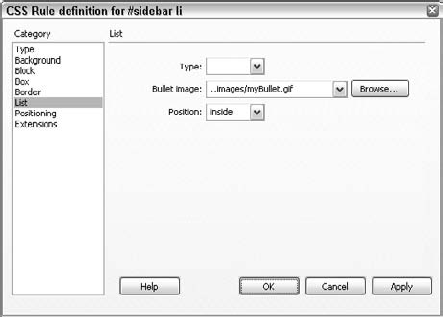
Table 7-6. List Category for Styles
List Setting | Description |
|---|---|
| Selects a built-in bullet type. The options include disc, circle, square, decimal, lowercase Roman, uppercase Roman, lowercase alpha, and uppercase alpha. |
| Sets an image to be used as a custom bullet. Enter the path to the image in the text box. |
| Determines whether the list item wraps to an indent (the default) or to the margin. |
For many designers, positioning has increased creativity in page layout design. With positioning, you have exact control over where an element is placed on a page. The positioning attributes are often applied to div tags to create page layouts without resorting to tables. Figure 7-21 shows the various attributes that provide this pinpoint control of your page elements. The options are described in Table 7-7.

Figure 7-21. Control over the placement of elements on a page frees the Web designer from the restrictions imposed with HTML tables and other old-style formats.
Table 7-7. CSS Positioning Attributes
Positioning Setting | Description |
|---|---|
| Determines whether an element can be positioned absolutely or relatively on a page. The third option, static, does not enable positioning and renders elements as they would be positioned with regular HTML. |
| Sets the width of the element. |
| Sets the height of the element. |
| Determines whether the element is visible, hidden, or inherits the property from its parent. |
| Sets the apparent depth of a positioned element. Higher values are closer to the top. |
| Specifies how the element is displayed when it's larger than the dimensions of the element. Options include the following: Clip, where the element is partially hidden; None, where the element is displayed and the dimensions are disregarded; and Scroll, which inserts scroll bars to display the overflowing portion of the element. |
| Sets the styled element's placement and dimensions with the left and top attributes and the width and height attributes, respectively. |
| Sets the visible portion of the element through the top, right, bottom, and left attributes. |
Note
Dreamweaver's AP elements are built upon the foundation of CSS positioning. For a complete explanation of AP elements and their attributes, see Chapter 11.
The specifications for Cascading Style Sheets are rapidly evolving, and Dreamweaver has grouped some cutting-edge features in the Extensions category. As of this writing, most of the Extensions attributes (see Table 7-8) are supported by Internet Explorer 4.0 and above, whereas only the Cursor extension is supported in Netscape Navigator 6.x. The Extensions settings shown in Figure 7-22 affect three different areas: page breaks for printing, the user's cursor, and special effects called filters.
Table 7-8. CSS Extensions Attributes
Extensions Setting | Description |
|---|---|
| Inserts a point on a page where a printer sees a page break. Currently supported only by Internet Explorer, versions 5.0 and higher. |
| Defines the type of cursor that appears when the user moves the cursor over an element. Currently supported by Internet Explorer, versions 4.0 and higher as well as Netscape 6 |
| Filters enable you to customize the look and transition of an element without having to use graphic or animation files. Currently supported only by Internet Explorer 4.0 and above. |
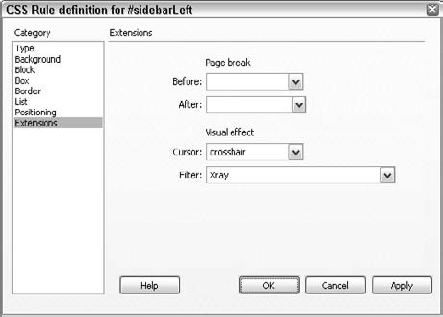
Figure 7-22. The CSS Extensions category enables some terrific effects, which, unfortunately, are not well supported across the board.
Note
One of the problems with the Web's never-ending evolution of page design is evident when you begin to print the page. The Pagebreak attribute alleviates this problem by enabling the designer to designate a style that forces a page break when printing; the break can occur either before or after the element is attached to the style. This attribute is especially important for print media styles.
The Filter attribute offers 16 different special effects that can be applied to an element. Many of these effects, such as Wave and Xray, are quite stunning. Several effects involve transitions, as well. Table 7-9 details these effects.
Table 7-9. CSS Filters
Filter | Syntax | Description |
|---|---|---|
* These three transitions require extensive documentation beyond the scope of this book. | ||
| Alpha (Opacity=opacity, FinishOpacity=finishopacity, Style=style, StartX=startX, StartY=startY, FinishX=finishX, FinishY=finishY) | Sets the opacity of a specified gradient region. This can have the effect of creating a burst of light in an image. |
Opacity is a value from 0 to 100, where 0 is transparent and 100 is fully opaque. | ||
StartX, StartY, FinishX, and FinishY are pixel values indicating where the effect should start and end. | ||
Style can be 0 (uniform), 1 (linear), 2 (radial), or 3 (rectangular). | ||
| blendTrans (duration=duration) | Causes an image to fade in or out over a specified time. |
Duration is a time value for the length of the transition, in the format of seconds.milliseconds. | ||
| blur (Add=add, Direction=direction, Strength=strength) | Emulates motion blur for images. |
Add is any integer other than 0. | ||
Direction is any value from 0 to 315 in increments of 45. | ||
Strength is any positive integer representing the number of pixels affected. | ||
| chroma (Color= color) | Makes a specific color in an image transparent. |
Color must be given in hexadecimal form, for example, #rrggbb. | ||
| Dropshadow (Color=color, OffX=offX, OffY=offY, Positive=positive) | Creates a drop shadow of the applied element, either image or text, in the specified color. |
Color is a hexadecimal triplet. | ||
OffX and OffY are pixel offsets for the shadow. | ||
Positive is a Boolean switch; use 1 to create shadow for nontransparent pixels and 0 to create shadow for transparent pixels. | ||
| FlipH | Flips an image or text horizontally. |
| FlipV | Flips an image or text vertically. |
| Glow (Color=color, Strength=strength) | |
Adds radiance to an image in the specified color. | ||
Color is a hexadecimal triplet. | ||
Strength is a value from 0 to 100. | ||
| Gray | Converts an image in grayscale. |
| Invert | Reverses the hue, saturation, and luminance of an image. |
| Light | Creates the illusion that an object is illuminated by one or more light sources. |
| Mask (Color=color) | Sets all the transparent pixels to the specified color and converts the nontransparent pixels to the background color. |
Color is a hexadecimal triplet. | ||
| RevealTrans (duration=duration, transition=style) | Reveals an image using a specified type of transition over a set period of time. |
Duration is a time value that the transition takes, in the format of seconds.milliseconds. | ||
Style is one of 23 different transitions. | ||
| Shadow (Color=color, Direction=direction) | Creates a gradient shadow in the specified color and direction for images or text. |
Color is a hexadecimal triplet. | ||
Direction is any value from 0 to 315 in increments of 45. | ||
| Wave (Add=add, Freq=freq, LightStrength=lightstrength, Phase=phase, Strength=strength) | Adds sine wave distortion to the selected image or text. |
Add is a Boolean value, where 1 adds the original object to the filtered object and 0 does not. | ||
Freq is an integer specifying the number of waves. | ||
LightStrength is a percentage value. | ||
Phase specifies the angular offset of the wave, in percentage (for example, 0% or 100% = 360 degrees, 25% = 90 degrees). | ||
Strength is an integer value specifying the intensity of the wave effect. | ||
| Xray | Converts an image to inverse grayscale for an X-rayed appearance. |
Cascading Style Sheets give the designer an awesome flexibility with respect to the overall look and feel of a site. In fact, it's entirely possible for sites to be designed with multiple style sheets, each one applicable to a particular condition. With a little JavaScript or server-side coding, different style sheets can be applied according to which browser is being used, the platform employed, even the screen resolution at work. How does Dreamweaver know which style sheet to use? With the design time style sheets feature, of course.
The design time style sheets feature enables you to show a specific style sheet while hiding others as you work. One key use of this command is to utilize a style sheet that is linked from your page dynamically at runtime. Your style sheets, in other words, do not have to be specifically attached to your page for you to be able to use them.
To set up design time style sheets, follow these steps:
From the CSS Styles panel Options menu choose Design Time Style Sheets. Alternatively, choose Text
To show a specific style sheet, click the Add (+) button above the Show Only At Design Time list area and select an external style sheet from the Select File dialog box.
To hide a specific style sheet, click the Add (+) button above the Hide At Design Time list area and select an external style sheet from the Select File dialog box.
To delete a listed style sheet from either list, select the entry and click the Remove (–) button above the list.
Warning
The Design Time Style Sheet information is stored in a design note; make sure that you do not unwittingly delete any such design note file.
Click OK when you're finished.

In this chapter, you discovered how you can easily and effectively add and modify Cascading Style Sheets. With CSS, you can now accomplish all the following:
Define external style sheets to control the look and feel of an entire site
Create styles automatically when working with the Text Property inspector
Update and change styles easily with the CSS Styles panel
Easily apply generated styles to an element on a page
Position fonts and elements, such as images, with pinpoint accuracy
Exercise control over the layout, size, and display of fonts on a page
Set up style sheets so that they're visible only at design time
In the next chapter, you learn how to insert and format text in Dreamweaver.