
MIDI track effects allow you to transform MIDI events in a track in real time without changing how the events were originally recorded. In other words, a MIDI effect processes the track’s events on their way out to the MIDI output port. It’s the same way a funhouse mirror transforms your reflection. You do not actually have a big head, small neck, big belly, and small legs—that’s just the way your image is processed. MIDI track effects work the same way, leaving the original MIDI image intact while reflecting the processing choices you’ve applied.
This chapter discusses MIDI effects applied via the MIDI Inserts and MIDI Sends sections of the Inspector area. Because MIDI track effects don’t affect the source MIDI events in the track, these modifications do not appear in the MIDI editors—although they do affect all the parts on a track.
Here’s a summary of what you will learn in this chapter:
The role of MIDI effects
Getting to know Cubase 6’s MIDI effects
How to add or edit MIDI inserts in a MIDI or instrument track
How to bypass one or several MIDI inserts or MIDI sends
How to assign a MIDI plug-in effect as the destination for a MIDI send
You may already know about audio effects and how you can use them to make audio tracks sound better or different. In this respect, MIDI effects are similar to audio effects. However, the process is quite different with MIDI than it is for audio.
When you apply a MIDI effect to a MIDI track, you are not processing the sound generated by the MIDI device (a VST instrument or hardware sound module, for instance). Instead, you are using a process that operates in real time as it transforms or adds to the MIDI events recorded on your track (or passing through it from its input) in real time. Because these effects are playing in real time, just like audio effects, you can rest assured that the recorded MIDI events on your track are not modified in any way except at the insert point or send destination where the MIDI effect actually does its processing.
By the way, if you are using an instrument track, as opposed to a straight MIDI track, you can combine both types of effects—audio and MIDI. This gives you even more flexibility in your creative process.
A MIDI effect can be applied to any MIDI track in two ways: through MIDI inserts and MIDI sends. On the other hand, instrument tracks playing through a VSTi plug-in or an external MIDI device can also be processed using MIDI inserts, but not MIDI sends. Both MIDI inserts and MIDI sends transform the MIDI events in real time according to the settings found in the MIDI effect.
Cubase 6 includes a number of plug-in effects for MIDI recording. In addition, plugins can be purchased from a variety of third-party manufacturers. For now, however, I’ll focus on those plug-ins that come in the Cubase 6 box, detailed in Table 27.1.
Table 27.1. Cubase 6 MIDI Plug-In Effects
Plug-In | Description |
|---|---|
Arpache 5 | An automatic arpegiattor; when a chord is input, it plays each note of the chord separately. |
Arpache SX | An automatic arpegiattor, similar to Arpache 5 but with more advanced functionality. |
Auto LFO | Enables you to send continuously changing MIDI controller messages; typically used for automatic MIDI panning. |
Beat Designer | MIDI pattern sequencer, used for creating drum parts or patterns. |
Chorder | Enables you to assign complete chords to single keys on your MIDI keyboard. |
Compressor | A classic dynamic compressor for MIDI data. |
Context Gate | Enables selective triggering/filtering of MIDI data, based on selected notes, velocities, and other parameters. |
Density | Randomly filters out or adds new notes to the MIDI track. |
Micro Tuner | Enables the creation of different microtuning schemes for the selected MIDI instrument. |
MIDI Control | Enables you to control up to eight different MIDI controller types on a MIDI instrument. |
MIDI Echo | Generates additional echoing notes. |
MIDI Modifiers | A duplicate of the MIDI Modifiers section in the Inspector; also includes a scale transposition function. |
MIDI Monitor | Used to monitor incoming MIDI events. |
Note to CC | Generates a MIDI continuous controller event for each incoming MIDI note. |
Quantizer | Changes the timing of MIDI notes by snapping them to a quantize grid. |
StepDesigner | Advanced MIDI pattern synthesizer. |
Track Control | Provides three ready-made control panels for adjusting parameters on Roland GS- and Yamaha XG-compatible MIDI devices. |
Transformer | A real-time version of Cubase’s Logical Editor. |
The most common way to add a MIDI plug-in effect to a MIDI or instrument track is through the MIDI Inserts section of the Inspector, shown in Figure 27.1. When you are using a MIDI plug-in effect as an insert, you are sending the track’s MIDI events through this effect. This effect then generates the necessary MIDI events through the MIDI output port of the track containing the effect. It is the destination VSTi or external sound module’s job to actually play the resulting MIDI effect, along with the original recorded MIDI material in this track.
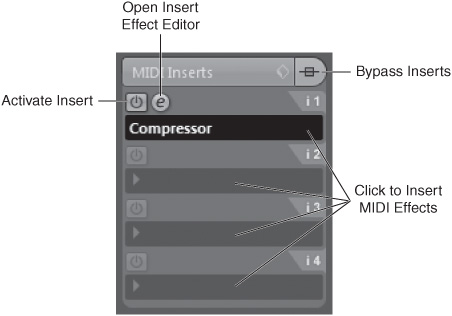
You can have up to four MIDI insert effects on each MIDI track. When a MIDI insert effect is selected from the drop-down menu in each of the track’s insert slots, a control panel opens to reveal its settings. You can re-open the insert’s control panel at any time by clicking on the Open Insert Effect Editor button above the appropriate insert.
Here are some of the things you can do with MIDI inserts:
Add a MIDI insert effect. Select a MIDI effect from the drop-down menu in one of the four insert slots.
Edit a MIDI insert effect’s parameters. Click the Open Insert Effect Editor button to display the plug-in’s control panel.
Bypass an individual MIDI insert. Deactivate the plug-in effect you want to bypass by clicking “off” the Activate Insert button. By default, an effect is activated as soon as you select it from the drop-down menu. By deactivating it, you can do a comparison without having to reset your effect each time.
Bypass all MIDI inserts from playback. Click the Bypass Inserts button at the top of the MIDI Inserts section. The MIDI Inserts section’s top-right corner will turn yellow, indicating that the effects are bypassed. Because you can always see the top part of the MIDI Inserts section, you can easily change the status (active or bypassed) of your inserts by using this bar.
When you assign a MIDI plug-in effect to an insert slot, it affects the events sent to the MIDI output port of this track, as shown in Figure 27.2. If, instead, you want to use one device to play the original content and another to play the processed information, you can use a MIDI send.
One of the big differences between MIDI inserts and MIDI sends is that MIDI sends allow you to route the processed MIDI events generated by the MIDI effect to a second MIDI destination. (For example, you could use a MIDI send to create an echo of a piano track to play back through a guitar sound.) In this fashion, MIDI track sends offer an additional setting for MIDI output ports and MIDI channels.
As you can see in Figure 27.3, the signal from a MIDI send can be routed to two different outputs. If you don’t need the effect to play through a different MIDI port and channel, apply the effect as a MIDI insert. However, if you want your effect to play through some other port and channel, or you want to send the MIDI events before or after the volume control setting of the MIDI track, use MIDI sends instead of inserts.

The MIDI Sends section is not displayed in the Inspector by default. To make this section visible, you need to right-click (PC)/Control-click (Mac) on the track name in the Inspector and check MIDI Sends from the context menu.
Once displayed, you can see that the options for the MIDI sends (shown in Figure 27.4) are similar to the ones in the MIDI Inserts section. In addition to the options explained earlier, below the Select Effect Type field, you will find the MIDI Send Destination selector; this lets you choose the appropriate MIDI port that will be destination for MIDI events generated by the MIDI effect, along with a MIDI channel setting. Finally, the Pre-/Post toggle button lets you choose whether the MIDI events sent to the MIDI send output include the parameters found in the MIDI Modifiers section (the default Post- setting) or exclude them (Pre- setting).
