
Quantizing rhythm makes events cling to a virtual grid. It’s a way to make imprecise performances more precise. As you record MIDI or audio performances, notes might be recorded a little bit before or after a beat. Humans are not as steady and consistent as the timing in Cubase, nor would you want them to be when it comes to the music’s feel.
Fortunately, you can quantize events and individual notes to “nudge” them this way or that on the time grid. For example, setting the quantize value to quarter notes (1/4) will make all recorded notes cling to quarter notes. Setting the quantize value to a lesser note value splits the grid into smaller, more precise subdivisions.
Cubase 6 lets you quantize both MIDI and audio events; we’ll discuss both techniques in this chapter:
Understanding different quantize methods
How to save, rename, or delete a quantize setting to and from a preset list
How to apply an automatic quantize value during the recording or editing process
How to apply a quantize method to selected events
How to undo quantization on selected events
How to create a groove quantize preset based on selected MIDI events
How to quantize audio events using hitpoints and audio warp
How to quantize multiple audio events
Cubase 6 offers two basic types of quantizing—over-quantizing and iterative quantizing.
Over-quantizing is Cubase’s default method. It works by moving the start of an event to the closest time increment on the quantize grid.
Iterative quantizing (what Cubase dubs “iQ”) is a looser version of the over-quantize method. It moves the start position of an event only a certain percentage of the distance toward the nearest increment on the quantize grid; this percentage is determined by the Iterative Strength field in the Quantize Panel window. Iterative quantizing uses the current location (this could be the quantized location) of the event rather than its original location (unquantized location). You can therefore quantize an event and then requantize it differently using the iterative quantize method.
Quantizing audio and MIDI events is similar, but with one key difference. With audio quantizing, the quantization affects only when selected events start. MIDI quantizing, on the other hand, can also affect the lengths of events, and when they end.
You configure quantization for an audio or MIDI part by selecting the part and then selecting Edit > Quantize Panel. (You can also open the Quantize Panel by clicking the down arrow next to the Quantize Presets button on the Project window toolbar.) The Quantize Panel window, shown in Figure 26.1, lets you customize the parameters of over-quantization to help make the quantized events sound more natural. You can also use this panel to select and configure iterative quantization.
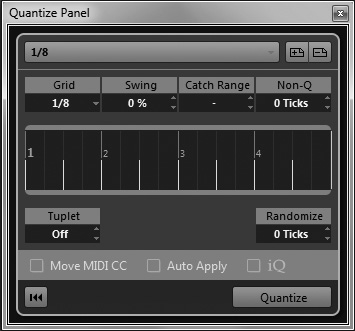
Here are the controls available in the Quantize Panel:
Select Preset. This lets you select from a variety of preset quantization values.
Quantize Grid. This sets the quantize reference value for the grid. The values displayed in the grid pop-up menu represent note subdivisions from 1/1 to 1/64, in straight, triplet, and dotted note values.
Swing Factor. This shifts the position of a straight grid type to produce a swing or a shuffle feeling.
Quantize Catch Range. This determines that only the area specified around the center of each increment on the grid is affected by quantizing. Each tick value represents 1/120 of a sixteenth note. This setting enables complex quantization tasks, such as quantizing only the heavy beats near each beat—and not the events in between.
Non-Quantize Range. This is the mirror image of the Quantize Catch Range parameter, in that it establishes an area around the center of each increment on the grid, within which note events are not affected. In other words, any note already found within this range is left un-quantized, creating a more human-like (read “looser”) feel to the quantization. In this case, quantization would be applied only to notes whose position is outside of the non-quantize area that surrounds each grid increment.
Grid Display. Found in the center of the Quantize Panel, this shows the result of your settings in the Grid quantize area above. The entire display area represents a single 4/4 bar.
Tuplet. This further subdivides the note value currently selected in the Grid field, to accommodate other rhythmic groupings that aren’t binary (multiples of two), including triplets (which can already be selected more easily in the Type selector), quintuplets, septuplets, and so on. For example, selecting a Grid value of 1/4 notes with a Tuplet value of 5 creates a grid of 1/8-note quintuplets—since there will be five grid subdivisions in the space of every 1/4 note.
Randomize. This is another feature that enables you to humanize the effect of quantization by adding small, random amounts of variation to the resultant position of the quantized notes.
Move MIDI CC. With this option, controllers related to MIDI notes, such as pitch bend, are automatically moved with any notes that are quantized.
Auto Apply. Activate this option to immediately apply changes you make to selected events.
iQ. Applies the looser iterative quantization—and displays the Iterative Strength panel.
Iterative Strength. This field becomes available when you check the iQ option, and sets the strength level of iterative quantization. With higher percentage values, events are moved closer to the nearest grid increment as specified by your current quantization settings. With lower percentage values, events are not moved as close to the grid setting, allowing for more variations. In other words, 0% strength would not move the notes at all, whereas 100% will move them all the way to the grid increment, as in normal over-quantize mode.
Reset Quantize. Click this button to undo any previous quantization.
Quantize. Click this button to apply quantization settings.
Previously we’ve discussed how you can magnetize different elements in the Project window using various Snap modes, as selected by the Snap Type button on the Project window toolbar. Quantization uses this same grid in which to snap selected events.
Know, however, that some Snap modes don’t take the grid into consideration, and therefore won’t be affected by the currently selected quantization. The mode that does work with quantization is the Grid mode; it not only affects movement of events, but also influences where parts are created and where markers will be placed. In other words, selecting an appropriate Grid and Quantize type for the task at hand will help you get the result you want more effectively.
For example, when you’re creating a new MIDI part, turn the Snap mode on (from the toolbar), select Grid as the Snap Type, and then select Bar as the Grid Type. As you record the new MIDI event, the newly created event will start at the closest bar from its beginning and will end at the closest bar after you stop recording. In such an example, as you create parts or events, their length could be increased or decreased by only one bar at a time.
Because the quantize setting influences how events are quantized, no matter which method you use, it’s a good idea to start by setting up how you want Cubase to quantize these events before applying a method.
Once you set quantization properties for an event, you can save those properties to a preset you can use for other events in this project. It’s important to know that a song’s feel is greatly influenced by its rhythmic definition, which is the result of rhythmic consistency between the instruments and throughout the project itself. Saving your own presets for quantize settings and reusing these presets throughout a project can help achieve this consistency.
You can apply a quantize setup to a MIDI event in a variety of ways. Here are a few to try out:
Apply a standard over-quantize method to already recorded events. Depending on which window is open when you click Apply, this method shifts the start position of selected events to the closest grid line set in the Project window or the current MIDI editor.
Apply an automatic quantize value during the recording process. This records the note events exactly as you play them, but automatically adjusts their positions in the resultant MIDI part according to the quantize settings of your project. In other words, you can still unquantize events that were recorded with the Auto-Quantize (the AUTO Q button in the Transport panel) feature enabled.
Apply a quantize value in real time—so that you can make adjustments in real time.
Use the Quantize Panel, which gives you more control over the effect quantization has on your recorded MIDI note events. For example, using the different parameters available in this panel, you can adjust the strength of the quantization, the swing factor, and the magnetic area of the grid, as well as create a grid for more complex rhythmic values, such as quintuplets and septuplets.
Apply the Quantizer, a MIDI plug-in, as a track’s insert or send effect.
Cubase also enables you to create a customized quantize setting, which is extracted from the rhythmic content of previously recorded MIDI events. For example, you might record a drum part and get just the groove you are looking for. Because the rhythmic “groove” of the percussions and drum parts is usually something you would want to apply to other musical parts, you can convert the MIDI groove you played into a reusable groove template (called a groove quantize map) that can be applied to other MIDI parts.
When you create a groove quantize map, it will appear in the Select Preset drop-down menu of the Quantize Panel, as well as on the Quantize Presets control on the Project window toolbar. Once a groove quantize map is selected, the Quantize Panel will offer a different set of controls from those described previously in this chapter for ordinary quantization, as shown in Figure 26.2. The new controls include the following:
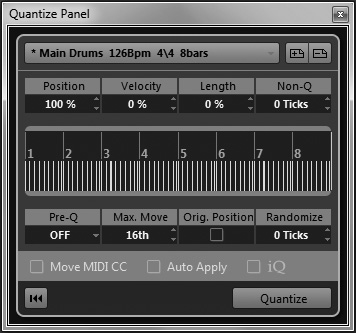
Position. Think of the position parameter as being like the iterative strength, where the position percentage represents the strength of the quantization from the groove’s source. The difference between the normal iterative strength value and the position is that the latter influences the groove quantization applied after a possible pre-quantize setting.
Velocity. This indicates what percentage of the groove quantize map’s velocity level is applied to the velocity of the selected events. With higher values, the resultant velocities are closer to the groove quantize map than to the original. With lower values, velocities are not changed as much, with no change if the value is set at zero.
Length. This indicates what percentage of the groove quantize map’s length value is applied to the selected events’ recorded length. With higher values, the resultant lengths are closer to the groove preset’s length than to the original. With lower values, lengths are not changed as much, with no change if the value is set at zero.
Prequantize (Pre-Q). This quantizes events to a selected note value before applying the groove quantize map to increase the rhythmic accuracy of the events.
Maximum Move. This parameter determines the maximum distance a MIDI event will be allowed to move from its original recorded position, in ticks. (Ticks are the smallest time increments inside a Cubase project.)
Original Position. When this option is selected, the selected MIDI event reverts to its original position on the grid when quantizing.
Inside the MIDI editors, you apply a groove quantize map as you would apply any another quantize type—by selecting the desired events and then selecting that groove quantize map in the toolbar’s quantize type field.
Before you can quantize an audio event, you must first identify hitpoints within the event, and then “slice” the event into individual beats or sections of the beat. It is these slices that are quantized to the underlying grid.
Hitpoints are special markers that can be added to an audio event to, among other things, create audio slices or create groove quantize maps. You can use slices to extract individual sounds from a loop, replace certain slices, or move them around to create new variations.
Hitpoints are created from attack transients that are associated with beats in a rhythmic part, identifying them with special markers. Later, you can use hitpoint markers to slice up the event into separate beats, replacing a single audio event with a series of audio slices in an audio part.
Hitpoints are used primarily with drum loops. The goal with hitpoints is to separate each beat of the audio event into its own slice; you can then use Cubase’s other tools to change the tempo of the event by manipulating the individual slices.
That said, to get the best results, you will often need to fine-tune the marker’s location and make sure that your audio content is appropriate for hitpoints. For example, audio with well-defined drum beats works better than material with long, sustained notes. Also, drum beats that have a lot of effects, such as reverb or delay, are harder to slice accurately.
All the following operations assume you have already loaded the event into the Sample Editor.
Create hitpoints and slices
Monitor the sample a few times to count how many bars and beats it has. This will help you later.
Enter the sample’s time signature in the Sample Editor’s Signature field (see Figure 26.3) using the small arrows on each side of the field. Many contemporary drum loop samples in dance-oriented styles use a 4/4 time signature.
Adjust the Bars and Beats fields to the corresponding values. For example, if your loop has eight beats, enter two bars (assuming the loop is in 4/4 time). Cubase calculates the audio tempo for the sample automatically.
Open the Hitpoints tab in the Sample Editor Inspector, shown in Figure 26.4.
Adjust the Threshold slider to the right to add more hitpoints, or to the left to remove unwanted hitpoints. (This control filters “hits” based on how loud they are; the assumption is that the louder the note, the more likely it is to be a major hitpoint.)
Click the Beats control and select which hitpoints you want to use—all, 1/4 notes, 1/8 notes, and so on.
Click the Create Slices button.

Cubase now creates slices based on the detected hitpoints and closes the Sample Editor window.
Additional hitpoint functions are located within the Hitpoints tab in the Sample Editor Inspector.
Edit Hitpoints enables you to add, move, or delete hitpoints.
Remove All removes all hitpoints from the selected event.
Create Slices creates slices between hitpoints, as just discussed.
Create Groove uses the timing provided by the current hitpoints to create a groove quantize map called Groove. You could create a groove based on the drum loop’s timing and apply the same feel to the MIDI bass line, for example.
Create Markers lets you convert existing hitpoints into markers in a project.
Create Regions creates regions within your event, based on hitpoints calculated. This is a good way to isolate recorded sounds for further editing.
Create Warp Tabs. Use this option to create warp tabs that can be time stretched. (We’ll discuss this in a moment.)
Create MIDI Notes lets you replace existing recorded notes with MIDI notes, in order to change sounds in a drum track. Learn more in Chapter 31, “Working with Beats and Loops.”
There are two primary approaches to quantizing an audio event. First, you can manually create hitpoints and slices, and then apply quantization to those slices. Or you can use AudioWarp technology to time stretch slices to the quantization grid.
Of these two approaches, the AudioWarp approach often produces the best results. When you quantize slices created with hitpoints, you sometimes end up with unwanted space (silence) between the slices. By time-stretching the slices instead, the drum track sounds more complete, not like it was artificially edited.
New to Cubase 6 is the ability to quantize multiple audio tracks simultaneously. This is nice if you want to “fix” an entire set of tracks for a live-recorded drum part—if you have separate tracks for bass drum, snare drum, and hi hat, let’s say. With multitrack quantization, the individual slices on all selected tracks are grouped and moved at once. (Cubase even creates crossfades and fills in any gaps between slices to ensure seamless transitions without unwanted silence.)
Quantize multiple audio tracks
In the Project window, select the tracks you want to quantize.
Select Project > Track Folding > Move Selected Tracks to New Folder. This places the tracks inside a single folder track.
Select the folder track.
In the Inspector for the folder track, as shown in Figure 26.5, click “on” the Group Editing (=) button. This applies edits made on one track to all tracks in the folder.
Double-click one of audio tracks in the folder to open the Sample Editor.
Click the Edit Hitpoints button in the Hitpoints tab of the Inspector, or select Audio > Hitpoints > Calculate Hitpoints to calculate the hitpoints in this event.
In the Slice Rules section of the Quantize Panel, shown in Figure 26.6, all tracks with hitpoints are listed. For each track, click and drag the “stars” control to assign a priority for that track. The track with the highest priority (highest number of stars) will define where the audio is sliced.
Set the Range parameter to determine the minimum distance between two hitpoints on different tracks. Hitpoints within this range are considered as marking the same beat.
Set the Offset parameter to determine how far before the hitpoint position an event is sliced.
Click the Slice button to slice the events.
Set the quantization parameters as desired.
Click the Quantize button to apply quantization.
In the Crossfades section at the bottom of the Quantize Panel, shown in Figure 26.7, click the Crossfade button to apply crossfades between any overlapping slides.
If necessary, click the Nudge Left or Nudge Right button to move the crossfade area to the left or right. This may be necessary if the crossfades cut note attacks.


