
Rendering a Scene
More often than exporting, though, you probably want to render your scenes. Rendering is the process of taking your 3D data and creating one or more 2D pictures from the perspective of a camera. The 2D result can then be seen by nearly anyone using image viewers or movie players.
 Rendering is very much like taking a photograph or a movie in meatspace. If you don't have a camera, you can't take a picture. Likewise in Blender, if there's no camera in your scene, Blender doesn't know what to render, so make sure that you have a camera in there.
Creating a still image
Rendering single images, or stills, in Blender is remarkably easy. Blender actually offers three different ways to do it. The fastest way is to simply press the F12 hotkey. Alternatively, you can click the Image button in the Render panel of Render Properties or choose Render![]() Render Image from the menu at the top of each of the screen layouts that ship with Blender.
Render Image from the menu at the top of each of the screen layouts that ship with Blender.
Viewing your rendered images in Blender
Any way you decide to do it, Blender uses its integrated UV/Image Editor to display the rendered output. If you don't have a UV/Image Editor already open in your screen layout, Blender takes the largest area in your screen layout and changes it to the UV/Image Editor while rendering. Of course, some people would prefer a different behavior for displaying renders. Fortunately, available options allow you to change that behavior. The control is a drop-down menu in the Render panel of Render Properties, labeled Display. By default, it's set to Image Editor.
Figure 14-2 shows the Render panel and the three different options you have for where to send your renders. I like to use the default Image Editor setting or Full Screen. Choosing Full Screen does the same thing as the Image Editor option, except it also maximizes the UV/Image Editor to the entire Blender window. If you choose the New Window option, Blender creates a completely new window, populated only with a UV/Image Editor that displays your image. For any of these render options, you can quickly toggle between your regular Blender screen and the render screen by pressing F11.
Figure 14-2: To view your renders, choose to use Full Screen, Image Editor, or Render Window.

![]() Another cool feature that works regardless of which way you like to see your renders are the render buffer slots. When you have your render output onscreen in the UV/Image Editor, hover your mouse cursor in that editor and press J. Upon doing so, Blender switches to a different image buffer. The first time, it may seem odd because you see a blank UV/Image Editor. However, bounce back to your scene (F11) and make a small change. Then render again (F12). Now when you press Alt+J on your render, it pops back to your previous render. Press J, and you're back at your current render. Press J again, and you're in a third, blank, render slot. Blender offers you the ability to swap between up to eight render slots. Using these render slots, you can quickly compare the differences between different renders, cycling forward and backward through the slots by using J and Alt+J, respectively. Render slots are a great way to see whether you like the changes you've made to your scene.
Another cool feature that works regardless of which way you like to see your renders are the render buffer slots. When you have your render output onscreen in the UV/Image Editor, hover your mouse cursor in that editor and press J. Upon doing so, Blender switches to a different image buffer. The first time, it may seem odd because you see a blank UV/Image Editor. However, bounce back to your scene (F11) and make a small change. Then render again (F12). Now when you press Alt+J on your render, it pops back to your previous render. Press J, and you're back at your current render. Press J again, and you're in a third, blank, render slot. Blender offers you the ability to swap between up to eight render slots. Using these render slots, you can quickly compare the differences between different renders, cycling forward and backward through the slots by using J and Alt+J, respectively. Render slots are a great way to see whether you like the changes you've made to your scene.
Picking an image format
Now, you have your image rendered, but you still haven't saved it anywhere on your hard drive, so it's available for sharing with other people. This, too, is easy, but before you save, you may want to change the file type for your image. This is done in the Output panel of Render Properties, as shown in Figure 14-3.
Figure 14-3: Output panel in Render Properties.

When you save with Blender's File Browser, you also can choose the file type for your image from a drop-down menu in the region on the left side. However, the Output panel in Render Properties gives you a few more options for controlling your saved file. The primary control for choosing the format of your file in the Output panel is a file type drop-down menu. By default, Blender saves renders as PNG images. If you want to render to a different image format, such as PNG, Targa, TIFF, or OpenEXR, left-click this drop-down menu and choose your desired file type. Depending on the file type you choose, the options at the bottom of the Output panel change. For example, with the PNG file type, the Compression slider is available for controlling the level of compression in the image.
The BW/RGB/RGBA buttons below the file type drop-down are always visible, and they're pretty important for both animations and stills. They control whether Blender, after rendering, saves a black and white (grayscale) image, a full color image, or a color image with an alpha channel for transparency. Typically, you use one of the latter two. RGB is the most common and is supported by all formats, creating a full color image. On occasions, however, you'll want to render with transparency.
As an example, say that you've made a really cool building model, and you want to add your building to a photo of some city skyline. You need everything that's not your building, including the background of your image, to be rendered as transparent. An alpha channel defines that transparency. The alpha channel is basically a grayscale image that defines what is and is not transparent. Totally white pixels are opaque, and totally black pixels are transparent. Gray pixels are semitransparent.
Not all image formats support an alpha channel, such as the JPEG and BMP formats. If you choose one of these file types and have RGBA set, Blender just omits the alpha information when saving. If you want to make sure that your alpha channel is preserved, though, choose one of the following formats: PNG, Targa, TIFF, or OpenEXR.
Setting dimensions for your renders
The Dimensions panel close to the top of Render Properties gives you control over the size of your final render. The X and Y values under the Resolution label set the width and height of your image in pixels. The X and Y values under the Aspect Ratio label are for determining the horizontal and vertical aspect ratio of your image. The ability to adjust aspect ratio is for certain circumstances where you want to render your image with rectangular pixels rather than square ones. Typically, rectangular pixels are necessary only for television formats, so unless you know exactly what you're doing or if you're using a preset, I recommend setting these to the same value. I use 1.000 most of the time.
![]() Speaking of presets, Blender offers a number of rendering presets for you to use. These presets are available from a drop-down menu at the top of the Dimensions panel. Choosing any one of them changes settings throughout Render Properties to get the render to properly match that preset. Using presets is a great timesaver when you know, for example, that you have to render to high-definition video specifications, but you can't remember the right resolution, aspect ratio, and frame-rate values.
Speaking of presets, Blender offers a number of rendering presets for you to use. These presets are available from a drop-down menu at the top of the Dimensions panel. Choosing any one of them changes settings throughout Render Properties to get the render to properly match that preset. Using presets is a great timesaver when you know, for example, that you have to render to high-definition video specifications, but you can't remember the right resolution, aspect ratio, and frame-rate values.
Whenever you change the resolution or aspect ratio values in the Dimensions panel, you need to render your scene again (F12) to get it to appear in the right size. If you're just changing your output file type, you don't need to rerender.
Saving your still image
After you've adjusted all your settings, rendered, and chosen your output file format, you have just one thing left to do: Save your still. Saving is quick and painless. From the UV/Image Editor, press F3 or choose Image![]() Save As, and Blender brings up a File Browser. Here, you can dictate where on your computer you want to save your render. That's it!
Save As, and Blender brings up a File Browser. Here, you can dictate where on your computer you want to save your render. That's it!
 Remember, if you're rendering a still image, it's not saved anywhere on your hard drive unless you explicitly save it by pressing F3 or navigating to Image
![]() Save As in the UV/Image Editor. I can't tell you how much time I spent rerendering images that I forgot to save when I first started using Blender. Hopefully, you can benefit from my mistake.
Save As in the UV/Image Editor. I can't tell you how much time I spent rerendering images that I forgot to save when I first started using Blender. Hopefully, you can benefit from my mistake.
Creating a finished animation
For rendering animations, the steps are similar to rendering stills (see preceding section), but you have a few more considerations. The largest consideration deals with the file type you choose. If, for example, you choose a still image format like JPEG, PNG, or OpenEXR, Blender creates an individual image for each frame in your animation. However, if you choose any of the movie options like AVI, QuickTime, or MPEG, Blender creates a single movie file that contains all the frames in the animation, as well as any sound you use for the animation. Note that Macintosh and most Windows users have the QuickTime option available, but Linux users do not.
Depending on the movie format you choose, an Encoding panel appears in Render Properties in which you have a second set of choices that enables you to pick the codec, or compression format, you want to use. QuickTime has its own interface, dependent on whether you're on a Windows computer or a Macintosh, whereas the other movie options work from the Encoding panel. Figure 14-4 shows the options in this panel.
Figure 14-4: The Encoding panel in Render Properties.
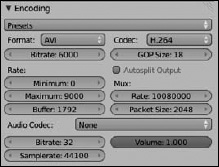
The Encoding panel lets you choose which codec you would like to use, and it also offers you the ability to tweak how the actual video gets compressed. More often than not, though, the default settings tend to work pretty well.
Like in the Dimensions panel, a presets drop-down menu appears at the top of the Encoding panel for commonly used configuration. Using this menu automatically enables the proper settings to render for outputs such as DV, DVD, and VCD.
The Audio Codec drop-down menu lower down the panel gives you similar control over the sound that Blender renders (if the file type supports audio), but arguably the most important thing to remember is to make sure that the Audio Codec drop-down isn't set to None if you want audio to be included with your rendered movie file. The PCM option gives you the best results, but also yields the largest file sizes.
![]() Make sure that you test your files if you want other people to be able to view them. I can't tell you how many times I've rendered a movie file that plays just fine on my Linux machine, but won't even open on a Windows or Macintosh machine. It's kind of ugly and makes everyone look bad. So make sure that you try to view the file on as many machines as possible before sharing it with the world.
Make sure that you test your files if you want other people to be able to view them. I can't tell you how many times I've rendered a movie file that plays just fine on my Linux machine, but won't even open on a Windows or Macintosh machine. It's kind of ugly and makes everyone look bad. So make sure that you try to view the file on as many machines as possible before sharing it with the world.
The other consideration to make when saving an animation is where on your hard drive you intend to store it. Enter this information on the first field of the Output panel. By default, Blender saves your animations to the /tmp directory on your computer. However, you may not have a /tmp directory, or you explicitly may want to save the animation to a different folder on your hard drive. Left-click the file folder icon to the right of this text field and use the File Browser to navigate where you want to save your animation.
So, to render animation, the steps are pretty similar to rendering a still:
- Set up your render resolution from the Dimensions panel and your file type from the Output panel.
If you've been working on your animation, hopefully you've set it all up already. Although changing the output resolution (the width and height) of the image after you animate isn't too bad, changing to other frame rates after the fact can get to be a pain. The frame rate is set with the FPS value in the second block of buttons of the Dimensions panel.
- Confirm the start and end frames from the Frame Range values in the Dimensions panel.
You probably already made this setting while animating, but double-check these start and end frames to make sure that they're correct.
- Verify where you want to save your file in the Output panel.
- Animate by pressing Ctrl+F12.
Also, you can press the Animation button in the Render panel or choose Render
 Render Animation. Your animation immediately starts being created. Now go get a cup of coffee. Rendering an animation can take quite some time.
Unlike rendering a still image, which does not save anything to your hard drive until you press F3, rendering an animation automatically saves your renders wherever you stipulate in the Output panel.
Creating a sequence of still images for editing or compositing
In a couple of situations, rendering out a sequence of still images rather than a single movie file makes a lot of sense. One of the biggest reasons for rendering a sequence of stills is for compositing, or combining multiple images together. When you do compositing, you often rely on having an alpha channel that makes everything transparent except for your rendered subject. Most video formats simply don't support an alpha channel, so to accommodate this shortcoming, you render out a sequence of still images in a format that does support alpha, such as PNG.
Another reason that you may want to have a still image sequence rather than a movie file is for editing, or sequencing multiple video and animation clips. To get smaller file sizes, many video codecs throw out large chunks of image data from one frame to the next. The result is a small file that plays well, but is pretty difficult to edit because in editing, you may want to cut on a frame that doesn't have very much image data at all. Using a sequence of still images guarantees that all image data for each and every frame is completely there for smooth editing. Chapter 15 covers both compositing and editing in more detail.
The third reason you may want to render a sequence of still images is largely practical. When rendering to a movie format, what happens if you decide to stop the render and change a small part of it? Or what happens if Blender crashes in the middle of rendering? Or if an army of angry squirrels invade your office and shut down your computer midrender? Well, you have to restart the whole render process from the start frame. Starting over, of course, is painful, especially if you have to wait multiple minutes for each frame in your sequence to render. If you render by using a sequence of still images, those images are saved the second that they're created. If your render process gets stopped for any reason, you don't have to start rendering again from the beginning. You can adjust the Start value in the Dimensions panel of Render Properties to pick up where you left off and resume the render process.
![]() If you choose to save a sequence of still images, you should create a specific folder just for these render files. You're going to create a lot of files. If the animation is 250 frames long and you render to still images, you're going to get 250 individual images saved to your hard drive.
If you choose to save a sequence of still images, you should create a specific folder just for these render files. You're going to create a lot of files. If the animation is 250 frames long and you render to still images, you're going to get 250 individual images saved to your hard drive.