
Setting Up the World
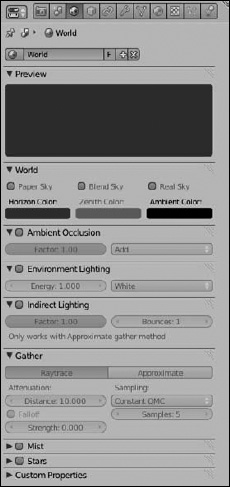
When you set up your scene for rendering, lighting is really only part of the equation. You must also consider your scene's environment. For example, are you outdoors or indoors? Is it daytime or nighttime? What color is the sky? Are there clouds? What does the background look like? You have to consider these factors when thinking about the final look of your image. Fortunately, nearly all the controls for setting up your environment are in World Properties, as shown in Figure 9-12.
Changing the sky to something other than dull gray
If you've worked in Blender for a while and gotten a few renders out, you might be pretty tired of that dull gray background color that the renderer uses by default. Here's where you change that color: Look in the World panel of World Properties. The leftmost color swatch sets the horizon color. You can adjust it by left-clicking the color swatch and using the color picker.
To the right of the horizon color is the zenith color. You may notice that trying to change this color doesn't seem to affect the background color at all. By default, Blender is set to use only the horizon color, so you end up with a solid color as the background. To change this default, left-click the Blend Sky check box in the World panel. When you do, the Preview shows a linear gradient that transitions from the horizon color at the bottom to the zenith color at the top. If I'm doing a render where I just want to see a model I've created, I often use this setup with my horizon color around 50 percent gray and my zenith color nearly black.
Figure 9-12: World Properties.
Of course, the next question you might have is, “Okay, so what do the other two check boxes in the World panel do?” I'm glad you asked. You can actually activate any combination of these check boxes. Here is a description of what each option does when enabled:
- Paper Sky: You typically use the Paper Sky setting with both Blend Sky and Real Sky also enabled. This setting keeps the horizon at the center of the camera, no matter where it's pointing. It also adjusts the gradient to make sure that the full zenith and horizon colors are visible.
- Blend Sky: Blend Sky enables a gradient going from the horizon to the zenith. When enabled by itself, the horizon is always at the bottom of the camera view and the zenith is at the top.
- Real Sky: Enabling Real Sky sets the horizon to the XY ground plane and the gradient to the zenith color along the global Z-axis. A bonus is that, because the horizon is locked to the XY ground plane, the gradient rotates with the camera, giving a much more realistic feeling to the background. I'm very fond of this setting, especially if I'm using a texture in the background.
Figure 9-13 shows a simple scene rendered with the various combinations of the Blend Sky check box enabled with the other two options so that you can get a better idea of what they do.
Figure 9-13: Ways to control the Blend gradient and the horizon.

Understanding ambient occlusion
Take a look outside. Now, hopefully it's daytime, or this example isn't going to work, but notice how much everything seems to be illuminated. Even on a bright sunny day, the deepest shadows aren't completely black. The reason is that light from the sun is basically bouncing off of every surface many times, exposing nearly all objects to at least some amount of light. In computer graphics, this phenomenon is often referred to as global illumination, or GI, and it's pretty difficult to re-create efficiently. As you may have guessed, the biggest reason is the “light only bounces once” rule (see Chapter 7).
Another result of GI is that all this bounced light also makes subtle details, creases, cracks, and wrinkles more apparent. At first, this statement may seem like a paradox. After all, if light is bouncing off of everything, intuitively, it would make sense that everything should end up even brighter and seem flatter. However, remember that not only is the light bouncing off of everything, but it's also casting small shadows from all the weird angles that it bounces from. Those small shadows are what bring out those minor details.
The GI effect is most apparent outdoors on overcast days where the light is evenly diffused by cloud cover. However, you can even see it happening in well-lit rooms with a high number of light sources, such as an office building with rows and rows of fluorescent lights lining the ceiling. You can somewhat fake this effect by using a Hemi lamp, but the problem with Hemis is that they don't cast shadows, so you don't get that nice, added detail from GI.
The bad news is that Blender's internal renderer doesn't have “true” GI capability. However, Blender does have a great way of approximating GI, thanks to ambient occlusion (AO). Often called dirty GI or dirt shader, AO finds the small details in your object and makes them more apparent by making the rest of the model brighter or making the details darker.
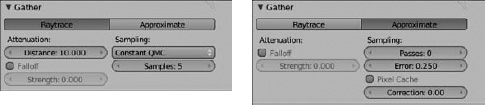
To enable AO, left-click the check box next to the Ambient Occlusion panel in World Properties. When you enable AO, Blender makes the settings in the Gather panel available. This panel gives you two ways of calculating AO: with ray tracing or as an approximation of the result. Figure 9-14 shows the Gather panel with the options for ray traced AO and approximate AO.
Figure 9-14: The Gather panel in World Properties with ray traced AO options (left) and approximate AO options (right).
 If you're going to use ray traced AO, make sure that you have the Ray Tracing check box enabled in the Render panel of Render Properties.
Most of the controls in the Ambient Occlusion and Gather panels are the same, regardless of whether you're using ray traced or approximate AO. Here's a description of the options available for both types of AO:
- Ambient Color: This color swatch in the World panel controls the source color for the diffuse energy used by AO. The Ambient color adds itself to the overall color of the scene. I don't normally advocate setting the Ambient color to anything other than black because it has a tendency to wash out the shading in the scene. However, when you enable AO and adjust the Ambient color, the shading isn't washed out as much, and you actually end up with a more believable image.
- Factor: The Factor value is the strength of the overall AO effect. The effect you choose from the Add/Multiply menu is multiplied by this value. Usually it's a good idea to keep this at 1.0, although I recommend that you play with it a bit to see how it affects your scene.
- Add/Multiply: With this drop-down menu in the Ambient Occlusion panel, you can control how AO creates shadows. Choosing Add brightens the rest of the object, making the details apparent by simply staying their own color. Choosing Multiply darkens the detailed areas while keeping the object's original shading.
- Falloff: This option in the Gather panel controls the size of the extra shadows that AO creates. When you enable the Falloff check box, you can use the Strength value field below it. Setting this value to higher numbers makes the shadows more subtle.
The other values for ray traced and approximate gathering are there for refining and optimizing how they work. If you read about ray traced lights earlier in this chapter in the “Universal lamp options” section, the settings for ray traced gathering are pretty familiar. I recommend using adaptive QMC because it typically yields faster results at good quality. I've even found that in a lot of situations, using ray traced gathering with adaptive QMC sampling is even faster than using approximate gathering. Using the other sampling types usually gives you a noisier, or more speckled, result.
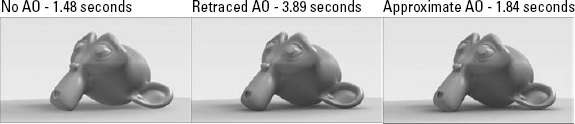
When choosing between ray traced and approximate gathering, keep in mind a set of tradeoffs. As you might expect, ray traced gathering gives you more accurate results, but it often takes longer to process when you use a higher Samples value to reduce the noisiness of the AO shading. Approximate gathering works fast and doesn't suffer the noise problem that you get with ray traced gathering. Of course, some people actually prefer that noisy grain that ray traced gathering gives, and approximate gathering is a bit more error-prone in creating its shadows, especially where things touch. So it may take some additional time to set things up so that they look believable. You have to weigh out the advantages and disadvantages for yourself and see which method works best for your projects. Figure 9-15 shows the same scene rendered with both types of gathering, as well as without any AO at all.
Figure 9-15: From left to right, with their render times: no AO, ray traced AO, and approximate AO.
Adding mist and stars
Other panels in World Properties are Mist and Stars. The settings in these panels are somewhat primitive in terms of what they actually do, but they can be pretty handy in a pinch for creating nice atmospheric effects and quick backgrounds.
Mist
Blender's Mist works by decreasing the opacity of objects as they get farther away from the camera, mixing more with whatever the sky is. To use it, enable the Mist check box and expand its panel. From here, you can adjust the Start and Depth values. Start defines how far away from the camera the mist starts to take effect. Depth is the distance from the Start value that the mist effect is at 100 percent. Anything farther away from the camera doesn't show up in the final render.
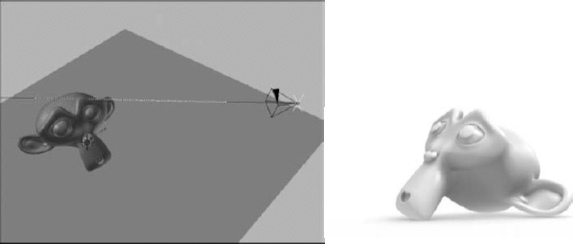
![]() These values are in the units you specify in Scene Properties, but it can be difficult to know intuitively where they actually fall in the scene, relative to your camera. Fortunately, you can see mist limits visually. Select the camera and switch to Object Data Properties. On the left side of the Display panel are four check boxes. Left-click the Mist check box. When you do, a line appears extending from your camera. If you switch back to World Properties and adjust the Start and Depth values, you can now see exactly where the mist region of influence is. Figure 9-16 shows a scene in the 3D View with a camera that has its mist limits visible.
These values are in the units you specify in Scene Properties, but it can be difficult to know intuitively where they actually fall in the scene, relative to your camera. Fortunately, you can see mist limits visually. Select the camera and switch to Object Data Properties. On the left side of the Display panel are four check boxes. Left-click the Mist check box. When you do, a line appears extending from your camera. If you switch back to World Properties and adjust the Start and Depth values, you can now see exactly where the mist region of influence is. Figure 9-16 shows a scene in the 3D View with a camera that has its mist limits visible.
Figure 9-16: A camera in the 3D View with its mist limits visible. To the right is a render of that scene.
The Falloff drop-down menu controls how the mist gets thicker from start to finish. Quadratic tends to be a more subtle effect, whereas Linear tends to make the mist thicker faster. If you want to limit the mist to a certain height, like when you see an early morning mist in a field, adjust the Height value. Like the other values, Height is set in your specified units and works relative to the XY ground plane. The Intensity value increases the mist's intensity. Be careful with this setting. Putting it too high hides your entire scene from you.
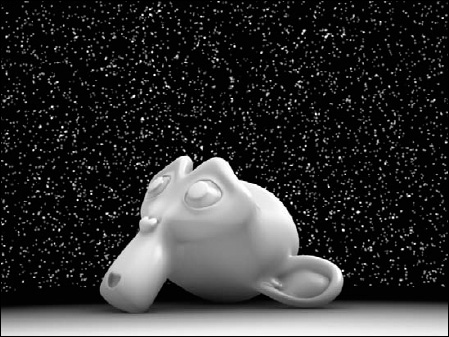
Stars
Blender's Stars feature is a quick way of adding starlike halos to your scene. You enable it by left-clicking the Stars check box in World Properties. Remember that Blender creates these stars in 3D space. They actually have a physical location and they aren't just a randomly generated speckled background. Descriptions of each option are as follows:
- Size: Size controls the average size of the stars in your scene. For realistic stars, use a relatively small Size value.
- Min. Dist: This value controls the minimum distance that stars can be from the camera. Unless you want stars to show up in front of some objects in your scene, this value should be larger than the distance between the camera and the farthest object away from it.
- Colors: Increasing this value colors the stars randomly. Setting this value to its maximum value makes your scene look a bit like a piñata exploded in space. However, lowering the value to 0.050 gives some subtle variety to your stars.
- Separation: The Separation value is the average distance between stars. Stars are randomly placed in the background, but this setting controls how dense the star field is.
Figure 9-17 shows a simple scene rendered with the Stars feature enabled.
Figure 9-17: Mon-keeeeyysss innnnnnnnn spaaaaace!
![]() When using stars, enable Real Sky in the World panel. This way, if you animate your camera moving in the scene, the stars behave realistically.
When using stars, enable Real Sky in the World panel. This way, if you animate your camera moving in the scene, the stars behave realistically.
Creating sky textures
Flat colors, gradients, and procedural stars are nice, but in some cases, you'd definitely rather have an image as your background. You can apply a texture to the World for your scene, like materials and lights.
In the new Blender interface, applying a texture is actually a little bit tricky to do. Like with texturing materials and lights, you use Texture Properties. What makes things a little complicated is that if you want to edit textures for your World, you need to first let Blender know the context in which you want to work. To do so, bring up Texture Properties and left-click the World button in the Context panel. The Texture Properties are the same familiar ones that I describe in Chapter 7. The primary difference is in the Influence panel, visible after you add a new texture.
The Influence panel gives you the ability to map the color of the texture to the blend, horizon color, and the upper and lower zenith colors. To use an image as your Sky texture, follow these steps:
- Left-click the New button in the texture datablock.
This button is located beneath the list box in Texture Properties.
- Change the texture Type to Image or Movie.
- In the Image panel, left-click the Open button and use the File Browser to find the image you want to use.
You may want to enable thumbnail view from the File Browser's header.
- In the Influence panel, map the texture to the horizon color by enabling the check box next to the Horizon slider.
- Back in World Properties, go to the Preview panel and enable the Real Sky check box.
This step ensures that the sky moves properly (or, more accurately, the sky stays still) as you move your camera in the scene.
- Switch back to Texture Properties and tweak the mapping and input settings to taste.
You may have to adjust the input coordinates as well as the texture size and offset. It's worth it to play around with these settings a bit to land on the look you want. When you're finished, you may have something that looks like Figure 9-18.
Figure 9-18: A simple scene with a sky texture, as well as the World and Texture Properties that set it up.
