
Working with Loops and Rings
Regardless of whether you're box modeling or point-for-point modeling, understanding the concepts of loops and rings definitely makes your life as a modeler a lot less crazy.
Understanding edge loops and face loops
Generally speaking, an edge loop is a series of edges that connect to form a path where the first and last edges connect to each other — well, that's the ideal case anyway. I like to call this kind of closed edge loop a “good” edge loop.
Of course, then you probably want to know what a “bad” edge loop is. Well, you can have a path of edges that don't connect at the beginning and end of the loop, but calling these loops bad isn't really accurate. It's better to refer to edge loops that stop before reconnecting with their beginning as terminating edge loops. While you generally want to avoid creating terminating edge loops in your models, you can't always avoid having them, and sometimes you actually need them for controlling how edges flow along the surface of your mesh.
To get a better understanding of the difference between closed edge loops and terminating edge loops, open Blender and add a UV sphere (Shift+A![]() Mesh
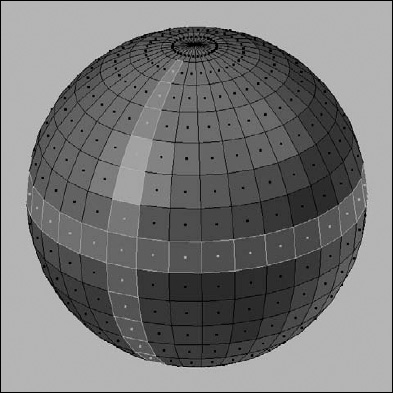
Mesh![]() UV Sphere) and leave the default settings for rings, segments, and radii. Tab into Edit mode on the sphere and Alt+right-click one of the horizontal edges on the sphere. This step selects an edge loop that goes all the way around the sphere like the latitude lines on a globe, as shown in the left image of Figure 5-2. This loop is a closed edge loop. Press A to deselect all and now Alt+right-click a vertical edge. When you do, you select a path of vertices that terminates at the top and bottom poles, or junctions of the sphere, as shown in the right image of Figure 5-2. That's a terminating edge loop.
UV Sphere) and leave the default settings for rings, segments, and radii. Tab into Edit mode on the sphere and Alt+right-click one of the horizontal edges on the sphere. This step selects an edge loop that goes all the way around the sphere like the latitude lines on a globe, as shown in the left image of Figure 5-2. This loop is a closed edge loop. Press A to deselect all and now Alt+right-click a vertical edge. When you do, you select a path of vertices that terminates at the top and bottom poles, or junctions of the sphere, as shown in the right image of Figure 5-2. That's a terminating edge loop.
The vertical loop doesn't go all the way around because, technically speaking, edge loops rely on four-point poles, or a vertex that's at the junction of four edges. Imagine that following an edge loop is like driving through a city. The four-point pole is like a four-way stop, where you have the option of going left, right, or straight. Well, to properly follow the loop, you keep traveling straight. However, if you come up to a fork in the road (a three-point pole) or a five-way (or more) intersection, you can't necessarily just go straight and be sure that you're following the loop. Therefore, the loop terminates at that intersection. That's why the horizontal edge loop in Figure 5-2, which is made up entirely of four-point poles, connects to itself, whereas the vertical loop stops at the top and bottom of the sphere, where all the edges converge to a single junction.
Figure 5-2: A closed edge loop (left) around a sphere and a terminating edge loop (right) on a sphere.

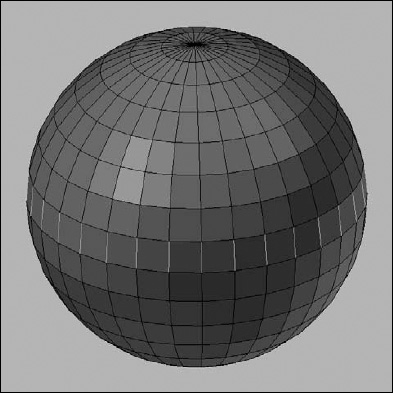
In addition to edge loops, you can also have face loops. A face loop consists of the faces between two parallel edge loops. Figure 5-3 shows horizontal and vertical face loops on a UV sphere. In Blender, you can select face loops when you're in Face Select mode (in Edit mode, press Ctrl+Tab![]() Faces) the same way you select edge loops in Vertex Select or Edge Select modes: Alt+right-click a face in the direction of the loop you'd like to select. For example, going back the UV sphere, to select a horizontal face loop, Alt+right-click the left or right side of one of the faces in that loop. To select a vertical face loop, Alt+right-click the top or bottom of the face.
Faces) the same way you select edge loops in Vertex Select or Edge Select modes: Alt+right-click a face in the direction of the loop you'd like to select. For example, going back the UV sphere, to select a horizontal face loop, Alt+right-click the left or right side of one of the faces in that loop. To select a vertical face loop, Alt+right-click the top or bottom of the face.
![]() In some Linux window managers, the Alt key manipulates windows, which supersedes Blender's control of it and prevents you from doing a loop select. Most window managers allow you to remap that ability to another key (like the Super or Windows key). However, if you use a window manager that doesn't offer that remapping ability, or you just don't feel like remapping that key, you can still select loops by using Shift+Alt+right-click. This key combination is actually for selecting multiple loops, but if you have no vertices, edges, or faces selected, it behaves just like Alt+right-click.
In some Linux window managers, the Alt key manipulates windows, which supersedes Blender's control of it and prevents you from doing a loop select. Most window managers allow you to remap that ability to another key (like the Super or Windows key). However, if you use a window manager that doesn't offer that remapping ability, or you just don't feel like remapping that key, you can still select loops by using Shift+Alt+right-click. This key combination is actually for selecting multiple loops, but if you have no vertices, edges, or faces selected, it behaves just like Alt+right-click.
Selecting edge rings
Say that instead of wanting to select an edge loop or a face loop, you'd like to select just the edges that bridge between two parallel edge loops, as shown in Figure 5-4. These edges form an edge ring. You can only select edge rings from Edge Select mode (in Edit mode, press Ctrl+Tab![]() Edges). When you're in Edge Select mode, you can select an edge ring by using Ctrl+Alt+right-click. Trying to use this hotkey sequence in Vertex Select or Face Select mode just selects a face loop.
Edges). When you're in Edge Select mode, you can select an edge ring by using Ctrl+Alt+right-click. Trying to use this hotkey sequence in Vertex Select or Face Select mode just selects a face loop.
Figure 5-3: Some face loops selected on a sphere.
Being able to use rings and loops for selecting groups of vertices in an orderly fashion can be a huge benefit and timesaver for modeling. More importantly, when creating organic models like humans or faces, using edge loops effectively to control your topology, or the layout of the vertices, makes the life of a character rigger and animator a lot easier. (You can find out more on this topic in the sidebar “The importance of good topology,” later in this chapter.)
Creating new loops
The ability to select loops and rings is nice, but the ability to create new loops is even more helpful when you want to add detail to a model. You can detail with what's called a loop cut. You can find this function in the Tool Shelf (Add![]() Loop Cut and Slide). Alternatively, you can simply press Ctrl+R to access the loop cut operation directly. Regardless of how you choose to make a loop cut, when you run your mouse cursor over your model, a pink/purple line is drawn on the mesh, indicating where you might want to add your edge loop. After you decide where you want to cut, left-click to confirm (right-click cancels the whole operation). Doing so creates the edge loop and automatically enables the Edge Slide function on that loop. With Edge Slide, you can move your mouse around, and your loop travels along the surface of the mesh, allowing you to place it precisely where you want it to go when you left-click. If you ever want to use Edge Slide without creating a new loop, select the edge loop (or portion of an edge loop) that you want to slide and press Ctrl+E
Loop Cut and Slide). Alternatively, you can simply press Ctrl+R to access the loop cut operation directly. Regardless of how you choose to make a loop cut, when you run your mouse cursor over your model, a pink/purple line is drawn on the mesh, indicating where you might want to add your edge loop. After you decide where you want to cut, left-click to confirm (right-click cancels the whole operation). Doing so creates the edge loop and automatically enables the Edge Slide function on that loop. With Edge Slide, you can move your mouse around, and your loop travels along the surface of the mesh, allowing you to place it precisely where you want it to go when you left-click. If you ever want to use Edge Slide without creating a new loop, select the edge loop (or portion of an edge loop) that you want to slide and press Ctrl+E![]() Edge Slide.
Edge Slide.
Figure 5-4: An edge ring selected on a UV sphere.
![]() When doing a loop cut, you can actually do multiple parallel loop cuts at the same time. When you activate the loop cut tool (Ctrl+R), scroll your mouse wheel, and you'll be able to add multiple loops all at the same time. If you don't have a scroll wheel on your mouse or you simply prefer to use your keyboard, you can adjust the number of loops in your cut by pressing Page Up and Page Down. Note that if you add multiple loops at the same time, Blender doesn't go into the Edge Slide functionality because it doesn't make sense to slide multiple parallel edges.
When doing a loop cut, you can actually do multiple parallel loop cuts at the same time. When you activate the loop cut tool (Ctrl+R), scroll your mouse wheel, and you'll be able to add multiple loops all at the same time. If you don't have a scroll wheel on your mouse or you simply prefer to use your keyboard, you can adjust the number of loops in your cut by pressing Page Up and Page Down. Note that if you add multiple loops at the same time, Blender doesn't go into the Edge Slide functionality because it doesn't make sense to slide multiple parallel edges.
You can make cuts other than loop cuts. This feature is accessible with the Knife tool, by pressing K. Currently, the Knife tool is one of the few instances in Blender that requires you to hold down a key. To use the Knife tool, first select the edges or faces you want to cut. Then hold down K while left-clicking and dragging your mouse cursor across your model. A line appears across your mesh. Anywhere that line intersects with a selected edge in your mesh, Blender adds a vertex when you release K. After you have your initial cut in place, the Last Operator panel of the Tool Shelf has a drop-down menu, labeled Type, with a few additional options:
- Exact: Creates connected vertices exactly where the line from the Knife tool intersects selected edges.
- Midpoints: Creates connected vertices located at the midpoints of the edges that the Knife tool intersects. When I use the Knife, I tend to use this feature the most.
- Multicut: This option is the same as the midpoints option, but it creates edges based on the number of cuts you specify. All new vertices are spaced equally along the edges that the Knife tool's line intersects.
![]() The settings in the Last Operator panel are also accessible from a pop-up panel in the 3D View that appears when you press F6. This panel is useful if, like me, you prefer to model with the Tool Shelf hidden.
The settings in the Last Operator panel are also accessible from a pop-up panel in the 3D View that appears when you press F6. This panel is useful if, like me, you prefer to model with the Tool Shelf hidden.
Unlike the loop cut, the Knife tool works only on the edges that are currently selected. Of course, seeing the actual edges that you're cutting through is also helpful. I recommend switching to wireframe view or turning off the Limit Selection to Visible button.
 With the Knife tool, you must select the edges you want to cut before using it.