
Looking at Editor Types
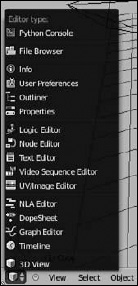
A Blender area can contain any editor type. You can see what editor types are available by left-clicking the button on the far left of that editor's header. Figure 2-1 shows the menu that appears when you press this button.
The editor types available through this menu are as follows. Next to each type is the hotkey sequence to bring up the editor type quickly:
- 3D View (Shift+F5): Arguably the most-used editor in Blender, the 3D View shows you the three-dimensional view of your model or scene and allows you to modify it.
- Timeline: The Timeline editor offers you a convenient way to quickly jump from one part of your animation to another, as well as play back the animation.
- Graph Editor (Shift+F6): Blender's Graph Editor shows a graphical representation of animatable attributes in your scene as they change over time.
- DopeSheet (Shift+F12): The DopeSheet is where you create and adjust your overall animation by using actions or keying sets. You can use actions to animate all of a character's movement in a scene, or you can mix them together in the NLA Editor. Keying sets give you the ability to group together several different animatable attributes.
- NLA Editor: NLA stands for nonlinear animation. This editor allows you to mix pre-animated actions on a single character (such as mixing a waving hand animation with a walking animation to have your character walk and wave her hand at the same time).
- UV/Image Editor (Shift+F10): With the UV/Image Editor, you can do basic image editing as well as edit the texture coordinates for your models (see Chapter 7).
- Video Sequence Editor (Shift+F8): Blender's Video Sequence Editor (VSE) is a lightweight video editor. The VSE isn't as powerful as some other programs created specifically for editing video, but it's quite effective for stringing a sequence of scenes together and doing basic effects, overlays, and transitions.
Figure 2-1: The Editor Type menu.
- Text Editor (Shift+F11): Blender's integrated Text Editor is not only handy for keeping notes about your scenes and models, but it's also a convenient place to write and test your own Python scripts in Blender.
- Node Editor (Shift+F3): Blender has a Node Editor for materials and textures, as well as for compositing. This editor is where you modify these node structures. See Chapter 15 for more on using the Node Editor for compositing.
- Logic Editor (Shift+F2): Blender has an integrated game engine, allowing you to create your own custom video games directly within Blender. The Logic Editor is how you control the behavior in your game.
- Properties (Shift+F7): You can manipulate nearly all the different attributes for objects in your scene via this editor. You can find out more about this topic later in this chapter in the section “Working with the Properties Editor.”
- Outliner (Shift+F9): The Outliner gives a hierarchical view of all the objects in your scene along with the ability to see how they're related to one another. It's also a quick way to select objects and do simple manipulations in a complex scene.
- User Preferences: Through the User Preferences editor, you can customize how you interact with Blender.
- Info: The Info editor contains Blender's main menu and displays basic information about your scene. It also serves as a report space where warnings and errors are logged. Advanced users and beginners alike can use the Info editor to figure out what happened if a feature doesn't work as expected.
- File Browser: This editor allows you to look through the files on your computer. It also allows you to look at the innards of your Blender projects to see how things are structured or for linking to other projects.
- Python Console (Shift+F4): The Console is a fairly handy editor that's often utilized by advanced users to help write custom Python scripts.
..................Content has been hidden....................
You can't read the all page of ebook, please click here login for view all page.