 Testing our trigger expressions
by Andrea Vacche, Patrik Uytterhoeven, Rihards Olups
Zabbix: Enterprise Network Monitoring Made Easy
Testing our trigger expressions
by Andrea Vacche, Patrik Uytterhoeven, Rihards Olups
Zabbix: Enterprise Network Monitoring Made Easy
- Zabbix: Enterprise Network Monitoring Made Easy
- Table of Contents
- Zabbix: Enterprise Network Monitoring Made Easy
- Zabbix: Enterprise Network Monitoring Made Easy
- Credits
- Preface
- I. Module 1
- 1. Getting Started with Zabbix
- The first steps in monitoring
- Zabbix features and architecture
- Installation
- Summary
- 2. Getting Your First Notification
- 3. Monitoring with Zabbix Agents and Basic Protocols
- 4. Monitoring SNMP Devices
- 5. Managing Hosts, Users, and Permissions
- 6. Detecting Problems with Triggers
- 7. Acting upon Monitored Conditions
- 8. Simplifying Complex Configurations with Templates
- 9. Visualizing Data with Graphs and Maps
- 10. Visualizing Data with Screens and Slideshows
- 11. Advanced Item Monitoring
- 12. Automating Configuration
- 13. Monitoring Web Pages
- 14. Monitoring Windows
- 15. High-Level Business Service Monitoring
- 16. Monitoring IPMI Devices
- 17. Monitoring Java Applications
- 18. Monitoring VMware
- 19. Using Proxies to Monitor Remote Locations
- 20. Encrypting Zabbix Traffic
- 21. Working Closely with Data
- 22. Zabbix Maintenance
- A. Troubleshooting
- B. Being Part of the Community
- 1. Getting Started with Zabbix
- II. Module 2
- 1. Zabbix Configuration
- 2. Getting Around in Zabbix
- 3. Groups, Users, and Permissions
- 4. Monitoring with Zabbix
- Introduction
- Active agents
- Passive agents
- Extending agents
- SNMP checks
- Internal checks
- Zabbix trapper
- IPMI checks
- JMX checks
- Aggregate checks
- External checks
- Database monitoring
- Checks with SSH
- Checks with Telnet
- Calculated checks
- Building web scenarios
- Monitoring web scenarios
- Some advanced monitoring tricks
- Autoinventory
- 5. Testing with Triggers in Zabbix
- 6. Working with Templates
- 7. Data Visualization and Reporting in Zabbix
- 8. Monitoring VMware and Proxies
- 9. Autodiscovery
- 10. Zabbix Maintenance and API
- C. Upgrading and Troubleshooting Zabbix
- III. Module 3
- 1. Deploying Zabbix
- 2. Distributed Monitoring
- 3. High Availability and Failover
- Understanding high availability
- Understanding the levels of IT service
- Some considerations about high availability
- Implementing high availability on a web server
- Configuring the Zabbix server for high availability
- Implementing high availability for a database
- Summary
- 4. Collecting Data
- 5. Visualizing Data
- 6. Managing Alerts
- 7. Managing Templates
- 8. Handling External Scripts
- 9. Extending Zabbix
- 10. Integrating Zabbix
- D. Bibliography
- Index
We have seen so far that we can build triggers by hand and by selecting triggers from a list. What we have not seen yet is a way to test our triggers before throwing everything in production. In this recipe, we will show you how to test the triggers you have just created.
For this recipe, we will need as always our Zabbix server properly set up with a super administrator account. You should also be familiar with creating items and triggers. In this recipe we will make use again of the ping item that we have created in our recipe, Creating triggers.
- Go back to the trigger that we have created for our item that was checking the availability of our host by making use of ping.
- Edit the trigger that we have created in our recipe, Creating triggers:

- Click on Expression constructor; you will now see a new box with our expression.
- At the left bottom of the box there is a small button named Test. Click on it and a new window will popup:
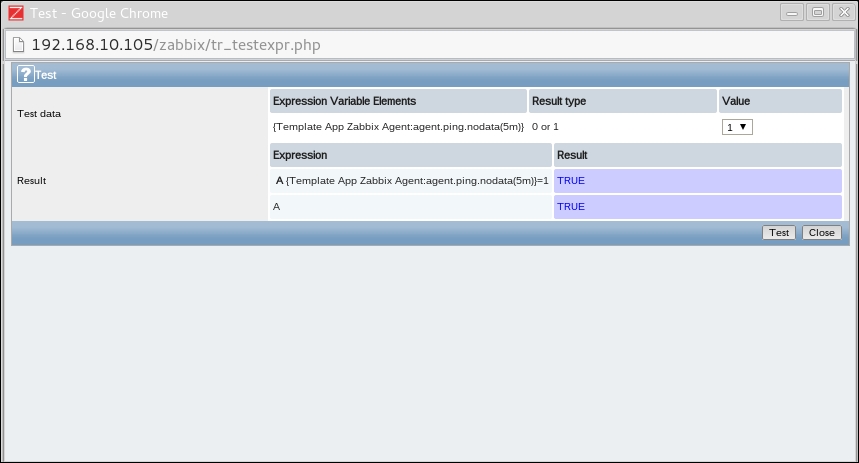
- As you can see we have our trigger expression and behind it a value of 1 or 0 that we can select. In our case, if ping is successful it will return a value of 1 and 0 if our ping fails.
- So select a value of
1and0and press the Test button to check the outcome. If everything was created fine then 1 should return us the status True and 0 False.
With the expression constructor, it is easy to build more complex constructions but also to test our expressions. By faking a positive or a negative outcome of the input we can see what the outcome will be for our trigger. Zabbix will show us True or False to let us know what the output will be. This way, it is possible to test the triggers that we have build before putting them in production without knowing if they will work or not.
We have seen in this chapter that the severity can be chosen for each trigger that we build. However, it is possible to rename them and to change the colors per severity. The GUI elements can be configured in Administration | General | Trigger severities. Users can also set audio alerts. Remember this was explained in Chapter 2, Exploring the frontend.
-
No Comment