
The next thing to do is to model the Northwind database. We will now drag and drop two tables and one view from the Northwind database into our project, so that later on we can use them to demonstrate LINQ to SQL.
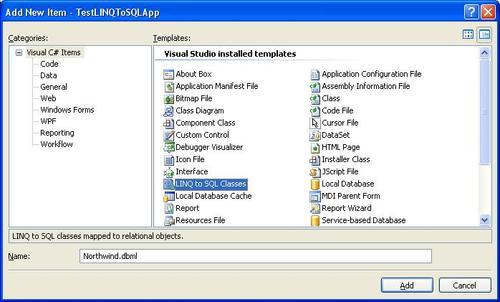
To start with, let us add a new item to our project TestLINQToSQLApp. The new item added should be of type LINQ to SQL Classes, and named Northwind.dbml as shown in the following Add New Item dialog window:
After you click Add, the following three files will be added to the project: Northwind.dbml, Northwind.dbml.layout, and Northwind.designer.cs. The first file holds the design interface for the DB model, while the second one is the XML format of the model. Only one of them can remain open inside Visual Studio IDE. The third one is the code for the model, which defines the DataContext of the model.
At this point, the Visual Studio LINQ to SQL designer should be open and empty, as shown in the following image:

Now, we need to connect to our Northwind sample database, in order to drag and drop objects from the database.
- Open the Server Explorer window from the left most side of the IDE. You can hover your mouse over Server Explorer and wait for a second, or click on Server Explorer to open it. If it is not visible in your IDE, select menu option View | Server Explorer, or press Ctrl+Alt+S, to open it.
- In Server Explorer, right-click on Data Connections, and select Add Connection to open the Add Connection dialog box. In this dialog box, specify your server name (including your instance name if this is not a default installation), login information, and choose Northwind as the database. You can click Test Connection to make sure everything is set correctly.

- Click OK to add this connection. From now on, Visual Studio will use this database as the default database for your project. You can look at the new file
PropertiesSettings.Designer.csfor more information.
The new connection Northwind.dbo should appear in the Server Explorer now. Next, we will drag and drop two tables and one view onto the LINQ to SQL design pane.
- Expand the Connection until all of the tables are listed, and drag the Products to the Northwind.dbml design pane. You should then have a screen similar to:

- Next, drag the Categories table from the Server Explorer to the Northwind.dbml design pane.
- We will also need to query data using a view. So drag view Current Product List from Server Explorer to the Northwind.dbml design pane.
The Northwind.dbml design pane on your screen should now look like the following image:
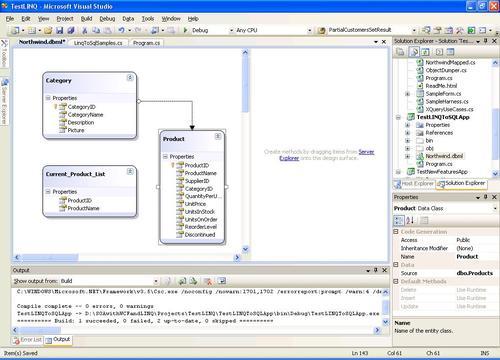
If you open file Northwind.Designer.cs, you will find that the following classes have been generated for the project:
public partial class NorthwindDataContext : System.Data.Linq.DataContext
public partial class Product : INotifyPropertyChanging, INotifyPropertyChanged
public partial class Category : INotifyPropertyChanging, INotifyPropertyChanged
public partial class Current_Product_List
In the above four classes, the DataContext class is the main conduit through which we'll query entities from the database, as well as apply changes back to it. It contains various flavors of types and constructors, partial validation methods, and property members for all of the included tables. It inherits from the System.Data.Linq.DataContext class, which represents the main entry point for the LINQ to SQL framework.
The next two classes are for the two tables that we are interested in. They implement the INotifyPropertyChanging and INotifyPropertyChanged interfaces. These two interfaces define all of the related property changing, and property changed event methods, which we can extend to validate properties before and after the change.
The last class is for the view. This is a simple class with only two property members. Because we are not going to update the database through this view, it doesn't define any property change or changed event method.