
In the previous chapter, we learned many WCF concepts and saw a few code snippets.
In this chapter, we will implement a basic WCF service from scratch. We will build a HelloWorld WCF service by carrying out the following steps:
- Create the solution and project
- Create the WCF service contract interface
- Implement the WCF service
- Host the WCF service in the ASP.NET Development Server
- Create a client application to consume this WCF service
Before we can build the WCF service, we need to create a solution for our service projects. We also need a directory in which to save all the files. Throughout this book, we will save our project source codes in the D:SOAwithWCFandLINQProjects directory. We will have a subfolder for each solution we create, and under this solution folder, we will have one subfolder for each project.
For this HelloWorld solution, the final directory structure is shown in the following image:

Note
You don't need to manually create these directories via Windows Explorer; Visual Studio will create them automatically when you create the solutions and projects.
Now, follow these steps to create our first solution and the HelloWorld project:
- Start Visual Studio 2008. If the Open Project dialog box pops up, click Cancel to close it.
- Go to menu File | New | Project. The New Project dialog window will appear.

- From the left-hand side of the window (Project types), expand Other Project Types and then select Visual Studio Solutions as the project type. From the right-hand side of the window (Templates), select Blank Solution as the template.
- At the bottom of the window, type HelloWorld as the Name, and D:SOAwithWCFandLINQProjects as the Location. Note that you should not enter
HelloWorldwithin the location, because Visual Studio will automatically create a folder for a new solution. - Click the OK button to close this window and your screen should look like the following image, with an empty solution.

- Depending on your settings, the layout may be different. But you should still have an empty solution in your Solution Explorer. If you don't see Solution Explorer, go to menu View | Solution Explorer, or press Ctrl+Alt+L to bring it up.
- In the Solution Explorer, right-click on the solution, and select Add | New Project from the context menu. You can also go to menu File | Add | New Project to get the same result. The following image shows the context menu for adding a new project.

- The Add New Project window should now appear on your screen. In the left-hand side of this window (Project types), select Visual C# as the project type, and on the right-hand side of the window (Templates), select Class Library as the template.
- At the bottom of the window, type HelloWorldService as the Name. Leave D:SOAwithWCFandLINQProjectsHelloWorld as the Location. Again, don't add
HelloWorldServiceto the location, as Visual Studio will create a subfolder for this new project (Visual Studio will use the solution folder as the default base folder for all the new projects added to the solution).
- You may have noticed that there is already a template for WCF Service Application in Visual Studio 2008. For the very first example, we will not use this template. Instead, we will create everything by ourselves so you know what the purpose of each template is. This is an excellent way for you to understand and master this new technology. In the next chapter, we will use this template to create the project, so we don't need to manually type a lot of code. Also, later in this book, we will use the Microsoft Web Service Software Factory pattern and practice creating a 3-layer framework for our enterprise SOA solution. This way, we not only type less code, but also have lots of best practices embedded in the code automatically.
- Now, you can click the OK button to close this window.
Once you click the OK button, Visual Studio will create several files for you. The first file is the project file. This is an XML file under the project directory, and it is called HelloWorldService.csproj.
Visual Studio also creates an empty class file, called Class1.cs. Later, we will change this default name to a more meaningful one, and change its namespace to our own one.
Three directories are created automatically under the project folder— one to hold the binary files, another to hold the object files, and a third one for the properties files of the project.
The window on your screen should now look like the following image:

We now have a new solution and project created. Next, we will develop and build this service. But before we go any further, we need to do two things to this project:
- Click the Show All Files button on the Solution Explorer toolbar. It is the second button from the left, just above the word Solution inside the Solution Explorer. If you allow your mouse to hover above this button, you will see the hint Show All Files, as shown in above diagram. Clicking this button will show all files and directories in your hard disk under the project folder-rven those items that are not included in the project. Make sure that you don't have the solution item selected. Otherwise, you can't see the Show All Files button.
- Change the default namespace of the project. From the Solution Explorer, right-click on the HelloWorldService project, select Properties from the context menu, or go to menu item Project | HelloWorldService Properties. You will see the project properties dialog window. On the Application tab, change the Default namespace to MyWCFServices.

Lastly, in order to develop a WCF service, we need to add a reference to the ServiceModel namespace.
- On the Solution Explorer window, right-click on the HelloWorldService project, and select Add Reference from the context menu. You can also go to the menu item Project | Add Reference to do this. The Add Reference dialog window should appear on your screen.
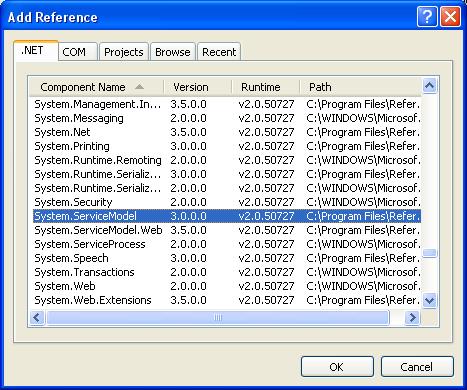
- Select System.ServiceModel from the .NET tab, and click OK.
Now, on the Solution Explorer, if you expand the references of the HelloWorldService project, you will see that System.ServiceModel has been added. Also note that System.Xml.Linq is added by default. We will use this later when we query a database.