
We have now customized the data access and business logic layers, and connected them together. Now, we will connect the service interface layer to the business logic layer, and customize the service contracts.
First, we will build a translator to translate data between the business entities, and the data contracts.
- From the Solution Explorer, right-click on the project item, MyWCF.EasyNorthwind.ServiceImplementation.
- Select Create Translator from the context menu. Note that the Create Translator context menu item is available only for the service implementation project. You won't see it if you right-click on any other project. This is because Service Factory expects you to create translator classes only for the service implementation project, and it knows which project is the service implementation project by its role, which is defined in the
ProjectMapping.xmlfile.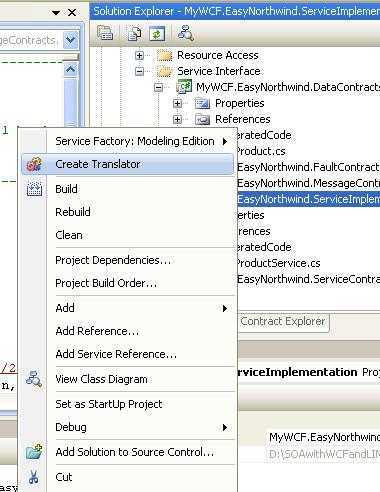
- You will see that the Service Factory: Modeling Edition | Contract Type Mapper Generator window has popped up. In this window, we will select two classes from the solution, and create a map between the fields of those two classes. First, we will select these two classes.
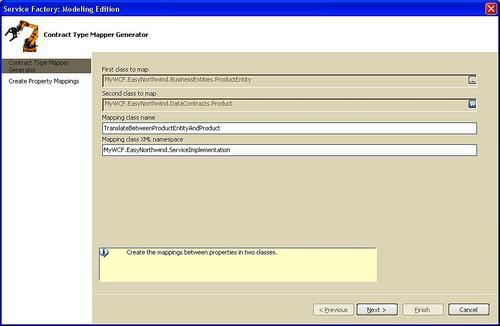
- Click on the ellipsis button for the First class to map. The Browse and Select a .NET Type window pops up.
- In our example, select MyWCF.EasyNorthwind.BusinessEntities in the left pane, and ProductEntity in the right pane. The selected type name now should be MyWCF.EasyNorthwind.BusinessEntities.ProductEntity.

- Click OK to close this window.
- Select MyWCF.EasyNorthwind.DataContracts.Product as the second class to map.
- Leave the Mapping class name to the defaulted TranslateBetweenProductEntityAndProduct, and the Mapping class XML namespace to MyWCF.EasyNorthwind.ServiceImplementation.
- Click Next.
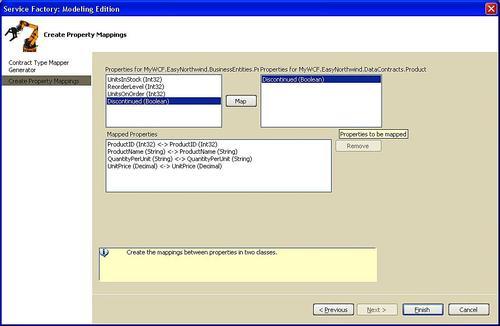
- The Create Property Mappings window should pop up. In this window, select ProductID(Int32) from the leftmost pane, and ProductID(Int32) from the rightmost pane, and then click Map to map them.
- Follow the same steps to map the other four properties (ProductName, QuantityPerUnit, UnitPrice and Discontinued). Leave three of the ProductEntity properties unmapped (UnitsInStock, ReorderLevel and UnitsOnOrder).
- Finally, click Finish to generate the mapping class code. You will notice a new file has been added to the project, under the GeneratedCode folder, with all of the property mapping information for the two mapped classes.
You can now build the service implementation project, to make sure that there is no build error.
..................Content has been hidden....................
You can't read the all page of ebook, please click here login for view all page.