In the previous sections, we modeled the data contract, and the Fault contract. In this section, we will model the service contracts, including the service operations, service contracts, and message contracts. We have to model the data contract and fault contract first because we will use them when modeling the service contracts.
As for to the Data Contract Model, we now need to add a Service Contract Model. Follow these steps to add the service contract model:
- From the Solution Explorer, right-click on EasyNorthwind Models.
- Select Add | New Model to add a new model.
- In the pop-up Service Factory | Specify model options dialog box, select Service Contract model type, enter ProductService as the model name, and
http://MyCompany.com/ProductService/EasyWCF/2008/05as the XML namespace. - Click Finish to add this model.
Next, we will add an operation, a request, and response message, a product service contract, and finally the product service itself.
Let's follow these steps to add the GetProduct operation first:
- Open the Service Contract Toolbox window.
-
Drag an Operation shape (
 ) onto the service contract design pane.
- Click on the new operation shape, and rename it from Operation1 to GetProduct.
- Right-click on this GetProduct operation and add a Data Contract Fault member to it.
- Change the name of this fault contract member from DataContractFault1 to ProductFault.

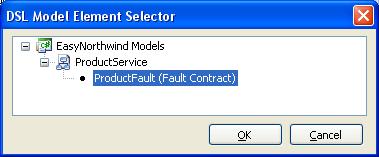
- With the ProductFault member still selected, click on the ellipsis button for its type on its Properties window.

- In the pop-up DSL Model Element Selector dialog box, select ProductFault and click the OK button. This fault member is now linked to the data contract ProductFault.
- If you have a blank DSL Model Element Selector screen, it means you haven't saved your Data Contract Model. You need to click the Save All button from the menu tools bar, and try again to populate this window.
In the previous section, we have added the GetProduct operation, but we only defined the fault contract of this operation. We didn't specify its request and response messages. In this section, we will define the request and response messages of this operation, and later we will connect these messages to the operation.
Follow these steps to define the request and response messages:
- Open the Toolbox window.
-
Drag a Message shape (
 ) onto the service contract design pane.
- Click on the new message shape, and rename it from Message1 to GetProductRequest.
- Right-click on this GetProductRequest message and add a primitive message part to it.
- Change the name of this part from PrimitiveMessagePart1 to ProductID, and change its type to be System.Int32.
- Add another message item, rename it to GetProductResponse, and add a Data Contract Message Part named Product and change its type to EasyNorthwind ModelsProductServiceproduct.
Before we connect the messages to the operation, we need to add the top level service contracts. This will include the service contract, and the service itself.
- Open the Toolbox window.
-
Drag a Service Contract shape
(
 ) onto the service contract design pane.
- Click on the new service contract shape, and rename it from ServiceContract1 to ProductServiceContract.
- Drag a Service shape onto the service contract design pane.
- Click on the new service shape, and rename it from Service1 to ProductService.
We have now created all of the required items for the service contracts. Next, we need to connect them together to form the message flow. Follow these steps:
- Open the Toolbox window.
-
Click on the Connector shape (
 )
)
- Drag it from the GetProductRequest message to the GetProduct operation.
- Click on the Connector again and drag it from the GetProduct operation to the GetProductResponse.
- Connect the ProductServiceContract service contract to the GetProduct operation, and the ProductService service to the ProductServiceContract service contact.
- We also need to change the serializer type for this Service Contract Model. Click on any empty space in the Service Contract Model design pane and change its Serializer Type from XmlSerializer to DataContractSerializer.
A serializer is used to convert the members of the service objects into XML for communication between the service and the client applications. By definition, a DataContractSerializer can serialize and de-serialize data contracts and message contracts, whereas an XmlSerializer can only serialize and de-serialize data types that are defined using programming constructors such as properties and fields. Because we have defined data contracts and message contracts in our service interfaces, we have to change the serializer type to DataContractSerializer.
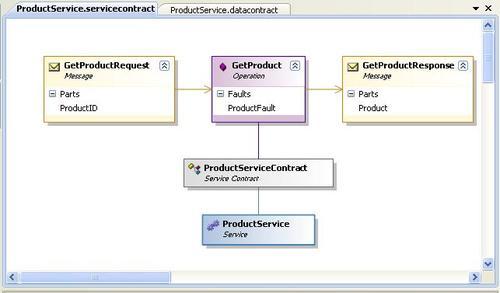
The final Service Contract Model for ProductService is shown in the following ProductService.servicecontract screenshot:
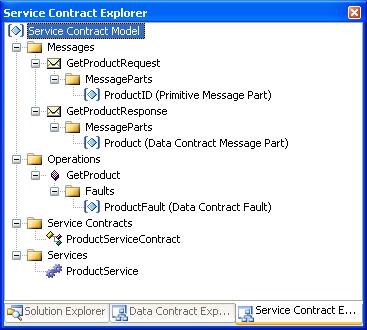
The same model appears in the Service Contract Explorer as follows: