
Now let's start using the Service Factory to build a WCF service. We will build a three-layer WCF service, similar to what we did in the previous chapters.
We will model the data contracts, then the service contracts, and finally, link the data contracts to the service contracts. Once we have all of the contracts ready, we will customize the data access and business logic layers, and host the service in IIS. We will also create a test client to test the service.
In this section, we will model the data contracts.
First, we need to create a solution using the Service Factory. Follow these steps to create the solution:
- Start Visual Studio 2008
- Select menu item File | New | Project.
- Select Guidance Packages | Service Factory: Modeling Edition as the project type, and Model Project as the template
- Enter EasyNorthwind as the Name, and leave the Location as the default value (D:SOAwithWCFandLINQProjects)
- When you click the OK button, the New Project dialog box should pop up on your screen.
Note
The Guidance Packages project type will be shown only after you have installed the Guidance packages.

- Next, let's rename the model project. In the Solution Explorer, right-click the bottom node EasyNorthwind, and rename it to EasyNorthwind Models. This is the folder where we will store all of the models for this solution.

Now, the solution has only one empty models folder. Let's add our data contract model using the following steps:
- In the Solution Explorer, right-click the EasyNorthwind Models.
- Select Add | New Model to add a new model.
- In the pop-up Service Factory | Specify model options dialog box, select Data Contract Model type, enter ProductService as the model name, and
http://MyCompany.com/ProductService/EasyWCF/2008/05as the XML namespace. - Click the Finish button.

Now that the ProductService data contract has been added to the solution models, we can model the data contracts.
- Open the Toolbox window. If you can't find Toolbox in your left side of Visual Studio, press Ctrl+Alt+X, or select menu item View | Toolbox, to open it. The EasyNorthwind Microsoft Visual Studio image below shows the toolbox for Data Contract Tools.
-
Drag a Data Contract (
 ) into the data contract design pane.

- Click on the new data contract shape, and change its name from DataContract1 to Product.
- Right-click on this Product data contract and add a Primitive Data Member to it:

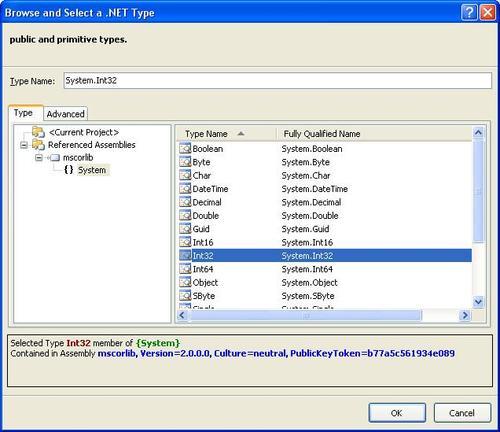
- Rename this data member from PrimitiveDataType1 to ProductID, and, while the ProductID is still selected, click on the ellipsis button for its type in the Properties window, and change the primitive's type to be System.Int32.
- Use the same method to add the following primitive data members, with the corresponding types shown here:
|
Member Name |
Member Data Type |
|---|---|
|
ProductID |
System.Int32 |
|
ProductName |
System.String |
|
QuantityPerUnit |
System.String |
|
UnitPrice |
System.Decimal |
|
Discontinued |
System.Boolean |
Next, we will add a product fault contract to the product service's data contract model. Follow these steps to add this fault contract:
-
From the Toolbox, drag a Fault Contract (
 ) shape into the ProductService data contract design pane.
- Rename it to ProductFault.
- Right-click on it, and add a new primitive data member FaultMessage to this fault contract, with the type System.String.
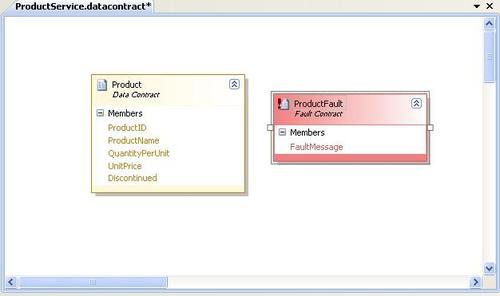
The final diagram of the ProductService Data Contract Model should look like the following ProductService.datacontract* image below:
The Data Contract Explorer, which is a window next to the Solution Explorer, also provides all of the information about the Data Contracts:
