
Chapter 1
Getting to Know Your Eee PC
IN THIS CHAPTER
![]() The various models of the Eee PC family
The various models of the Eee PC family
![]() The ports, indicators, and controls for the Eee PC
The ports, indicators, and controls for the Eee PC
![]() Connecting to networks and the Internet
Connecting to networks and the Internet
![]() Using the video and sound features
Using the video and sound features
Meeting the Asus Eee PC Family
Starting with the 701, the Eee PC family has grown to machines with both 7” and 8.9” monitors. Each model has its own limitations and advantages.
Eee PC 701 Series
The four models in the 701 series (2G Surf, 4G Surf, 4G, and 8G) all have the following components:
![]() Seven-inch display.
Seven-inch display.
![]() Intel GMA 900 graphics processor, using a shared memory architecture. A VGA port supports monitor resolutions up to 1600×1280 dpi.
Intel GMA 900 graphics processor, using a shared memory architecture. A VGA port supports monitor resolutions up to 1600×1280 dpi.
![]() Xandros Linux with the IceWM (Easy Mode) and KDE (Full Desktop) window managers. The machine can also be purchased with Microsoft Windows XP or, if you purchased a Linux-equipped Eee, you can load XP yourself. Some folks have reported loading various other Linux distributions, Microsoft Windows Vista, Microsoft Windows XP Professional, and even Sun OpenSolaris. We’ll talk about that in Chapters 12, 13, and 14.
Xandros Linux with the IceWM (Easy Mode) and KDE (Full Desktop) window managers. The machine can also be purchased with Microsoft Windows XP or, if you purchased a Linux-equipped Eee, you can load XP yourself. Some folks have reported loading various other Linux distributions, Microsoft Windows Vista, Microsoft Windows XP Professional, and even Sun OpenSolaris. We’ll talk about that in Chapters 12, 13, and 14.
![]() Three USB ports (you’ll probably want more).
Three USB ports (you’ll probably want more).
![]() Ethernet connector.
Ethernet connector.
![]() Wireless (802.11b and 802.11g).
Wireless (802.11b and 802.11g).
![]() Realtek High-Definition Audio with built-in speakers and microphone.
Realtek High-Definition Audio with built-in speakers and microphone.
![]() DC power connector.
DC power connector.
![]() MMC/SD/SDHC card reader.
MMC/SD/SDHC card reader.
Table 1.1 Asus 701 Eee PC Model Comparison.

The primary differences to keep in mind follow:
![]() The Surf models don’t have a webcam.
The Surf models don’t have a webcam.
![]() The 2G Surf doesn’t have expandable memory, runs a little slower, and has a bit shorter battery life. Some 4G units may also have the lighteer.
The 2G Surf doesn’t have expandable memory, runs a little slower, and has a bit shorter battery life. Some 4G units may also have the lighteer.
All four models have a solid-state drive (SSD), which is a fancy way of saying that, for storage, they use flash memory instead of a hard drive. This allows the unit to be smaller, nearly immune to bumps and jolts, and use less power, but using flash memory does have its limitations (namely, capacity and life expectancy).
Eee PC 900
The 900 is similar to the 701 series, with a few changes:
![]() The 900MHz Intel Celeron M processor is clocked at a full 900MHz.
The 900MHz Intel Celeron M processor is clocked at a full 900MHz.
![]() 1GB of memory is standard.
1GB of memory is standard.
![]() The screen is 8.9 inches, with the speakers located on the bottom of the machine.
The screen is 8.9 inches, with the speakers located on the bottom of the machine.
![]() The resolution of the webcam is 1.3 megapixels (MP).
The resolution of the webcam is 1.3 megapixels (MP).
![]() The unit weighs 990g.
The unit weighs 990g.
![]() The storage is 12GB (Windows version) or 20GB (Xandros version).
The storage is 12GB (Windows version) or 20GB (Xandros version).
Eee PC 901
The 901 is similar to the 900, but substitutes an Intel Atom processor for the Celeron M. Its differences include:
![]() 1.6 GHz Intel Atom processor.
1.6 GHz Intel Atom processor.
![]() Intel 950 graphics processor.
Intel 950 graphics processor.
![]() 7.4V, 6600 mAh battery proving 4.2h+ hours of battery life.
7.4V, 6600 mAh battery proving 4.2h+ hours of battery life.
![]() The unit weighs 1140g.
The unit weighs 1140g.
Eee PCs Yet To Come
The Eee PC 1000, with a 10 inch screen, 40 or 80 GB SSD, and an Intel Atom processor will soon be available. Other machines that should hit the market in 2008 include the Eee Box, a Mac Mini-like Eee PC designed as a desktop machine, and the Eee TV, which will be a combination TV, computer, and video game machine.
A Guided Tour of the Eee PC
This section gives you a tour of the exterior of my Eee PC 4G, a Pearl White model that I have named Stelios. Because the Eee PC manual also provides an introduction to the outside of the Eee PC, I’ll try to make this tour a little more interesting by pointing out some tidbits of information that aren’t covered in the manual. Note that the exterior of the 900 series is slightly different from the 701 series, so the figures presented in this section might not depict exactly what you see if you have an Eee PC 900.
Front View
Figure 1.1 shows an image of the front of the Eee PC 4G. The features identified in Figure 1.1 are described next.
FIGURE 1.1 Front view of the Eee PC 4G.
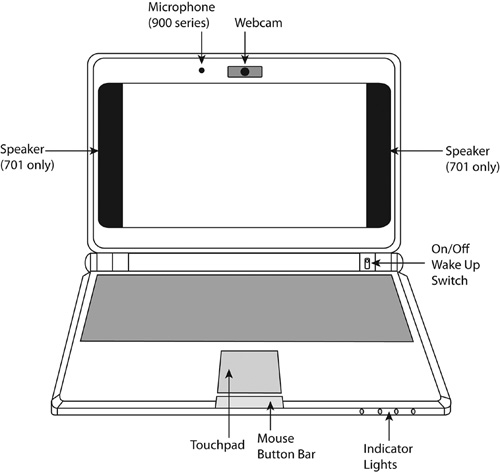
Webcam: If your 701 Eee PC model has a webcam, it has up to 640×480-pixel resolution. If you have an Eee PC 900, you have 1.3MP to play with. The Eee PC can handle a frame rate of 30 frames per second (fps), regardless of model.
Display: The Eee PC sports a thin-film transistor (TFT) display. The display has excellent contrast, making it not only quite readable but also useful as an e-book display device. When we discuss how to set up the video in Chapter 2, I’ll explain how to make your Eee PC into something akin to an Amazon Kindle.
On/Off/Wake Up switch: Press to turn on the Eee PC, and press and hold for 5 seconds to turn it off. Although this is not the normal way to turn off the Eee PC, it does shut down gracefully by closing and saving files (unless the system was locked up, in which case it might not). When the Eee PC hibernates, you can press this switch to wake it up.
Touchpad and mouse button bar: You can control it by
![]() Sliding your finger in the direction you want the mouse pointer to move
Sliding your finger in the direction you want the mouse pointer to move
![]() Tapping the pad to simulate a mouse click
Tapping the pad to simulate a mouse click
![]() Clicking the left side of the mouse button bar to simulate a left-click
Clicking the left side of the mouse button bar to simulate a left-click
![]() Clicking the right side of the bar to simulate a right-click
Clicking the right side of the bar to simulate a right-click
![]() Sliding along the extreme right edge to perform vertical scrolling. There’s a line on the right side of the touchpad that marks the area you can user for vertical scrolling. If you have wide fingers, place only half your finger on the touchpad.
Sliding along the extreme right edge to perform vertical scrolling. There’s a line on the right side of the touchpad that marks the area you can user for vertical scrolling. If you have wide fingers, place only half your finger on the touchpad.
The 900 and later units have some more advanced scrolling and zooming gestures. You can scroll vertically or horizontally by placing two fingers on the touchpad and moving them in the direction you wish to scroll. A limited number of applications, such as Open Office and Adobe Acrobat Reader, also support zooming in and out on the touchpad. To zoom out, place two fingers on the touchpad and spread them out. To zoom in, do the opposite and draw your fingertips together.
Indicator lights: The Eee PC has an array of four lights, listed here from left to right:
![]() Power (yellow): Lit when the Eee PC is on.
Power (yellow): Lit when the Eee PC is on.
![]() Battery (red): Lit when the Eee PC is charging and unlit when it is fully charged. If it blinks, 10% or less of the battery power remains, which means you should shut down as quickly as possible, without losing any data, or plug your power supply into the Eee PC.
Battery (red): Lit when the Eee PC is charging and unlit when it is fully charged. If it blinks, 10% or less of the battery power remains, which means you should shut down as quickly as possible, without losing any data, or plug your power supply into the Eee PC.
![]() Disk indicator (yellow): Flashes when data is being written to or read from the solid-state disk (flash disk), similar to a drive indicator light on any other computer.
Disk indicator (yellow): Flashes when data is being written to or read from the solid-state disk (flash disk), similar to a drive indicator light on any other computer.
![]() Wireless (blue): Lit when the wireless network transceiver is active.
Wireless (blue): Lit when the wireless network transceiver is active.
Speakers: The speakers, which actually sound reasonably good, are to the left and right of the display on the 701 series. On the 900 series, they are on the bottom of the Eee PC (and therefore slightly muffled). Thus, the 900 series sacrifices sound quality in favor of a wider display.
Microphone: Having the microphone mounted downward pointing is suboptimal, but it is functional. If you plan to use your Eee PC often for video conferencing or phone conversations, consider getting a headset.
Bottom View
Figure 1.2 shows an image of the bottom of the Eee PC 4G. The features identified in Figure 1.2 are described next.
FIGURE 1.2 Bottom view of the Eee PC 4G.
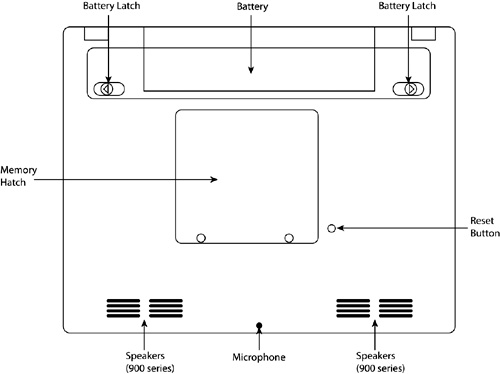
Battery panel latches: The latch on the left is spring loaded and the latch on the right latches. Here’s how you remove the battery:
1. Slide the latch on the right to the right (it will stay in position; if you see the red dot, then the latch is unlocked).
2. Slide the latch on the left to the left.
3. Remove the battery while holding the left latch at its leftmost position. The battery slides straight out the back, not up or down.
Reset button: You access the Reset button through a small hole next to the bottom-right corner of the memory hatch. This is the all-else-has-failed button that you press when the computer is frozen and won’t respond to any controls. It’s similar to the emergency latch on a CD or DVD drive. To use it, bend the end of a paper clip straight and gently insert it into the small hole until you feel the button depress and the system resets. Should this fail (and it shouldn’t), unplug the unit and remove the battery.
tip
To reinstall the battery, just slide it along until the latches drop into place (feel free to help them a little if they’re hanging up). Then slide the right-side latch to the left to ensure that the battery is secured.
Warning! Do this at risk to your data and your solid-state drive (SSD). The reset switch will stop the machine in the middle of writing data, so check the disk indicator and make sure that it isn’t flashing. This is especially risky if you install another Linux distribution and decide not to use a journaling file system to reduce writes to the SSD.
note
The reason you would want to upgrade to as much memory as possible under Xandros is that swapping is disabled. This makes sense, given the limited space for storage on the Eee PC and the fact that every read and write shortens the life of the SSD.
Memory hatch: Open this hatch to access the memory module. On the Eee PC 2G Surf model, the memory module is soldered onto the board, so you can’t upgrade the memory. For all other models, this is where you plug in a bigger memory module, as covered in detail in Chapter 17.
Good news Windows XP fans: you don’t need to do anything special to access 2GB of RAM. Also, other Eee PC Linux distributions can access the additional RAM.
So why not just chuck Xandros in favor of another operating system? Well, Xandros does have its endearing qualities, including the nifty Easy Mode. If you get the urge to change the version of Linux, take a look at Chapter 12.
Right-Side View
Figure 1.3 shows an image of the right side of the Eee PC 4G, which has the following slots and ports:
Kensington slot: The little slot toward the rear is for a Kensington locking device. This is a widget for fastening the Eee PC to something sturdy and difficult to move, such as a desk. The drawback here is that although the cable may be very tough, the Eee PC’s case is not. A vigorous yank and the thief has your Eee PC, albeit with a ruptured case.
VGA port: The VGA port is a typical 15-pin connector. Resolutions up to 1600×1200 are possible and not hard to set up, although sometimes anything over 1024×768 DPI requires a bit of tinkering, which is covered in Chapter 2.
note
The Kensington slot and VGP port are located so close together that they cannot be used at the same time.
USB ports: The two USB ports on this side are both USB 1.1 and USB 2.0 compatible.
tip
Many USB devices draw their power from the Eee PC, so running a USB device while the Eee PC is running on battery shortens the battery life.
MMC-SD slot: The slot will accept any MultiMediaCard or Secure Digital format flash memory, including the newer SD High Capacity (SDHC) cards. This is the best and least expensive way to provide extra storage, although USB flash drives work quite handily as well.
FIGURE 1.3 The right-side connectors.

Left-Side View
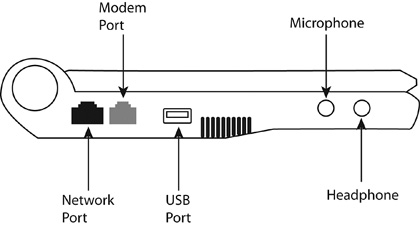
Figure 1.4 shows an image of the left side of the Eee PC 4G, which has the following ports:
Network port: This is an Ethernet 10/100Mbps port for a standard Cat5 or Cat6 cable. If you purchase a cross-over cable (or build your own), you can connect your Eee PC directly to another computer. I’ve used such as cable to set up and configure industrial equipment with Ethernet ports. You could also do this with two “straight” Ethernet cables and an ethernet hub or switch in between.
Modem port: The presence of this port is a tease. There is no hardware in the Eee PC to support a modem, so this port is plugged up. It is a useful access hole into the case for controls for any hardware modifications (mods) that you may install.
USB port: Like the two USB ports on the right side, this third and final port of entry for peripheral devices is USB 1.1 and USB 2.0 compatible.
Microphone port: This port takes any standard PC microphone.
Headphones port: You can plug in headphones or powered speakers here. Okay, you can plug in unpowered speakers as well, but remember that they draw their power from the Eee PC.
FIGURE 1.4 The left-side connectors.
Back View
Finally, our tour ends at the back of the unit, where we find the DC power port. There’s nothing else back there.
FIGURE 1.5 The lonely power connect on the back.

Using the Special Keyboard Functions
Use the following key combinations:
![]() Fn+F1: Enter Sleep Mode. Have care with this as you can lose your external monitor resolution setting on wakeup. This can occur if you’re using dual monitors and the Eee PC enters sleep mode. Press the power button to wake the computer.
Fn+F1: Enter Sleep Mode. Have care with this as you can lose your external monitor resolution setting on wakeup. This can occur if you’re using dual monitors and the Eee PC enters sleep mode. Press the power button to wake the computer.
![]() Fn+F2: Toggle the Wireless Transceiver on and off.
Fn+F2: Toggle the Wireless Transceiver on and off.
![]() Fn+F3: Turn the brightness down. This works only for the onboard LCD display, of course.
Fn+F3: Turn the brightness down. This works only for the onboard LCD display, of course.
![]() Fn+F4: Turn the brightness up.
Fn+F4: Turn the brightness up.
![]() Fn+F5: Toggle between the onboard LCD display, an external monitor (or video projector), and both monitors mirroring each other. Switching between modes is another action that may cause you to lose your external monitor resolution setting. By the way, both Easy Mode and Full Desktop have an External Display application that not only controls the external display resolution, but allows you to select the resolution for the internal display as well.
Fn+F5: Toggle between the onboard LCD display, an external monitor (or video projector), and both monitors mirroring each other. Switching between modes is another action that may cause you to lose your external monitor resolution setting. By the way, both Easy Mode and Full Desktop have an External Display application that not only controls the external display resolution, but allows you to select the resolution for the internal display as well.
![]() Fn+F6: Launch the Task Manager. Task Manager shows you what applications are running, identifies how much memory they are taking, and (best of all) allows you to shut down any applications that are frozen.
Fn+F6: Launch the Task Manager. Task Manager shows you what applications are running, identifies how much memory they are taking, and (best of all) allows you to shut down any applications that are frozen.
![]() Fn+F7: Toggle between Mute and Audio On.
Fn+F7: Toggle between Mute and Audio On.
![]() Fn+F8: Turn the audio volume up.
Fn+F8: Turn the audio volume up.
![]() Fn+F9: Turn the audio volume down.
Fn+F9: Turn the audio volume down.
![]() Fn+F11: The Num Lock key.
Fn+F11: The Num Lock key.
![]() Fn+F12: The Scroll Lock key.
Fn+F12: The Scroll Lock key.
![]() Fn+Ins: The Print Screen key.
Fn+Ins: The Print Screen key.
![]() Fn+Del: The System Request key. This System Request key has no function, unless you’ve compiled the Linux kernel with the magic system request keys for debugging. These keys are not compiled into the Eee PC Xandros kernel. Really, given the size of the keyboard and the combination with the Fn key, using these would be almost impossible anyway.
Fn+Del: The System Request key. This System Request key has no function, unless you’ve compiled the Linux kernel with the magic system request keys for debugging. These keys are not compiled into the Eee PC Xandros kernel. Really, given the size of the keyboard and the combination with the Fn key, using these would be almost impossible anyway.
![]() Page Up (up arrow).
Page Up (up arrow).
![]() Page Down (down arrow).
Page Down (down arrow).
![]() Home (right arrow).
Home (right arrow).
![]() End (left arrow).
End (left arrow).
There are a few other special function keys:
![]() Home: Launches the Xandros Launch menu.
Home: Launches the Xandros Launch menu.
![]() Menu: Launches the right-click menu for the current application, or the desktop shortcut menu.
Menu: Launches the right-click menu for the current application, or the desktop shortcut menu.
Extending Battery Life
As Table 1.1 indicated earlier in the chapter, the 2G Surf and 4G Surf are supposed to run up to 2 hours and 45 minutes and the other models could run as long as 3 hours and 30 minutes. Those estimates are based on ideal conditions, of course, and mileage varies depending on what’s plugged in to the Eee PC. My Eee PC 4G runs about 2 hours and 30 minutes with a monitor, keyboard, mouse, and flash drive plugged in and running wireless. By itself, it’ll run a little over 3 hours with wireless enabled.
The 900 has a life of about 3.5 hours, and the 901 has a battery life in excess of 4.2 hours.
The key to extending battery life is to minimize use of anything that draws power. If your next chance to access an AC power outlet is hours away, keep the following in mind:
![]() Anything plugged into a USB port will likely draw power.
Anything plugged into a USB port will likely draw power.
![]() Having the screen brightness turned up draws more power than having it turned down.
Having the screen brightness turned up draws more power than having it turned down.
![]() Playing the speakers draws more power than using an efficient headset.
Playing the speakers draws more power than using an efficient headset.
![]() Having wireless turned on drains your battery faster.
Having wireless turned on drains your battery faster.
tip
To check how much power remains, hover the mouse pointer over the power icon in the system tray.
You also have a number of power management controls in Full Desktop (covered in Chapter 5). To access the power management controls:
1. Click Launch.
2. Select Control Center from the Control Center menu.
3. Expand Power Management and click Power Controls.
You have three power saving modes: Standby, Suspend, and Power Off. Standby wakes up the quickest, whereas Power Off takes the longest. From any power saving mode, either make a small mouse movement or tap a key to re-enable the display.
You can use the sliders to set the time before each of these modes takes effect.
Networking
You have two network options for connecting your Eee PC to a network, which could include the Internet: an Ethernet (wired) connection via the Cat5 connector and a wireless connection. In this section, we’re getting a bit ahead of ourselves, because we haven’t touched on switching from Easy Mode to Full Desktop. If you don’t know how to do this, consult the “Getting to the Full Desktop” section near the end of this chapter.
Establishing a Wireless Connection
Connecting through wireless on the Eee PC is also actually quite easy, and almost sets itself. When in Easy Mode and with wireless active, the Eee PC pops up a little box showing that you are in range of a wireless network. When you click the pop-up box, a window opens with a list of any wireless networks in range.
The first step in getting wireless to work is to enable it. In Easy Mode, click either the Wireless Network icon on the Internet tab or the wireless icon (which looks like a fan with a wrench) in the system tray (properly called the panel in the Linux world). In Full Desktop, click the wireless icon in the panel and select Wireless Networks in the shortcut menu.
The next step is to connect to a wireless network, which is easy enough if it’s broadcasting its ESSID. The Wireless Networks dialog box shows the available wireless networks. To connect to one, double-click it. If it has security (you’ll see a lock icon beside the name), a dialog box will appear prompting you to enter the key or passphrase. If a connection point isn’t broadcasting its ESSID, you must go back the Network icon and enter all of the information for that wireless connection.
There are two types of protected access, both of which require you to enter a key or passphrase:
![]() Wired Equivalent Privacy (WEP): You need to know the network key, which may be either 40 or 128 bits. These keys are usually pairs of numbers and letters (actually, hexadecimal characters). You also need to know the key index, although this is almost always 1. The use of WEP is diminishing, except in home networks, because it isn’t secure against a concerted attack. It’s really just a polite way of saying “stay out.”
Wired Equivalent Privacy (WEP): You need to know the network key, which may be either 40 or 128 bits. These keys are usually pairs of numbers and letters (actually, hexadecimal characters). You also need to know the key index, although this is almost always 1. The use of WEP is diminishing, except in home networks, because it isn’t secure against a concerted attack. It’s really just a polite way of saying “stay out.”
![]() Wi-Fi Protected Access (WPA): You need to know the passphrase. You’ll likely encounter WPA at public hotspots.
Wi-Fi Protected Access (WPA): You need to know the passphrase. You’ll likely encounter WPA at public hotspots.
After you double-click the network name of a security-enabled connection point, you enter the key or passphrase and then click Connect to connect. If you want to reconnect to this network in the future, you simply click the Network icon on the Internet tab, select the wireless network, and select Connect under Connection.
If you want to connect automatically to a network, such as your home network, when you start the Eee PC, you can also set that up:
note
If you want to get a little fancier than that, you can set up a fallback network by using the Fallback drop-down list box in the Properties dialog box (see Figure 1.6). For example, if you have multiple network connections (say wired and wireless), you can try to connect to the wired network first and then, if that doesn’t work, connect to a wireless network.
1. Click the Network icon.
2. Select the network to which you wish to autoconnect on bootup.
3. Click the Properties button to open the Properties dialog box, shown in Figure 1.6.
4. In the Start Mode drop-down list box in the lower-left corner, choose On Boot. Click OK, and then click OK again.
5. Allow the Eee PC to restart the network connection, after which your system should attempt to join that connection on bootup.
FIGURE 1.6 Setting a network to start on bootup.

Joining a Windows Network
If you have a Windows network at home (that is, you have set up Windows networking with workgroups and so forth), the Eee PC dives right into that arrangement with absolute ease. You first need to set up the Windows workgroup that you want to join, and you’ll need to do this from the Full Desktop. Start the Control Center (choose Launch, Control Center, Control Center), expand Network, and then select Windows Networking, as shown in Figure 1.7. Changing this sort of thing requires administrative access, so click the Administrator button.
In Easy Mode, you can share through the File Manager. Right-click the directory (or partition) you wish to share, then click Sharing. Select Windows sharing in the shortcut menu and then select Share this item and its contents. You can now select the share name, sharing permissions, etc.
Enter the machine name you’d like to use on the Windows network (yes, you can change it from the default) and the name of the Windows workgroup you’d like to join. You can also check the box to enable file and printer sharing. Click the Apply button when you’re finished.
FIGURE 1.7 Setting the machine name and workgroup.

When that’s done, in the File Manager, simply click on the Windows network in the tree, and you’ll see the other computers in the workgroup. You’ll need to set this up before you can tap into any shared printers on a Windows network.
Introducing the Video and Sound Features
The following is simply and introduction to the video and sound capabilities of the Eee PC. Actual detailed use is covered in Chapters 2 and 3.
tip
If you want a little more privacy, invest in a microphone/headphones combination or a headset.
With the combination of built-in webcam, microphone, and speakers, the Eee PC is just about the most portable video-conferencing device around.
Webcam
Both the non-Surf 701 models and the Eee PC 900 and 901sport nifty webcams that you can use for video conferencing and so forth. You can use the webcam in video conferencing with a number of applications, such as Skype. You can also build your own You Tube videos by using the built-in webcam application, ucview. This is available in Easy Mode on the Play tab, or by choosing Launch, Applications, Multimedia, ucview in Full Desktop.
Regardless of how you run it, ucview is a very competent package. You can record in low (300kbps), medium (800kbps), and high-quality (8000kbps) formats, or you can define the bitrate, encoding, quality, and frames per second yourself (choose the Custom compression quality under Tools, Video). Videos are stored in Ogg Theora video format, which is a good thing. Theora is an open standard from the Xiph.org Foundation, which is dedicated to making high-quality video and audio tools for the patent-free, open source world.
YouTube, unfortunately, is not Theora-friendly. There is an Ogg sort of YouTube environment called Theora Sea (http://en.theorasea.org/), but don’t get too excited, because there’s hardly any content on it. However, VLC (one of the applications covered in Chapter 9, “Must-Have Utilities”) can convert Theora format to MPEG, which YouTube does like.
Microphone
The Eee PC has a tiny microphone mounted below the mouse pad area. Actually, despite its diminutive size, it has reasonable sound quality. Sound pickup is a little less than optimal, but not terrible. As shown in Figure 1.8, the Sound Recorder application has a number of quality options and can record in mono or stereo. To do stereo, you need a stereo input (which the single built-in mic isn’t). You can launch the Sound Recorder from the Multimedia tab in Easy Mode or by choosing Launch, Applications, Multimedia, Sound Recorder in Full Desktop.
FIGURE 1.8 Recording quality options in the Sound Recorder.

The Sound Recorder saves in standard .wav file format, so the files it creates are very compatible with most other applications. If you want to edit sound files that you record, refer to Chapter 9, which discusses Audacity, a very powerful and yet simple-to-use sound editor.
Speakers
The really surprising thing about the Eee PC 701 is its speakers. PCs sound tinny at best, but the 701 speakers, mounted on either side of the screen, actually sound somewhat reasonable. This is especially true if your media player supports an audio equalizer so that you can pump up the base a bit. The sound quality isn’t as good with the Eee PC 900, with its speakers on the bottom.
note
Check out the “Sound Mixer” section in Chapter 2 for information about how to set the balance and volume of the various inputs and outputs.
Setting the Clock in Full Desktop
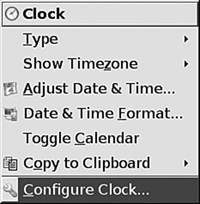
In Full Desktop, right-click the time display in the system tray and select Configure Clock from the shortcut menu, as shown in Figure 1.9.
In Full Desktop, you can set the style of the clock, and change the foreground and background colors and the font for both the time and the date. The digital clock looks just like you might imagine. The analog clock is far too small for the system tray (well, at least it is for my eyes) and, oddly, displays the time in words rather than numbers. Otherwise, the settings are quite straightforward.
FIGURE 1.9 Configuring the clock.
“Timezone” is actually handier than you might think, as it allows you to select multiple time zones. You can then right-click the time display, choose Show Timezone, and select from the submenu which time zone to use. The Eee PC is easy to take with you as you travel the globe, so this feature is very useful if you travel frequently.
Some other nice features on the right-click menu are Show Calendar, which simply displays the current month calendar, although you can pan forward and backward by month and year, or simply type in the month and year. You can also use a drop-down list to select any week in the year.
Copy to Clipboard in the menu does what it says, but you get to select the date format. That’s also handy when you simply don’t want to type the date.
One of the omissions in the Eee PC is the inability to sync to an NTP time via ntpdate server. Asus does include the rdate command to sync to an rdate server. (Chapter 9 discusses how to download and use ntpdate, if you want to use it. However, you can just as easily use a time server for rdate.) Because I’m in North America, I use time.nrc.ca to use the time server provided by the National Research Council, Ottawa, Canada. Substitute your own closest server in the command to set the time:
> sudo /usr/sbin/rdate -s time.nrc.ca
If you want, you can put this command into a file and copy it to the /usr/bin directory. I named my file gettime. Change the permissions on the file to allow it to execute by right-clicking the file in the Administrative File Manager, selecting Properties, and setting all the execute permissions. To set the file to execute from the command line, enter the following:
> sudo chmod +x gettime
If you want to see this work, simply set the time to something wrong on your Eee PC and then, from the command prompt, issue the gettime command. It’ll instantly set the time back to its proper value.
Setting the Volume
In Easy Mode, you can access a simple volume and balance control, reminiscent of the Windows volume control, from either the system tray or by clicking the Volume icon on the Settings tab.
In Full Desktop, the Eee PC has a Sound Mixer application that you can use to set the various input and output volume levels. It also provides both internal and external microphone boost channels. Of course, there’s also a mute control. To access the mixer, right-click the speaker icon in the system tray and select the function you want (see Figure 1.10).
FIGURE 1.10 Selecting the Master Channel.
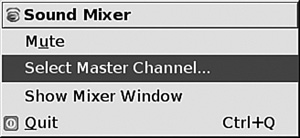
If you choose Select Master Channel, you can select the various input and output channels. The Mixer Window has some of that functionality, and also has the volume and balance controls. The Input tab lets you select between the internal and external microphones.
For command-line fans, you can also pull up alsamixer (it is installed). I personally find the semi-GUI interface for alsamixer to be a little rough (see Figure 1.11). If you want to try it out, launch a terminal window by pressing Ctrl+Alt+t. At the prompt, issue the following command:
> alsamixer
You control alsamixer through a combination of the Tab key and the arrow keys. The vertical bars are either output or input levels. Use the Tab key to navigate between the “views” (toward the top of the interface), and use the right and left arrow keys to navigate between the channels. The up and down arrow keys turn the output or input levels up or down.
FIGURE 1.11 The alsamixer GUI.

Cleaning Your Eee PC
You can wipe the outside of the case with a slightly damp sponge. You can use a drop of mild dish detergent on the sponge if you like. You can clean the dirt around the keys with a cotton swab (alcohol works well here). Vacuuming around the keyboard also works well.
Cleaning the display is best done with an eyeglass cleaning kit. Do not spray the cleaner directly on the screen, but rather use one short spray on the cloth. In fact, never spray or drip anything into any of the machine’s openings.
Getting to the Full Desktop
No introduction to the Eee PC would be complete without learning how to switch between the two desktops. Asus literature variously calls the Linux KDE Desktop both the Full Desktop and Advanced Mode. Either way, the KDE desktop is a handy way of controlling your Eee PC, with a lot more flexibility than Easy Mode.
There’s a utility that you can easily download and install that adds an icon in the Shut Down menu you can click to switch to the Full Desktop. From the Full Desktop, there’s a command on the Launch menu to switch back to Easy Mode. So you will now have the best of both worlds.
This will be your first foray into the world of downloading and installing Linux packages. Packages are bundles of executable and library files that comprise a complete application. The Eee PC’s Xandros operating system can download and install packages for you. For now, we’ll use the command-line interface but Chapter 8 will go over all of the ways to do this, both via a GUI and from the command line.
From Easy Mode, press Ctrl+Alt+T to launch a terminal window. In the terminal window, type the following two commands:
> sudo apt-get update
> sudo apt-get install ksmserver kicker
When the packages are installed, click the close box on the terminal window or type the following command:
> exit
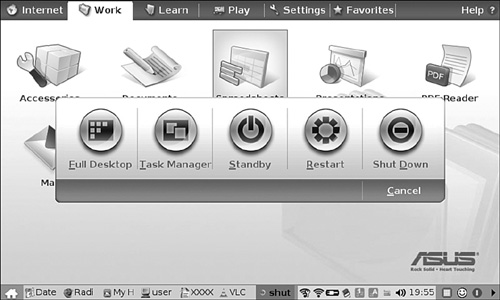
Before switching desktops, make sure that close all of your applications. If you don’t, they will be closed for you. Click the Shut Down icon at the right of panel at the bottom of the screen (see Figure 1.12). It’s a red circle with a white horizontal line. Click the new Full Desktop icon to switch desktops. When in Full Desktop, click the Launch button at the left of the panel, and select Easy Mode. Once again, close your applications before doing this or they will be closed for you.
FIGURE 1.12 The Full Desktop icon in the Shut Down Menu.
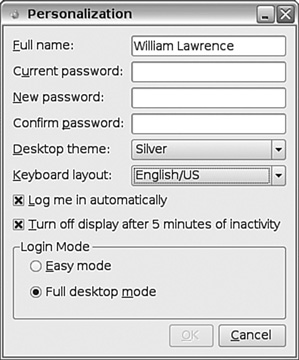
If you wish to boot directly into the Full Desktop, in Easy Mode click the Settings Tab. Click the Personalization icon and then select Full Desktop mode under Login Mode (see Figure 1.13). Click OK and it’s set. When you boot directly into the Full Desktop, it takes a little longer to start the Eee PC. This is because you are first booting under the Easy Mode (momentarily) and then launching the Full Desktop.
FIGURE 1.13 Selecting Full Desktop as the default desktop.
Summary
In this chapter, you got a good introduction to the Eee PC, its main controls and connections, and some of its basic features. You also learned to launch a terminal window in Easy Mode and used the Linux Bash command shell to run an application and to download and install a package.
You also got to see a side of the Eee PC you may not have known was there: Full Desktop. We’ll spend a lot of this book with Full Desktop, as it’s really the best way to do advanced tasks in the Xandros Linux operating system.