
Chapter 3
Configuring Internet Applications
IN THIS CHAPTER
![]() Setting up email access via Thunderbird
Setting up email access via Thunderbird
![]() Subscribing to RSS feeds through Thunderbird and Firefox
Subscribing to RSS feeds through Thunderbird and Firefox
![]() Accessing Usenet Newsgroups with Thunderbird
Accessing Usenet Newsgroups with Thunderbird
![]() Setting up the Pidgin Instant Messenger Client
Setting up the Pidgin Instant Messenger Client
![]() Using Skype for free phone calls
Using Skype for free phone calls
![]() Setting up VNC for remote access
Setting up VNC for remote access
The Thunderbird email client (from Mozilla, which also offers the Firefox web browser) can manage all of your email accounts (both web email and ISP-based email) and your RSS and Usenet subscriptions. This chapter explains how to use Thunderbird to connect to email providers and to subscribe to RSS feeds and Usenet groups. (Subscribing to RSS feeds via Firefox is also covered.)
This chapter also covers how to use Pidgin, the instant messenger application installed in Xandros. The Eee PC has some other pretty nifty Internet applications installed under Xandros: Skype and VNC. As explained in this chapter, you can use Skype to make free phone calls to other Skype users and use VNC to remotely access another computer.
Accessing Email via Thunderbird
This section covers using Thunderbird to:
![]() Set up a new email account
Set up a new email account
![]() Work with an existing email account
Work with an existing email account
![]() Manage your mail storage
Manage your mail storage
Setting Up an Email Account
There are two general protocols for exchanging email with an email server: POP3 and IMAP (actually IMAP version 4). IMAP is a newer, somewhat more capable protocol, although both are very much in current use. These protocols are used to retrieve email from email servers. Both methods rely on SMTP (Simple Mail Transfer Protocol) to send email. Setting up either system is relatively simple and the procedure is fairly similar. This section covers setting up POP3 and then explains the few differences in setting up IMAP. Although the focus is on setting up email through an ISP, this section also covers configuring Thunderbird for Google’s webmail system: Gmail. Thunderbird does have a wizard for setting up Gmail, but it doesn’t quite set things up properly, so I’ll show you how to fix it.
Setting Up a POP3 Account
Although the following example is primarily intended to demonstrate setting up POP3 access from an ISP and Gmail, the procedure is pretty much the same for almost any webmail source. From any webmail system, you must activate POP3 access. Also, webmail systems tend to use secure transfers on certain ports, and you have to set Thunderbird to match these requirements. Webmail providers also provide detailed instructions for setting up POP3 access to their systems, so look for a link that provides help on settings.
You can launch Thunderbird in Easy Mode by clicking the Email icon on the Work tab. In Full Desktop, you start it by choosing Launch, Applications, Internet, Thunderbird Email Client.
To set up a POP3 account:
1. Choose File, New, Account, as shown in Figure 3.1. This opens the Account Wizard.
2. Select Email Account and click the Next button to move to the Identity wizard page, shown in Figure 3.2.
3. In the Your Name field, enter your name as you’d like it to appear in the From field of your email messages.
4. In the Email Address field, enter your email address. Your ISP should have provided this when you opened your account, usually on some sort of account information form.
FIGURE 3.1 Adding a new account in Thunderbird.

FIGURE 3.2 Filling in the Identity wizard page.

5. Click the Next button.
6. On the Server Information wizard page (see Figure 3.3), click the POP radio button and enter the name of the server for incoming email. This is usually mail. whateveryourISPis.com, pop3.whateveryourISPis.net, or something like that. Look on the account information form from your ISP.
7. If you plan to have more than one email account, you might want to clear the Use Global Inbox check box. If this is checked, all new email from all accounts accumulates in the single Local Folder account. Clearing this sets up an individual inbox for this account.
note
If you’re setting up multiple accounts, Thunderbird has an annoying habit of using the default SMTP server and not providing a way to change this during account setup for subsequent accounts. If you run into this problem, fear not because it is easy to fix by editing the account information, as described later in this section.
8. If this is the first email account, you can also enter the name of your Outgoing Server on this dialog box. Again, refer to the information from your ISP. This will be something like smtp.whateveryourISPis.com.
FIGURE 3.3 Selecting POP3 protocol.

9. Click the Next button.
10. On the User Name wizard page, enter the username that your ISP (or webmail provider) assigned to you. This too should be on the account information form from the ISP. If this is the first email account you’ve set up, you can also enter the Outgoing User Name.
12. On the Account Name wizard page, enter the name you’d like to give to the account within Thunderbird. For example, if it’s the account from your ISP and you also have webmail accounts, you might want to call this one “Home.”
13. Click the Next button.
14. Congratulations! The wizard page gives you a chance to review the information for your account. If it isn’t correct, you can use the Back button to go back and fix it, or you can complete the wizard and then edit the account. Editing the account is sometimes preferable because you can’t set the more advanced properties through the Account Wizard. Clear the check box if you don’t want to try to download your email now. Clearing this is a good idea if you know you have to change settings.
15. Click Finish and you’re done.
At no point in this entire process were you asked for the password. Thunderbird requests this when you actually connect to the account, at which point you also have the option to have Thunderbird remember the password.
Setting Up an IMAP Account
The steps for setting up an IMAP account are almost exactly the same as for the POP account, except that you select IMAP instead of POP. The same subtle shift of the functionality of the wizard applies: you can only enter the name of the outgoing server when setting up the first email account. All subsequent accounts assume that the SMTP server will be the same, and don’t give you a chance to enter a new different SMTP server in the wizard. You must edit the account to change the SMTP server.
Editing an Existing Email Account
Let’s edit the account and take a look at the sorts of things you might want to fix. To do that, select the account in Thunderbird (you’ll see a screen similar to Figure 3.4) and then click View Settings for This Account on the right. If you clicked Local Folders, after opening the settings you may have to select the appropriate account on the tree to the left.
If you need to create a new SMTP server listing, scroll the tree (on the left) to the bottom and click Outgoing Server (SMTP). To add a new entry, click the Add button on the right and enter the information about the outgoing server in the SMTP Server dialog box.
FIGURE 3.4 Editing an account.

Setting Up Gmail
Gmail uses a secure connection, so when setting up Gmail, the settings in the SMTP Server dialog box should match those shown in Figure 3.5.
FIGURE 3.5 SMTP server settings for Gmail.

If you’re using Gmail, you also need to set the POP3 server properties. Scroll to the top of the tree and click Gmail. Click View Settings for This Account to open the Account Settings window. Gmail requires that you select SSL and set the port to 995.
Setting up a Gmail IMAP account is very similar to setting up a POP3 account, but with a few deviations:
![]() On the Account Information page of the Account Wizard, you must select IMAP instead of POP3.
On the Account Information page of the Account Wizard, you must select IMAP instead of POP3.
![]() The Gmail setup uses port 993 for the imap.gmail.com server, as shown in Figure 3.6. Note that TLS must be enabled.
The Gmail setup uses port 993 for the imap.gmail.com server, as shown in Figure 3.6. Note that TLS must be enabled.
FIGURE 3.6 Server settings for IMAP (Gmail).

Managing Storage with Your Email Accounts
Once you have email set up, you need to consider how to handle downloads, because storage space on the Eee PC is very limited. If you download all the email to your Eee PC, you need to carefully monitor how much email you store on the computer. You’ll need to either clean up your email quite often or reset the location in which downloads are stored (such as an SD flash drive). Some methods for minimizing the amount of email stored on your Eee PC follow.
Store Email on an SD Flash Drive
To change the location in which you store email to your SD flash drive, follow these steps:
1. Open the Account Settings window for your account.
2. Click Server Settings under the account name.
3. On the Server Settings properties sheet, click the Browse button next to the Local Directory field and choose your SD drive. If you’re using the internal display of the Eee PC, this field is hidden as the dialog has been sized to fit the screen. The workaround for large windows is to Alt+drag them with the mouse. In this case, Alt-drag the window up until you can see the bottom, then just drag the bottom downward until you can see the Local Directory field.
Empty Trash on Exit
Also on the Server Settings properties sheet, you can check the Empty Trash on Exit check box to automatically clean out anything you put in the trash.
Space Saving Thunderbird Settings
On the Offline & Disk Space properties sheet of the Account Settings window, you can configure a few more settings that will help to keep your solid-state drive from filling up:
![]() If you want to be able to read messages when you aren’t connected to the email provider, you need to configure Thunderbird to download complete messages. However, you can set Thunderbird to not download messages larger than 50KB, as shown in Figure 3.7. So, if someone sends you a 10MB attachment, you’ll have to save that manually (Thunderbird won’t download big attachments automatically).
If you want to be able to read messages when you aren’t connected to the email provider, you need to configure Thunderbird to download complete messages. However, you can set Thunderbird to not download messages larger than 50KB, as shown in Figure 3.7. So, if someone sends you a 10MB attachment, you’ll have to save that manually (Thunderbird won’t download big attachments automatically).
![]() You can set Thunderbird to automatically delete messages more than 30 days (or some arbitrary time) old (see Figure 3.7).
You can set Thunderbird to automatically delete messages more than 30 days (or some arbitrary time) old (see Figure 3.7).
FIGURE 3.7 Space-saving settings for offline email reading.

Setting Up RSS Feeds
Really Simple Syndication (RSS) is a way to subscribe to receive headlines and synopses of updates to blogs, general news sources, and almost everything else that’s available on the Web. Basically, an RSS document, or “feed,” is an XML file that has a link to the full article or blog entry along with the title and a synopsis.
RSS feeds are provided by many web sites, including news sites, blogs, company and organizational sites, and almost anything else you can think of. Subscribing to a site simply requires linking to an XML file at the site. Your RSS reader periodically reads the file and the file’s contents describe the current headlines.
The RSS reader software downloads the headlines, which contain links to the main articles, and organizes them such that they appear like a set of email headers in your inbox. If you find a particular entry interesting, you can either expand it to look at the synopsis or click the link to open the complete article in Firefox.
Subscribing to RSS Feeds via Thunderbird
Subscribing to feeds in Thunderbird is a two-step process:
1. Create an account to contain the RSS feed subscriptions.
2. Add feeds, which are really URLs that point to the XML files.
Setting Up an RSS Account
To set up the RSS feeds account:
1. Click File, New, Account to open the Account Wizard, shown in Figure 3.8.
2. Select the RSS News & Blogs radio button. Click Next.
3. Give the account a name (or just leave the default name of News & Blogs).
FIGURE 3.8 Adding a new RSS account in Thunderbird.

Adding RSS Feeds
The easiest way to explain how to add RSS feeds is through an example:
1. Point Firefox at http://www.space.com.
2. Scroll to the bottom of the page and click the orange XML button on the left. (This is a typical location for the button.) A page of available feeds appears.
3. Click the link for any feed, and you’ll get a page that shows the current content available under that feed, each containing the headline and the synopsis (see Figure 3.9).
4. Select the web address in the Address field and copy it (Ctrl+C) to the clipboard.
FIGURE 3.9 Finding the XML button that leads to the feeds.

5. In Thunderbird, click the News & Blogs (or whatever you named it) top-level folder in the folder tree, and then click Manage Subscriptions on the right.
6. In the RSS Subscriptions dialog box, click the Add button.
7. In the Feed URL field, paste the web address of the feed (Ctrl+V). To save on disk space, you might want to select the Show the Article Summary Instead of Loading the Web Page option.
The Import button provides a way to load an OPML or an XML file for an RSS feed. OPML files are sets of RSS feeds, and many RSS readers can save their subscription sets to an OPML file. You can use the Export button to save your set of RSS feeds as an OPML file, which you can then share with others.
8. Click OK. Thunderbird downloads the various feed entries (see Figure 3.10).
FIGURE 3.10 Viewing RSS feeds in Thunderbird.

To view an RSS feed, just open its folder like any other mail folder. Click a link and Thunderbird will load the related article in the bottom pane. Click the website link and it’ll load that article into Firefox. Pretty cool, eh?
Subscribing to RSS Feeds via Firefox
In the previous section, you navigated to a web page and found the orange XML button to list the RSS feeds. Well, that’s pretty much all that’s required to subscribe via Firefox. When you get to a page listing RSS feeds, click the Subscribe Now button (see Figure 3.11).
To see your RSS feeds, go to the Bookmarks menu and select the Bookmarks Toolbar folder. When you hover the mouse pointer over the name of the feed source, such as space.com, you’ll see the latest feeds. Just select a feed and the article will load in your browser.
Accessing Usenet Newsgroups via Thunderbird
Usenet is old technology (well, for the Internet at least) and is basically a set of thousands of categorized online forums. A word of caution about Usenet: there are adult forums and usenet is mostly not moderated (on moderated forums, the post is sent to a moderator before it goes to the group). In unmoderated groups, anyone can post anything they want. These are some of the reasons that Usenet has fallen out of favor, and many folks prefer moderated forums on Yahoo or other web portals, blogs, and RSS feeds. Still, there are useful technical forums on Usenet.
FIGURE 3.11 Click the Subscribe Now button.

Many ISPs offer access to news servers that provide access to newsgroups. If you’d like to build an account to access a news server in Thunderbird, follow these steps:
1. Click File, New, Account to open the Account Wizard.
2. Select the Newsgroup Account radio button. Click Next.
3. Enter your name and email address. Click Next.
4. On the Server Information wizard page, enter the name of the news server from your ISP (see Figure 3.12). The format for this is usually news. yourISPdomain.com (or .net, or whatever). Click Next.
5. Give the account a name (such as New or Usenet). Click Next.
6. Verify that the settings are correct. Click OK, and you’re ready to go.
If a login and password are required, you’ll be prompted for this when Thunderbird first connects with the server.
Now the fun begins. There are literally thousands of Usenet groups, some of which are decidedly unsavory. How do you navigate this morass? Fortunately, people keep lists of what the various groups are. One of the best of these lists is at http://www.dmoz.org/Computers/Usenet/. Peruse the links on this page and you’ll be able to find what you’re looking for. Alternatively, you can use the Search function for newsgroups within Thunderbird itself. To use this, click Newsgroups (or whatever you called the account) in the All Folders tree and then click Manage Subscriptions on the right. Wait a moment, because it takes a while to download a list of all newsgroup names.
FIGURE 3.12 Setting up a news server in Thunderbird.

Suppose, for instance, that you want to look up forums about Debian Linux. Well, just type Debian into the Show Items that Contain field and a set of forums is listed. Check the boxes for the forums to which you’d like to subscribe and then click the Subscribe button.
Once you’ve successfully subscribed to some forums, just click one in the Newsgroups folder in Thunderbird and you’ll see a set of posts on the right. Clicking the Get New Messages button downloads the latest set of posts. Click the post and, unless it’s too old and has “expired,” you’ll see the post in the bottom pane. Double-click it and it gets its own window.
You can manage subscriptions just by right-clicking them in the Newsgroups folder, as shown in Figure 3.13. So, if you decide that you no longer want a subscription, just right-click and choose Unsubscribe.
FIGURE 3.13 Unsubscribing from a Usenet forum.

Using the Pidgin Instant Messenger Client
Pidgin is the instant messenger application installed in Xandros. You can load it in Easy Mode by clicking the Messenger icon on the Internet tab. In Full Desktop, start it by choosing Launch, Applications, Internet, Pidgin Internet Messenger. The thing about Pidgin is that it’s merely a client, meaning you must add an account from an existing IM system to make it work.
The supported set of IM systems includes:
![]() AIM: The ubiquitous AOL Instant Messenger.
AIM: The ubiquitous AOL Instant Messenger.
![]() Google Talk: The chat client that you get with Gmail.
Google Talk: The chat client that you get with Gmail.
![]() Groupwise: The IM component of the Novell collaborative platform.
Groupwise: The IM component of the Novell collaborative platform.
![]() ICQ: The first IM system.
ICQ: The first IM system.
![]() IRC: Internet Relay Chat, a really old system mostly used for conferencing between groups of people (the so-called “channels”).
IRC: Internet Relay Chat, a really old system mostly used for conferencing between groups of people (the so-called “channels”).
![]() MSN: The Microsoft entry into the IM world.
MSN: The Microsoft entry into the IM world.
![]() QQ: Really Tencent QQ, the most popular IM system in China.
QQ: Really Tencent QQ, the most popular IM system in China.
![]() Simple: This is also called SIP/SIMPLE. Pidgin supports the chat component of this open standard, which also includes Voice over IP (VoIP).
Simple: This is also called SIP/SIMPLE. Pidgin supports the chat component of this open standard, which also includes Voice over IP (VoIP).
![]() Sametime: The IBM/Lotus IM system.
Sametime: The IBM/Lotus IM system.
![]() XMPP: An open standard for IM that’s been adopted by a number of systems, most notably Google Talk and Apple iChat.
XMPP: An open standard for IM that’s been adopted by a number of systems, most notably Google Talk and Apple iChat.
![]() Yahoo: The Yahoo instant messenger.
Yahoo: The Yahoo instant messenger.
Of course, for any of these systems, you first need to set up an account. You need a valid username/ID plus a password. This section shows you how to set up Pidgin for two popular systems: AIM and Google Talk.
When you launch Pidgin in Full Desktop, it simply places the green-ball chat symbol on the toolbar. If you don’t realize this, you can end up launching it again and again. To access the Pidgin application, double-click the toolbar icon. You can also right-click the icon to see the shortcut menu shown in Figure 3.14.
FIGURE 3.14 The Pidgin shortcut menu on the toolbar.

To set up an account from the Pidgin application:
1. Choose Add/Edit from the Accounts menu (from right-clicking the toolbar icon).
2. In the Accounts dialog box, click the Add button.
3. In the Add Account dialog box, in the Protocol list, choose the system that you want to join.
4. For an AIM account, you simply need to enter the ID and password, as shown in Figure 3.15. Everything else is taken care of automatically.
For Google Talk, you also need to know the domain name. This is almost always gmail.com. It matches the domain name of your Gmail account.
tip
When you check this box for Google Talk, you can double-click the email status bar in the Pidgin application to launch the browser and load Google.
5. If you want to be notified when you have incoming email, check the New Mail Notifications box.
6. Click Save to save the account.
FIGURE 3.15 Setting up AIM in Pidgin.

AIM provides all sorts of goodies, including the AIM Bots (automated services). You can also check your AOL email from here.
The bar at the bottom of the application provides choices for your current status in AIM, such as available, away, offline, and so forth. The Buddies menu contains the controls for starting a chat or joining one. You can also check the current status of others (via User Info).
When using any of the instant messaging networks, if you choose to log the messages, which you’ll find under the Pidgin Tools menu by choosing Preferences (it’s on the Logging tab), you can also view the logs of previous conversations with specific users. You can also use the Preferences dialog box to customize the look of the application.
Conversations in Pidgin work just like in AIM or any of the chat applications. Figure 3.16 shows a conversation in progress.
FIGURE 3.16 Pidgin in action chatting via an AIM account.

Making Free Phone Calls via Skype
Skype is a free-to-use tool as long as you are communicating only with other Skype users. For a fee, you can also make phone calls to landline phones and wireless phones. The focus of this section is what you can do via the Eee PC for free on Skype. This is where the nifty webcam comes into play for video conferencing. You simply need to set up a free Skype account and you’re ready to video conference.
Setting Up a Skype Account
Setting up a Skype account is quite simple:
1. Launch Skype. In Easy Mode, click the Skype icon on the Internet tab. In Full Desktop, choose Launch, Applications, Internet, Skype.
2. Click the Don’t Have a Skype Name Yet? link.
3. Complete the Create a New Skype Account dialog box, shown in Figure 3.17. All the information is required except the optional Full Name field.
4. Click the Sign Up button.
During the rest of the signup process, unless you really want to use Skype as a phone service, simply ignore all the extra services and places where you can put in credit card numbers, Pay Pal accounts, and so forth. What you’re after is a free account, so you just need to set your screen name (the choice of which is not always easy, considering Skype has 309 million accounts with screen names) and your password. Once you finally fight your way through all of that, you’re ready.
FIGURE 3.17 Signing up for a Skype account.

Using Skype
After you sign in with your screen name and password, do a sound check. Make sure that your speakers are on or your headset is plugged in.
tip
A cheap headset unit with an ear bud and tiny microphone works fine. Mine plugs into both the headphone and microphone ports, and is nice to have for places like Internet cafes where I want to use Skype but don’t want my entire conversation to be public.
Just to make sure things are working, click the Echo/Sound Test Service link and record a message. This will check your microphone and speakers or headset. If you need to make some changes to the input or output volume, see Chapter 1, “Getting Started,” for a description of the volume controls.
When you’re ready, click the little green ball at the bottom of the Skype application window to access the contacts list. Just for “grins,” I typed Eee into the search list and found lots of Eee users. Just start adding your contacts, and you’re ready to make calls.
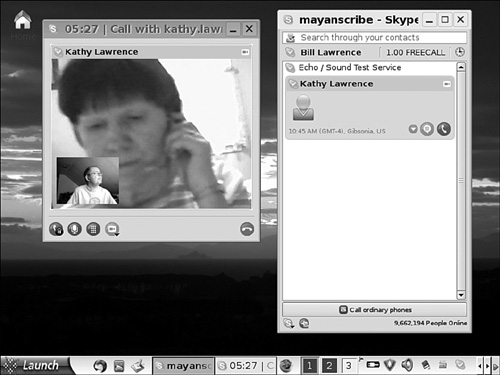
The green phone icon in the Skype application is your call button. Select a contact and click the icon to ring the contact. Once connected, make sure that your video is on. You’ll be able to see your own camera in a little window within the video conference window, as shown in Figure 3.18.
FIGURE 3.18 Skype video conferencing through the Eee PC.
Remotely Accessing Another Computer Using VNC
Using VNC is a way to remotely access another computer. The Eee PC has a VNC server and client built in. You can access both the server and client in the same menu in Full Desktop by choosing Launch, Applications, System, Remote Desktop Sharing. The server, which allows other computers to see your video and operate the GUI, is the Share My Desktop part. To do this, the remote computer must have a VNC client installed. The other computer’s owner can get the VNC client, plus a server, for free at http://www.realvnc.com.
To run these in Easy Mode, you must first launch a terminal window via Ctrl+Alt+T. The command to run the client is krdc and the command to run the server is krfb.
Inviting a Remote Computer to Access Your Eee PC
Assuming that the remote computer is equipped with the VNC client, all you have to do to enable someone using that other computer to remotely access your Eee PC is to:
1. Launch Share My Desktop from the Launch menu.
2. In the Invitation – Share My Desktop dialog box (see Figure 3.19), you’ll see a couple of buttons for creating invitations. Click the Create Invitation button.
3. This simply creates a password for logging and displays your URL and port. Jot down the password for logging in and the URL and port and give this information to the person who’ll be logging into your Eee PC remotely.
FIGURE 3.19 The invitation choices.

You can also try to use the Invite via Email button, but it’s frankly worthless. It does indeed launch Thunderbird, but neglects to put the information necessary into the email, and there’s no way to access the information for that invitation. So, you might as well do this manually.
The great thing about the invitation system is that it provides a way to deactivate the password. Just click the Manage Invitations button and you can delete invitations you’ve created.
Accessing a Remote Computer from Your Eee PC
To go the other way and log into a remote computer, you need precisely the same information from the other computer: IP address and port (or machine name and port) plus a password. Actually, it’s possible that the remote computer may not require a password, in which case you’ll just suddenly see the remote computer’s desktop. Launch the Remote Desktop Connection application and enter the address of the remote computer (don’t forget the colon and port) in the Remote Desktop field. Click the Connect button. If there’s a password, you’ll be challenged to enter this. Enter the password, and you’ll see the screen from the remote computer on your screen, as shown in the example in Figure 3.20. You’re now running the remote computer from your keyboard and mouse.
FIGURE 3.20 Running a Windows XP PC remotely from the Eee PC.

Summary
In this chapter, you learned how to set up the various Internet communications packages that come with the Eee PC. Much of this information is general enough that you now can apply it to both other Linux applications or to applications in other operating systems.
With the exception of the VNC tools, all of these applications are available on the menus in both Easy Mode and the Full Desktop. If you need to access VNC in Easy Mode, you can do so via the command line.