
Chapter 11
Introduction to the Linux Command Line
IN THIS CHAPTER
![]() An introduction to Linux Shells
An introduction to Linux Shells
![]() How to launch a shell in both Easy Mode and the KDE (Full Desktop)
How to launch a shell in both Easy Mode and the KDE (Full Desktop)
![]() A description of how to use a basic set of Linux commands
A description of how to use a basic set of Linux commands
![]() A command reference
A command reference
Regardless of how simple the graphical user interface (GUI) becomes, to efficiently use and control a Linux system, you should at least become familiar with the shell commands. “Shell” is just another term for the command-line prompt. The prompt provides an interface to the underlying Linux system, but through typed commands instead of a GUI. The original UNIX shell was called the Bourne shell, and the default Linux shell for the Eee PC, as well as most Linux systems, is Bash (Bourne-again shell). The Bash shell is a sophisticated and powerful environment from which you can perform just about any task on the computer.
This chapter provides a quick reference to the Bash shell commands and some basic Linux concepts, such as Linux file permissions. At the end of the chapter, you’ll find a very quick reference to the most useful Bash commands.
Launching the Shell in Easy Mode
In Easy Mode, you can launch what’s called an xterm window. This is nothing more than a terminal-emulator window, harkening back to the days when one interacted with a computer via a terminal. To launch it, press Ctrl+Alt+T. The window that appears has a prompt that looks like this:
note
There is a convention in Linux command documentation to use the $ prompt to mean user commands and the # prompt to mean “superuser” or root commands. But for simplicity, throughout this chapter (and the book), you’ll see the prompt shown as >. If the sudo command is required, it’ll be specifically included in the examples. Thus, > sudo means the command is being used with root authority. sudo is required whenever your command affects the system as a whole. While modifying a file in your user directories doesn’t require sudo, changing a system configuration file does.
/home/user>
The prompt, by default, displays the current directory. Note that I said “directory” instead of “folder.” “Folder” is used more in the context of a GUI that actually uses folder icons. When discussing the shell, however, the term “directory” is the preferred term. But when you get down to the file system itself, the two terms refer to exactly the same thing.
In Full Desktop, you can launch an xterm window by choosing Launch, Run Command, and entering xterm &. However, you can launch a much nicer terminal emulator called Konsole by entering konsole &. Konsole is a powerful terminal emulator, with lots of features configurable via menus.
One more bit of background: In Linux, to protect your system, you are given somewhat restricted permissions and privileges in your user account. On the Eee PC, these are simply the permissions that any default user might have. To have administrative, or root, privileges, you must preface a command with sudo. However, do this with extreme care, as you can render your system unusable with a mistake (though this is unlikely). At least with the Eee PC, it’s easy to reimage the solid-state drive.
Comparing the Linux File System to the Windows File System
The following are several of the major apparent differences between the Linux file system and the Windows file system:
![]() The character used to separate directories in Linux is a slash (
The character used to separate directories in Linux is a slash (/), not a backslash (). This will drive you crazy if you must switch between Windows and Linux machines during the day.
![]() There is only one top to the Linux file system, the root, instead of a number of peer drives (such as C:, D:, and X:). Various “drives” on the Eee PC, such as flash drives and DVD drives, are accessible through the /mnt or /media directories.
There is only one top to the Linux file system, the root, instead of a number of peer drives (such as C:, D:, and X:). Various “drives” on the Eee PC, such as flash drives and DVD drives, are accessible through the /mnt or /media directories.
![]() The Linux file system uses file links, of which there are two types. A symbolic link (also called a sym link or soft link) is a shortcut across the file system to another directory or file. It’s actually a shortcut file that’s easy to distinguish from the file or directory to which it points. It’s very similar to file shortcuts on Microsoft Windows systems. But there is also a “hard” link, which is actually a pointer at the file-system level. Hard links are difficult to distinguish from the target to which they link, which makes them a lot trickier to use than symbolic links.
The Linux file system uses file links, of which there are two types. A symbolic link (also called a sym link or soft link) is a shortcut across the file system to another directory or file. It’s actually a shortcut file that’s easy to distinguish from the file or directory to which it points. It’s very similar to file shortcuts on Microsoft Windows systems. But there is also a “hard” link, which is actually a pointer at the file-system level. Hard links are difficult to distinguish from the target to which they link, which makes them a lot trickier to use than symbolic links.
![]() Linux is case sensitive. In Windows, MYFILE.DOC, Myfile.Doc, and myfile.doc are considered the same filename and extension. Not so in Linux, where all three would be different files.
Linux is case sensitive. In Windows, MYFILE.DOC, Myfile.Doc, and myfile.doc are considered the same filename and extension. Not so in Linux, where all three would be different files.
![]() Architecturally, Linux has no concept of a separate filename “extension” as there is in the Microsoft world. Although filenames can be in the form <name>.<ext>, and in fact usually are, in the Linux and UNIX world, this is nothing more than a naming convention; the dot (.) character is treated as any other character. The only special meaning is that if a file or directory name begins with a dot, that file or directory is hidden to a number of commands (
Architecturally, Linux has no concept of a separate filename “extension” as there is in the Microsoft world. Although filenames can be in the form <name>.<ext>, and in fact usually are, in the Linux and UNIX world, this is nothing more than a naming convention; the dot (.) character is treated as any other character. The only special meaning is that if a file or directory name begins with a dot, that file or directory is hidden to a number of commands (ls in particular).
One way in which the file systems are the same is in the way they treat filenames that include spaces. Once upon a time, when UNIX boxes roamed the earth, you couldn’t have spaces in filenames. But now that you can in Linux, you must enclose them with double quotes so that the commands can deal with them, like so:
“this is a very tediously long filename”
In Chapter 8, I said that most new applications that you install have instructions. If you wish to delve further into the intricacies of the various commands covered in this chapter, you can take a look at either the man page or manual. To see the man page for the ls command, for example, simply enter:
> man ls
You can scroll up and down, and when you’re done, enter q (for “quit”) to exit. Some commands also come with a manual file, which has more detailed information. For example, for a full manual on the bzip2 command, enter:
> info bzip2
Again, use q to escape. If the manual doesn’t exist, you’ll get the man page. Manuals can have links to jump to other sections. To use these, simply use the arrow key to navigate to a link (links are easy to recognize, as they are preceded with an asterisk) and press Enter. Figure 11.1 shows a number of links in an info file.
FIGURE 11.1 The Info file for bzip2, showing a number of links.

Working with Files and Directories
The following sections list the most commonly used commands for viewing information about files and directories, as well as manipulating them.
Listing Directory Contents
The command to list the contents of a directory is ls (short for “list”). For example:
> ls
Desktop/ MMC-SD My Documents/ Trash/
media
You’ll see a number of files listed, some of which are displayed in different colors. Although the colors can be changed in the settings for the console program, by default they mean:
black: file
dark blue: directory
light blue (cyan): symbolic link
If you want to see all the files, including hidden files and directories, use the -a switch:

If you want to see all the information about files, such as their current permissions, use the -l switch, as follows. This also shows the target of the symbolic link:

Some translation is now required. The first 10 characters in each line lists the entry’s type and permission flags. For directories, the first character is a d (such as with Desktop), and for symbolic links, it’s l (such as with /media) For files, the first flag is -. Although you probably will not encounter these in your daily travels about the Eee PC file system, for completeness’ sake, you should know that p is a pipe, s is a socket, c is a character device, and b is a block device. These have the following, if somewhat esoteric, meanings:
![]() Pipe is a special file used for communications between two processes. It connects the output of one process to the input of another.
Pipe is a special file used for communications between two processes. It connects the output of one process to the input of another.
![]() Socket is another special file that’s used for communications between processes.
Socket is another special file that’s used for communications between processes.
![]() Character is a device file type for a serial device. Serial devices take input and output as a stream of data. One of the really neat things is that all hardware devices, except for network devices, are treated as files. These device files handle permissions information and configuraton for the various devices on the system.
Character is a device file type for a serial device. Serial devices take input and output as a stream of data. One of the really neat things is that all hardware devices, except for network devices, are treated as files. These device files handle permissions information and configuraton for the various devices on the system.
![]() Block is a device for devices that have random access data.
Block is a device for devices that have random access data.
The next nine characters are the permissions settings, and they are owner (first three characters), group (middle three characters), and world, or all (last three characters). Because the Eee PC is essentially a single-user Linux system, you’re basically interested in owner, and that’s either going to be you or root. This is where the sudo command comes into play, because if you’re not the owner, and group and world don’t have permissions on the file, you need to use sudo to manipulate the file.
The permissions break down as a triplet of r (read), w (write), and x (execute). You can change the permissions with the chmod command, which is covered a bit later in this section. You can change owner with chown, which is covered with chmod. To read a file, you must have the r permission. To change a file, you must have the w permission, and to run a script or program, you must have the x permission.
The next number is the link count, which simply indicates the number of hard links to the file or directory. Following that are the owner and group, both of which are called “user” or “root” in the preceding example. You can manipulate user files without sudo, but root files require you to preface the command with sudo.
After the user and group comes the size of the file, in bytes. Following the file size is the date and time stamp for when the file was either created or last “touched” (which normally means edited or updated). Finally, the last entry is the name of the file or directory, and if it’s a symbolic link, it shows the destination after an arrow.
Creating, Removing, and Moving Around in Directories
Now that you can list and understand the contents of a directory, you need to know how to create and remove one. If you’re going to create a directory, you use the mkdir command. So, if you’re in your /home/user directory, try this:
> mkdir mydir
If you use ls -l, you’ll find that you’re both the owner and group, which is only fair because you created it.
Changing into the directory requires the cd command. Because this is a subdirectory of the current directory, you don’t need the “fully qualified” path and can just use a relative path, which means just the path from your current directory. In this case, the cd command is:
If you had wanted to use the fully qualified path, that would be:
> cd /home/user/mydir
Note that the prompt now changes to reflect the current directory.
To change back to the next directory “up” (/home/user), you can use the shortcut of .., like this:
> cd ..
Also, because /home/user is your home, you can use the ~ shortcut to return to your home directory:
> cd ~
To jump all the way to the root, use:
> cd /
Copying Files
Suppose that you’re back in the mydir directory and want to copy a file. For that, you need to use the cp command. The file you’ll copy is a hidden configuration file in your home directory, and you’ll rename it in the process:
> cp ../.bash_profile mybash.txt
That copies .bash_profile and gives the copy the name mybash.txt. Now that you have a file in mydir, jump back to the home directory and try to delete the directory:
> cd ~
> rmdir mydir
Note that the Eee PC refuses and complains:
rmdir: mydir: Directory not empty
Clearly, you need to hunt down mybash.txt and remove it. To do that, you need to use the rm command (but don’t type this yet):
> rm mydir/mybash.txt (BUT DON’ T TYPE IT YET!)
Now, because you just entered the rmdir command, you can use something called command memory. Just press the up-arrow key twice. The first press produces the last command and the next press produces the previously issued command. You can use the down-arrow key to navigate back down through the command stack. When you see the rmdir mydir command, press Enter and this time it will remove the directory.
Treat the rm command with some respect. Combined with wildcards, it can be devastating to your system. The * means match everything, so rm * will delete all the contents of the current directory. There are two switches for rm:
![]()
-f means to “force” the deletion. Occasionally, the system may ask if you really want to delete something, and using -f is a polite way of saying “don’t ask, just do it.”
![]()
-r means “recursive” deletion, which means to go down through the subdirectories and remove their contents.
So, for example, to force the deletion of the file “bob,” you’d enter:
> rm –f bob
Sometimes, you’ll want to move a file from one directory to another—that is, place it in another directory and remove it from its source directory. You could do that by issuing back-to-back cp and rm commands, but you can instead use mv. For example:
> mv /somewhere/myfile.txt /else/
You can also use mv to move or just rename a directory (and all of its subdirectories). For example, to rename the “zane” directory to “kira,” you would enter:
> mv zane kira
To move kira and its subdiretories under the hope directory, you’d enter:
> mv kira hope/
Note that the trailing slash makes all the difference, as it identifies hope as a directory.
Checking Free Storage Space
Suppose you’re interested not in listing the contents of directories, but in how much space is left on the Eee PC. Simple, use the df (“display freespace”) command:

The information you want is in any of the first three entries. In the case of my machine, 88% of the solid-state drive is full, with a mere 177,644 bytes left. My Eee PC is a 701 4G, so I have a little breathing room. Folks with a 900 series machine will have much more space.
You might be wondering if the file system has a single root, why are there six entries. Mounted devices and disk partitions are also shown. The top three are actually just different references to the same thing. Note that the MMC-SD drive is shown as a device in the /mnt directory (which is because it’s mounted).
Creating Symbolic Links
Symbolic links are handy things, because they can provide a shortcut to any location in the file system. They’re easy to create with the ln command. For example, to create a symbolic link docs directory that links to a directory on the MMC-SD drive, use the following:
> ln -s /media/MC-SD/partition1/Documents/ docs
Note the trailing slash after Documents, which makes it specific that this is a directory target.
Creating Tarballs
Now and then, you might want to make backups of your home directory and your MMC-SD drive. A common way to do this is to create a “tarball,” which is a tar file compressed by bzip2. A tar file is a single file that contains a collection of files, so the tar part of the exercise gathers all the files from the target directory path into a single file. You can both tar and compress in one single command.
tip
The name “tar” comes from the fact that, way back in the mists of time, the format was originally used for (T)ape (AR)chives.
Given that space is at a premium on 700 series Eee PCs, make sure the target (such as a USB flash drive) has sufficient space for the tarball.
As a rule, tar does not follow symbolic links, but rather backs up the symbolic link file itself. However, if you throw in the h switch, it will follow symbolic links, which will back up all your /media directories (such as the MMC-SD drive). However, the problem with this is that it will also follow along to wherever you’re creating the backup file, which would be bad. If you’re going to use the h switch, have the target be on a network share.
To create a tar file of the user directory, issue:
> tar -cjf /whatever/your/target/directory/is/backupfilename.tar.bz2 /home/user
where /whatever/your/target/directory/is/ is the directory path to the directory that will hold the tar file, and backupfilename.tar.bz2 is some name that you choose for the tar file.
If you write another tarball with the same name to the same location, it will simply overwrite the first one.
The -cjf switches simply tell tar to create a file with the following argument as the name of the file and compress it with bzip2. To restore the file, issue the following command:
> tar -xjf backupfilename.tar.bz2
Issue the restore command from where you want the directory and its contents, including subdirectories, restored. It will re-create its parent directory structure as well.
Changing File Ownership and Permissions
You’ll want to know how to change the ownership of a file and its permissions. Now, of course, you can easily do this through the graphical file manager, but you can also use chown and chmod.
The chown command can really have only two arguments on the Eee PC: root and user. To change the ownership of a file from root to user, you need to use chown with sudo:
> sudo chown user filename
where user is the new owner and filename is the name of the file whose ownership is to be changed.
Changing permissions is almost as easy. The chmod command has as switches a (all users), g (group), and u (user). Each of these switches has several arguments: + (add), - (remove), r (read permission), w (write permission), and x (execute permission). So, to make yourfile.ext have read, write, and execute permission for all users, which includes the group and the owner, you would issue this command:
> chmod a+rwx yourfile.ext
To remove write permissions from the group, you would issue this command:
> chmod g-w yourfile.ext
Finding Files
This section discusses how to find files or sets of files, and how to find information contained within files.
You can find files easily with the find command. All you need for find is to know, more or less, what you’re looking for and where to start. By the way, this is a really great command to use if you’re looking for a file that you installed via apt-get or the Synaptic Package Manger and you know the name of the file. To search for a fictitious file called key.asc in the /home/user directory (and any of its subdirectories), you’d issue this command:
>find /home/user/ -name “key.asc”
To find all JPG graphics files in the Eee PC’s built-in file system, issue this command:
> find / -name “*.jpg”
To find the same set of files on the attached flash drives, issue this command:
> find /media/ -name “*.jpg”
The find command is pretty fast, even though it’s doing a brute-force search. If you want to find the location of a program file that’s currently installed, you can use the which command. For example, to use which to report the location of the GIMP executable, gimp, you’d use this command:
> which gimp
The which command depends on things being in the path. The path is actually a set of directories, stored in an environment variable (PATH) that tells Linux where to look for programs. If you want to see the current path, use this command:
> echo $PATH
The echo command “echoes” the current value of the variable, denoted by the dollar sign, to the screen. On the Eee PC, the path returned is actually pretty short:
/usr/local/bin:/usr/bin:/bin:/usr/games
Using environment variables is simply a way to set some information so that programs can access it. The great thing about environment variables is that they can be redefined and, by doing so, programs get the new definition. If you want to take a look at all the environment variables that are currently set, run this command:
> printenv
So, what if you want to find something inside of a file or files? That’s where grep comes in. For grep to work, the files must be text files. So, if you want to find a file that contains the string “winning lottery” and there are a number of TXT files in the directory, you’d issue this grep command:
> grep ‘winning lottery’ *.txt
grep will report back any file in the specified directory with the .txt extension that contains the search string. The grep command also understands regular expressions, and using those makes it an incredibly powerful search tool. Regular expressions are the subjects of entire books and thus beyond the scope of this book. However, you can find more than you even want to know about regular expressions at http://www.regular-expressions.info/reference.html.
The grep command can also search for strings of information “piped” through it. We’ll cover pipes and redirection in the “Command-Line Tricks” section.
Viewing Text Files
If you now want to view the text files you’ve found, you have two ways of doing that: cat and less.
The cat command is designed to join two text files together; however, if you give it a single file as an argument, it will simply spew the contents of the file to the console. Clearly, this is really only good for short files, unless you can read faster than the console can spew text. So, to do this with a file, you would issue:
> cat yourfile.txt
A better way is to use the less command, which fills a single screen full of text. Then, you can scroll up and down with the up- and down-arrow keys. If you want to scroll up and down faster you can use the Page Up and Page Down keys. Use q to exit from the file. To run less on a file, issue this command:
> less yourfile.txt
If you want to compare two text files, you can do that with the diff command. If fact, you’ll likely hear UNIX and Linux folks using this as a verb as they discuss “diffing” two files. Usage is pretty simple:
> diff thisfile.txt thatfile.txt
The diff command will echo any lines that aren’t identical to the console, and won’t show any lines that are identical. You’ll also see > and < signs at the beginning of the lines: < means that the line came from the first file in the command, and > means that the line came from the second file (see Figure 11.2).
FIGURE 11.2 Results from “diffing” two text files.

Command-Line Tricks
In this section, you’ll learn about ways to work with the command line, including command completion and command editing. You’ll also find a few other handy tips, such as how to stop a script or how to clear the screen. Finally, this section covers redirections and pipes, which are poweful ways of working with command inputs and outputs.
Command-Line Completion
Command-line completion is a tremendous time-saver (and hand-saver), because Linux will fill in parts of the command line for you. Suppose you’re sitting with a command prompt in front of you, and you want to change directories to this rather long path: /media/MMC-SD/partition1/downloads. After you enter the cd command and the following space, simply enter /me and then press Tab. Because no directories that are children of the root other than /media begin with “/me,” the system knows which directory you mean and fills in the rest of the path. If there were more than one directories beginning with “/me,” cd would list the possible choices for you so that you could type enough letters to make the choice clear. You can keep pressing Tab throughout the directories in the path and have the Bash shell fill in the blanks for you as you go. This even works for individual filenames.
Editing Commands
If you make a mistake on a long command, you can use the left- and right- arrow keys to move the cursor back and forth along the command line. Ctrl+A will jump to the beginning of the line, and Ctrl+E will jump to the end. If you want to delete everything before the cursor, press Ctrl+U. Pressing Ctrl+K deletes everything from the cursor position to the right.
If you want to clear the current xterm or Konsole screen, simply enter the following command:
> clear
I’ve mentioned this before, but adding a space and then an ampersand (&) after a command spawns it off from the current console, freeing your command prompt for the next command. Thus, launching gimp with the ampersand gives you back your prompt, but neglecting the ampersand means that the prompt is frozen until the gimp session is complete.
Stopping Scripts
If a script is running, you can usually stop it with a simple Ctrl+C command. If this does not work, look ahead to the next section on controlling processes.
Creating Aliases
If you tire of typing the same long command over and over again, you can make up your own short command name that’s actually the long command and its arguments. This is done through the alias command. For example, the following will back up the /home/user directory into a tarball on the MMC-SD drive:
> tar -cjf /media/MMC-SD/partition1/backup/homebak.tar.bz2 /home/user
You can simply create a command called backme that has all of that defined in it:
> alias backme=‘tar -cjf /media/MMC-SD/partition1/backup/homebak.tar.bz2
/home/user’
Now, when you issue the backme command, it will actually run the big, long tar command.
Redirection and Pipes
In Linux, you can combine commands by taking the output of one command and sending it to another command. This is called “piping.” You can also take the output of a command and send it to a file or to the console, which is called “redirection.” For example, suppose that you’re looking for all the JPG graphics files on the Eee PC that have the string “wallpaper” somewhere in their name. You could use *wallpaper.jpg as the argument to the find command, but what if “wallpaper” is merely the first part of a long filename? That won’t match *wallpaper.jpg. However, you could find all the JPG files with *.jpg, and then “pipe” the output of the find command into the grep command, which can search for the string “wallpaper.” To do that, you use the pipe character (|):
> find / -name *.jpg | grep ‘wallpaper’
That’s great, except perhaps you’d like to save these results to review later. Now you need a way of saving the results to a file. This is where redirection comes in. You can use the redirection character (>) to redirect the output from the console to a file that you specify, like so:
> find / -name *.jpg | grep ‘wallpaper’ > wallpaper.txt
If you want to add additional information to the end of an existing file, you can use a pair of angle brackets rather than just one. For example:
> ls -l homeuser >> mydir.txt
Controlling Processes
Each time you run an application on the Eee PC, that application starts one or more processes. Xandros also has its own processes, such as those in the X Window System. Some of these processes start when the system starts.
Using the top Command
To see what processes are currently running, run the top command:
> top
Figure 11.3 shows the output from the top command. The top few lines provide system status, some of which information is of more use on a multiuser system (such as the number of users). Still, this is all useful stuff. You can tell at a glance how much memory is being consumed and how much is left. You can also see the total number of tasks.
FIGURE 11.3 The output from the top command.

The processes themselves are listed by percentage of available CPU cycles in use (the %CPU column). The columns in the listing have the following meaning:
PID: The process ID, which is a unique number assigned to each process. If you want to stop (kill) a process, you need to know this.
USER: The owner of the process. On the Eee PC, it’ll either be user or root. Most of the root processes are in fact system processes.
PR: The priority of the process. This number changes depending on the order of processes in the CPU queue.
NI: The “nice” value for the process, which can range from -20 (highest-priority processes) to 19 (lowest-priority processes). You can change the “niceness” of a process by using the renice command, covered at the end of this section. Keep in mind that some high-priority processes, especially system processes, are set that way for a good reason.
VIRT: The amount of virtual memory consumed by the process.
RES: The amount of physical memory consumed by the process.
SHR: The amount of shared memory consumed by the process.
S: The task status. Normally, this is R (running) or S (sleeping). Occasionally you’ll have a Z, or zombie process. This is usually junk, and is normally a child process left behind after the parent process was killed.
%CPU: The percentage of available CPU cycles in use.
%MEM: The percentage of available physical memory in use.
TIME+: The amount of time that the process has been running.
COMMAND: The name of the process.
If you press the ? or H key, you’ll get help on the top command. If you press the spacebar, top immediately updates its display. It automatically updates every few seconds. Pressing A toggles the display between a “multiwindow” display, which is really just a grouped display, and the normal display.
Entering q quits top and returns your xterm or Konsole window to your control.
Determining Parent and Child Processes with pstree
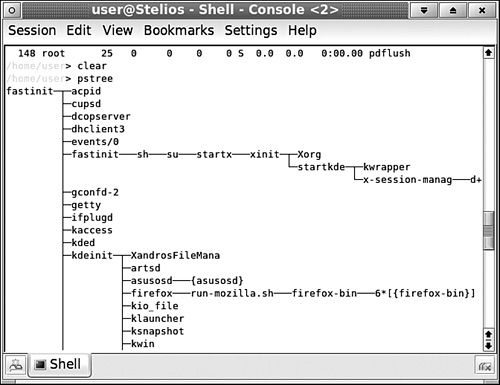
If you want to see which processes own other processes (parent and child processes), use the pstree command, which provides a tree structure showing the parent/child relationships (see Figure 11.4). If you’re running something like Konsole, you can easily scroll back up through the tree. You can also use the pipe character and pipe the output through the less command:
> pstree | less
FIGURE 11.4 Output from pstree.
Given that you can now view processes and get their PIDs, you have all the information you need to manage them. You can either change the “niceness” (or priority) of a process that’s hogging all of your CPU cycles or outright kill a process that’s gone awry.
Changing Process Niceness
The renice command resets the priority of a running process. Priorities run from -20 (high) to 19 (low). You may need to add sudo to this if you get a permission denied. To set Firefox (PID 3918) on my system to a lower priority than its default of 0, I’d run this command:
> renice 10 3918
Killing a Process
To stop a process, you can use the kill command, which takes the PID as its only argument. To kill PID 3918, for example, you’d use this command:
> kill 3918
Sometimes, issuing the kill command won’t stop a process. Actually, kill is really sending signals to shut down the process. Many processes have some cleanup to do in order to “gracefully” exit, which includes writing buffers, cleaning up temporary files, etc. Database applications, such as mysql, are especially prone to data corruption if suddenly stopped. So, give the process some time to exit.
If, after a reasonable amount of time, the process simply won’t shut down, you can stop it cold with kill -9. This is a last resort option and it like shutting off the power (at least as far as the process is concerned).
For example, to kill the process with PID 3918 right now, enter:
> kill -9 3918
Scheduling with crontab
The crontab command gives you a way to schedule a task to be run at a particular time. Given that the Eee PC is pretty much the most portable and personal of computers, I was having a little trouble imagining a case in which crontab would be useful. The Eee PC will likely be turned on when you need it and turned off pretty much the rest of the time. So the likelihood that the Eee PC will be running when the crontab task is set to run isn’t very high. However, just in case you come up with a reason to use crontab, this section presents it. For the example, you’ll use the command to back up the /home/user directory onto the MMC-SD drive as a tarball:
> tar -cjf /media/MMC-SD/partition1/backup/homebak.tar.bz2 /home/user
What you’re really doing with crontab is editing the crontab file for “user,” which lives in the /var/spool/cron/crontabs directory. To do this, you issue the crontab command with the -e switch:
> crontab -e
This loads the user crontab file into the nano editor. To set up the backup command, you need to first give it a time to execute. You do this by setting the minutes, hours, date, month, and/or day. These take the following values:
minutes: 0 through 59
hours: 0 through 23
date: 1 through 31 (be careful because not all months have 31 days)
month: 0 though 11
day: 0 (Sunday) through 6 (Saturday)
You can also use the * wildcard to mean “all” for these settings.
So, to back up the home directory every day at noon, enter a line with nano that looks like this:
0 12 * * * tar -cjf /media/MMC-SD/partition1/backup/homebak.tar.bz2 /home/user
If you want to schedule more tasks, just put each one on a separate line. When you’re done, press Ctrl+X to exit. Nano will ask you if you want to save the file. Press Y to say yes, and then nano will ask if it’s okay to save the file in a subdirectory of /tmp. Press Enter and it’ll save the file. If you want to change the crontab entry, simply issue contab -e again. If you want to take a look at your current crontab settings, enter this command:
> crontab -l
You can remove the current crontab settings by using this command:
> crontab -r
Another way to schedule tasks, which probably makes more sense on the Eee PC, is to use Anacron. Anacron doesn’t rely on specific times or days, but rather you can give it a period. For example, every seven days you could run the same backup command. The only catch is that Anacron isn’t on the Eee PC by default. However, the Debian repositories listed in Chapter 8, “Getting More Linux Applications,” do reference Anacron, so you can install it by using the Synaptic Package Manager.
The anacron command is run automatically at bootup. The configuration file is called anacrontab, and is in the /etc/ directory. You need to use the sudo command to edit it. The syntax for the anacrontab file is a little different from cron, and consists of the period (in days), the delay after its run at bootup before running the task, some arbitrary name you assign to the task, and the command itself. Instead of the period being the number of days, you can also set it to run monthly with @monthly. The delay is really important, and you should give it several minutes. Attempting to run a command while booting can have unpredictable, and potentially bad, effects. The name you assign can’t have spaces, so use the old UNIX trick of substituting an underscore for a space (for example, my_backup_job).
When you edit the anacrontab file, you’ll find some entries already in there. Simply make yours the next line after the others. These entries also provide examples.
Quick Reference
The following is a very abridged, noncomprehensive quick reference to the Linux commands discussed in this and other chapters. For detailed command information, use the man and info commands. This is just a “cheat sheet” to get you by until you’re comfortable with these commands.
alias
To create a command:
> alias newcommand=‘oldcommand -arguments’
To display existing aliases:
> alias
apt-cache
tip
To delete an existing alias, see unalias.
To search through the existing APT database:
> aptcache search package_name
To display information about a package:
> aptcache show package_name
To display dependencies for a package:
> aptcache depends package_name
apt-get
To install new packages:
> sudo apt-get install package_name
To remove a package:
> sudo apt-get remove package_name
To (attempt to) upgrade all packages:
> sudo apt-get upgrade
To update the APT database:
> sudo apt-get update
To delete old package installation files:
> sudo apt-get clean
bzip2
To compress a file (the file is replaced by the compressed file unless you use the -k switch):
> bzip2 -k filename.ext
cat
To list a file:
> cat filename.ext
cd
To change directories:
> cd /directory/path
chmod
To change permissions for a file or directory (a = all, u = user, g = group, r = read, w = write, x = executable):
> chmod a+rwx filename.ext
chown
To change ownership of a file to “user”:
> chown user filename.ext
clear
To clear the screen:
> clear
cp
To copy files:
> cp filename.ext /directory/path/
crontab
To edit the crontab file to schedule a task (command) to recur at a given time:
> crontab -e
To display the amount of free space in the file system:
> df
diff
To show the differences between two text files:
> diff file1.txt file2.txt
dpkg
To install an installation package (DEB file) on the local file system:
> dpkg -i packagename.deb
To remove an installed application (but not the configuration files):
> dpkg -r packagename
To remove an installed application, including the configuration files:
> dpkg -R packagename
exit
To exit from an xterm or Konsole window:
> exit
find
To find a file in the file system, starting from the specified directory:
> find /directory/path -name ‘filename.ext’
free
To see current memory usage:
> free
grep
To search a file for a specific text string:
> grep “search string” filename.txt
gzip
To compress a file and replace it with the compressed version (this is an older compression tool):
> gzip filename.ext
help
To list Bash shell commands:
> help
To display the manual (or, if it doesn’t exist, the man page) for a specific command:
> info command_name
kill
To stop (kill) a specific process:
> kill PID
less
To display the contents of a text file, allowing you to navigate through the file:
> less filename.txt
ln
To create a “hard” link to another directory:
> ln /target/directory/path/ link_name
To create a symbolic link to another directory:
> ln -s /target/directory/path/ link_name
ls
To list the contents of a directory (or the current directory if no directory path is given):
> ls [/directory/path]
To list all files, including hidden files:
> ls [/directory/path] -a
To list information about the files:
> ls -l
man
To display the man page for a specific command:
> man command_name
mkdir
To create a directory:
> mkdir directory_name
mv
To move a file from one directory to another:
> mv filename.ext /directory/path/
printenv
To list the current environment variables and their definitions:
> printenv
To view a tree of parent and child processes:
> pstree
renice
To change the priority, -19 (high) to 20 (low), of a running process:
> renice priority PID
rm
To remove a file:
> rm filename.ext
rmdir
To remove a directory:
> rmdir MyDir
sudo
To run a command with root privileges:
> sudo command
tar
To bundle a group of files into a compressed tarball:
> tar cjf filename.tar.bz2 /path/directory/
top
To display the currently running processes:
> top
unalias
To remove an alias:
> unalias alias_name
which
To provide the location of an application in the path:
> which application
Summary
This chapter covered the basics of the Bash shell and a set of the most commonly used Linux commands. If you are new to Linux, mark this chapter as it will be a good reference. You’ll come back to it time and again as you master the command line. If you decide to try one of the other versions of Linux covered in the next chapter, this command reference will still be useful.