Chapter 12
Loading Other Linux Distributions
IN THIS CHAPTER
![]() How to reinstall Xandros Linux, should you decide to return to the operating system
How to reinstall Xandros Linux, should you decide to return to the operating system
![]() The pluses and minuses of Mandriva Linux, plus how to install that operating system
The pluses and minuses of Mandriva Linux, plus how to install that operating system
![]() The pros and cons of Pupeee Linux, a Puppy Linux derivation that comes complete with Eee drivers
The pros and cons of Pupeee Linux, a Puppy Linux derivation that comes complete with Eee drivers
![]() The advantages and disadvantages of Ubuntu Eee, a GNOME-based Ubuntu derivation with Eee drivers
The advantages and disadvantages of Ubuntu Eee, a GNOME-based Ubuntu derivation with Eee drivers
This chapter introduces three other flavors of Linux that you can run on the Eee PC. Two of them, Ubuntu Eee and Pupeee, are maintained by volunteers. The third, Mandriva Linux, is a commercial offering from Mandriva S.A. The Mandriva Linux One version (which is free) is a “Live CD” that can also be installed on the system. A live CD is a complete version of the operating system that can be booted and run entirely from the CD.
If you’re seriously considering switching your Eee PC’s operating system, take a look at this chapter and the next two (Chapter 13 covers switching to OpenSolaris, and Chapter 14 covers switching to Windows). You’ll probably want to add a DVD R/W unit with a USB interface as well, as discussed in Chaper 3. Most of the OS distributions come as an ISO file, which is intended for a CD or DVD. This chapter also covers how to load an ISO file onto a flash drive.
This chapter begins by explaining how to restore Xandros on your Eee PC, in case you change your mind about using any of the operating systems covered in this or the following few chapters or you encounter problems while switching to a different Linux distribution.
Restoring Xandros
The Eee PC ships with either a support DVD or CD, which is an amazing resource for this little machine. I’ve used everything on it, and it’s one of the reasons that the Eee PC is so versatile. It contains all the Windows drivers, the documentation, and the Eee PC’s default Xandros image. I’ve lost track of the number of times I’ve reinstalled the default image in the course of writing this book.
Reinstalling does require that you have access to other hardware: either a DVD drive or a Windows-based computer. You can restore directly from the DVD itself or you can put the image on a flash. Either way works fine, but if you anticipate doing this more than once, you should consider the flash drive method. It’s much faster and more convenient. The only catch is that you need access to a Microsoft Windows machine to put the Xandros operating system image on the flash drive.
Restoring from a Flash Drive
You should invest in a 2GB flash drive if you want to use one for re-imaging. The Asus documentation has ominous notes about the Eee PC sometimes not recognizing flash drives with more than 2GB of storage.
Creating a Bootable Flash Drive
To place the Xandros image on a flash drive plugged into a Windows machine, pop the Asus Support DVD into the drive of a Windows machine and wait for the DVD to autorun. If you have turned off autorun, using Windows Explorer, access the DVD and double-click Setup. After the support application appears, click the Utilities tab and then click the Asus Linux USB Flash Utility button. On the next screen, select to Copy Eee PC Image Files to USB flash and Make it Bootable. Click the Run button. If prompted to insert the Recovery DVD, do so.
The next screen warns you that this process will delete everything from the flash drive and asks whether you want to proceed. Click the Yes button and you’re on your way. When the Confirm dialog box appears, follow the instructions and remove and reinsert the flash drive. Click Retry to complete the copy process. When the Success dialog box appears, click OK.
Now for the fun part:
1. Plug the flash drive into your Eee PC and boot the computer.
2. Press the F2 key at the prompt to enter the BIOS configuration screens.
3. Use the arrow key to navigate to the Advanced tab and make sure all of the hardware is enabled.
4. Also under the Advanced tab, set the OS installation option to Start.
5. Use the arrow key to navigate to the Boot tab and, under Hard Disk Drives, make the USB drive the 1st Drive in the list. Under Boot Device Priority, select the USB drive as the 1st Boot Device.
6. Press F10 to save the changes and continue to boot.
7. You’ll be prompted to indicate whether you want to reinstall the images. Type yes and press Enter. When you’ve completed the process, unplug the flash drive and, on next bootup, make sure that the BIOS settings are returned to boot 1st from the internal drive and that the internal drive is 1st in the boot order. Also, under the Advanced tab, set the OS Installation to Finished.
Restoring from the DVD
To restore from a DVD:
1. Attach a DVD drive with a USB connector to your Eee PC, insert the recovery DVD (or support DVD, if your Eee PC shipped with a single DVD), and reboot the machine.
2. Press F2 when you see the prompt to launch the the BIOS configuration screens.
3. Use the arrow key to navigate to the Advanced tab and set OS Installation to Start.
4. Use the arrow key to navigate to the Boot tab and, under Boot Device Priority, select the DVD drive as the 1st Boot Device.
5. Press F10 to save the changes and continue to boot.
6. You’ll be prompted to indicate whether you want to reinstall the images. Type yes and press Enter.
When the operation is complete, make sure you change the boot order in the BIOS so that the internal drive is 1st on next reboot. Also, on the Advanced tab, set OS Installation to Finished.
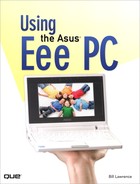
Comparing the Various Distributions
The following table provides a quick look at the three Linux distributions discussed in this chapter.
Mandriva Linux One
Mandriva Linux is an absolute gem and, if you don’t mind plunking down the $89 USD (69 EUR), Mandriva Linux Power Pack is probably the best operating system for the Eee PC. The Mandriva Linux One installation, which is a free “live” version of the software, provides pretty much everything you need, with all the drivers the Eee PC requires. However, it lacks a lot of other things that you might want, such as printer configuration. I’ll cover only how to install it from a Live CD; however, you’ll find all the information you need to install networks, flash drives, and so forth at http://wiki.mandriva.com/en/Docs/Installing_Mandriva_Linux#Installation_from_Mandriva_Linux_One.
There is also a Mandriva Linux Free version, but it lacks the drivers that come with Mandriva Linux One to support the Eee PC.
One of the best features of Mandriva Linux One or Power Pack is the Metisse window manager. With Metisse, you can scale individual windows, including their fonts, so that larger windows can fit within the small Eee PC screen. This is an elegant solution to limited display resolution.
Frankly, Mandriva Linux Power Pack is my candidate for best Linux OS for the Eee PC. It’s well stocked with applications, knows all about the Eee PC’s hardware, and can do some amazing things. However, if you want to use Mandrive Linux One as your operating system, you’ll need to consider if you can live without printer support or extensive software repositories.
Installing Mandriva Linux One
You can download Mandriva Linux One from http://www.mandriva.com. Simply burn the ISO file to a CD and you’re ready to begin. The installation is extremely straightforward. Drop the CD into an attached USB CD drive and reboot the Eee PC. Press F2 at the prompt and set the following in the BIOS setup screens:
![]() On the Advanced tab, enable all hardward and set OS Installation to Finish.
On the Advanced tab, enable all hardward and set OS Installation to Finish.
![]() On the Boot tab, under Hard Disk Drives, make the USB drive the 1st Drive in the list. Under Boot Device Priority, select the USB drive as the 1st Boot Device.
On the Boot tab, under Hard Disk Drives, make the USB drive the 1st Drive in the list. Under Boot Device Priority, select the USB drive as the 1st Boot Device.
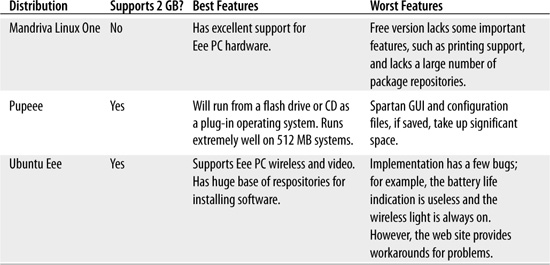
Press F10 to save the changes and continue to boot. Mandriva Linux will boot itself from the CD. After the desktop is active, click the Live Install icon on the desktop (see Figure 12.1). I selected to use the entire disk. Check the latest on partitioning and file systems in the various wikis and forums for the partitions and file systems that are currently recommended.
FIGURE 12.1 Starting the Mandriva Linux installation.
Once Live Install begins, you can pick the various language and regional options to run on your Eee PC. Pay close attention to your login account name, password, and administrative password settings. You’ll need those after the installation is complete (this isn’t like Xandros, for which you don’t have to log in). After installation is complete, remove the CD, reboot, and reset your BIOS boot settings.
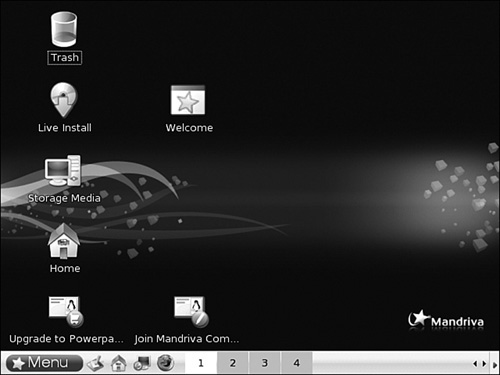
After you’ve logged in, you need to set up your network (you may be prompted before login). Choose Menu, Tools, System Tools, Configure Your Computer. You’ll be prompted for the administrative password. In the Mandriva Linux Control Center window, click Network & Internet. Select Set Up a New Network Interface and click Next. In the next window, shown in Figure 12.2, select either Ethernet or Wireless and click Next. For wireless,the utility will scan for networks and allow you to select any of those that are detected. You can enter you security settings (if any) and set Mandriva Linux One to automatically connect to a designated wireless network on bootup.
FIGURE 12.2 Mandriva Linux wireless configuration.
Metisse
The Metisse 3D window manager, shipped with Mandriva Linux, lets you shrink any given window and its fonts to fit the screen. The more you shrink the window, the fuzzier the text will become. However, you can shrink things quite a bit and still have readable text.
note
Actually, Mandriva Linux comes with two 3D window managers: Metisse and Compiz Fusion. Compiz Fusion is quite similar to Beryl, which, as discussed in Chapter 6, is a 3D window manager that you can run under Xandros.
Aside from shrinking windows, Metisse does some amazingly cool and useful things that can make working on the 701 or 900 series screen a lot easier. Like the KDE, Metisse has virtual desktops. However, it has nine of them instead of the default two with the KDE. Also, you can rotate screens, navigate through a table of screens, and even clone windows. The cost of all this is processing power, so the Eee PC will respond a little, though not painfully, sluggishly. Figure 12.3 shows some of the windows effects available in Metisse.
You can activate Metisse by choosing Menu, Tools, System Tools, Configure Your Computer. Once again, you’ll need your administrator password. Click Hardware, and then click Configure 3D Desktop Effects. From there, you can select Metisse. You need to log out and then log in again to reset the X Window System server.
Right-click the corner of any window, and you’ll get a number of arrows with labels such as Scale, Z-Rotate, and Resize. Drag the mouse pointer in any of the directions shown and the magic happens. You’ll be able to rotate windows and scale them, which is the trick you need with smaller screens.
FIGURE 12.3 Metisse windows effects.

Right-click the title bar of any window and you’ll get a menu of options, including the ability to set the transparency of the window. You can also use this menu to rotate in the third dimension, making 3D windows.
The widget at the lower right, aside from being your access to the nine virtual desktops, can expand to full screen so that you can easily arrange things between windows. If you have a mouse attached to the Eee PC, simply put your mouse pointer over it and rapidly spin the mouse wheel. If you’re using an Eee PC 900 or higher, you can use two-finger scrolling. Figure 12.4 shows the nine virtual desktops in the “table view.”
FIGURE 12.4 Metisse table view of virtual desktops.

If you want to know more about what Metisse can do, check out its documentation at http://insitu.lri.fr/metisse/docs/using.html. I think it’s the most innovative windows manager I’ve ever seen.
tip
No screen-capture program works in Metisse. However, screen-capture capability is built in through the Super(Windows)+F key combination. The full screen is saved to a JPG image in your home directory. The utility can’t overwrite an existing snapshot, so you need to rename it before you take another.
Pupeee
Pupeee, which is a derivative of Puppy Linux, is so lightweight that you can carry it around on a fairly compact flash drive. Suppose that you’re using Windows but you’d like a Linux distribution that you can boot when you want to use a Linux application. Or suppose that you want another version of Linux to play with, or that you have a 2GB version of the Eee PC and want a smaller, “lighter” operating system. Pupeee is the ideal operating system for any of these situations.
Pupeee loads into a mere 256MB of memory, and it loads the entire OS into memory on bootup. Moreover, it includes a whole lot of stuff, including:
![]() AbiWord (word processor)
AbiWord (word processor)
![]() SeaMonkey (a scaled-down Firefox browser)
SeaMonkey (a scaled-down Firefox browser)
![]() CD- and DVD-ripping software
CD- and DVD-ripping software
![]() Simple graphics applications
Simple graphics applications
![]() xine media player
xine media player
![]() Audacity audio editor
Audacity audio editor
Figure 12.5 shows some of the other applications included in the Eee PC version of Puppy Linux.
FIGURE 12.5 Some of the applications in little Pupeee.
But wait, there’s more! Pupeee also has driver support for the Eee PC’s hardware, so wireless configuration is trivial. It also easily fits on even the 701’s diminutive screen.
Pupeee is kind of self perpetuating: launch it and you can then install it easily on something else, such as a flash drive.
You can get the ISO disk image file from http://puppylinux.ca/members/Pupeee/. This is based on Puppy 3.01, which probably won’t be anything close to current by the time you read this. Your best approach is to do a Google search for Pupeee and pick the one that has all the drivers.
When you have the ISO file, you can burn it to a CD or write it to to a flash drive and make the flash drive bootable. Boot up the system and press F2 to enter the BIOS when prompted. On the Advanced tab, make sure that all hardware is enabled and that the the OS installation option is set to Start. Also, make sure that boot device (CD or flash drive) is first in the boot priority. Press F10 to save and exit, and you’re on your way. Pupeee boots up very quickly, and loads into the Eee PC’s memory. You’ll be asked to pick a keyboard language and graphics resolution, and that’s it.
Configuring wireless is just about as easy, as Pupeee knows about the Eee PC’s Atheros wireless hardware:
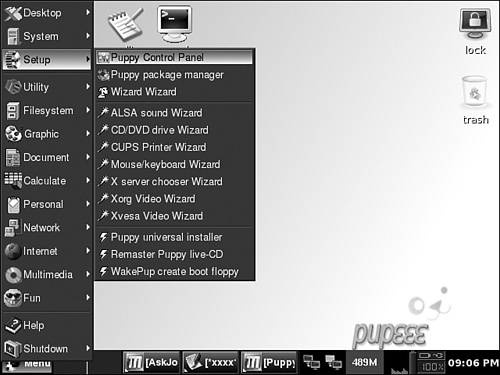
1. Launch the Puppy Control Panel by choosing Menu, Setup, Puppy Control Panel, as shown in Figure 12.5 (the window manager panel autohides on the bottom of the screen, so just place the mouse cursor there).
2. From the Control Panel, click the Connect button.
3. Click the Network Wizard.
4. On the Puppy Network Wizard page, click the ath0 button.
5. On the next wizard page, click the Wireless button. Clicking the Scan button will find any wireless networks in range, and then you can select the network you want and create a profile to link to the network (as shown in Figure 12.6). You can also enter any security configuration information.
6. When you save the profile, click Back and then test it and set it to AutoDHCP (if that’s the type of network).
FIGURE 12.6 Configuring wireless in Pupeee.

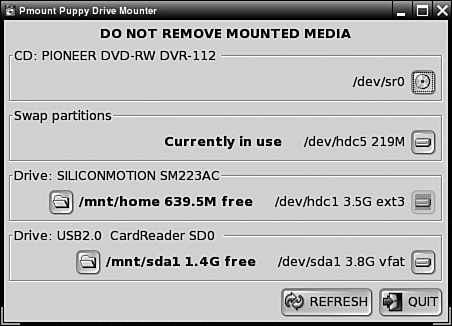
When you plug in a storage device in Pupeee, it does not automount. You can mount it by choosing Menu, File System, Pmount Mount/Unmount Drives. Simply plug in your flash drive, MMC-SD card, or other device, and click Refresh. The Pmount Puppy Drive Mounter, shown in Figure 12.7, scans the hardware and provides a list of available devices. Click the button to the right of each entry to mount it (it will turn green when successfully mounted). Click again to unmount the device.
FIGURE 12.7 Mounting devices in Pupeee.
Finally, you might want to build another installation of Pupeee on a CD, flash drive, etc. You can do that through the Puppy Universal Installer. Choose Menu, Setup, Puppy Universal Installer. You can choose the device to which you wish to install Pupeee.
Looking over the vast array of utilities that comes with Pupeee, Pupeee appears to be best suited (aside from fitting even the most modest Eee PC quite nicely) for troubleshooting networks, broken computers, and so forth. It also has a lot of productivity applications.
When you shut down Pupeee, it’ll offer to write its files and so forth to your Eee PC. Consider this offer carefully, as it’ll take up about 600MB or more.
Installing Ubuntu
I’ve run the KDE version (Kubuntu) of Ubuntu for a while, so I was looking forward to seeing Ubuntu on the Eee PC. I wasn’t disappointed. I chose to run Ubuntu Eee, but EeeXbuntu is available as well. Ubuntu Eee is located at http://www.ubuntu-eee.com, and is a CD-sized, live version of the operating system packaged as an ISO file. Since it is a live CD, you can choose to either run it directly from the CD or install from the CD.
Boot up the system and press F2 to enter the BIOS when prompted. On the Advanced tab, make sure that all hardware is enabled and that the the OS installation option is set to Start. Also, ensure that the CD/DVD is first in the boot priority. Press F10 to save and exit and, when prompted, choose to install.
Installation is extremely simple. You will select the language and keyboard, as well as the usual username, password, and so forth. The only slightly tricky spot is when you select the installation disk. Make sure that you select /dev/sda1 if you are installing on the internal SSD. When I installed it, I was left with about 1.2GB of free space on the SSD at the end. That’s fairly impressive by itself, considering how much is installed.
Ubuntu Eee is a version with GNOME. It has a very clean interface, with short, compact menus, that fits the 701 or 900 series nicely. Figure 12.8 shows the GNOME desktop. Ubuntu Eee comes completely stocked with basic applications and with the Synaptic Package Manager pointed to repositories. For example, after I had configure my wireless connection, when I pulled up an Internet radio station in Firefox and told Firefox to open the M3U file with /usr/bin/rhythmbox (the built-in music player), it immediately launched Synaptic to find the missing codecs to play the streaming media.
FIGURE 12.8 Ubuntu Eee, sporting one of the brown themes.

Some of the other applications onboard are the ubiquitous OpenOffice.com (without which I couldn’t have written this book), Firefox, Mozilla, Thunderbird, and Pidgin—pretty much the basics of Internet and productivity software. Conspicuously missing are GIMP and K3b, although there is a CD/DVD writer.
If you’re concerned about your Eee PC being stolen and someone getting access to proprietary or valuable data, you’ll be happy to know that you can install the TrueCrypt encryption package via Synaptic. Unlike under Xandros, TrueCrypt works under Ubuntu Eee.
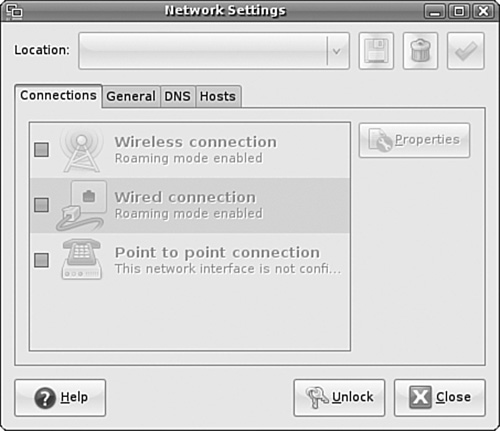
Getting onto wireless is trivial, as the hardware is supported. Simply choose System, Network to open the Network Settings window, shown in Figure 12.9. You can’t make any changes until you click the Unlock button and enter your password. Click Wireless Connection and then click the Properties button. Make sure roaming mode is enabled. I had to reboot at this point to get Ubuntu to find my wireless network, and I then I got the network icon in the top panel. Right-click this icon and choose Edit Wireless Networks. You can then configure your network by selecting it and adding the necessary security information.
FIGURE 12.9 You need to unlock the network settings with your password.
That’s about all that you need to do. Almost everything else just seems to work, including Bluetooth. The following are a few of the issues that I encountered:
![]() The battery indicator is reporting meaningless values.
The battery indicator is reporting meaningless values.
![]() It doesn’t play DVD movies, but that seems to be a codec problem.
It doesn’t play DVD movies, but that seems to be a codec problem.
![]() I’m still struggling with GPS and the GPS daemon,
I’m still struggling with GPS and the GPS daemon, gpsd.
![]() Shutdown doesn’t work properly, and you must press the off button to get power to go off. There is a workaround for this posted on the Ubuntu Eee site.
Shutdown doesn’t work properly, and you must press the off button to get power to go off. There is a workaround for this posted on the Ubuntu Eee site.
![]() The wireless light remains lit even when wireless isn’t enabled. Again, there is a workaround on the Ubuntu Eee site.
The wireless light remains lit even when wireless isn’t enabled. Again, there is a workaround on the Ubuntu Eee site.
In fact, Ubuntu Eee is almost as functional as Xandros. Actually, some things that don’t work in Xandros work quite well in Ubuntu, such as the Scribus desktop publishing system. This would not run under Xandros, but downloaded directly from the Ubuntu repositories and ran perfectly.
Ubuntu Eee comes with a limited, though very nice, set of themes and wallpaper. You can add your own if desired, but first try the brown and tan themes that come by default.
While I think the commercial version of Mandriva is a wonderful option for an operating system for the Eee PC, Ubuntu Eee is almost as good (albiet a little buggy at this point). Because of the vast amount of software available, Ubuntu Eee is my choice for an operating system for my Eee PC. The default Xandros Linux is certainly useful and well tuned to the machine, but Ubuntu Eee is elegant and provides more software choices. Over time, the small glitches will be ironed out and it will be as completely functional as Xandros.
Summary
This chapter covered how to restore Xandros onto your Eee PC, which is a good thing to know about regardless of whether you ever try another operating system or not. The chapter also covered installing three alternative versions of Linux for the Eee PC: Mandriva Linux One, Pupeee, and Ubuntu Eee. Depending on your Eee PC configuration and tastes, you may find that you like one of these better than the default Xandros distribution. The next chapter covers a true UNIX operating system (Solaris) and the following chapter covers the installation of three different versions of Microsoft Windows. So, if you want something other than Linux, you have a lot of choices.