
Chapter 6
Using Other Window Managers
IN THIS CHAPTER
![]() A look at three alternate-window managers
A look at three alternate-window managers
![]() Loading the Beryl window manager
Loading the Beryl window manager
![]() Loading the GNOME window manager
Loading the GNOME window manager
![]() Loading the Fluxbox window manager
Loading the Fluxbox window manager
The previous chapters covered configuring the Easy Mode (IceWM) window manager and the Full Desktop (KDE) window manager, but what if you’re a huge fan of GNOME instead of the KDE? What if you want to run something extremely lightweight, such as Fluxbox? What if you’d like to try the really cutting-edge Beryl, with its “rubbery” windows and 3D cube? This chapter explains how to load and use these three window managers. First, it offers a few factors to consider before you load one of these window managers on your Eee PC.
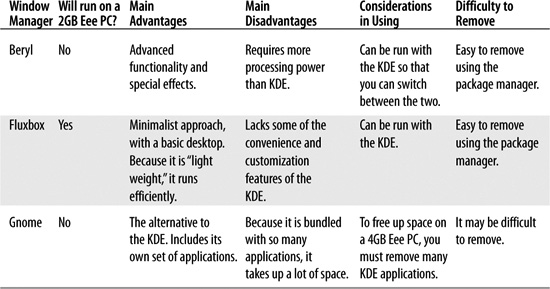
Quick Comparison of Beryl, Fluxbox, and GNOME
Whereas Beryl and Fluxbox are pretty lightweight and should fit with ease on a 4GB system, GNOME, with all of its applications, is very hefty indeed. On a 4GB Eee PC, loading GNOME is marginal but certainly within reason. Moreover, you don’t need all the applications that come with the KDE if you have GNOME (or vice versa), so you can make room by removing redundant applications. If you have an 8GB Eee PC, or a 900 Eee PC with its whopping 20GB, running GNOME isn’t a problem. If you have a 2GB unit, forget it.
Here’s a quick overview of the three window managers, including their advantages and disadvantages.
The other thing to keep in mind is that these window managers are alternatives to Full Desktop, the Xandros implementation of the KDE. If you’re a devoted fan of Easy Mode (the IceWM window manager) and you wish to customize that interface, check out Chapter 4, “Customizing Easy Mode.”
Beryl is a little more challenging to install than GNOME or Fluxbox. In fact, the same technique that is used to switch interfaces with IceWM is what is used to run GNOME and Fluxbox. That is, you edit the /usr/bin/startsimple.sh file to point to another window manager other than KDE (see Chapter 4).
Although these are three separate window managers, Beryl and Fluxbox are both lightweight enough that you can run with both of them installed plus KDE! Beryl’s red diamond panel control has a menu entry for switching between installed window managers.
Beryl
Beryl is an advanced 3D Windows Manager with lots of eye-candy and special effects. Some of the special effects include:
![]() The virtual desktop cube, which presents four virtual monitors as the sides of a cube. To switch desktops, the cube rotates.
The virtual desktop cube, which presents four virtual monitors as the sides of a cube. To switch desktops, the cube rotates.
![]() Rubbery windows that wobble as you drag them around.
Rubbery windows that wobble as you drag them around.
![]() The task switcher, with live previews of what’s currently going on in the interface of each application.
The task switcher, with live previews of what’s currently going on in the interface of each application.
If you’d like to learn more about Beryl and its capabilities, check our its main web site at http://www.beryl-project.org.
Beryl, and other 3D window managers, are built on a framework called compiz. They all provide lots of eye-candy, which means that they require significant processing power. So, when I saw a page on the eeuser.com wiki (http://wiki.eeeuser.com/) talking about Beryl, I thought, “You’ve got to be kidding me. No way will something like Beryl run on the Eee PC.” I mean, the Eee PC has a pretty modest processor. Still, the lure of my Eee PC being resplendent with a 3D desktop was just too tempting to resist. Hat’s off to “Maddocs” who came up with this craziness.
The startling thing is that the Eee PC actually runs Beryl tolerably well, which is a genuine testament to the Beryl folks. If you’re sitting at your neighborhood coffee shop running the Eee PC and folks are already staring at your ultra-portable, Beryl’s visual effects will make their jaws drop. The downside is that running Beryl is quite a load, and the Eee PC runs palpably slower.
Installing Beryl
To load Beryl, you need the Synaptic Package Manager, or at least the apt-get command. It’s really much easier to work with Synaptic on a 701 when the Eee PC is hooked to an external terminal, because the dialog boxes fit the screen. The work around is that you can use the Alt-drag technique to drag the oversized window up and down in the smaller screen. With the 900 or later models, you have plenty of room to see the whole application.
Loading the Repositories
First off, you need to add to the Eee PC’s repository list the Beryl organization’s repository and an additional Debian repository. These are in addition to the repositories identified in Chapter 8, “Getting More Linux Applications.” This section uses the Synaptic Package Manager, but you could simply edit the /etc/apt/sources.list in your favorite editor (don’t forget to use sudo) and then use apt-get to pull in the repositories.
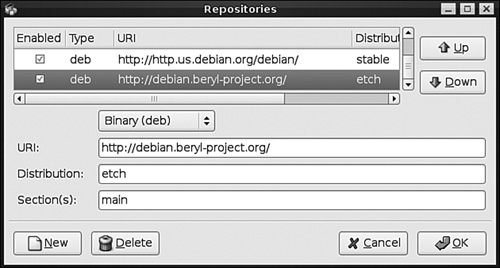
From Full Desktop, launch the Synaptic Package Manager via Launch, Applications, System, Synaptic Package Manager. Open the Repositories dialog box via Settings, Repository and then add the following two repositories (see Figure 6.1):
Binary (deb)
URI: http://http.us.debian.org/debian
Distribution: stable
Section(s): main
Binary (deb)
URI: http://debian.beryl-project.org/
Distribution:etch
Section(s): main
tip
See the “Loading Repositories” section in Chapter 8 for specific instructions on using the Repositories dialog box.
FIGURE 6.1 Adding the repositories required for Beryl.
You may see an error box because you can’t access a repository (you lack the necessary key). That’s OK, you’ll fix that next. Click the OK button, and then exit from Synaptic (momentarily). Bring up a terminal by entering either xterm or konsole into Launch, Run Command. From the terminal, you’ll want to enter the following rather long command. This will add the security key you need to access the Beryl repository.
> wget -O - http://maillto:debian.beryl-project.org/[email protected] |
sudo apt-key add –
When typing this command, the “” is a continuation character that was added to show that this should all fit on one line. This is a long command line so look it over carefully to make sure it is correct. It must be precisely right or you won’t get the key installed.
After the key is successfully installed, keep the terminal window open (we’ll need it again soon). Launch Synaptic again and then click the Reload button to refresh the repository database. Once this is complete, and it may take a while, click on a package in the list and type beryl. Right-click and mark beryl for installation. This will automatically mark the other packages that Beryl needs as well. It looks like a lot of packages (11 when this was written), but really it doesn’t take up that much space.
Click the Apply button, and then click the OK button at the prompt windows that follow. When all is installed, exit from Synaptic via File, Exit.
Configuring X-Windows for Beryl
In the terminal window, open the xorg.conf file in your favorite editor, such as kwrite or nano. For example, to edit the file with nano, you’d type:
> sudo nano /etc/X11/xorg.conf
Find the following line:
Option “AIGLX” “false”
Change the line to:
option “AIGLX” “true”
Under the “Device” section, find:
Driver “intel”
Change it to:
Driver “i81θ”
Finally, in the “Extensions” section, find the line:
Option “Composite” “Disable”
Change it to:
Option “Composite” “Enable”
Save and exit.
Launching Beryl
Now you’re ready to crank up Beryl. Choose Launch, Applications, System, Beryl Manager. In a few seconds, you’ll see a red diamond in the panel, which indicates that Beryl is running. (If this doesn’t work, you may need to run it a second time for the first startup.) “Maddocs” (from the eee.com wiki) recommends some setup options, and they seem to work. Right-click the red diamond and select Advanced Beryl Options to open the submenu shown in Figure 6.2. Set the following options for each of the advanced selections:
Rendering Path: Copy
Composite Overlay Window: Use COW
Rendering Platform: Force AIGLX
Binding: Automatic
Rendering: Indirect Rendering
FIGURE 6.2 Advanced Beryl options.

To launch Beryl, right-click the red diamond and choose Select Window Manager, Beryl. That should do it. If not, you can restart X-Windows with Ctrl+Alt+Backspace or restart the Eee PC.
Previewing Some Beryl Tricks
First, drag some windows around and you’ll discover that they seem to be made of rubber. (They drag best from the red bar at the top of the window.) Maximize a window and then click-and-drag the left-top corner down and toward the center. You can actually bend the window to see what’s behind it (see Figure 6.3).
FIGURE 6.3 The amazing bending-window trick.

Next, repeatedly press Alt+Tab. For each press you move through a scrolling, previewing, application selector from which you can select any of the running applications (see Figure 6.4). If you’re running in any video resolution higher than the Eee PC 701’s native 800×480 pixels, you’ll get a similar preview by just hovering the mouse over any of the running application buttons in the panel.
FIGURE 6.4 Alt+Tab application scroller.

Now this is “too cool for school”: Press and hold Ctrl+Alt and then click the mouse button. While holding down the keys and the mouse button, drag the mouse from side to side. The desktop is actually a cube, and you’re rotating it (see Figure 6.5). You can launch applications on any side of the cube, or even drag them from side to side. This gives you four interconnected virtual desktops that you can simply rotate as you please. If you click any of the panel buttons for running application, the screen cube automatically rotates to the face that contains the application.
FIGURE 6.5 Rotating the desktop cube.

Just for fun, you can rotate the cube up and down. You’ll see the red diamond logo on the top and bottom of the cube. Now, quickly move your mouse pointer to the top-right corner of the screen. This “scales” all the windows onto the current desktop, a la Mac OS X. Select one and they “unscale.”
note
“Maddocs” recommends some changes to the “Emerald” theme, although I don’t really mind the defaults. If you want to fiddle with the theme settings (under the Beryl Settings Manager on the red diamond right-click menu), have at it. There are lots more themes at http://themes.beryl-project.org/.
Given the less-than-huge screen size on both the 701 and 900, this is an almost ideal capability for increasing your screen space. This literally quadruples the width of your desktop.
There are many more Beryl tricks, and you can find these at http://www.beryl-project.org/userguide.php. While you’re there, explore some of the other resources for Beryl.
Uninstalling Beryl
If you find the performance degradation of running Beryl to be too annoying, you can use Synaptic to uninstall it. Should you do this, run the sudo apt-get clean command to clean up the configuration files.
Gnome
GNOME and the KDE are the two most popular desktop options in the Linux world. In many ways, they are similar, especially in the basic controls for windows, how one interacts with windows using the mouse, and in their application launchers. Both are very full-featured, highly customizable desktops. So which is better? It’s really a matter of taste. GNOME does have one advantage in that it is known to take up a little less memory than the KDE.
Like the KDE, GNOME has its own set of associated applications. Most major applications, such as OpenOffice, GIMP, Inkscape, etc., are equally at home under any window manager. However, while KDE has the Konqueror file manager/browser, GNOME has Nautilus. Also, GNOME will install AbiWord on the Eee PC as its default word processor, instead of OpenOffice (which is already there).
While both GNOME and KDE have different sets of “their own” applications, this is to a certain extent nonsense. Applications for GNOME will run quite nicely under KDE and most other Linux window managers. The same is true for KDE applications under GNOME.
Loading GNOME requires that the sources.list file have the repository entries and pinning outlined in Chapter 8. The nearly 180 downloaded packages comprise around 200MB, and the installation itself takes up around 550MB, so you should have at least around 800MB free to attempt this installation.
Installing GNOME
You can install GNOME and its many related packages via the Synaptic Package Manager. To install Gnome:
1. Launch the Synaptic Package Manager via Launch > Applications > System > Synaptic Package Manager.
2. Click into the package list and type gnome.
3. Right-click gnome and mark it for installation.
4. Click the Apply button, and click OK for the various installation dialog boxes. The GNOME package references all of the additional packages that it needs.
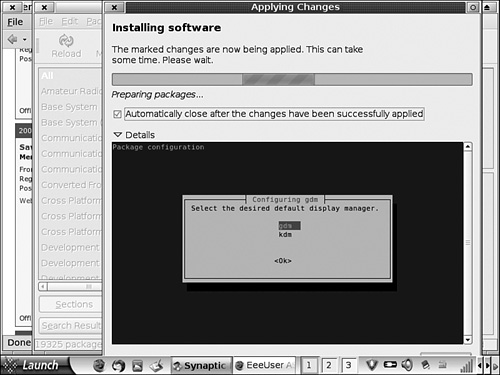
This is a very long installation (over an hour with a download speed of 42 kB/s), and it has a catch: After Synaptic completes the download part of the process, but prior to actually installing the various packages, it pops up some windows to prompt you for answers. However, you’ll never see these unless you click the Details button in Synaptic’s Applying Changes dialog box, so be sure to do that.
Clicking the Details button expands the dialog box to contain a console pane. This makes the dialog box too large for the default 701 display, so use Alt+drag to reposition the window in the screen. Press Return in response to the first prompt. In the next prompt, you’ll be asked to pick whether KDE (the prompt refers to it as KDM) or GNOME (GDM) should be the default window manager (see Figure 6.6), which is actually meaningless because this is determined within the startsimple.sh script. However, you need to provide a response or it won’t continue.
You’ll also be asked whether to replace one of the KDE configuration files. I did not, and things seemed to go okay…well, sort of. One package simply won’t install, and it seems to have something to do with the hardware abstraction layer. This is the last package, HAL, and it shows during the gnome-office installation. The installation can’t overwrite a file. When you reach this part and the installation stops dead and won’t continue, click the close box for the Applying Changes dialog box and then close Synaptic.
When GNOME starts up, it complains about not being able to launch the Power Monitor, and this may be related. However, it seems to run quite well.
FIGURE 6.6 Configuration prompts that hide under Details.
The next thing to do is to modify the /usr/bin/startsimple.sh script. You need to use sudo when you run your editor to be able to save changes to this file. You’re looking for the exec statement that says:
exec startkde
and you want to change that to:
exec gnome-session
This exec statement launches the window manager and enables you to fire up whatever window manager you want. Save the file and exit, and then you’re ready to try it out.
tip
I watched my free drive space dwindle away to about 150MB when things were finally all installed. The section, “Freeing Up Space on GNOME” explains how you open up some disk space.
Launching GNOME
Restart the X Window System to get GNOME to start. You can use Ctrl+Alt+Backspace to restart X-Windows. GNOME came right up and found all the devices, installed applications (which were neatly tucked into the appropriate menus), and even the monitor I had plugged in. It does produce a Warning dialog box, on every startup, about not being able to start the dbus system service. Click the Close button when this appears.
In many ways, GNOME seems to fit the small screen on the Eee PC better than the KDE. It also has, by default, better font choices for the cramped 640×480-pixel screen of the 701 models. Everything in GNOME is just a little different from KDE. The Applications menu is, by default, on the top (see Figure 6.7). Four virtual screens are preloaded (the rectangles to the right of the bar at the bottom of the screen). Having four screens is also a good thing when you’re starting out with a cramped screen.
FIGURE 6.7 The GNOME desktop, showing the applications menu.

Setting Up Wireless
A very major difference between GNOME and the KDE is the procedure for setting up the wireless network. To set up wireless in GNOME, choose Applications, Internet, Connection Wizard. The wizard walks you though the process of selecting the following:
1. The type of network connection (wireless or wired).
2. The hardware (you’ve only got one wireless, the Atheros Communications device, so this choice is easy).
3. DHCP or static IP; with most home router configurations, you’ll want DHCP.
4. The network that you want to tie into (the wizard provides a list of available wireless networks).
5. The wireless channel number and frequency (you’ll typically want to pick Any).
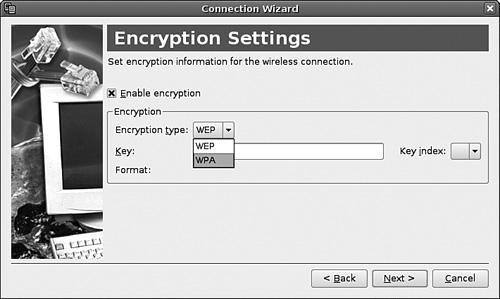
6. The security settings, either WEP or WPA (see Figure 6.8). See Chapter 1, “Getting Started.”
7. The name for the network, and whether or not it should be the default and automatically connect. If you set it to automatically connect, you’ll simply connect on bootup.
FIGURE 6.8 Encryption type in the Connection Wizard.
GNOME Applications
GNOME has its own complement to almost everything on the KDE, ranging from file browsers to word processors. However, the locations are a little different and the security is a little stricter. Many administrative functions will challenge you for the system password (this is the password you entered when you first switched on the Eee PC).
The GNOME desktop comes with the following additional office applications, all of which may be found under Applications, Office:
AbiWord: A Microsoft Word–compatible word processor. Like OpenOffice.org Writer, it has rather extensive stylesheet capabilities. Oddly, it does not support the OpenOffice.org file format.
Evolution: An email program, which is installed instead of Thunderbird. To my mind, Thunderbird is the superior program. It knows about both POP3 and IMAP (including the newer IMAP standard). It can also function as a news reader. For more information about Thunderbird, see CHAPTER 3, “Configuring Internet Applications.”
Gnumeric Spreadsheet: A Microsoft Excel–compatible spreadsheet program. This supports a lot of odd and legacy spreadsheet formats, such the UNIX Applixware and Microsoft Multiplan (the Excel predecessor) formats. It also can read OpenOffice.org Calc.
Project Management: This is Planner, and is a very useful tool if you’re in the world of project management. It can read Microsoft Project XML format, so you’ve got a way of getting those ubiquitous Project files into the system (see Figure 6.9). The interface is quite similar to Project, so it’s really not hard to make the transition.
FIGURE 6.9 Planner, showing the Microsoft Project Import command.

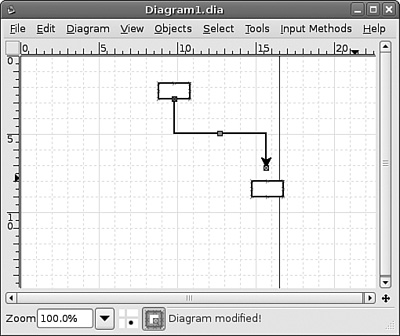
For graphics, GNOME comes with two of the must-have Linux applications: GIMP and Inkscape. Like the KDE, GNOME also has a screen-capture program. Unlike the KDE, GNOME comes bundled with Dia (see Figure 6.10), the closest thing to a Microsoft Visio application (other than OpenOffice.org Draw) in the Linux world. It’s a little “geekier” than Visio as it emphasizes flow diagrams and the like.
FIGURE 6.10 Running a connector between boxes in Dia.
For multimedia, GNOME has the Rhythmbox audio player and the Totem movie player. It also has a CD ripper called Sound Juicer. Like the KDE, it has sound-recorder, recording-level, and mixer tools.
The Desktop menu in GNOME leads to the system administration menus (this is where you’ll find Synaptic) and an amazing array of preferences that you can set. GNOME is just as customizable as the KDE, and the Screen Resolution function works better than the default KDE function on the Eee PC, especially in detecting available video modes.
Freeing Up Space on GNOME
So it occurred to me that, whereas removing the KDE might be somewhat problematic and dangerous, it might be easiest to remove OpenOffice.org to free up some disk space. So I gave it a try to see what happened. To remove any application, such as OpenOffice:
1. Make sure the application is currently not running.
2. Launch the Synaptic Package Manager via Launch > Applications > System > Synaptic Package Manager.
3. Click in the packages pane and then start typing the name of the application. In this instance, openoffice.
4. Right-click the application and mark it for uninstallation.
5. Click the Apply button.
Removing OpenOffice.org gave me back a bit more than 100MB, which provides a little breathing room but not as much as I’d like. So I took out SMPlayer and Thunderbird as well, figuring I could rely on the tools installed with GNOME. Then, to make sure I cleaned out all of the configuration files, I ran:
> sudo apt-get clean
Suddenly, life was much better. Now I was up to about 500MB of free space. I’m sure with a little diligence I could hunt down even more applications to remove, and probably get back to 600 or 700MB of free space on my 4GB 701.
So, what does this mean? Well, if you’re truly a fan of the GNOME desktop, you can pretty easily make this work on a 4GB Eee PC. Just peel away the KDE applications for which you have GNOME replacements. Also, by default, GNOME comes with a lot of games. If you don’t want those, you can tear them out, too. Given that GNOME actually seems a little more at home on the Eee PC than the KDE, running GNOME on the Eee PC isn’t a bad option.
Uninstalling GNOME
Since the KDE is actually still installed, you can uninstall GNOME by reversing the installation:
1. Launch a terminal window through the Applications > Accessories menu in GNOME.
2. Issue the following on the command line:
> sudo gedit /usr/bin/startsimple.sh
3. Change the exec statement from:
exec gnome-session
to
exec startdke
4. Save the file and exit.
5. Press Ctrl+Alt+Backspace to restart X-Windows and launch the KDE.
6. Launch the Synaptic Package Manager via Launch > Applications > System > Synaptic Package Manager.
7. In the packages pane, right-click each installed package beginning with “gnome” (these have the green box), and mark them for removal. There are several of these so make sure you mark them all.
8. Click the Apply button.
9. After removal is complete, close Synaptic.
10. Press Ctrl+Alt+Backspace to restart X-Windows.
You may find that the Trash icon and Home icons on your desktop are now occupying the same space. Drag Home away from Trash to correct this.
Fluxbox
Whereas Beryl strives for advanced functionality and startling eye-candy, Fluxbox excels at minimalism and speed. It is another excellent choice as a standard window manager, especially for the Eee PC. Fluxbox has a very small memory footprint, running in less than half of the memory space that KDE uses. Fluxbox also provides all of the basics that one needs to run a Linux PC, so it’s not a big sacrifice to use it.
Installing Fluxbox
Fluxbox can also be loaded through the Synaptic Package Manager:
1. Launch the Synaptic Package Manager via Launch > Applications > System > Synaptic Package Manager.
2. Click into the package list and type fluxbox.
3. Right-click fluxbox and mark it for installation.
4. Click the Apply button, and click OK for the various installation dialog boxes. The Fluxbox package references the additional package that it needs.
5. When all is installed, exit from Synaptic via File, Exit. Now you’re ready to enable Fluxbox.
Launching Fluxbox
There are a number of schemes available on the various Eee PC forums for loading Fluxbox and switching window managers. However, the simplest way of loading it is to simply replace the default Easy Mode (IceWM) with Fluxbox. Fluxbox can do pretty much anything you can do in the KDE. Simply replace it in the /usr/bin/startsimple.sh. This is exactly the same procedure that was used to launch GNOME.
To start, open an xterm or Konsole window. For example, choose Launch, Run, enter konsole, and press Enter. In the Konsole window:
> sudo kwrite /usr/bin/startsimple.sh &
Find the exec line, and change it to:
exec fluxbox
Save the file and exit. Restart the Eee PC and it will quickly load Fluxbox. You’ll be faced with a nearly barren screen and toolbar. The basic controls for Fluxbox are the toolbar and the right-click menu (which you can access by right-clicking any open area of the screen). By the way, the default network connection is launched automatically, so you will have wireless if you’re configured for that.
Configuring Fluxbox
Fluxbox seems to do a fairly decent job of populating the menus. Although the various Eee PC forums and wiki pages give advice about how to set up your menus for the Eee PC, the default layout is decent. If you really want to dig into Fluxbox, head off to http://fluxbox.org/ and learn how to configure it and what additional applications are available.
Remember that all of the KDE applications are still there and that they will run just fine under any window manager (including Fluxbox). So, setting up wireless or any other device is easy as you can get to the configuration tools. The administrative console can be launched from the Fluxbox right-click menu. Right-click on a blank area in the desktop and choose Apps > System > kcontrol.
The first thing I did was improve its looks. If you right-click over an empty space and select Styles, you’ll get a fairly nice selection of themes (see Figure 6.11). Launch a few windows to play with, and you’ll discover that you can switch to adjacent virtual desktops by just dragging them left or right. You can also switch using the buttons at the left of the toolbar. The button near the right end of the toolbar switches which application has focus (or you can just click the Applications button on the toolbar).
FIGURE 6.11 The Artwiz theme, shown as active, and how to find it in the menu.

The windows have some nice controls that you can access by simply right-clicking the top bar of the window. For example, you can “roll up” the window with the Shade command or move it in front or behind other windows with the Raise or Lower commands.
On its own, Fluxbox picked up almost all the installed applications, and these are under Apps on the right-click menu (see Figure 6.12). Finding them is fairly easy. For example, OpenOffice.org Writer is under Editors and Synaptic is under System. There are a few notable exceptions, such as Firefox, that don’t show up by default.
FIGURE 6.12 Finding applications on the right-click menu.

While Fluxbox configuration is largely done through its configuration files, which are in your user directory in .fluxbox, there is a Fluxbox Configuration Tool available through the right-click menu at Configuration (see Figure 6.13). Any changes you make to themes and so forth must be saved by clicking Reconfigure on the main Fluxbox right-click menu.
FIGURE 6.13 Fluxbox Configuration Tool.

If you take a liking to Fluxbox, it has a number of advanced functions such as tabbing and something called the “Slit,” which is a docking area for applications. It also supports window tabbing, which is a nice feature.
Uninstalling Fluxbox
Should you tire of Fluxbox, simply edit the /usr/bin/startsimple.sh file, and change the exec line back to:
exec startkde
This will restore everything to its previous state, and when you restart, KDE will load instead of Fluxbox.
Summary
In this chapter, you explored several alternate window managers, ranging from the exotic Beryl to the simple Fluxbox. This not only widens your options for interacting with the Eee PC, it demonstrates how to load almost any window manager and run it from the /usr/bin/startsimple.sh file. Having lots of choices and learning to experiment is part of the fun of Linux.
Another lesson from this chapter is that the Eee PC, for all its capabilities, is a limited platform. The 900 and 701 series have limited processing power and many of the 701 models have limited storage. You must take these things into consideration when choosing window managers.